1. Introduction
This manual provides detailed instructions for the installation, configuration, and operation of your ASRock X870 Taichi Creator Motherboard. This high-performance ATX motherboard is designed to support AMD Ryzen 9000, 8000, and 7000 Series Processors with an AM5 socket, offering advanced features for creators and enthusiasts.
2. Consignes de sécurité
Please read the following safety guidelines carefully before installing or operating your motherboard to prevent damage to the product or injury to yourself.
- Débranchez toujours le cordon d'alimentation de la prise murale avant de toucher un quelconque composant.
- Wear an anti-static wrist strap to prevent electrostatic discharge (ESD) when handling components.
- Assurez une ventilation adéquate à l'intérieur de votre boîtier PC pour éviter toute surchauffe.
- Protégez la carte mère de l'humidité et des températures extrêmes.
- Refer to the CPU and other component manuals for specific installation instructions.
3. Contenu du colis
Vérifiez que tous les éléments listés ci-dessous sont présents dans l'emballage de votre carte mère. Si un élément est manquant ou endommagé, contactez votre revendeur.
- Carte mère ASRock X870 Taichi Creator
- Guide d'installation rapide
- Avis réglementaire
- Câbles de données SATA
- Antenne Wi-Fi
- Vis et entretoises M.2
- ASRock Graphics Card Holder
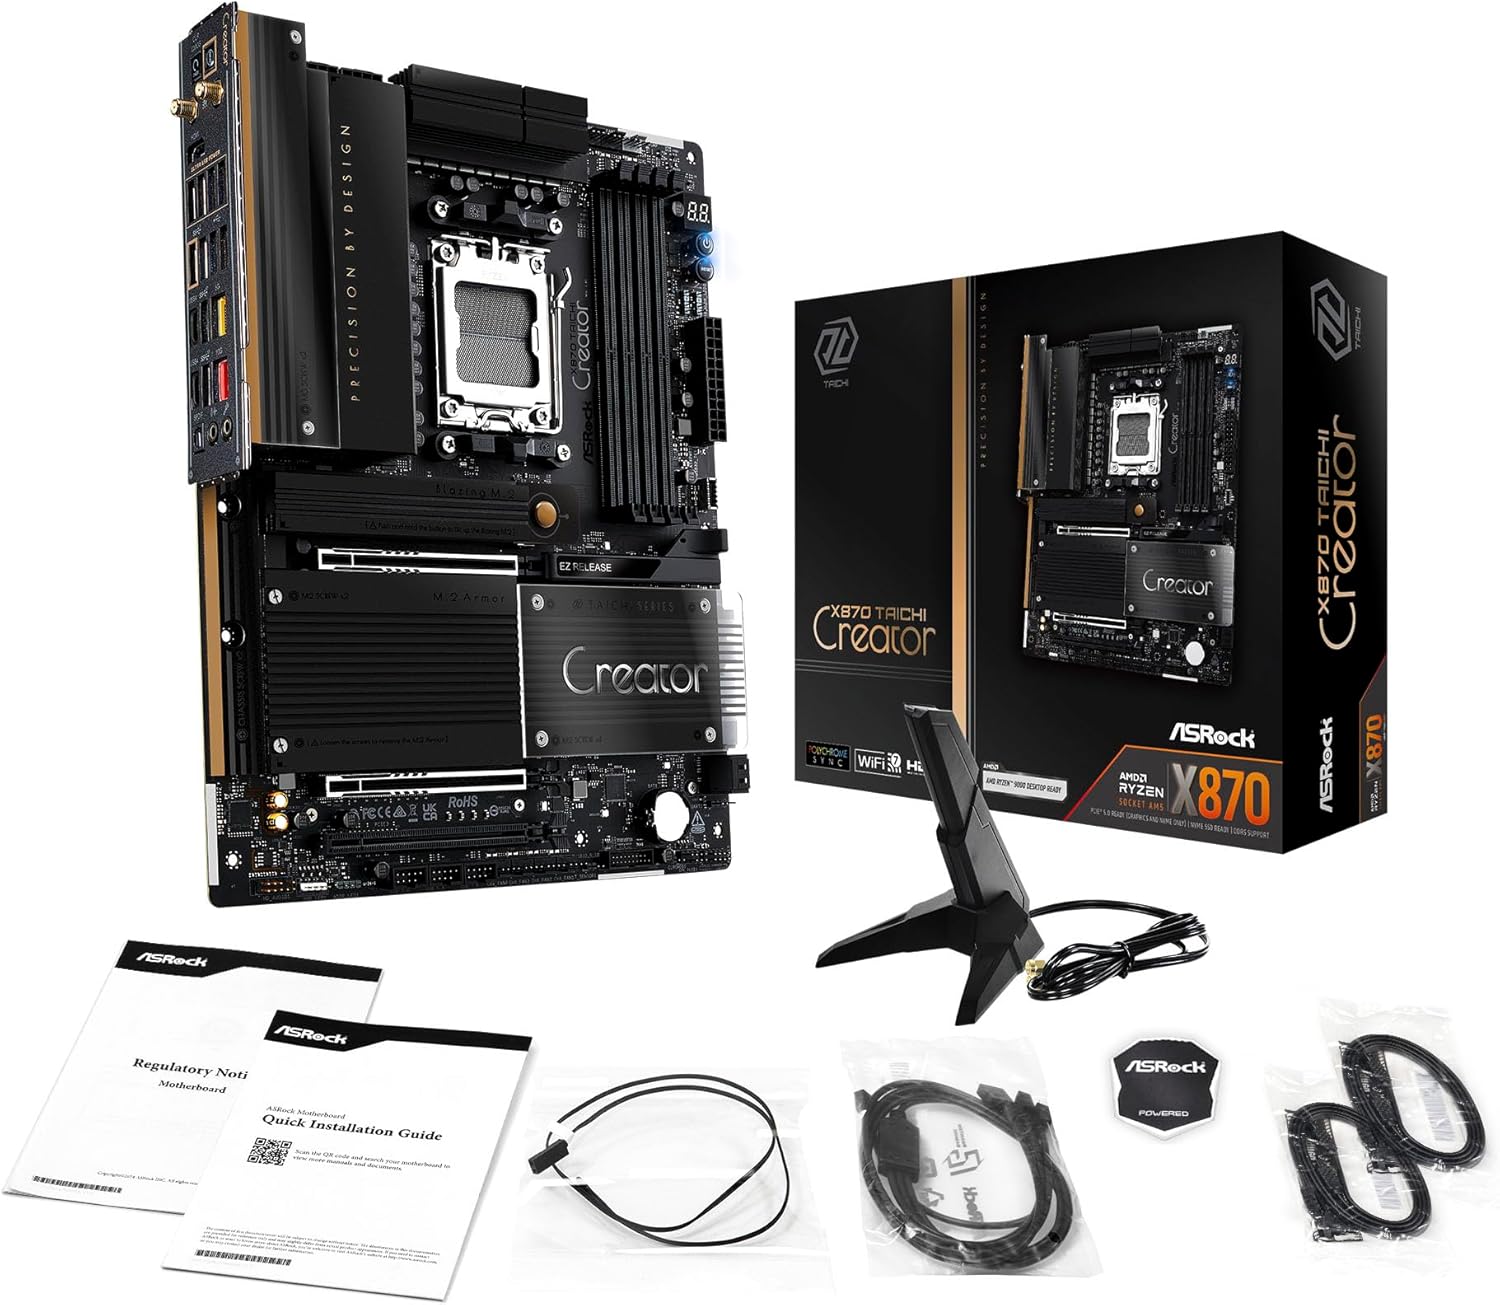
Image: The ASRock X870 Taichi Creator Motherboard shown alongside its retail packaging and various accessories, including cables, documentation, and a graphics card holder.
4. Configuration et installation
Suivez ces étapes pour installer correctement votre carte mère et ses composants.
4.1. Installation du processeur (Socket AM5)
- Repérez le socket du processeur AM5 sur la carte mère.
- Soulevez délicatement le levier de retenue du processeur.
- Align the triangular mark on your AMD Ryzen processor with the corresponding mark on the socket.
- Carefully place the CPU into the socket without applying force.
- Lower the retention lever until it clicks into place, securing the CPU.

Image : Vue de dessus view of the ASRock X870 Taichi Creator Motherboard, highlighting the central AM5 CPU socket and surrounding components like VRMs and RAM slots.
4.2. Installation de la mémoire (RAM)
The motherboard supports 4 x DDR5 DIMM slots for dual-channel memory technology.
- Ouvrez les clips situés aux deux extrémités de l'emplacement DIMM.
- Alignez l'encoche du module de mémoire DDR5 avec le loquet de l'emplacement DIMM.
- Insérez fermement le module de mémoire dans son emplacement jusqu'à ce que les clips s'enclenchent.
- For dual-channel configuration, refer to your motherboard manual for recommended slot pairing.
4.3. Installation du périphérique de stockage
The motherboard features M.2 slots and SATA3 ports for storage.
4.3.1. Installation du SSD M.2
The board includes 1 Ultra M.2 (PCIe Gen3x4), 1 Hyper M.2 (PCIe Gen4x4), and 2 Blazing M.2 (PCIe Gen5x4) slots.
- Locate the desired M.2 slot and remove the M.2 heatsink if present.
- Insérez le SSD M.2 dans l'emplacement à un angle de 30 degrés.
- Gently push down the SSD and secure it with the provided M.2 screw or standoff.
- Remontez le dissipateur thermique M.2 pour des performances thermiques optimales.
4.3.2. Installation du périphérique SATA
Connect SATA storage devices (HDDs/SSDs) to the 4 SATA3 ports using SATA data cables.
4.4. Installation de la carte PCIe
The motherboard provides 2 PCIe 5.0 x16 (x8/x8) slots and 1 PCIe 3.0 x16 slot.
- Sélectionnez un emplacement PCIe disponible.
- Retirez le cache de l'emplacement d'extension correspondant de votre boîtier PC.
- Align your PCIe card with the slot and press down firmly until it is seated correctly.
- Fixez la carte au boîtier du PC à l'aide d'une vis.
4.5. Connexions d'alimentation
Connectez le connecteur d'alimentation ATX à 24 broches et le connecteur d'alimentation CPU à 8 broches (ou 4+4 broches) de votre bloc d'alimentation (PSU) aux ports correspondants sur la carte mère.
4.6. Connexions d'E/S du panneau avant et de l'arrière
Connect your PC case's front panel connectors (power button, reset button, USB ports, audio jacks) to the appropriate headers on the motherboard. Connect peripherals to the rear I/O panel.

Image : Un gros plan view of the rear I/O panel of the ASRock X870 Taichi Creator Motherboard, showing various ports including USB, HDMI, Ethernet, and audio jacks.
5. Mode d'emploi
5.1. Démarrage initial et configuration du BIOS/UEFI
- Après avoir assemblé votre PC, branchez un moniteur, un clavier et une souris.
- Mettez votre système sous tension. Pendant le démarrage, appuyez plusieurs fois sur la touche Du or F2 touche permettant d'accéder à l'utilitaire de configuration du BIOS/UEFI.
- Configure boot order, enable XMP/EXPO for memory, and adjust other settings as needed.
- Enregistrez les modifications et quittez le BIOS/UEFI. Le système redémarrera.
5.2. Installation du pilote
After installing your operating system, install the necessary drivers for the motherboard components. These can typically be found on the ASRock support website or the included driver CD/USB drive.
- Pilotes de chipset
- LAN Drivers (10Gbps, 5Gbps)
- Wi-Fi 7 + Bluetooth Drivers
- Pilotes audio (Realtek ALC4082)
- Pilotes USB
6. Entretien
6.1. Nettoyage
Regularly clean your PC to prevent dust buildup, which can lead to overheating. Use compressed air to remove dust from fans, heatsinks, and other components. Ensure the system is powered off and unplugged before cleaning.
6.2. Mises à jour du BIOS
Vérifiez régulièrement l'ASRock website for BIOS/UEFI updates. Updates can improve system stability, add support for new CPUs, or fix bugs. Follow the instructions provided by ASRock carefully when performing a BIOS update.
7. Dépannage
En cas de problème, reportez-vous aux étapes de dépannage courantes suivantes :
- Pas d'alimentation : Ensure all power cables (24-pin ATX, 8-pin CPU) are securely connected. Check your PSU and wall outlet.
- Pas d'affichage : Verify that your monitor is connected to the correct graphics output (dedicated GPU or integrated graphics). Reseat your graphics card and RAM modules.
- Instabilité du système : Check CPU and GPU temperatures. Ensure RAM is properly seated and configured (XMP/EXPO settings). Update drivers and BIOS.
- Retour au BIOS : The motherboard features a BIOS Flashback button on the rear I/O panel. This allows you to update the BIOS without a CPU or RAM installed. Refer to the ASRock webConsultez ce site pour obtenir des instructions détaillées sur l'utilisation de cette fonctionnalité.
- Effacer le CMOS : If your system fails to boot after changing BIOS settings, you can clear the CMOS to reset BIOS settings to default. Locate the 'CLR CMOS' button or jumper on the motherboard (often near the rear I/O).
8. Spécifications
| Fonctionnalité | Spécification |
|---|---|
| Marque | ASRock |
| Nom du modèle | X870 |
| Numéro de modèle de l'article | 90-MXBTE0-A0UAYZ |
| Prise de processeur | Prise AM5 |
| Processeurs compatibles | AMD Ryzen 9000, AMD Ryzen 8000, AMD Ryzen 7000 Series |
| Type de chipset | AMD X870 |
| Technologie de mémoire RAM | DDR5 |
| Slots mémoire | 4 x DDR5 DIMM Slots (Dual Channel, up to 8000+(OC), 256GB max) |
| Sortie graphique | 2 x USB4 Type-C (up to 8K 30Hz), 1 x HDMI 2.1 (up to 4K 120Hz) |
| Emplacements PCIe | 2 x PCIe 5.0 x16 (x8/x8), 1 x PCIe 3.0 x16 |
| Stockage | 4 x SATA3, 1 x Ultra M.2 (PCIe Gen3x4), 1 x Hyper M.2 (PCIe Gen4x4), 2 x Blazing M.2 (PCIe Gen5x4) |
| Réseau local | 10Gbps LAN, 5Gbps LAN |
| Réseau local sans fil | Wi-Fi 7 (802.11be) + Bluetooth |
| Audio | Codec audio HD 7.1 canaux Realtek ALC4082, Nahimic Audio |
| Ports USB (arrière) | 2 x USB 2.0, 6 x USB 3.2 Gen1, 2 x USB 3.2 Gen2, 2 x USB4 Type-C |
| Ports USB (avant) | 6 x USB 2.0, 4 x USB 3.2 Gen1, 1 x USB 3.2 Gen2x2 Type-C |
| Facteur de forme | ATX |
| Power Phase Design | 18+2+1 Power Phase, 80A SPS |
9. Informations sur la garantie
ASRock motherboards typically come with a limited manufacturer's warranty. The duration and terms of the warranty may vary by region and retailer. Please retain your proof of purchase for warranty claims. For detailed warranty information, refer to the official ASRock webconsultez votre site web ou contactez votre point de vente.
10. Assistance technique
Pour obtenir une assistance technique, télécharger des pilotes, mettre à jour le BIOS et accéder à des informations complémentaires sur le produit, veuillez consulter le support officiel d'ASRock. website:
You may also contact ASRock customer service directly through their website for personalized support.


