Introduction
Thank you for choosing the NEEWER TP63 Camera Tripod Monopod. This versatile and robust photography accessory is designed to provide stability and flexibility for a wide range of shooting scenarios, from overhead shots to low-angle photography and monopod use. Please read this manual carefully to ensure proper setup and operation.
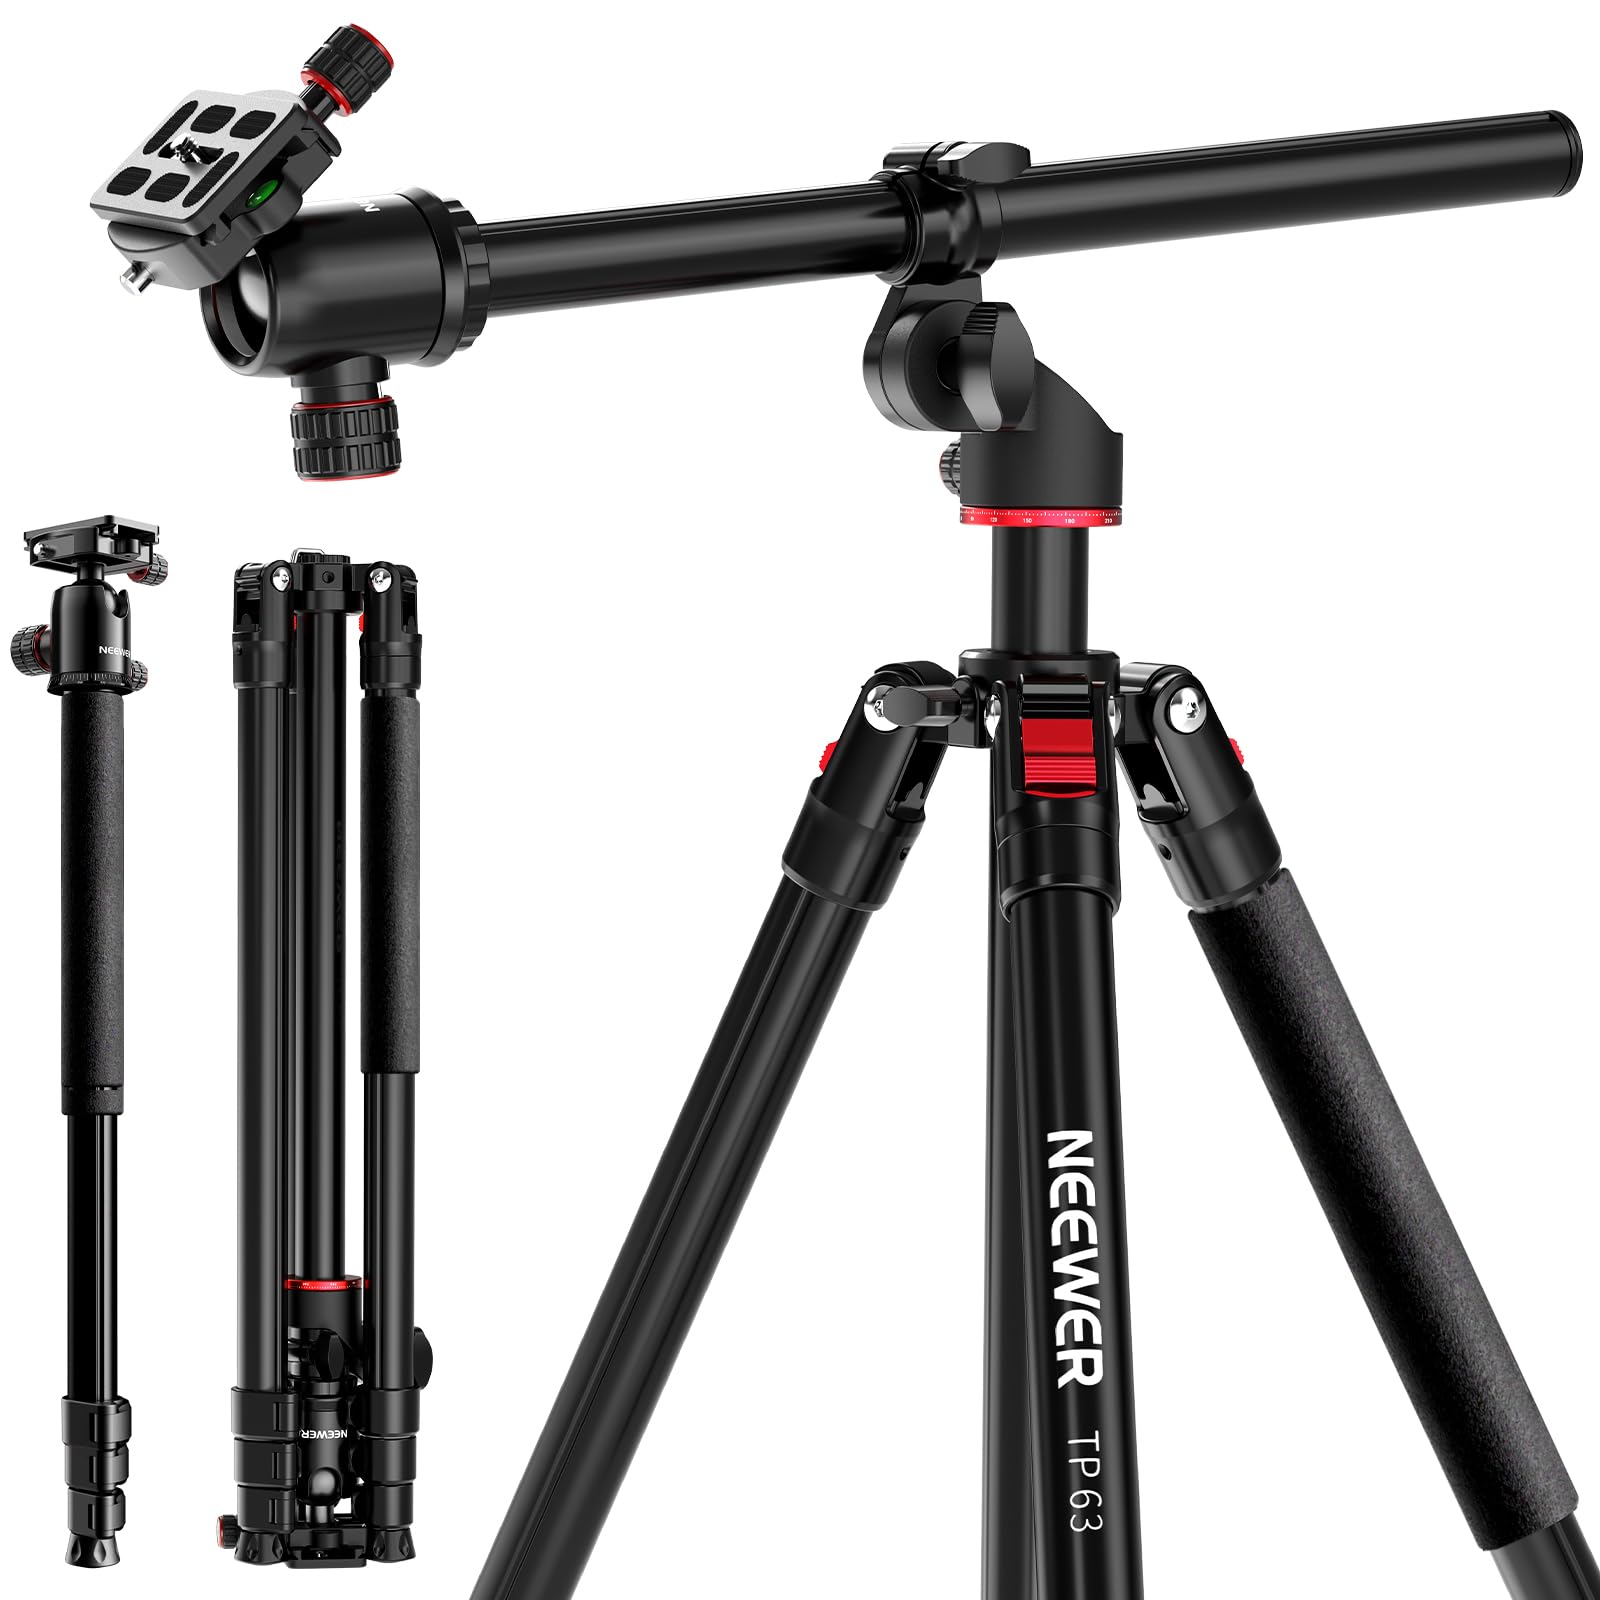
Image: The NEEWER TP63 tripod monopod set up outdoors, showcasing its full height and stability.
Caractéristiques principales
- Versatile Setup & Flexible Center Column: The adjustable center column can be raised for higher shooting angles or positioned horizontally for 360° rotation and 120° vertical tilt.
- Height Adjustable & Inverted Legs: Offers three adjustable leg angles and a height range of 25.2 inches (64 cm) to 65 inches (165 cm), extending to 90.6 inches (230 cm) with the center column. Legs fold in reverse for compact storage.
- 360° Ball Head & Arca Type QR Plate: Features a 360° scaled pan base and +90° to -90° tilt with locking knobs. The 1/4" Arca type quick release plate is compatible with various cameras and devices.
- Transform into a Monopod: One tripod leg can be detached and combined with the tripod head to form a monopod, adjustable from 22.2 inches (56.5 cm) to 94.5 inches (240 cm).
- Metal Build & Added Stability: Constructed from heavy-duty metal alloy, supporting up to 22 lbs (10 kg). Includes a hook for attaching sandbags (not included) for enhanced stability.
Configuration et assemblage
Dépliage du trépied
- Placez le trépied sur une surface plane et stable.
- Release the leg angle adjustment locks on each leg.
- Extend the legs to your desired height by twisting the leg locks counter-clockwise to loosen, pulling out the sections, and twisting clockwise to secure.
- Adjust the leg angles using the leg angle adjustment locks for optimal stability.
Fixation de la caméra
- Ensure the quick release plate is detached from the ball head by loosening the locking knob.
- Screw the quick release plate onto the bottom of your camera or device.
- Slide the quick release plate with your camera back into the ball head and tighten the locking knob securely.

Image : détaillée view of the 360° panoramic ball head, showing the quick release plate, bubble level, and locking knobs for precise adjustments.
Mode d'emploi
Adjusting the Flexible Center Column for Overhead Shots
- Desserrez le bouton de verrouillage de la colonne centrale.
- Pull the center column upwards to extend it.
- To achieve horizontal positioning, loosen the knob at the base of the center column, tilt the column to a horizontal position, and slide it out to the desired length.
- Tighten all knobs to secure the column in place. This allows for 360° horizontal rotation and 120° vertical tilt for overhead or unique angle shots.

Image: The flexible center column of the TP63 tripod extended horizontally, demonstrating its capability for overhead camera positioning.
Conversion en monopode
- Locate the tripod leg with the foam grip.
- Unscrew this leg from the tripod body.
- Detach the ball head from the main center column and screw it onto the top of the detached leg.
- Extend the monopod sections to your desired height and secure the locks.

Image: A visual guide illustrating the steps to transform one of the tripod legs into a standalone monopod.
Low Angle Shooting with Inverted Legs
- Fully retract the center column.
- Adjust the leg angles to their widest setting for maximum stability and lowest height.
- For extremely low angles, the center column can be inverted. Remove the center column, flip it upside down, and reinsert it into the tripod body. Attach your camera to the inverted column.

Image: The tripod configured for multi-angle shooting, demonstrating how the legs can be adjusted for low-angle shots.
Démonstrations vidéo
Video: A demonstration of the NEEWER 90-inch tall overhead horizontal camera tripod, highlighting its flexible center column and versatile adjustments.
Vidéo : Un overview of the NEEWER overhead horizontal camera tripod monopod, showcasing its various configurations and ease of use.
Entretien
- Nettoyage: Essuyez le trépied avec un chiffon doux et sec après chaque utilisation pour enlever la poussière et les saletés. Pour les saletés tenaces, utilisez un chiffon légèrement plus épais.amp chiffon et du savon doux, puis séchez soigneusement.
- Lubrification: Periodically check the leg locks and ball head for smooth operation. Apply a small amount of silicone-based lubricant if any parts feel stiff. Avoid oil-based lubricants as they can attract dirt.
- Stockage: Rangez le trépied dans son sac de transport, dans un endroit frais et sec, à l'abri des températures et de l'humidité extrêmes.
- Inspection: Regularly inspect all screws, knobs, and moving parts for tightness and wear. Tighten any loose components and replace worn parts as needed.
Dépannage
- Le trépied est instable : Ensure all leg locks are fully tightened and the leg angles are set appropriately for the terrain. Consider using the hook to add weight (e.g., a sandbag) for increased stability.
- Le mouvement de la tête sphérique est rigide : Loosen the ball head locking knob completely. If still stiff, clean any debris from the ball joint and apply a small amount of silicone lubricant.
- Camera not secure on quick release plate: Ensure the quick release plate is firmly screwed onto your camera and the plate locking knob on the ball head is fully tightened.
- Center column not sliding smoothly: Loosen the center column locking knob completely. Check for any obstructions or dirt and clean if necessary.
Caractéristiques
| Fonctionnalité | Détail |
|---|---|
| Modèle | TP63 |
| Type d'article | Camera Tripod Monopod |
| Caractéristiques principales | Flexible Center Column |
| Points de montage | 1/4", Arca Type |
| Matériau principal | Alliage métallique |
| Capacité de charge | 22 livres (10 kg) |
| Height (Tripod) | 25.2" (64 cm) à 90.6" (230 cm) |
| Height (Monopod) | 22.2" (56.5 cm), 65.4" (166 cm), 94.5" (240 cm) |
| Poids | 4.1 lb / 1860g |
| Dimensions du produit | 29.13 x 7.48 x 7.48 pouces (plié) |
| Couleur | Noir |
| Appareils compatibles | Caméra |
| Dossier spécial | Flexible, Rotatable |
| Type de tête de trépied | Rotules |
Qu'y a-t-il dans la boîte
- 1 x TP63 Camera Tripod Monopod
- 1 x sac de transport
- 1 x clé hexagonale en forme de L

Image: The NEEWER TP63 tripod, its carrying bag, and an L-shaped hex key, as included in the package.
Garantie et assistance
For warranty information and customer support, please refer to the documentation included with your product or visit the official NEEWER website. Conservez votre reçu d’achat pour les réclamations au titre de la garantie.


