Introduction
Thank you for choosing the QUW 71-inch Tall Arched Kitchen Pantry Cabinet. This manual provides essential information for the safe assembly, operation, and maintenance of your new furniture. Please read these instructions carefully before beginning assembly and retain them for future reference.
This cabinet is designed to provide versatile storage solutions for various rooms, including kitchens, dining rooms, living rooms, entryways, and hallways. Its features include an arched design, tempered glass doors, adjustable shelves, and an anti-tipping mechanism for enhanced safety.
Consignes de sécurité
Veuillez respecter les consignes de sécurité suivantes lors du montage et de l'utilisation :
- Assemblage adulte requis : This product requires assembly by adults. Keep children and pets away from the assembly area.
- Utilisez des outils appropriés : Ensure you have the correct tools for assembly as specified in the instructions.
- Dispositif anti-basculement : It is crucial to install the included anti-tipping device to prevent the cabinet from falling over. This is especially important in households with children or pets. Failure to install this device can result in serious injury.
- Limites de poids : Do not exceed the weight limits for shelves. Overloading can cause structural damage or collapse.
- Surface stable : Place the cabinet on a flat, stable, and level surface to prevent wobbling or tipping.
- À manipuler avec précaution : Glass components are fragile. Handle them with care to avoid breakage and injury.

Description de l'image : This image illustrates the critical importance of the anti-tipping design. On the left, a cabinet is shown leaning precariously forward, marked with a red 'X', indicating an unsafe condition. On the right, the same cabinet is shown securely anchored to the wall with an anti-tipping strap, marked with a green checkmark, demonstrating a safe setup. A small child is depicted reaching towards the securely installed cabinet, emphasizing the safety benefit for families.
Contenu du colis
Before assembly, verify that all components and hardware are present. If any parts are missing or damaged, please contact customer support.
- Panneaux d'armoires (dimensions diverses)
- Glass Doors (2)
- Adjustable Shelves (multiple)
- Metal Handles (4)
- Hinges and Fasteners
- Kit anti-basculement
- Quincaillerie d'assemblage (vis, chevilles, verrous à came, etc.)
- Manuel d'instructions
Instructions de montage (installation)
Follow these steps carefully for proper assembly. It is recommended to assemble the cabinet on a soft, clean surface to prevent scratches.
- Déballer et identifier les pièces : Lay out all panels and hardware. Refer to the parts list in your manual to identify each component.
- Assembler le panneau de base et les panneaux latéraux : Attach the base and side panels according to the diagrams in your specific manual. Ensure all connections are secure.
- Installer le panneau arrière : Secure the back panel to the main structure. This adds stability to the cabinet.
- Fixer les charnières aux portes : Fasten the hinges to the glass doors. Be careful when handling glass.
- Portes de montage : Attach the doors to the cabinet frame using the pre-drilled holes. Adjust hinges as needed for proper alignment (refer to Troubleshooting section for detailed hinge adjustment).
- Installer les poignées : Secure the metal handles to the doors.
- Insérer des étagères réglables : Place the shelf pins into the desired holes and then rest the shelves on top.
- Installer un dispositif anti-basculement : Securely attach the anti-tipping device to the top rear of the cabinet and then to a wall stud. This step is mandatory for safety.

Description de l'image : This diagram provides detailed measurements of the QUW Arched Kitchen Pantry Cabinet. It shows the overall height of 72 inches, width of 31 inches, and depth of 16 inches. Internal shelf dimensions are also indicated, including the height of various compartments (e.g., 13.7 inches, 8.8 inches, 8.7 inches) and the internal width of 29.8 inches. A weight capacity of 45 lbs per shelf is also noted.

Description de l'image : Un intérieur view of the QUW Arched Kitchen Pantry Cabinet with its doors open, showcasing son ample storage capacity and adjustable shelves. The shelves are filled with various kitchen and pantry items, including plates, bowls, jars, and utensils, demonstrating how different items can be organized. Arrows and measurements indicate the 2.5-inch increments for shelf adjustment.
Mode d'emploi
Using your QUW Pantry Cabinet is straightforward:
- Ouverture/Fermeture des portes : Use the metal handles to gently open and close the cabinet doors. Avoid slamming the doors to prevent damage to hinges and glass.
- Réglage des étagères : To adjust a shelf, remove all items from it. Carefully lift the shelf and remove the four shelf pins. Reinsert the pins into the desired holes at the new height, ensuring they are level, then place the shelf back on the pins.
- Chargement du contenu : Distribute weight evenly across shelves. Place heavier items on lower shelves to maintain stability. Do not exceed the maximum weight capacity of 45 lbs per shelf.
Entretien
Un entretien approprié prolongera la durée de vie et préservera l'apparence de votre meuble :
- Nettoyage: Essuyez les surfaces avec un chiffon doux, damp cloth. Avoid abrasive cleaners or harsh chemicals, which can damage the finish. For glass, use a standard glass cleaner.
- Saupoudrage: Dépoussiérez régulièrement le meuble avec un chiffon doux et sec.
- Vérification du matériel : Vérifiez régulièrement le serrage de toutes les vis et fixations. Resserrer si nécessaire.
- Évitez la lumière directe du soleil : Une exposition prolongée à la lumière directe du soleil peut entraîner une décoloration ou un ternissement de la finition.
- Protection contre l'humidité : Protect the cabinet from excessive moisture and humidity. Wipe up spills immediately.
Dépannage
Voici des solutions aux problèmes courants que vous pourriez rencontrer :
Door Alignment Issues
If the cabinet doors do not align flat or have gaps, hinge adjustments are required. Refer to the diagrams below for guidance:
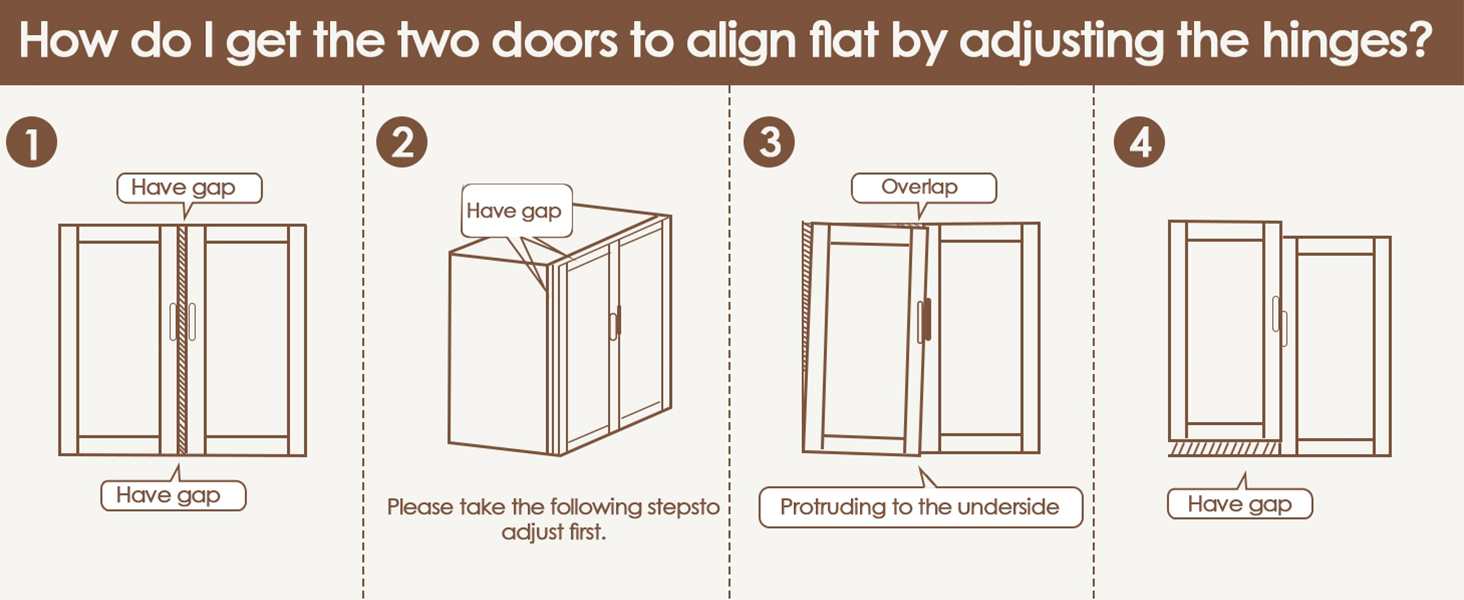
Description de l'image : This diagram shows four common door alignment problems: 1) a gap between the doors, 2) a gap at the top corner of the doors, 3) doors overlapping, and 4) a door protruding at the bottom. These visuals help identify the specific alignment issue before proceeding with adjustments.
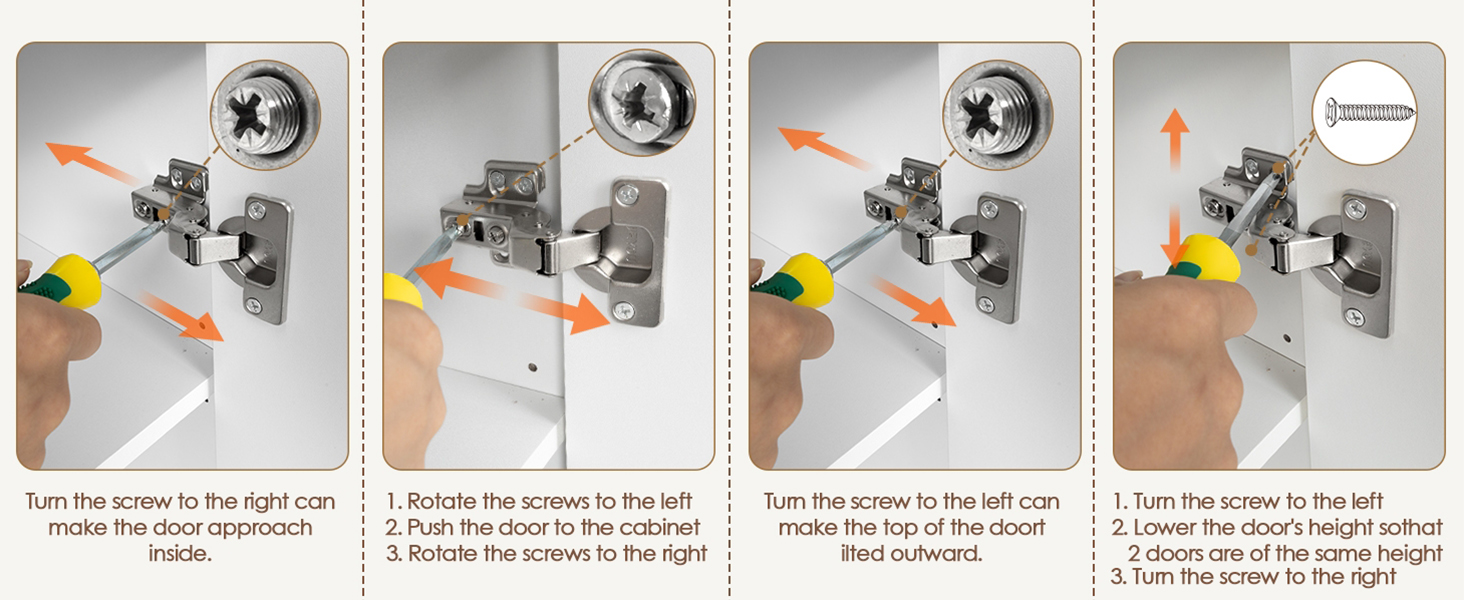
Description de l'image : This image provides a step-by-step visual guide on how to adjust cabinet door hinges using a screwdriver. It shows four distinct adjustments: 1) turning a screw to the right to move the door inward, 2) rotating screws to push the door into the cabinet and then rotating them to the right, 3) turning a screw to the left to tilt the top of the door outward, and 4) turning a screw to the left to lower the door's height, followed by turning it to the right to secure the adjustment. Each step is accompanied by an arrow indicating the direction of adjustment.
- Horizontal Adjustment (Side-to-Side): Locate the screw on the hinge that controls the door's horizontal position. Turning it right typically moves the door inward, while turning it left moves it outward. Adjust until the gap between doors is even.
- Depth Adjustment (In-and-Out): Some hinges have a screw that allows the door to be moved closer to or further from the cabinet frame. Adjust this if the door is not flush with the cabinet.
- Vertical Adjustment (Up-and-Down): There is usually a screw that allows the entire door to be raised or lowered. Adjust this to ensure the top and bottom edges of the doors align.
Wobbling Cabinet
If the cabinet wobbles, ensure it is placed on a level surface. Check and tighten all assembly screws. If the floor is uneven, use shims under the legs to stabilize it.
Caractéristiques
| Marque | QUW |
| Nom du modèle | ABC023 |
| Couleur | Gris |
| Dimensions du produit | 16.2"P x 31.1"L x 72"H |
| Poids de l'article | 116.8 livres |
| Matériel | Wood Composite (Cabinet), Metal (Handles) |
| Caractéristiques spéciales | Adjustable Shelf, Anti-Tipping |
| Type de montage | Floor Mount (with wall anchor) |
| Style de porte | Façade en verre |
| Assemblage requis | Oui |
Informations sur la garantie
Specific warranty details for the QUW 71-inch Tall Arched Kitchen Pantry Cabinet are not provided within this instruction manual. Please refer to the product packaging, the manufacturer's official website, or your purchase receipt for comprehensive warranty terms and conditions.
Assistance clientèle
If you have any questions, require assistance with assembly, or need to report missing or damaged parts, please contact QUW customer support through the retailer where the product was purchased or visit the official QUW website pour les coordonnées.