1. Introduction
Thank you for choosing the DWVO 52 Inch Ceiling Fan with Dimmable Light. This manual provides essential information for the safe installation, operation, and maintenance of your new ceiling fan. Please read these instructions thoroughly before installation and retain them for future reference.

Image 1.1 : Terminéview of the DWVO 52 Inch Ceiling Fan. This image displays the fan's overall design, including its five black blades, central light fixture with a gold accent ring, and flush mount canopy.
2. Consignes de sécurité
AVERTISSEMENT: Pour réduire les risques d'incendie, d'électrocution ou de blessures corporelles, suivez toujours ces précautions de base :
- Lisez attentivement toutes les instructions et les informations de sécurité avant d’installer votre ventilateur et conservez ces instructions.
- All wiring must be in accordance with national and local electrical codes. Consult a qualified electrician if you are unfamiliar with wiring.
- Avant l'installation, coupez l'alimentation en désactivant les disjoncteurs au niveau du tableau électrique principal.
- Assurez-vous que le lieu d'installation puisse supporter le poids du ventilateur (environ 12.1 livres).
- N’utilisez pas le ventilateur si le cordon d’alimentation ou la prise est endommagé.
- Évitez de placer des objets sur le chemin des pales du ventilateur.
- Do not attempt to repair or modify the fan yourself. Contact customer support for assistance.
3. Contenu du colis
Verify that all components listed below are included in your package. If any parts are missing or damaged, please contact DWVO customer service.
- Assemblage du boîtier du moteur
- Pales de ventilateur (5)
- Ensemble de kit d'éclairage
- Télécommande avec support mural
- Support de montage
- Kit de quincaillerie (vis, connecteurs de fils, rondelles)
- Manuel d'instructions
4. Spécifications
| Fonctionnalité | Spécification |
|---|---|
| Marque | DWVO |
| Nom du modèle | MADWVz9zor |
| Taille | 52 pouces |
| Couleur | Black Gold New |
| Matériel | Acrylonitrile butadiène styrène (ABS) |
| Type de moteur | Moteur à courant continu réversible |
| Quoitage | 25 watts (fan motor) |
| Type de source lumineuse | LED intégrée |
| Lumière Wattage | 18 W |
| Température de couleur | 3000K (Blanc chaud), 4500K (Blanc naturel), 6000K (Blanc froid) |
| Méthode de contrôle | Télécommande |
| Nombre de vitesses | 6 |
| Type de montage | Plafonnier |
| Dimensions du produit | 52"L x 52"l x 12"H |
| Poids de l'article | 12.12 livres |

Image 4.1: Dimensional diagram of the 52-inch ceiling fan, showing key measurements for length, width, and height from the ceiling.
5. Configuration et installation
5.1 Pré-installation
- Coupez le courant au niveau du disjoncteur.
- Assurez-vous que le boîtier électrique est solidement fixé et capable de supporter le poids du ventilateur.
- Unpack all components and lay them out on a soft surface to prevent scratches.
5.2 Installation du support de montage
- Fixez le support de montage à la boîte de sortie à l'aide des vis fournies. Assurez-vous qu'il est bien fixé.
5.3 Câblage
- Connect the household supply wires to the fan wires according to the wiring diagram in the manual. Typically, black to black (live), white to white (neutral), and green/bare copper to green (ground).
- Fixez tous les connecteurs de fils avec des écrous à vis.
5.4 Fixation des pales du ventilateur
- Carefully attach each fan blade to the motor housing using the provided screws. Ensure all screws are tightened securely.
5.5 Installation du kit d'éclairage
- Raccordez les fils du kit d'éclairage aux fils correspondants du moteur du ventilateur.
- Fixez le kit d'éclairage sous le boîtier du moteur du ventilateur.
- Install the light diffuser by twisting or snapping it into place.
6. Mode d'emploi
Your DWVO ceiling fan is controlled by a remote control. Familiarize yourself with its functions for optimal use.
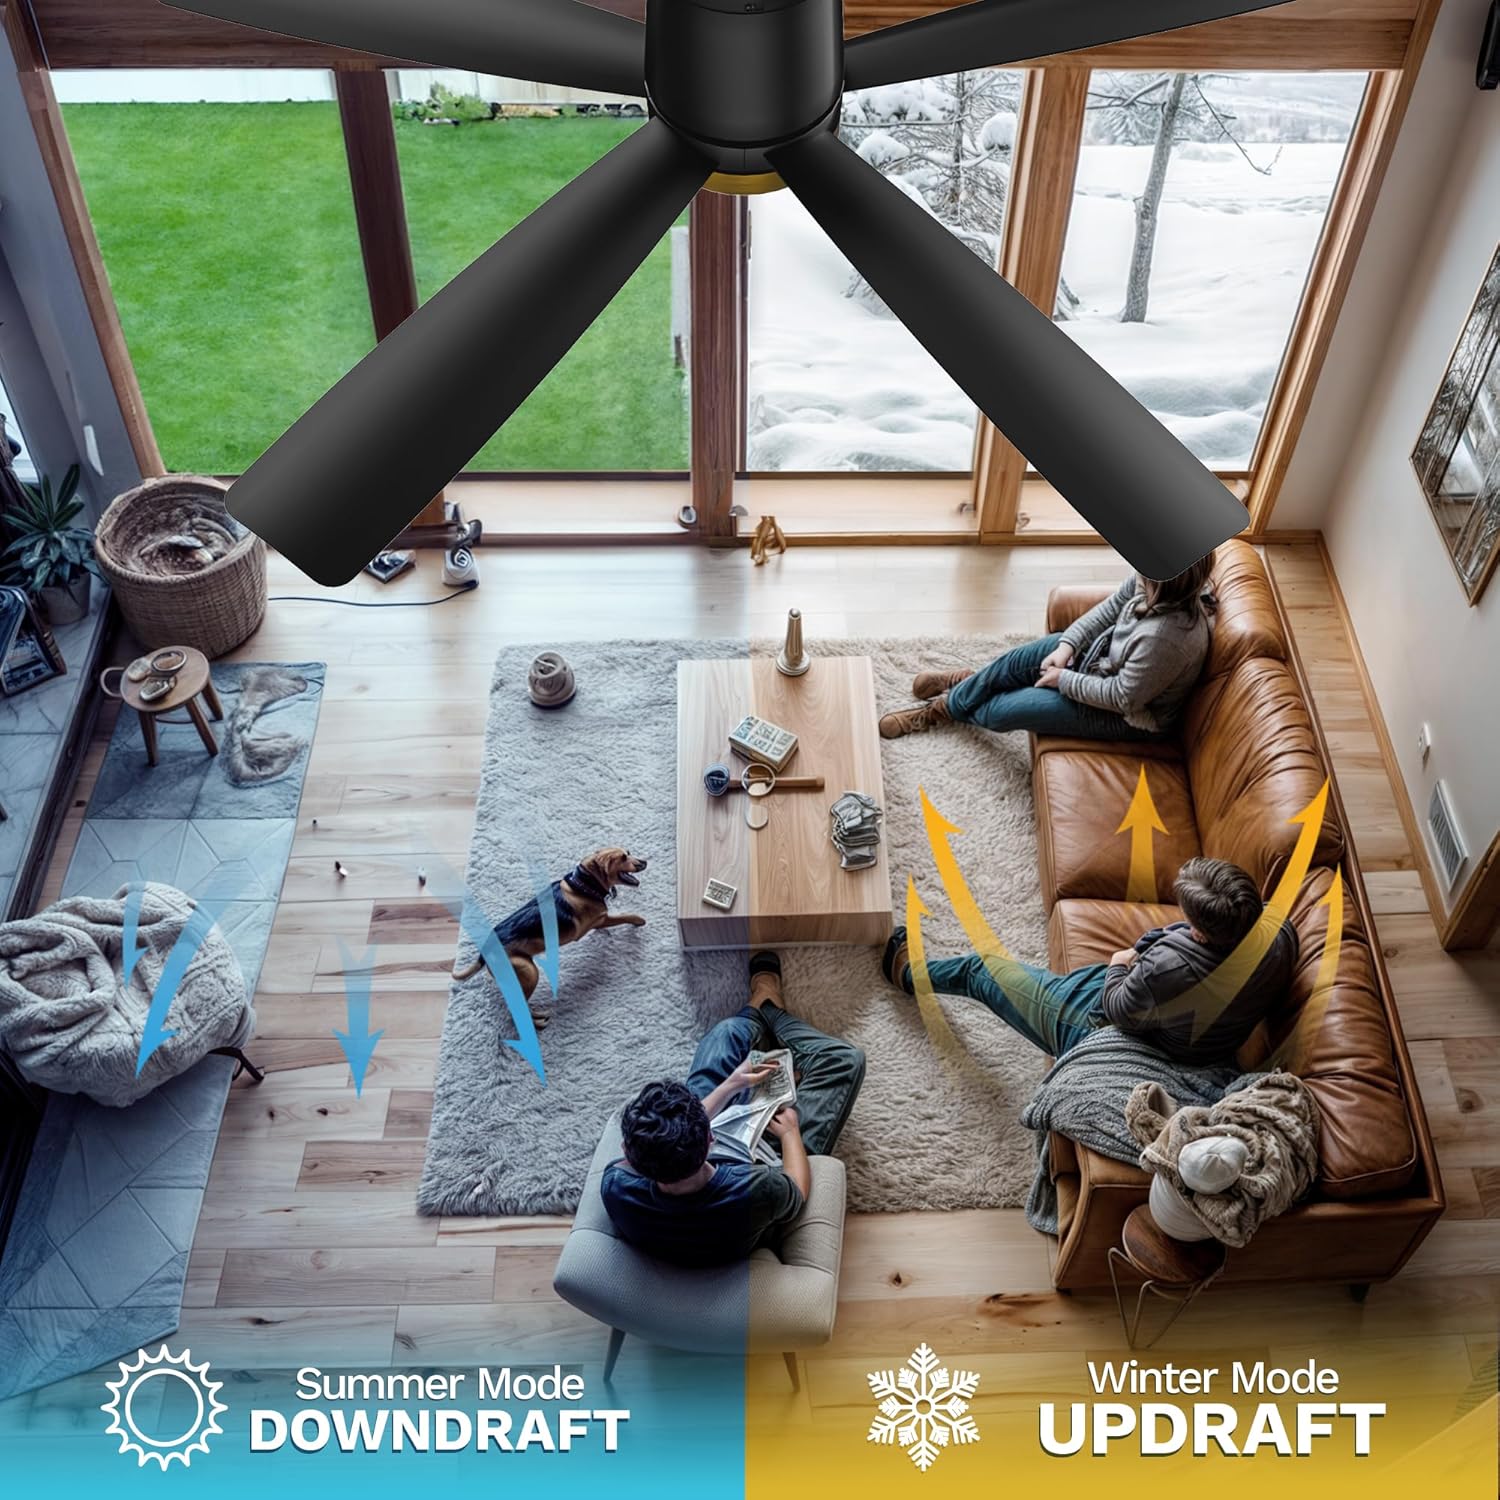
Image 6.1: The remote control for the DWVO ceiling fan, showing its various buttons for fan and light operation.
6.1 Fonctions de la télécommande
- Bouton d'alimentation : Allume/éteint le ventilateur et la lumière.
- Boutons de vitesse du ventilateur (1-6) : Régle la vitesse du ventilateur de 1 (la plus basse) à 6 (la plus élevée).
- Bouton Marche/Arrêt de la lumière : Permet d'allumer ou d'éteindre la lumière indépendamment du ventilateur.
- Bouton de température de couleur : Cycles through 3000K (Warm White), 4500K (Natural White), and 6000K (Cool White). The fan retains the last used color temperature setting.
- Boutons de minuterie (1H, 2H, 4H, 8H) : Permet de programmer l'arrêt automatique du ventilateur après la durée sélectionnée.
- Forward/Reverse Rotation Button: Changes the direction of the fan blades for seasonal use.

Image 6.2 : Détail view of the remote control, highlighting the functions of each button, including sleep mode, natural wind, forward/reverse rotation, fan speed adjustment, and timing settings.
6.2 Adjustable Light & Timer
The integrated LED light offers three distinct color temperatures to suit your preference and environment. Press the light button to cycle through 3000K, 4500K, and 6000K. The fan's memory function will recall the last selected color temperature when turned on again.
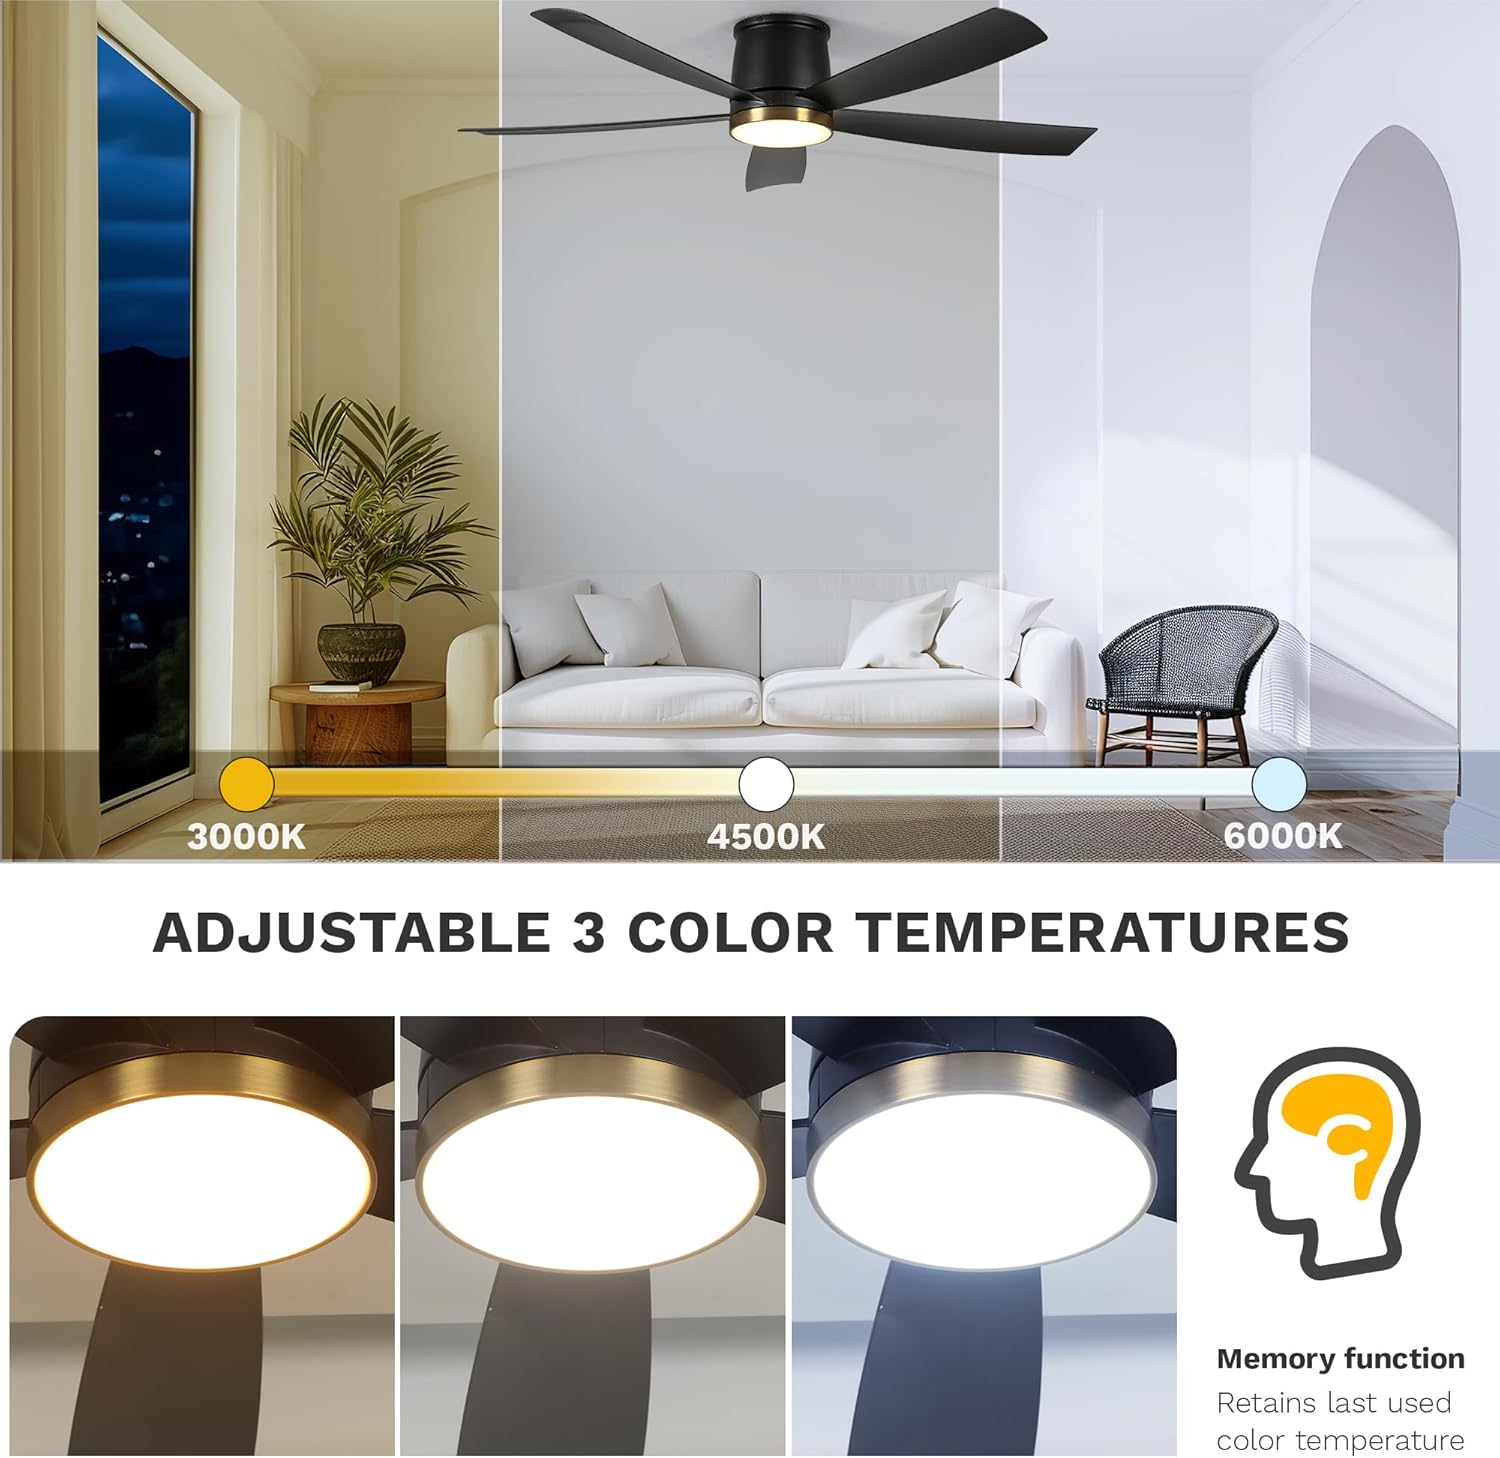
Image 6.3: Visual representation of the three adjustable color temperatures (3000K, 4500K, 6000K) and the memory function that retains the last used setting.
Utilize the timer function (1H, 2H, 4H, 8H) to automatically shut off the fan after a set period, ideal for sleeping or when leaving a room.

Image 6.4: Illustrates the quiet operation of the DC motor (below 35dB) and the available timer settings (1h, 2h, 4h, 8h, 12h max).
6.3 Reversible Seasonal Mode
The DC reversible motor allows for year-round use. Press the forward/reverse button on the remote to change blade direction:
- Mode été (sens antihoraire) : Crée un courant descendant, produisant une brise rafraîchissante.
- Mode hiver (sens horaire) : Creates an updraft, circulating warm air trapped near the ceiling.

Image 6.5: The DWVO ceiling fan installed in a modern living room setting, demonstrating its aesthetic integration.

Image 6.6: Depicts the six fan speed levels, suggesting appropriate uses for different activities like sleeping/reading (Level 1-2), fun/parties (Level 3-4), and fitness/sports (Level 5-6).
7. Entretien
7.1 Nettoyage
- Coupez toujours le courant au disjoncteur avant de procéder au nettoyage.
- Utilisez un chiffon doux et sec.amp Utilisez un chiffon pour essuyer les pales du ventilateur et le boîtier du moteur. N’utilisez pas de nettoyants abrasifs ni de solvants.
- Periodically check for dust accumulation on the blades and light diffuser to maintain optimal performance and light output.
7.2 Remplacement de la source lumineuse
The LED light source is integrated and designed for long-term use. If the light fails, please contact DWVO customer support for assistance. Do not attempt to replace the LED module yourself.
8. Dépannage
If you experience issues with your fan, refer to the common problems and solutions below. If the problem persists, contact customer support.
| Problème | Cause possible | Solution |
|---|---|---|
| Le ventilateur ne démarre pas | Pas d'alimentation électrique ; câblage desserré ; pile de la télécommande faible/déchargée. | Check circuit breaker; Verify all wire connections; Replace remote control battery. |
| Le ventilateur est bruyant | Loose screws on blades or mounting bracket; Fan not balanced. | Tighten all screws; Ensure blades are securely attached; Check for blade balance. |
| La lumière ne fonctionne pas | Loose wiring; LED module failure; Remote control issue. | Check light kit wiring; Contact customer support for LED replacement; Replace remote control battery. |
| La télécommande ne fonctionne pas | Battery dead; Remote not paired (if applicable); Obstruction. | Replace battery; Refer to remote pairing instructions (if provided separately); Ensure clear line of sight to fan receiver. |
9. Garantie et assistance
9.1 Informations sur la garantie
This DWVO ceiling fan comes with a Garantie de 1 ans from the date of purchase. This warranty covers manufacturing defects in materials and workmanship under normal use. It does not cover damage resulting from improper installation, misuse, accidents, or unauthorized repairs.
9.2 Assistance clientèle
For technical assistance, warranty claims, or to order replacement parts, please contact DWVO customer support. Have your model number (MADWVz9zor) and purchase date available when contacting support.
You can visit the official DWVO store for more information: DWVO Store on Amazon


