1. Introduction
This manual provides detailed instructions for the installation, operation, and maintenance of your GAOMON 24000 BTU 19 SEER2 Mini Split AC System. This high-performance inverter system offers efficient cooling and heating for spaces up to 1500 sq.ft, featuring Wi-Fi connectivity, remote control, and low-noise operation. Please read this manual thoroughly before installation and use to ensure proper function and safety.
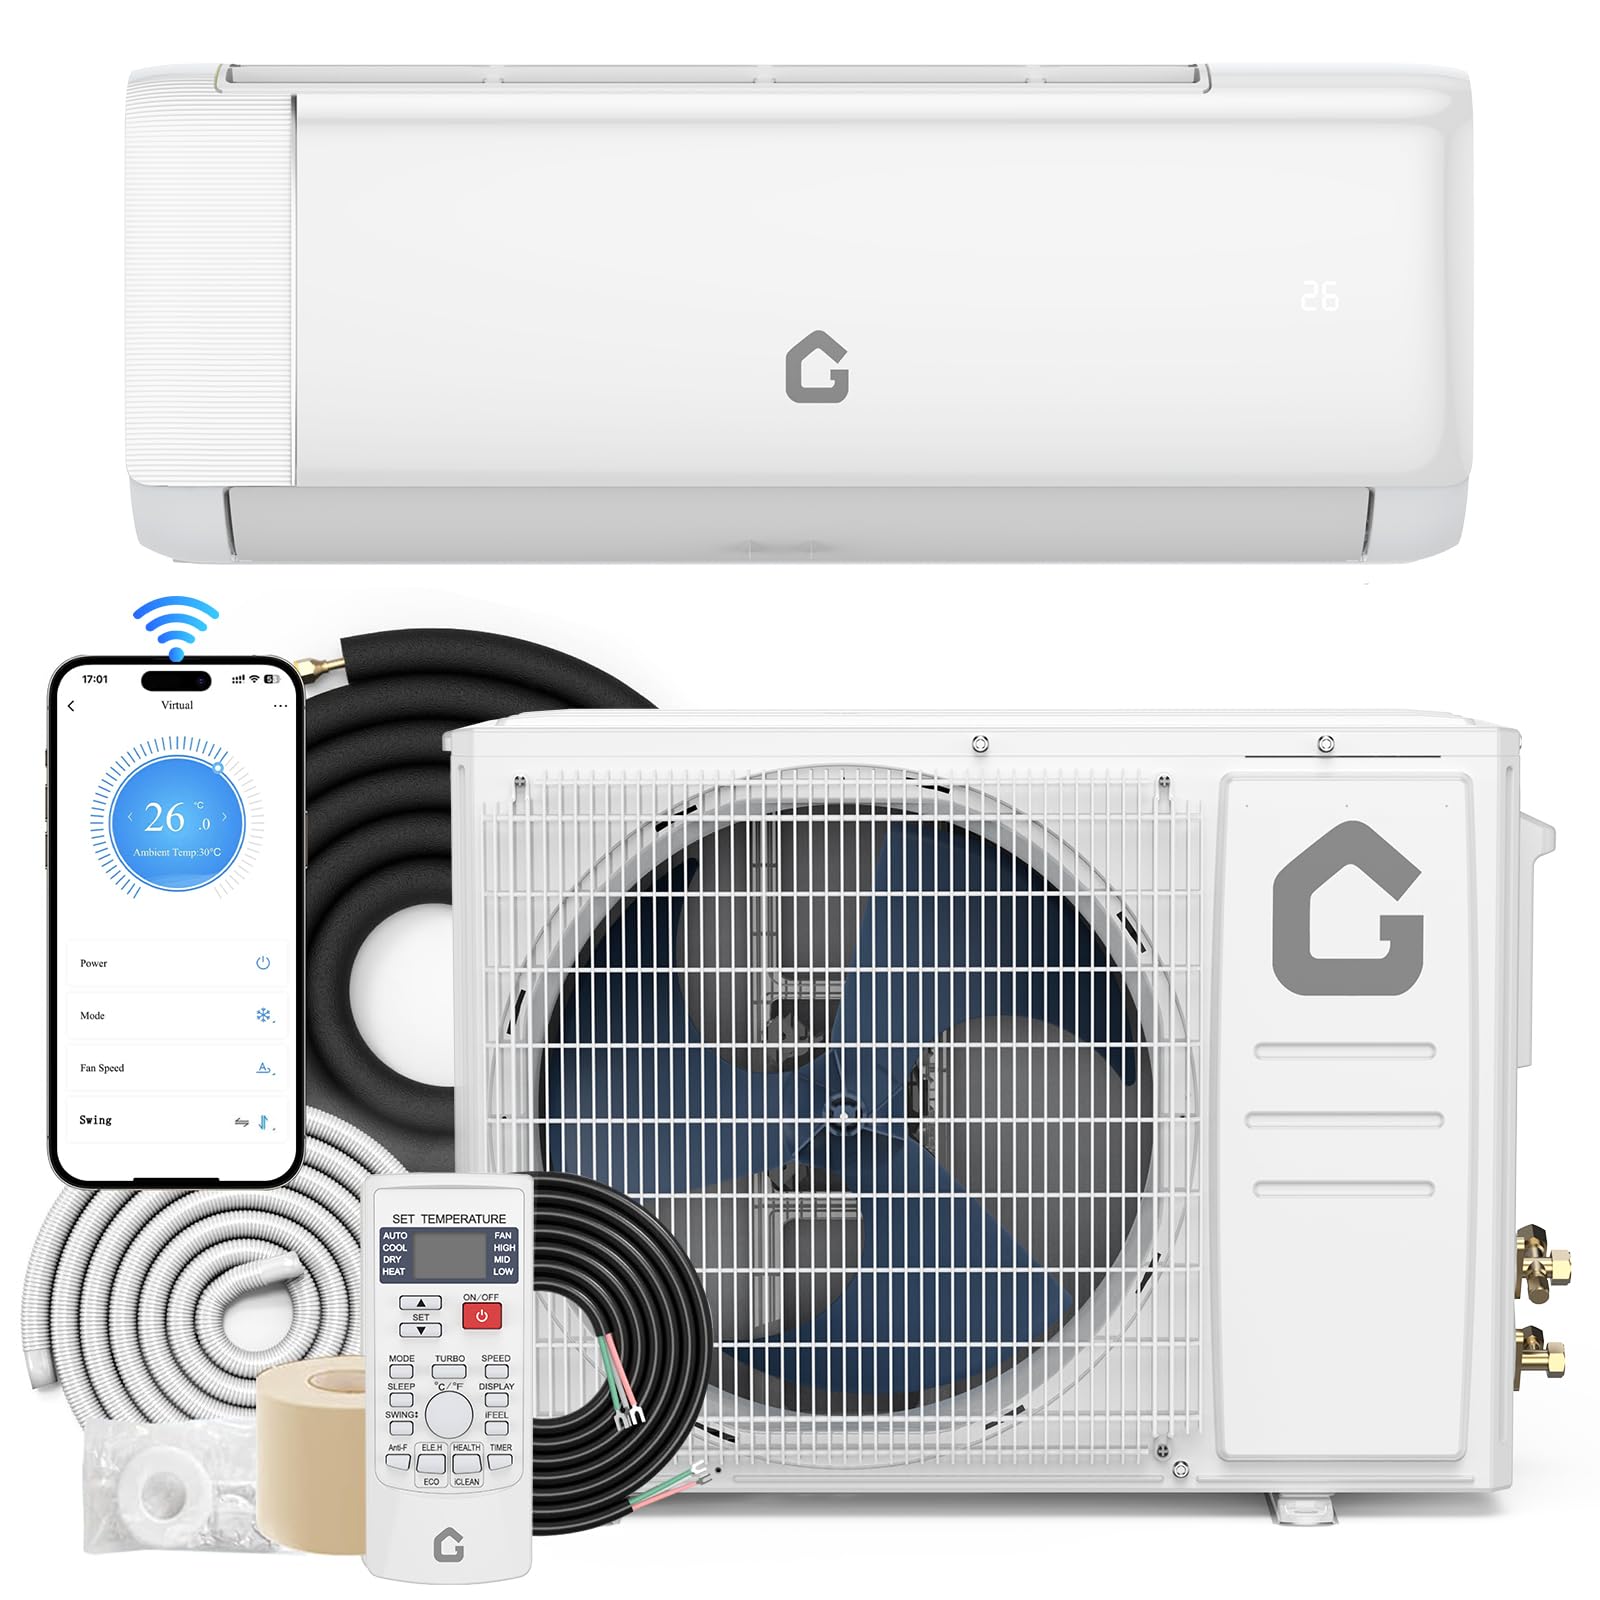
Figure 1: GAOMON 24000 BTU Mini Split AC System
2. Consignes de sécurité
WARNING: Professional installation is required for this system. Improper installation can lead to electric shock, fire, or serious injury.
- Veillez toujours à débrancher l'alimentation électrique avant toute installation ou opération de maintenance.
- Wear appropriate personal protective equipment (PPE) during installation, including safety glasses, gloves, and a helmet if working at heights.
- Assurez-vous que toutes les connexions électriques sont conformes aux codes et réglementations locaux.
- N’essayez pas de réparer ou de modifier l’appareil vous-même. Contactez un technicien qualifié.
- Tenez les enfants et les animaux domestiques éloignés de l'appareil pendant son fonctionnement et son entretien.
Vidéo 1 : Cette vidéo présente un aperçuview of the installation process for the Mini Split AC Unit, highlighting necessary tools and safety precautions.
3. Contenu du colis
The GAOMON Mini Split AC system is shipped in two packages. Please verify all components are present upon delivery:
- 1 x Unité extérieure
- 1 x Unité intérieure
- Tuyau de raccordement en cuivre de 1 x 13 pi - Tuyau d'air
- Tuyau de raccordement en cuivre de 1 x 13 pi - Tuyau pour liquide
- 1 tuyau de drainage de 2 m (6.5 pi)
- 1 câble de communication de 13 pieds
- 1 x télécommande
- 1 x Guide de l'utilisateur
Note: Shut-off valves housing and side protection grille are excluded. The air filter is washable and easy to clean.

Figure 2: Visual representation of the components included in the GAOMON Mini Split AC package.
4. Spécifications
| Fonctionnalité | Valeur |
|---|---|
| Numéro de modèle | PHO_163 |
| Dimensions du produit | 42.87 x 22.44 x 39.37 pouces |
| Poids de l'article | 82 livres |
| Marque | GAOMON |
| Facteur de forme | Mini-Split |
| Capacité | 1500 pieds cubes |
| Couverture de la surface au sol | Jusqu'à 1500 XNUMX pieds carrés |
| Voltage | 230 volts |
| Niveau de bruit | 42 décibels |
| Puissance de refroidissement | 24000 unités thermiques britanniques (BTU) |
| Coefficient d'efficacité énergétique saisonnière (SEER) | 19 |
| Caractéristiques spéciales | Auto Clean, Heating & Cooling Function, Silent Mode, Sleep Mode, WiFi Enabled |

Figure 3: Detailed dimensions and key specifications of the GAOMON Mini Split AC System.
5. Guide d'installation
Professional installation is strongly recommended for this appliance.
5.1. Préparation
Outils et matériaux requis
- Scie à trou
- Multimètre
- Coupe-tuyau
- Clés hexagonales
- Réfrigérant (R410A)
- Clé dynamométrique
- Clé à molette
- Mètre à ruban
- Manomètre
- Safety belt (for high installations)
- Outil d'évasement
- Bracket (for outdoor unit)
- Niveau
- Tournevis cruciforme
- Électrosonde
- Pompe à vide
- Pinces
- Copper tube (if extending lines)
Environmental Checks
- Ensure there is no heat source or steam source near the installation area.
- Avoid obstructions around the inlet and outlet of both indoor and outdoor units.
- The area should be free from smoke or oil.
- Do not install in areas with flammable or explosive gas, or corrosive gas.
5.2. Installation de l'unité intérieure
Sélectionnez l'emplacement d'installation
- The wall for the indoor unit must be hard, flat, and firm to prevent vibration and noise.
- Maintain a minimum clearance of 15cm to the ceiling.
- Maintain a minimum clearance of 20cm to obstacles on either side.
- The unit should be installed between 230-260cm from the floor.
Fixer la plaque de montage
Place the mounting plate on the wall and use a level to ensure it is horizontal. Select the position for at least 5 screws to firmly fix the plate.
Percer un trou dans le mur
After determining where the pipe will go through the wall, drill a wall hole. The wall hole should be inclined outward by 5-10 degrees, with a diameter of 60-80mm. Use an anti-dust bag to avoid dust when drilling.
Install Connection Cable
Faites passer le câble d'alimentation à l'arrière de l'unité intérieure et fixez-le sur le bornier. Fixez le câble à l'aide d'une pince.amp. Remove the knock-out panel with a knife and remove burrs to prevent the drain pipe from being broken.
Raccordement de la tuyauterie de réfrigérant
Use both hands to turn the pipe in the desired direction. Aim at the pipe center, tighten the taper nut with fingers, then tighten with two wrenches. Use a torque wrench for precise tightening according to the pipe size (refer to the table in the installation video).
Installez le tuyau de vidange
Raccordez le tuyau d'évacuation au tuyau de sortie d'eau et fixez-le solidement avec du ruban adhésif. Sa longueur doit être supérieure à 5 cm pour éviter les fuites d'eau.
Enveloppez la tuyauterie
Wrap the refrigerant piping, wires, and drain pipe with wrapping tape.
Monter l'unité intérieure
Put the refrigerant piping out of the wall hole. Put the indoor unit on the mounting plate. Push the lower part of the indoor unit until a 'click' sound is heard to ensure it is firmly fixed to the wall.
Pipe Protecting Ring and Putty
To protect piping and wires, a pipe protecting ring shall be installed and sealed with putty.
5.3. Installation de l'unité extérieure
Sélectionnez l'emplacement d'installation
The outdoor unit must be installed in a firm and flat place to prevent vibration and noise.
- Maintain a minimum clearance of 20cm to the obstruction above.
- Maintain a minimum clearance of 30cm to obstacles on the left and right sides.
- Maintain a minimum clearance of 10cm for air intake on the right side.
- Maintain a minimum clearance of 200cm for air exhaust in front.
Install Outdoor Unit Bracket
If installing the air conditioner in a higher place, the operator should wear a safety belt and helmet. Use a level to ensure the bracket is horizontal and vertical. Use at least 6 expansion bolts to make sure brackets are fixed firmly on the wall.
Réparer l’unité extérieure
Put the outdoor unit onto the brackets. Use 4 screws to fix the feet of the outdoor unit.
Connecter la tuyauterie de réfrigérant
Remove the nut from the stop valves. Aim at the pipe center of the stop valve, tighten the taper nut with fingers, then tighten with two wrenches. Screw the 2 caps back on. Use a torque wrench for precise tightening according to the pipe size (refer to the table in the installation video).
Passer l'aspirateur
Before vacuuming, check all the nuts of the indoor and outdoor unit are tightened. Connect the stop valve, charging hose, manifold valve, and vacuum pump as shown in the diagram (refer to the installation video). Turn on handle Lo to vacuumize. Vacuumize for at least 15 minutes, making sure the value on the pressure gauge is ≤0.1MPa. Keep pressure for 3-5 minutes after vacuumizing, ensuring pressure springback is ≤0.05MPa. Open the 1/4 liquid valve, and remove the charging hose.
Fix Cables
Retirez le couvercle du boîtier électrique. Fixez les câbles au bornier conformément au schéma de câblage figurant sur le couvercle du boîtier. Suivez impérativement le schéma de câblage à l'intérieur du couvercle. Utilisez un outil de câblage.amp Pour réparer les câbles, remettez le couvercle du boîtier électrique en place.
Refrigerant Adjustment
When the length of the connecting pipe is changed, an extra amount of refrigerant may need to be added or reduced to ensure optimal operation and performance.
| Longueur du tuyau de raccordement | Réfrigérant ajouté ou réduit | Quantité de réfrigérant pour l'unité |
|---|---|---|
| <3 m | CC≤12000Btu : réduire de 20 g/m | ≤1 kg |
| CC≥18000Btu : réduire de 50 g/m | ≤2 kg | |
| 3-5 m | Pas nécessaire | - |
| 5-15 m | CC≤12000Btu : ajouter 20 g/m | ≤1 kg |
| CC≥18000Btu : ajouter 30 g/m | ≤2 kg |
Video 2: This video demonstrates the complete installation process for the Mini Split AC Unit, including both indoor and outdoor components.
6. Mode d'emploi
6.1. Fonctions de la télécommande
The backlit LCD remote controller allows effortless system control. Key functions include:
- En mode cool: Pour un refroidissement rapide.
- Mode de chauffage: Pour un chauffage rapide.
- Mode de séchage: One-key drying mode to quickly reduce indoor humidity.
- Fan seulement: Low, Mid, High, Turbo 4 wind speeds with 50ft long distance air flow.
- Mode automatique: Automatically selects operating mode based on ambient temperature.
- Affichage activé/désactivé : Controls the unit's display.
- Mode veille: Adjusts temperature and fan speed for comfortable sleep and quiet operation (41 dB).
- ECO Energy Saving Mode: Optimise le fonctionnement pour une consommation d'énergie réduite.
- Mode SANTÉ : Activates negative ions, electrostatic dust removal, and PM2.5 removal.
- Mode iFEEL : Senses temperature at the remote control's location for precise comfort.
- Minuteur 24 heures : Planifiez les heures de marche/arrêt.
- Balancement automatique 4D : Assure une distribution d'air uniforme.

Figure 4 : Plusview de la télécommande et de ses différentes fonctions.
6.2. Wi-Fi Setup and Smart Control
The unit is Wi-Fi enabled and Google-compatible, allowing control via a smartphone app.
Video 3: This video demonstrates the process of setting up Wi-Fi connectivity for your Mini Split Air Conditioner, enabling smart control via an app.

Figure 5: The mobile application interface for intelligent control of the AC unit, compatible with Amazon Alexa and Google Assistant.
7. Entretien
7.1. Nettoyage du filtre à air
The air filter is washable and easy to clean. Regular cleaning of the air filter is essential for maintaining optimal performance and air quality. Refer to the full user guide for detailed instructions on how to remove, clean, and reinsert the air filter.
7.2. Fonction autonettoyante
The unit features an automatic defrosting and self-cleaning function to maintain internal hygiene and efficiency. This includes a 57°C high-temperature self-cleaning and sterilization process.

Figure 6: Illustration of the 57°C high-temperature self-cleaning and sterilization process.
8. Dépannage
If you encounter any issues with your GAOMON Mini Split AC System, please refer to the following common problems and solutions before contacting customer support:
- L'appareil ne s'allume pas : Check power supply, circuit breaker, and ensure the remote control has working batteries.
- Pas de refroidissement/chauffage : Verify the correct mode is selected, check temperature settings, and ensure air filters are clean.
- Bruit inhabituel : Check for loose parts, obstructions in the fan, or improper installation of the outdoor unit.
- Fuite d'eau: Ensure the drain hose is properly installed and sloped, and not blocked.
- Remote control missing: If the remote control is missing, contact customer support for a replacement.
- Problèmes de connectivité Wi-Fi : Ensure your Wi-Fi network is 2.4GHz, check router settings, and follow the app's troubleshooting steps.
For more complex issues or if the problem persists, please contact GAOMON customer support.
9. Garantie et assistance
The GAOMON 24000 BTU 19 SEER2 Mini Split AC System comes with a Garantie à vie. For warranty claims, technical support, or any questions regarding your product, please refer to the contact information provided in your purchase documentation or visit the official GAOMON website.


