Introduction
Thank you for choosing the Amazon Basics Single Outlet Hose Watering Timer. This device is designed to simplify your garden irrigation by providing flexible and automated watering schedules. Please read this manual carefully before installation and use to ensure proper operation and longevity of your product.
Caractéristiques du produit
- Smart Watering Timer: Program flexible watering schedules from 1 minute to 3 hours 59 minutes for hassle-free garden irrigation.
- Commandes intuitives : Activate manual watering with customizable duration when needed. The program can be paused for 24, 48, or 72 hours.
- Angled Screen Design: The 45% adjustable tilted screen ensures optimal visibility from any angle, displaying time, program, and battery status.
- Leak-Free Connection: Rubber gaskets ensure a tight seal and prevent water waste. Standard 1.9cm BSP thread. Operates on 2 AA alkaline batteries (not included).

Figure 1 : Face avant view of the Amazon Basics Single Outlet Hose Watering Timer, showing the digital display and control buttons.
Contenu du colis
Votre colis doit contenir les éléments suivants :
- 1 x Amazon Basics Single Outlet Hose Watering Timer
- 1 x Manuel d'utilisation
- Rubber gaskets (pre-installed or included for leak-free connection)
Note: 2 AA alkaline batteries are required and are NOT included in the package.
Installation
1. Installation de la batterie
- Repérez le compartiment à piles à l'arrière du minuteur.
- Ouvrez le couvercle du compartiment à piles.
- Insérez 2 piles alcalines AA neuves, en veillant à respecter la polarité (+/-).
- Refermez soigneusement le couvercle du compartiment à piles pour préserver l'étanchéité.

Figure 2: Top connection of the timer, showing the filter and threaded inlet. Ensure rubber gaskets are in place for a leak-free seal.
2. Connecting to the Faucet
- Assurez-vous que le robinet est propre et exempt de débris.
- Check that the rubber gasket is properly seated inside the timer's inlet connector.
- Screw the timer onto your standard 1.9cm (3/4 inch) outdoor faucet by hand until it is snug. Do not overtighten.
- Connect your garden hose to the outlet of the timer.
- Slowly turn on the faucet. Check for any leaks. If leaks occur, tighten the connections slightly or adjust the rubber gaskets.
Mode d'emploi
1. Réglage de l'heure actuelle
Refer to the angled screen for clear visibility of settings.
- Press the "SET" button to enter time setting mode.
- Use the "+" and "-" buttons to adjust the hour. Press "SET" to confirm.
- Use the "+" and "-" buttons to adjust the minute. Press "SET" to confirm.
2. Programming a Watering Schedule
The timer allows flexible schedules from 1 minute to 3 hours 59 minutes.
- Press the "PROG" button to enter program setting mode.
- Set the START TIME: Use "+" and "-" to adjust the hour and minute, pressing "PROG" to confirm each.
- Set the WATERING DURATION: Use "+" and "-" to adjust the duration (minutes/hours), pressing "PROG" to confirm.
- Set the WATERING FREQUENCY: Use "+" and "-" to select how often the timer should water (e.g., every 12 hours, every 24 hours, specific days). Press "PROG" to confirm.
- Once all settings are confirmed, the timer will display the next scheduled watering time.
3. Arrosage manuel
Arroser manuellement en dehors du programme :
- Appuyez sur le bouton « MANUEL ».
- Use "+" and "-" buttons to set the desired manual watering duration.
- Press "MANUAL" again to start manual watering. The timer will automatically stop after the set duration.
4. Pause Function (Rain Delay)
If it rains or you don't need to water for a few days, you can pause the program:
- Appuyez sur le bouton « DÉLAI ».
- Use "+" and "-" buttons to select the pause duration (24, 48, or 72 hours).
- Press "DELAY" again to confirm. The timer will resume its programmed schedule after the delay period.

Figure 3: Visual representation of the timer's main features, including flexible schedules, manual watering, and secure sealing.
Entretien
- Remplacement de la batterie : Remplacez les piles lorsque le témoin de batterie faible apparaît à l'écran afin d'assurer un fonctionnement continu.
- Nettoyage du filtre : Periodically check and clean the filter located in the inlet connector to prevent blockages and maintain water flow.
- Entreposage d'hiver : During freezing temperatures, remove the timer from the faucet, drain any remaining water, and store it indoors to prevent damage.
- Nettoyage général : Essuyez la minuterie avec un chiffon doux.amp chiffon. N'utilisez pas de nettoyants abrasifs ou de solvants.
Dépannage
| Problème | Cause possible | Solution |
|---|---|---|
| Le minuteur n'arrose pas. | Low batteries, incorrect program, faucet off, water pressure too low. | Check battery status and replace if needed. Verify program settings. Ensure faucet is fully open. Check water supply. |
| Fuite d'eau au niveau des raccords. | Loose connection, damaged gasket, missing gasket. | Tighten connections. Check and replace rubber gaskets if damaged or missing. |
| L'écran est vide ou sombre. | Piles mortes ou faibles. | Remplacez les piles par des piles alcalines AA neuves. |
Caractéristiques
- Numéro de modèle : AMZ622617EU
- Dimensions: 8.2 cm x 13.7 cm x 18.5 cm (Longueur x Largeur x Hauteur)
- Poids: 383.4 g
- Type de fil : Standard 1.9cm (3/4 inch) BSP
- Source d'alimentation : 2 piles alcalines AA (non incluses)
- Durée d'arrosage : 1 minute à 3 heures 59 minutes
- Fonction Pause : 24, 48 ou 72 heures
- Couleur: Gris, noir, bleu
- Pays d'origine : Chine
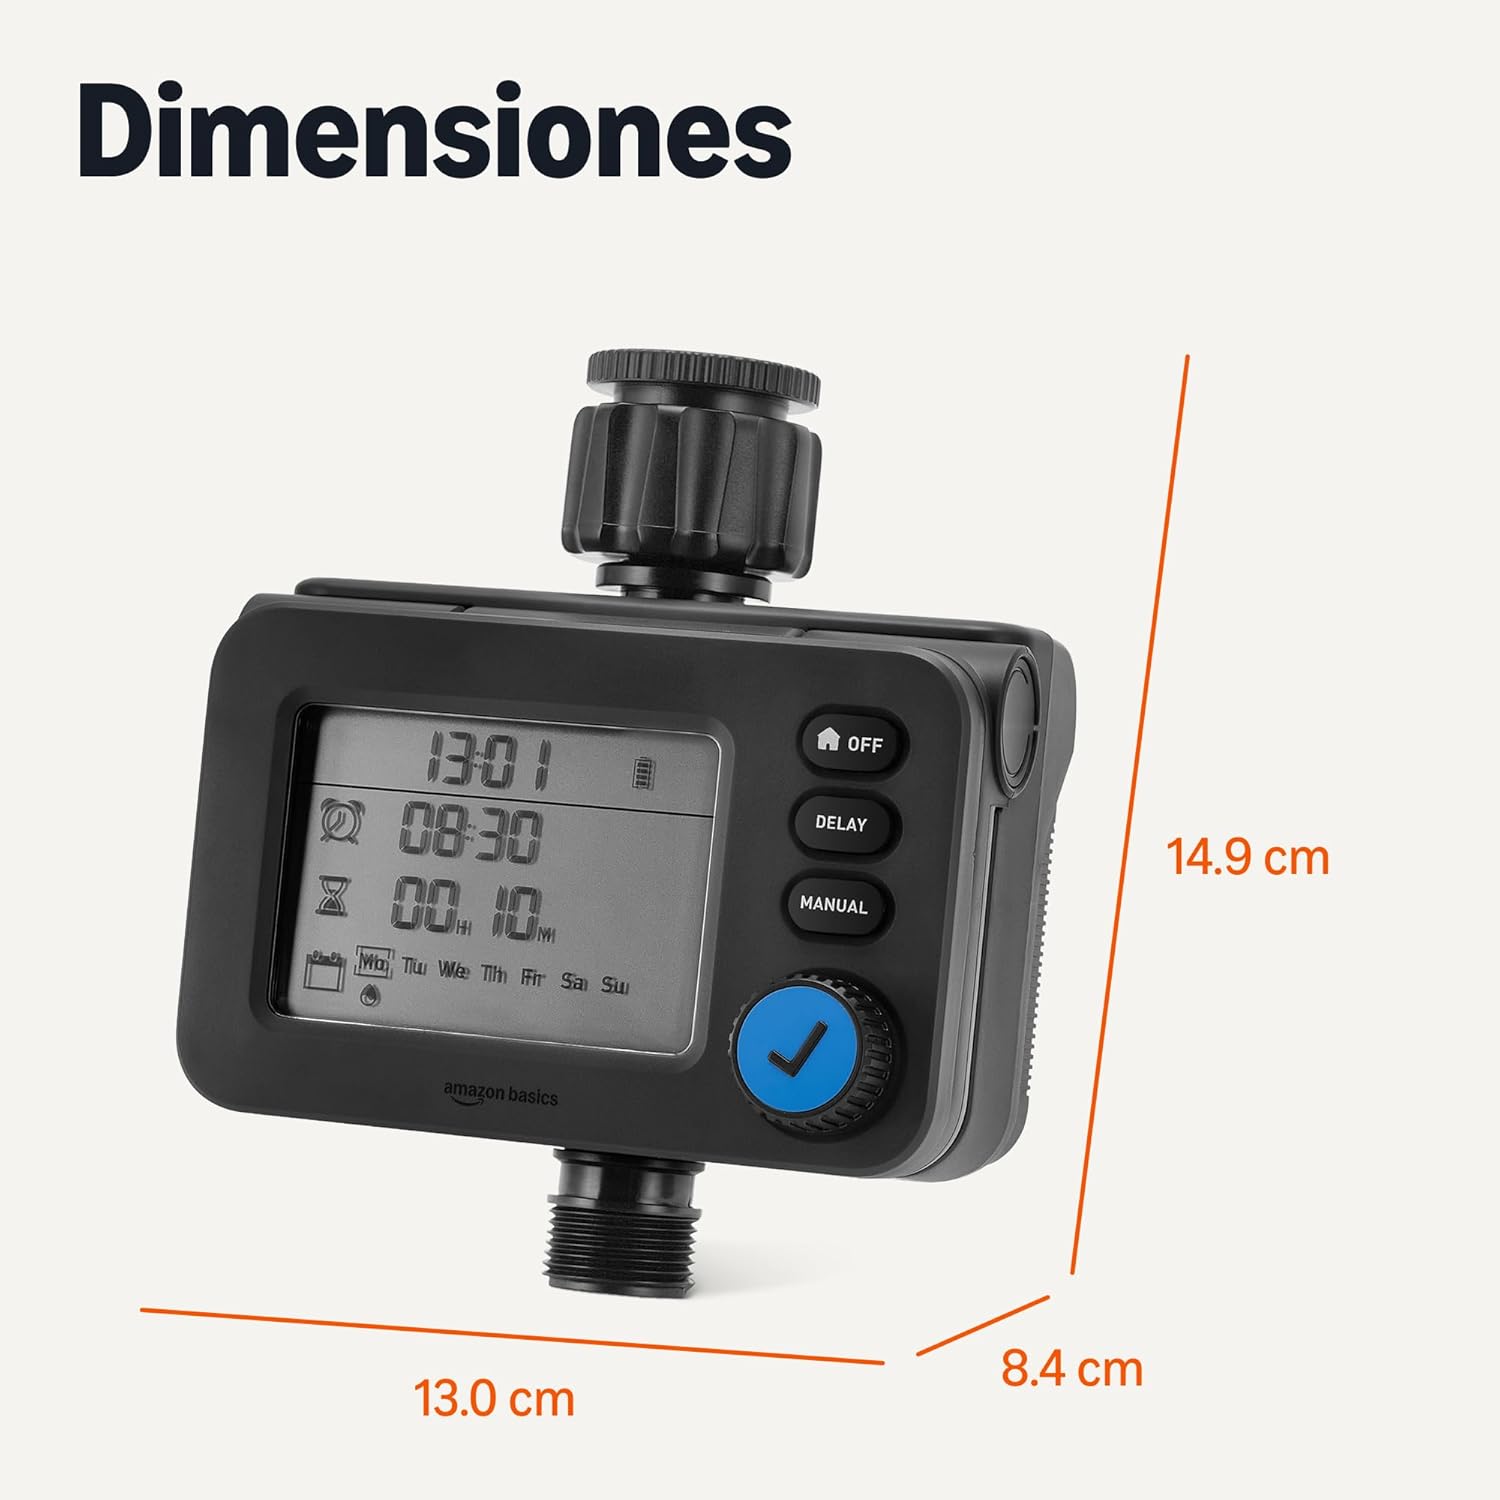
Figure 4 : Dimensions du produit pour la planification de l'installation.
Garantie et assistance
For warranty information and customer support, please refer to the documentation included with your purchase or visit the official Amazon Basics website.


