Introduction
Thank you for choosing the SmallRig CT25 Overhead Tripod. This versatile tripod (Model 5290) is designed to enhance your photography and videography experience, offering features like overhead shooting, monopod conversion, and support for multiple devices. This manual will guide you through the proper setup, operation, and maintenance to ensure optimal performance and longevity of your equipment.

Image: The SmallRig CT25 Overhead Tripod in its primary configuration, showcasing its ability to mount both a camera and a smartphone simultaneously on its horizontal arm.
1. Installation
1.1 Déballage et identification des composants
Carefully unpack all components from the packaging. Verify that all included items are present:
- Trépied × 1
- Sac de transport × 1
- Clé hexagonale × 3
- Overhead Shooting Attachment × 1
- Crochet × 1
- Mobile Phone Clip × 1
- Carte de garantie × 1

Image: A visual representation of the SmallRig CT25 tripod and its complete set of accessories, including the carry bag, hex wrenches, overhead attachment, hook, and mobile phone clip.
1.2 Basic Tripod Assembly
- Place the tripod on a stable, level surface.
- Extend the tripod legs by releasing the leg locks. Adjust the leg angles for desired stability.
- Extend the center column to the desired height. Secure all locks firmly.
- Attach your camera or other compatible device to the ball head's quick release plate. Ensure it is securely fastened.
1.3 Converting to Overhead Shooting Mode
The CT25 tripod features a horizontal center column for overhead shooting.
- Loosen the knob at the base of the center column.
- Press the button located at the base of the center column and pull the column upwards until it can be tilted.
- Tilt the center column 90 degrees to a horizontal position.
- Push the center column back down and secure the knob firmly to lock it in place.
- Attach your camera or smartphone to the end of the horizontal arm using the appropriate mount.

Image: Step-by-step visual guide on how to convert the tripod's center column from vertical to horizontal for overhead shooting, showing the button and rotation mechanism.
2. Mode d'emploi
2.1 Réglage de la hauteur
The 5-section legs and adjustable center column allow for a wide range of heights, from a minimum of 52.5 cm to a maximum of 164 cm.
- To adjust leg height: Release the twist locks on each leg section, extend or retract the legs, and then firmly tighten the twist locks.
- To adjust center column height: Loosen the center column lock, raise or lower the column, and then firmly tighten the lock.

Image: A visual scale demonstrating the various working heights of the tripod, ranging from its minimum height to its maximum extension of 164cm, with human silhouettes for context.
2.2 360° Panorama Shooting
The integrated ball head allows for smooth 360° panoramic rotation and tilt adjustments, providing flexibility for creative compositions.
- Loosen the panoramic lock knob on the ball head.
- Rotate your camera to the desired angle.
- Tighten the panoramic lock knob to secure the position.

Image: A camera mounted on the tripod's horizontal arm, illustrating its ability to rotate 360 degrees for panoramic photography against a scenic background.
2.3 Conversion de monopode
One of the tripod legs can be detached and converted into a monopod for increased portability and flexibility in tight spaces.
- Locate the leg with the foam grip.
- Twist the leg counter-clockwise to detach it from the tripod chassis.
- Unscrew the cap from the top of the detached leg.
- Attach the ball head (or a separate monopod head) to the top of the detached leg.
- Extend the monopod sections to your desired height and secure the twist locks.
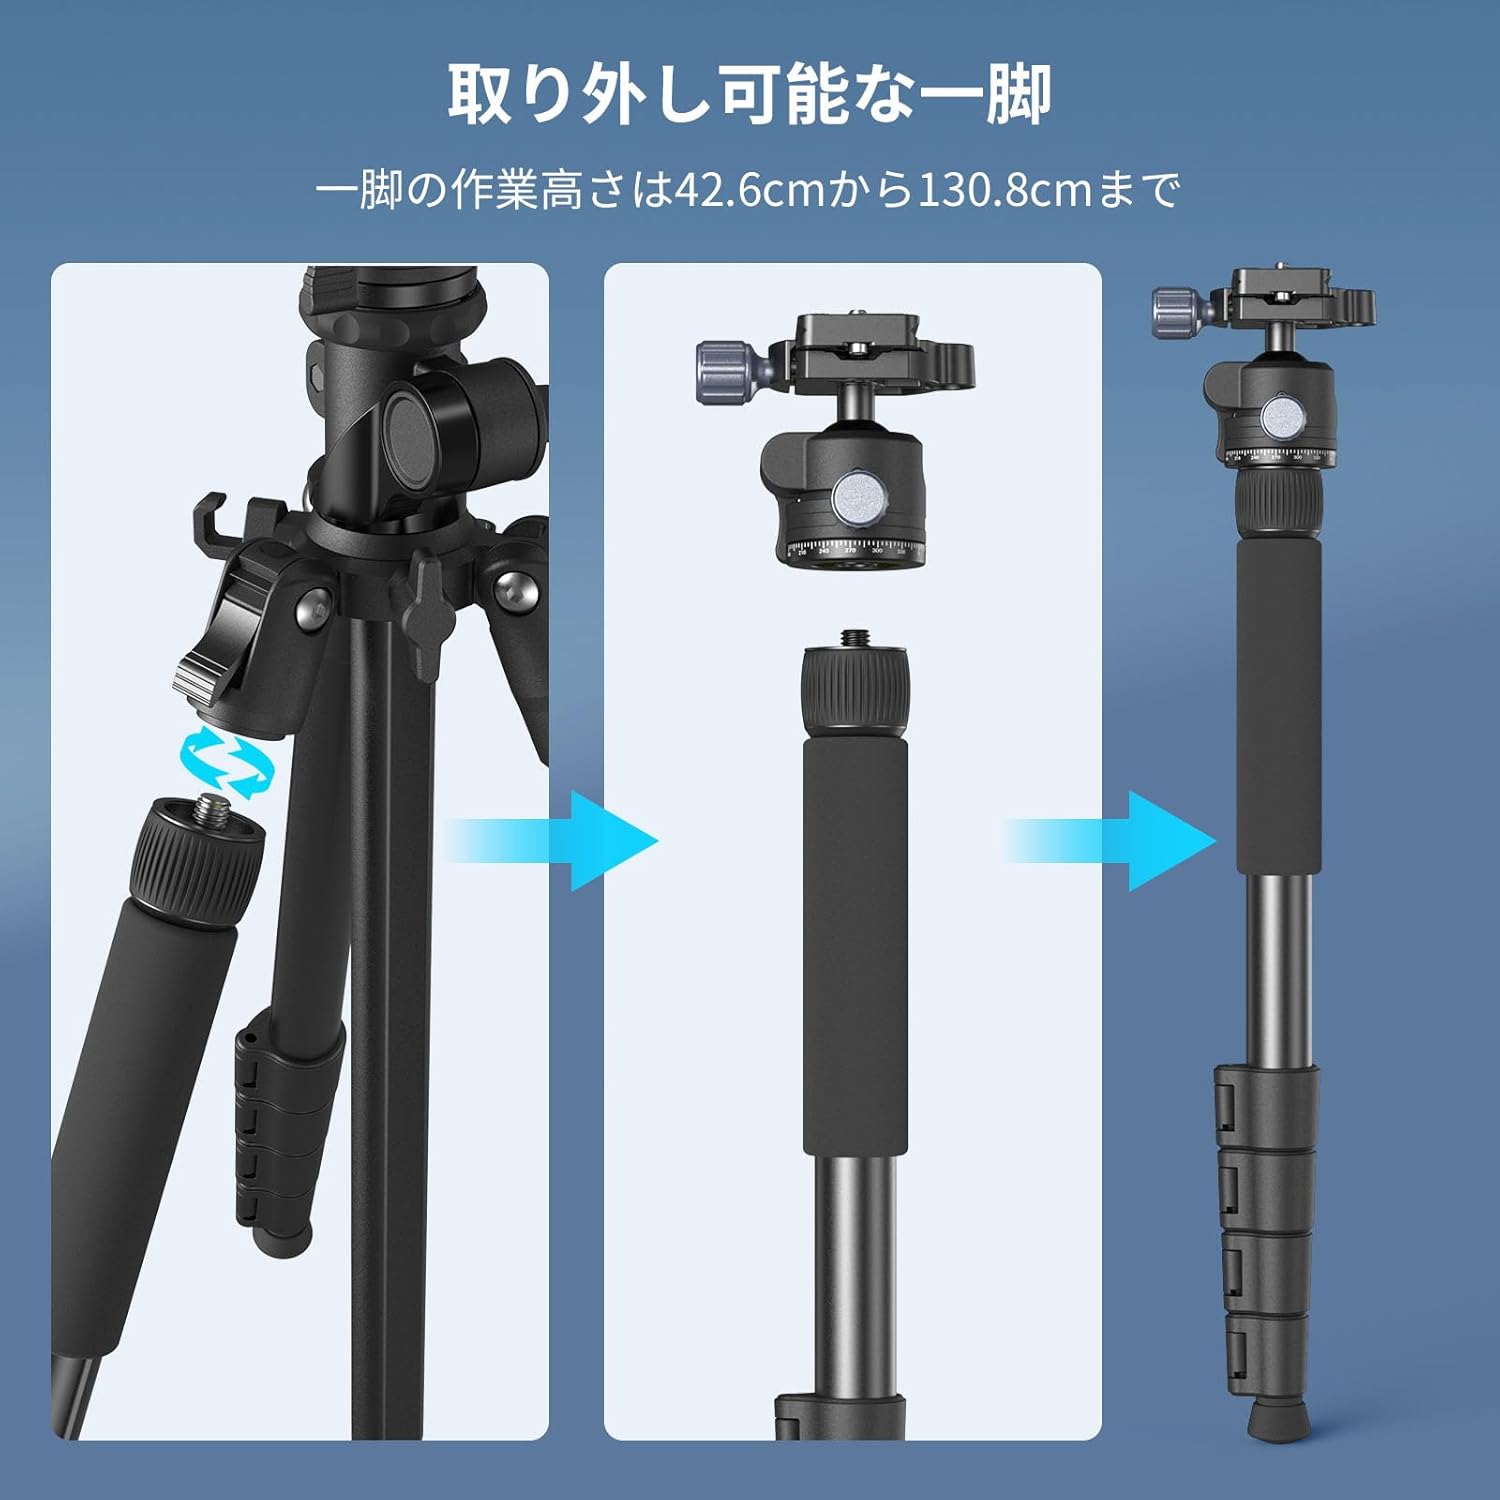
Image: A three-step illustration demonstrating the process of detaching one of the tripod legs, attaching the ball head, and forming a standalone monopod.
2.4 Dual Device Support
The horizontal arm allows for mounting two devices simultaneously, such as a camera and a smartphone, or a camera and an accessory light.
- Ensure the tripod is in overhead shooting mode (horizontal arm).
- Attach your primary camera to one end of the arm using the ball head.
- Use the included mobile phone clip or another accessory mount to attach a second device to the other end of the arm.
2.5 Fixation des accessoires
The tripod features 1/4"-20 threaded holes for attaching additional accessories like magic arms (e.g., SmallRig models 3874, 3959) or external lights.

Image: A user attaching an accessory light to the tripod's horizontal arm via a 1/4"-20 threaded hole, highlighting the versatility for expanding equipment.
2.6 Directives relatives à la capacité de charge
Adhering to the load capacity limits is crucial for stability and safety.
- Mode normal : Maximum load capacity is 5 kg.
- Mode aérien : Maximum load capacity is 3 kg.
- Crochet de contrepoids : The included hook can support up to 1 kg of counterweight to enhance stability, especially during overhead shooting.

Image: A visual breakdown of the tripod's maximum load capacity: 5kg in normal vertical mode and 3kg in horizontal overhead mode, with a note about the 1kg hook capacity.
3. Entretien
- Nettoyage: Essuyez le trépied avec un chiffon doux et sec après chaque utilisation. Pour les saletés tenaces, utilisez un chiffon légèrement plus sec.amp Nettoyer avec un chiffon et du savon doux, puis sécher soigneusement. Éviter les produits chimiques agressifs.
- Lubrification: Vérifiez régulièrement le bon fonctionnement des verrous de pieds et des pièces mobiles. Appliquez une petite quantité de lubrifiant à base de silicone si nécessaire, en évitant d'en mettre trop.
- Stockage: Store the tripod in its carry bag in a cool, dry place away from direct sunlight and extreme temperatures.
- Inspection: Regularly inspect all screws, knobs, and leg locks for tightness. Tighten any loose components using the provided hex wrenches.
4. Dépannage
4.1 Problèmes de stabilité
- Surface irrégulière : Ensure all tripod legs are fully extended and adjusted to match the terrain.
- Loose Locks: Verify that all leg locks and the center column lock are firmly tightened.
- Surcharge: Check that the total weight of your equipment does not exceed the specified load capacity for the current mode (5kg for normal, 3kg for overhead).
- Vibrations: For overhead shooting, attach a counterweight (up to 1kg) to the hook located at the bottom of the center column to improve stability.
4.2 Difficulty Adjusting Height/Angle
- Stiff Locks: Ensure all locking mechanisms are fully loosened before attempting to adjust. Do not force adjustments.
- Center Column Rotation: Remember to press the button at the base of the center column before attempting to tilt it for overhead mode.
5. Spécifications
| Fonctionnalité | Détail |
|---|---|
| Marque | Petit Rig |
| Numéro de modèle | 5290 |
| Matériel | Alliage d'aluminium, ABS |
| Poids de l'article | 1.6 kg (1600 grammes) |
| Hauteur maximale | 164 cm |
| Hauteur minimale | 52.5 cm |
| Taille pliée | 52.5 cm |
| Sections de jambe | 5 |
| Load Capacity (Normal Mode) | 5 kg |
| Load Capacity (Overhead Mode) | 3 kg |
| Counterweight Hook Capacity | 1 kg |
| Type de tête | Ball head with pan handle |
| Appareils compatibles | Camera, Video Camera, Microphone, Monitor, Smartphone |
6. Informations sur la garantie
Specific warranty details for the SmallRig CT25 Overhead Tripod are typically provided with the product packaging, often on a dedicated warranty card. Please refer to the included "Warranty Card" for information regarding warranty period, coverage, and claims process.
For further inquiries, please contact SmallRig customer support.
7. Assistance clientèle
If you encounter any issues or have questions regarding your SmallRig CT25 Overhead Tripod that are not covered in this manual, please contact SmallRig customer support through their official weble site ou le détaillant où vous avez acheté le produit.
Ressources en ligne : For additional tips, tutorials, and product information, visit the official SmallRig website: www.smallrig.com


