1. Introduction
Thank you for choosing the Novodesk AZ5130 6-in-1 Automatic Vacuum Sealer Machine. This manual provides essential information for the safe and efficient operation, maintenance, and troubleshooting of your new appliance. Please read these instructions thoroughly before first use and retain them for future reference.

Image 1.1: The Novodesk AZ5130 Vacuum Sealer in operation, sealing food for preservation.
2. Consignes de sécurité importantes
Lors de l'utilisation d'appareils électriques, des précautions de sécurité de base doivent toujours être respectées pour réduire les risques d'incendie, de choc électrique et de blessures corporelles, notamment les suivantes :
- Lisez toutes les instructions avant d’utiliser cet appareil.
- Do not operate the appliance with a damaged power cord or plug. If the cord or plug is damaged, contact customer support for assistance.
- Ne plongez pas l'appareil, le cordon d'alimentation ou la prise dans l'eau ou tout autre liquide.
- Cet appareil n'est pas destiné à être utilisé par des personnes (y compris les enfants) ayant des capacités physiques, sensorielles ou mentales réduites, ou manquant d'expérience et de connaissances, à moins qu'elles ne bénéficient d'une surveillance ou d'instructions concernant l'utilisation de l'appareil par une personne responsable de leur sécurité.
- Une surveillance étroite est nécessaire lorsqu’un appareil est utilisé par ou à proximité d’enfants.
- Débranchez l'appareil de la prise lorsqu'il n'est pas utilisé et avant de le nettoyer. Laissez-le refroidir avant d'ajouter ou de retirer des pièces et avant de le nettoyer.
- N'utilisez pas d'accessoires non recommandés par le fabricant.
- Ne pas utiliser à l'extérieur.
- Ne pas placer sur ou à proximité d'un brûleur à gaz ou électrique chaud, ni dans un four chaud.
- Vérifiez toujours que le couvercle est correctement verrouillé avant utilisation.
- Use only vacuum sealer bags designed for vacuum sealing.
3. Contenu du colis
Carefully unpack your Novodesk AZ5130 Vacuum Sealer and check that all items are present and in good condition. If any items are missing or damaged, please contact customer support.
- 1 x Novodesk AZ5130 Vacuum Sealer Machine
- 1 x Power Cord
- 1 x Vacuum Hose (for external vacuuming)
- 2 x Sealing Foam Gaskets (replacement)
- 6 x Pre-cut Vacuum Bags (3.9" x 7.8")
- 6 x Pre-cut Vacuum Bags (7.8" x 11.8")

Image 3.1: All components included in the Novodesk AZ5130 Vacuum Sealer package.
4. Produit terminéview
Familiarize yourself with the various parts and functions of your vacuum sealer.

Image 4.1: Control panel and function buttons of the vacuum sealer.
Fonctions du panneau de contrôle :
- Process Indicator Light: Illuminates to show operating status.
- Mode de séchage: For vacuum sealing dry foods like nuts and grains.
- Mode humide : For vacuum sealing foods with a small amount of liquid.
- Fonction d'impulsion : Allows manual control of the vacuum process, ideal for fragile foods.
- Seal Function: Seals bags without vacuuming.
- Bouton d'arrêt: Arrête l'opération en cours.
Image 4.2: Internal components of the vacuum sealer.
Composants clés :
- Chambre à vide : Zone où l'air est extrait du sac.
- Silicone Strip: Helps create a tight seal.
- Bande d'étanchéité : Heats to create the bag seal (4mm wide).
- Foam Seal Ring: Ensures proper vacuum.
- Cover Slaps: Prevents the vacuum bag from coming out of the vacuum chamber.
- External Sliding Cutter: Coupe-sacs intégré pour sacs de tailles personnalisées.
- External VAC Port: For connecting the vacuum hose to jars and containers.
5. Installation
Avant la première utilisation, assurez-vous que l'appareil est propre et sec. Placez la machine sous vide sur une surface plane et stable.
Étapes de configuration initiale :
- Connect the power cord to the appliance and then to a suitable electrical outlet.
- Prepare your vacuum bag with food, ensuring the open end is clean and dry. Leave at least 2-3 inches of space between the food and the top of the bag.
6. Mode d'emploi
6.1. Basic Vacuum Sealing (Dry & Moist Modes)
Follow these steps for standard vacuum sealing of food bags:
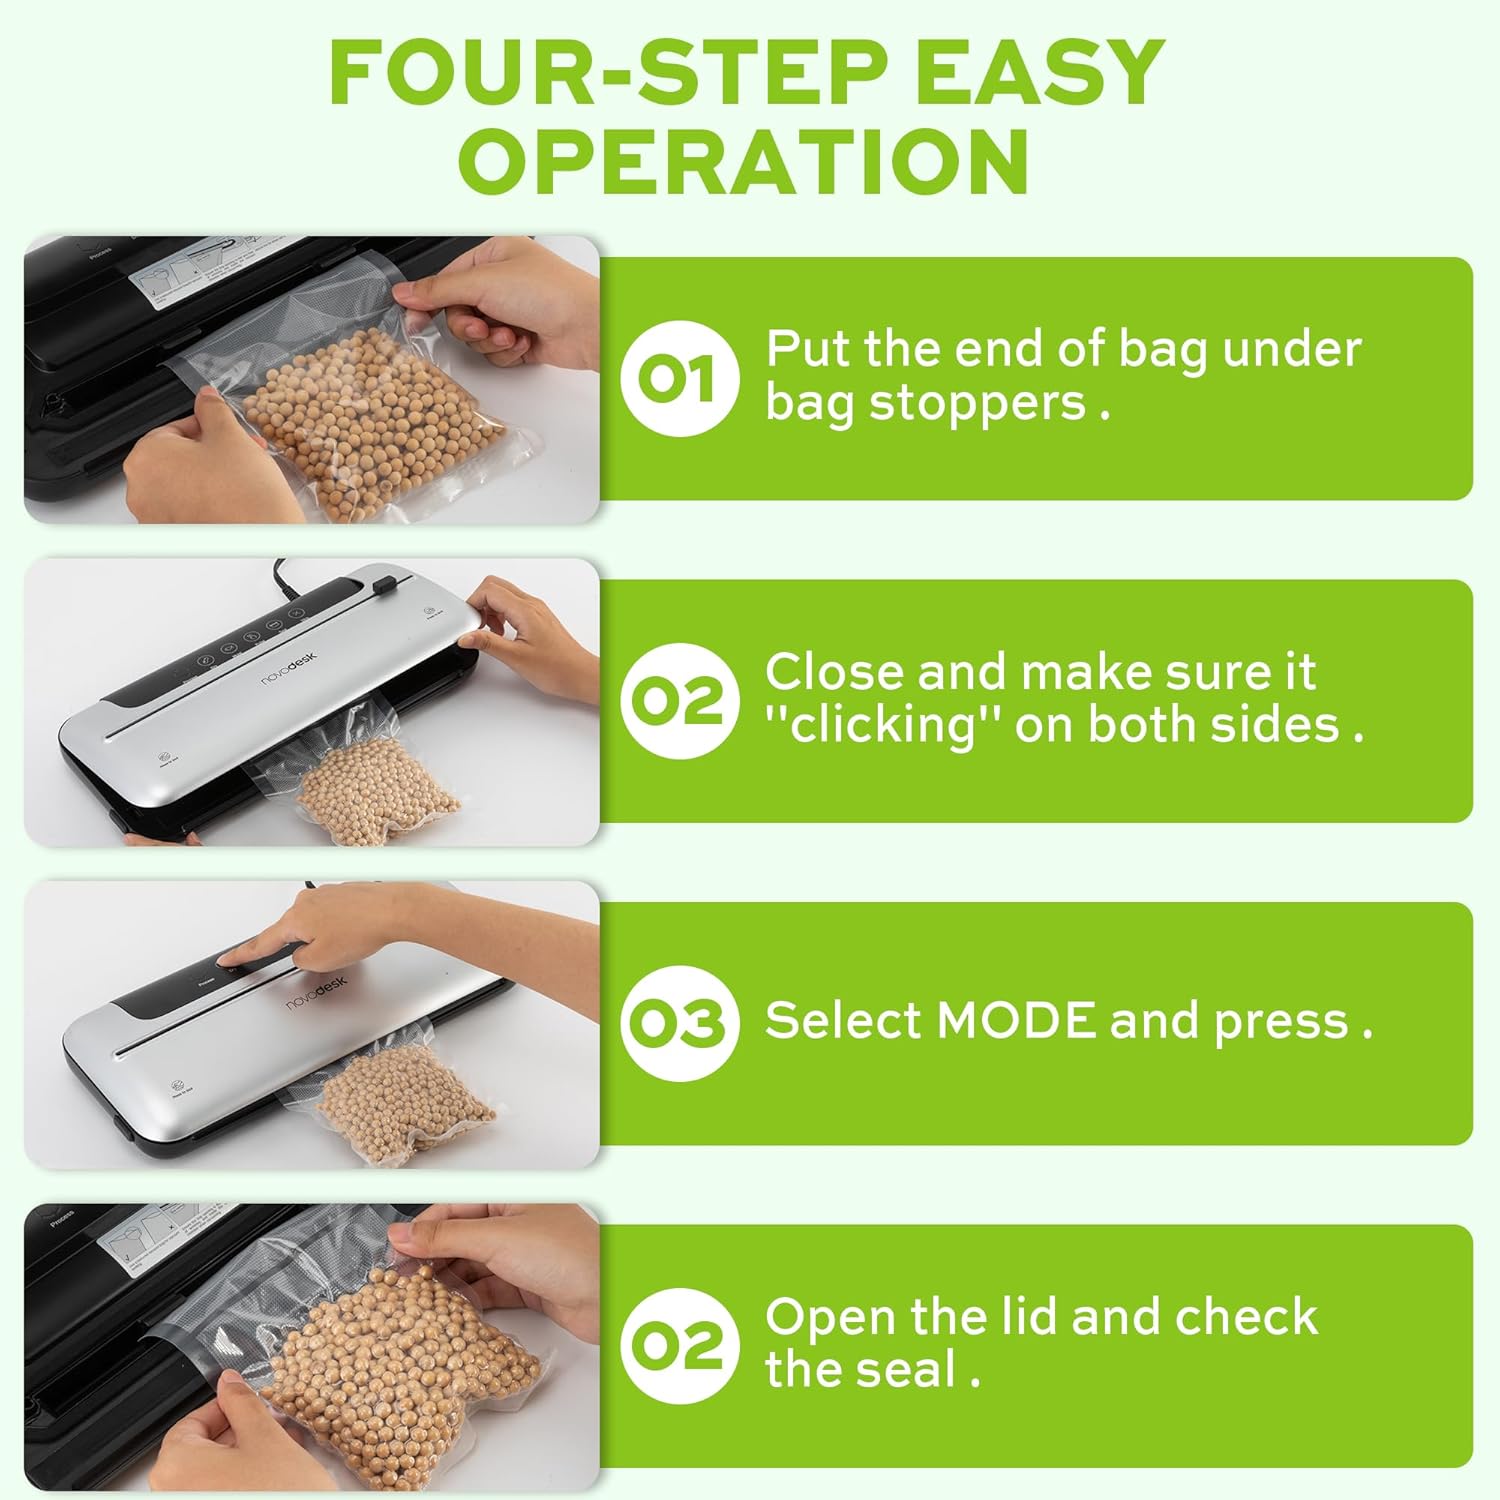
Image 6.1: Four-step easy operation for vacuum sealing.
- Préparez le sac : Place the open end of the vacuum bag under the bag stoppers, ensuring it is flat and centered within the vacuum chamber.
- Ferme la couverture: Firmly close the lid of the vacuum sealer. Press down on both sides until you hear a "clicking" sound, indicating that the lid is securely latched.
- Sélectionnez le mode: Choose the appropriate mode for your food:
- Appuyez sur le Sec button for dry foods.
- Appuyez sur le Humide button for moist foods.
- Vérifiez le sceau : Once the process is complete and the indicator light turns off, open the lid and remove the sealed bag. Inspect the seal to ensure it is airtight.
6.2. Fonction d'impulsion
The Pulse function provides manual control over the vacuum process, which is ideal for delicate or fragile foods that could be crushed by full vacuum pressure.
- Follow steps 1 and 2 from "6.1. Basic Vacuum Sealing".
- Appuyez et maintenez enfoncé le Impulsion button. The machine will begin to vacuum.
- Relâchez le Impulsion button when the desired vacuum level is reached.
- Appuyez sur le Joint bouton pour fermer le sac.
- Ouvrez le couvercle et retirez le sachet scellé.
6.3. Fonction d'étanchéité uniquement
Use the Seal function to create a seal without vacuuming, useful for making custom-sized bags from a roll or resealing snack bags.
- Placez l'extrémité ouverte du sac sur la bande de fermeture.
- Fermez fermement le couvercle jusqu'à entendre un clic.
- Appuyez sur le Joint button. The machine will heat and seal the bag.
- Une fois le processus de scellage terminé, ouvrez le couvercle et retirez le sachet scellé.
6.4. External Vacuum Function (for Jars/Containers)
Your vacuum sealer includes an external vacuum hose for use with compatible vacuum-sealable jars, containers, and wine stoppers.

Image 6.2: Using the external vacuum system with various containers.
- Prepare your vacuum-sealable jar or container with food. Ensure the lid is properly placed.
- Insert one end of the vacuum hose into the external VAC port on the vacuum sealer.
- Insert the other end of the vacuum hose into the port on your vacuum-sealable jar or container.
- Close the lid of the vacuum sealer (no bag needed inside).
- Appuyez sur le CA externe button (if available, otherwise use Dry/Moist mode to activate vacuum pump). The machine will begin to remove air from the container.
- Once the vacuum process is complete, remove the hose. The container should now be sealed.
6.5. Using the External Sliding Cutter
The integrated sliding cutter allows you to create custom-sized bags from a roll of vacuum sealer material.
- Place the vacuum bag roll across the cutting area.
- Slide the cutter blade across the bag material to achieve the desired length.
7. Entretien et nettoyage
Un nettoyage et un entretien réguliers garantiront la longévité et les performances optimales de votre machine sous vide.
Instructions de nettoyage :
- Débranchez toujours l’appareil avant de le nettoyer.
- Essuyez l'extérieur de la machine avec un chiffon doux.amp chiffon. N'utilisez pas de nettoyants abrasifs ou de solvants.
- Nettoyez la chambre à vide et la zone du joint d'étanchéité avec un produit nettoyant pour vitres.amp Chiffon. S'assurer qu'il ne reste aucun résidu alimentaire ni liquide.
- The foam seal rings can be removed for cleaning if necessary. Wash with mild soap and water, rinse thoroughly, and allow to air dry completely before reinserting.
- Assurez-vous que toutes les pièces soient parfaitement sèches avant de ranger ou de réutiliser l'appareil.
Stockage:
Store the vacuum sealer in a clean, dry place. For best results, store with the lid unlatched to prevent compression of the foam seal rings, which can affect sealing performance over time.
8. Dépannage
Si vous rencontrez des problèmes avec votre machine sous vide, consultez les problèmes et solutions courants suivants :
| Problème | Cause possible | Solution |
|---|---|---|
| La machine ne s'allume pas. | Pas d'alimentation électrique. | Vérifiez que le cordon d'alimentation est bien branché à la prise et à l'appareil. Testez la prise avec un autre appareil. |
| La machine aspire le vide mais ne ferme pas hermétiquement. | Sealing strip or foam gasket is dirty/damaged. Bag is not positioned correctly. | Clean the sealing strip and foam gaskets. Ensure the bag is flat and centered over the sealing strip. Replace gaskets if damaged. |
| La machine assure l'étanchéité mais ne fait pas le vide. | Lid not properly latched. Foam gaskets are dirty or worn. Bag has holes or is not suitable. | Ensure the lid is firmly closed and latched on both sides. Clean or replace foam gaskets. Use proper vacuum sealer bags and check for damage. |
| Le vide est faible ou irrégulier. | Foam gaskets are dirty or worn. Too much liquid in the bag (for Dry mode). | Clean or replace foam gaskets. Use Moist mode for foods with liquid, or pre-freeze liquids. |
| Le sac fond lors de la fermeture. | Sealing time too long (unlikely for automatic models). | Ensure you are using appropriate vacuum sealer bags. If issue persists, contact customer support. |
If the problem persists after attempting these solutions, please contact Novodesk customer support for further assistance.
9. Spécifications
| Marque | Novodesk |
| Numéro de modèle | AZ5130 |
| Puissance / Eautage | 120 watts |
| Voltage | 120V |
| Matériel | Acrylonitrile butadiène styrène (ABS) |
| Poids de l'article | 980 g (2.16 livres) |
| Couleur | Argenté |
| Mode de fonctionnement | Automatique |
| Puissance d'aspiration maximale | 75 kPa |
| Largeur de la bande d'étanchéité | 4 mm |
10. Garantie et assistance
Novodesk products are manufactured to high-quality standards. For information regarding warranty coverage, product support, or to purchase replacement parts, please refer to the warranty card included with your product or visit the official Novodesk website. If you have any questions or require assistance, please contact Novodesk customer service.

