1. Introduction
This instruction manual provides essential information for the safe and efficient operation, maintenance, and troubleshooting of your 3i P10 Ultra Robot Vacuum and Mop Combo. Please read this manual thoroughly before using the product and retain it for future reference.
2. Consignes de sécurité
Respectez toujours les consignes de sécurité de base lors de l'utilisation d'appareils électriques afin de réduire les risques d'incendie, d'électrocution ou de blessure. Cet appareil est destiné à un usage domestique uniquement.
- Ne laissez pas les enfants utiliser le robot. Surveillez les enfants et les animaux domestiques lorsque le robot est en marche.
- Assurer la puissance voltage correspond à l'étiquette de puissance sur la station de charge.
- N’utilisez pas le robot sur des surfaces humides ou dans des zones où l’eau stagne.
- Avant le nettoyage, retirez les câbles non fixés, les petits objets et les objets fragiles de la zone concernée.
- Do not use the robot to pick up large or sharp objects, flammable materials, or liquids.
- Only use manufacturer-specified accessories and replacement parts.
- Si le cordon d'alimentation est endommagé, il doit être remplacé par le fabricant ou un agent de service qualifié pour éviter tout danger.
3. Produit terminéview
3.1 Composants inclus
Le forfait comprend les éléments suivants :
- 1 x aspirateur robot
- 1 x station de base
- 2 x lingettes de nettoyage
- 2 x Pinceaux latéraux
- 1 x 800ml Cleaning Solution
- 1 base amovible.
- 1 x Power Cord
- 1 x Manuel d'utilisation
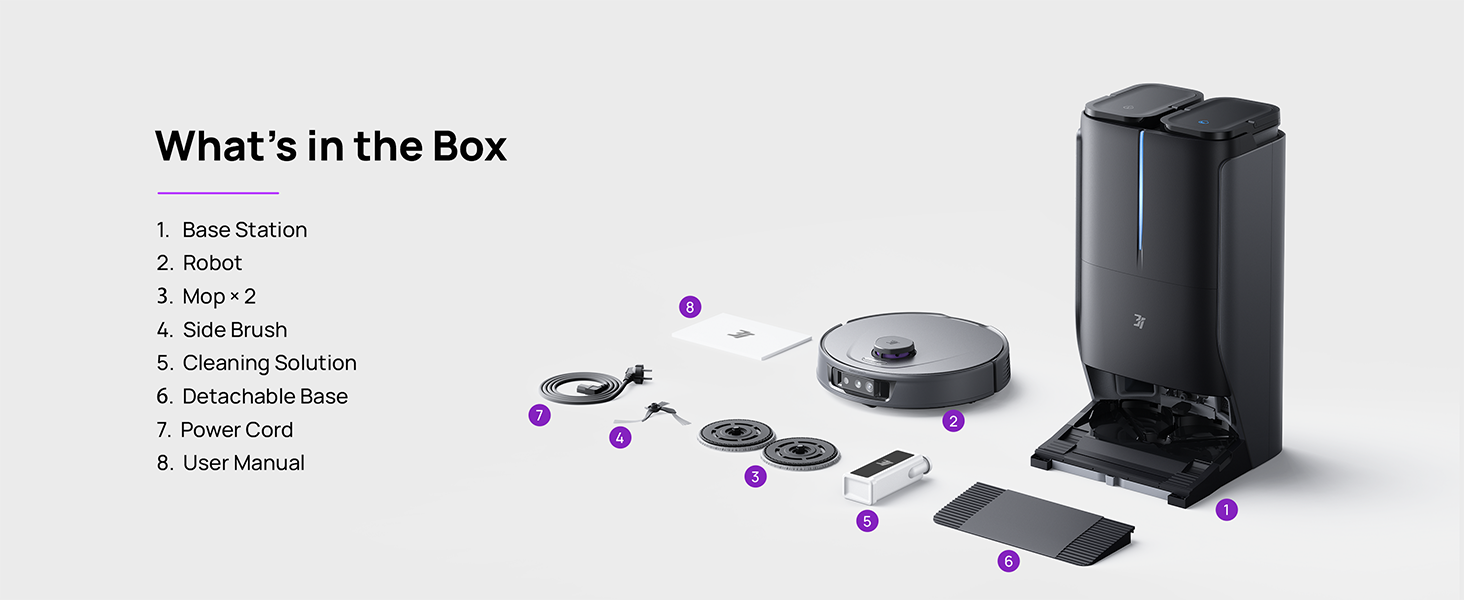
Figure 3.1: Contents of the 3i P10 Ultra package.
3.2 Robot Vacuum Features
- UltraReach Mop: The auto-extending mop system cleans edges and corners thoroughly. Dual mops spin at 220 RPM for effective stain removal.
- Aspiration de 10 000 Pa : Provides powerful suction for deep cleaning on various floor types, including carpets and hard floors. Features smart carpet detection to boost suction and lift mops.
- All-in-One Automated Station: Offers automatic hot-water mop washing, hot air drying, solution adding, and hands-free dust collection for up to 70 days.
- Navigation avancée : Utilizes LiDAR for 3D mapping, dual 3D structured light, and an AI camera for obstacle avoidance, threshold crossing, and collision resistance.
- AI-Powered DirtScan: Identifies over 100 household objects and messes, adapting cleaning methods for optimal results, even in low light conditions.
- Gestion des cheveux : Equipped with anti-tangle brushes and a TangleCut blade to prevent hair from wrapping around components.
- Smart Route Planning: Learns home layouts for efficient cleaning routes. Supports scheduled cleaning, no-go zones, and app control. Compatible with Alexa and Google Assistant.
- Connectivité Wi-Fi : Supports both 2.4G and 5G Wi-Fi networks.

Figure 3.2 : Haut view of the 3i P10 Ultra Robot Vacuum.

Figure 3.3: The 3i P10 Ultra Base Station.
4. Installation
4.1 Déballage et placement
- Retirez soigneusement tous les composants de l'emballage.
- Choose a suitable location for the base station. Ensure it is placed against a wall, on a hard, level surface, with at least 0.5 meters (1.6 feet) of clear space on both sides and 1.5 meters (4.9 feet) in front. Avoid areas with direct sunlight or strong Wi-Fi interference.
- Branchez le cordon d'alimentation à la station de base et branchez-la à une prise de courant.
4.2 Préparation du robot
- Install the side brushes by pressing them into their slots until they click.
- Attach the mop pads to the mop holders on the robot.
- Place the robot onto the base station to charge. Ensure the charging contacts align. The robot will announce its charging status.
4.3 Installation et connexion de l'application
- Download the 3i app from your mobile device's app store (iOS or Android).
- Open the app and follow the on-screen instructions to create an account and add your 3i P10 Ultra robot.
- Ensure your phone is connected to a 2.4GHz or 5GHz Wi-Fi network during the pairing process.
5. Mode d'emploi
5.1 Nettoyage et cartographie initiaux
For the first use, allow the robot to complete a full cleaning cycle to create a map of your home. This map is crucial for advanced features.

Figure 5.1: Precision 3D Mapping in the 3i App.
5.2 Démarrage d'un cycle de nettoyage
- Via Robot : Appuyez une fois sur le bouton marche/arrêt du robot pour démarrer ou interrompre le nettoyage.
- Via l'application : Open the 3i app, select the desired cleaning mode (Vacuum, Mop, Vac & Mop, AI Auto, Custom), and tap 'Start'.
- Par commande vocale : Use compatible voice assistants (Alexa, Google Assistant) with commands like "Hey Google, start vacuuming."

Figure 5.2: Using voice control to operate the 3i P10 Ultra.
5.3 Fonctionnalités de l'application
The 3i app provides extensive control and customization options:
- Paramètres de nettoyage : Schedule cleaning, select rooms, set no-go zones, customize carpet cleaning.
- Paramètres de la carte : View 3D maps, quick mapping, multi-floor maps, edit rooms and furniture.
- Station Settings: Customize dust collection, mop washing, auto-drying, and TangleCut.
- Autres réglages: Do Not Disturb mode, Smart Route Planning, Pet Recognition, Child Lock.
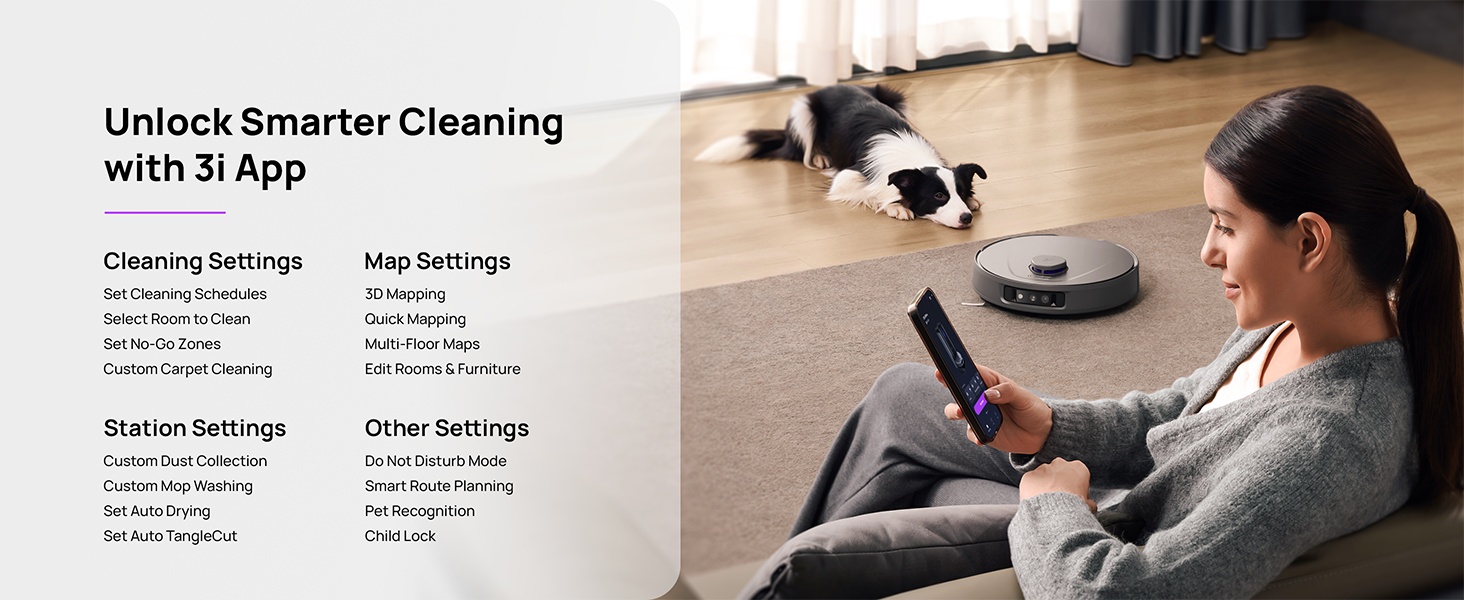
Figure 5.3: The 3i App interface for smart cleaning.
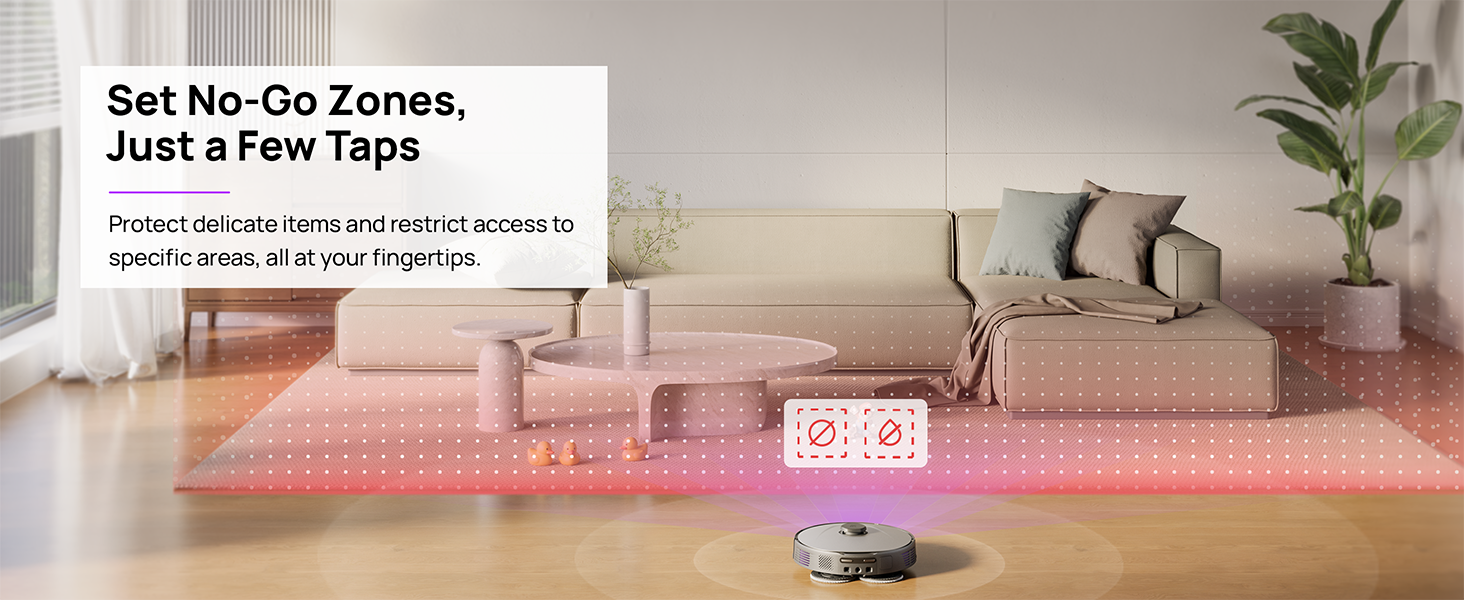
Figure 5.4: Setting No-Go Zones in the 3i App.
6. Entretien
Regular maintenance ensures optimal performance and extends the lifespan of your 3i P10 Ultra.
6.1 Maintenance des stations de base
- Vider la poubelle : The base station automatically empties the robot's dustbin into a 3L bag. Replace the dust bag approximately every 70 days, or as indicated by the app.
- Lavage et séchage des serpillières : The base station automatically washes mop pads with 140°F / 60°C hot water and dries them with hot air (131°F / 55°C) after each cleaning cycle. Ensure the clean and dirty water tanks are properly installed.
- Remplissage du réservoir d'eau : The extra-large 4L clean water tank automatically refills the robot. Refill the clean water tank as needed. The base station also collects dirty water into a separate wastewater tank. Empty the wastewater tank regularly.
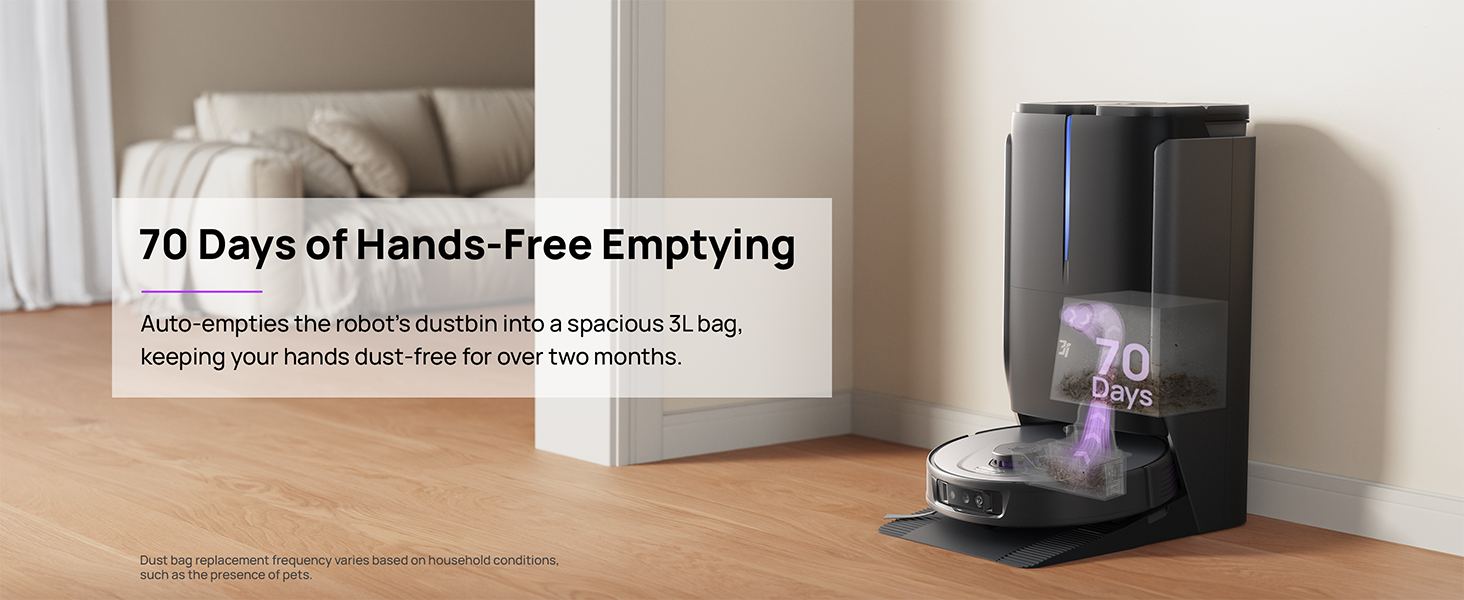
Figure 6.1: Automatic dustbin emptying at the base station.
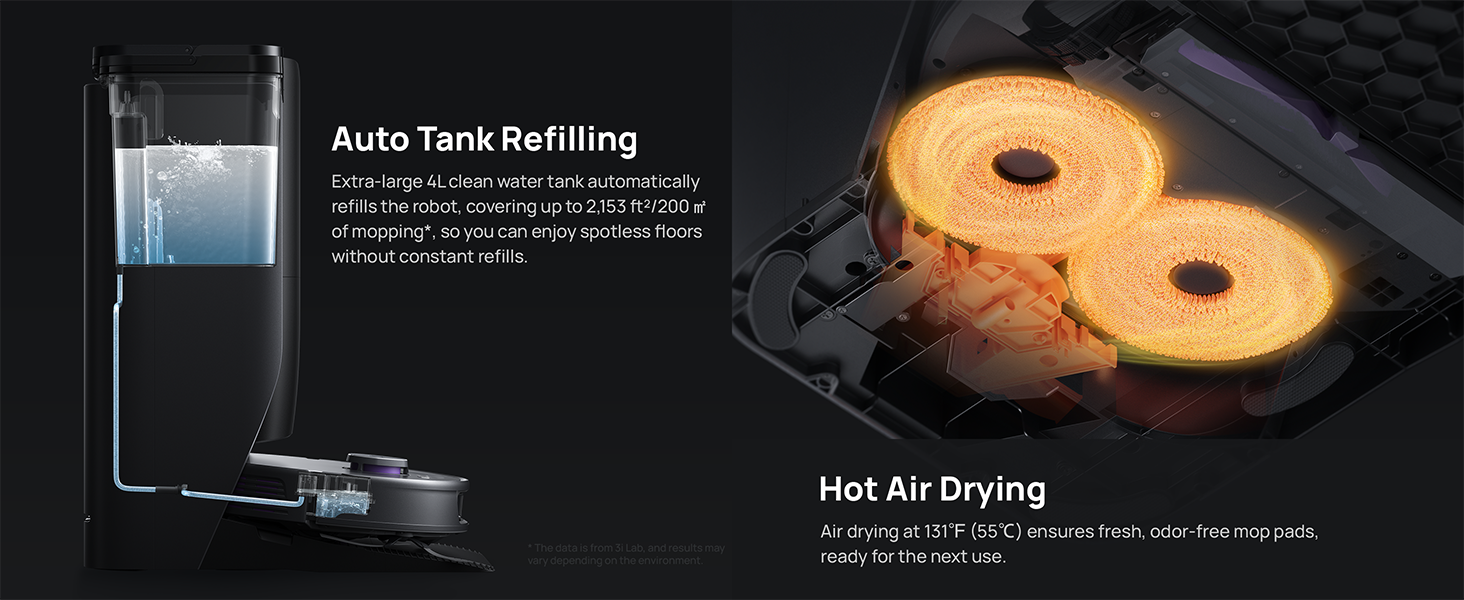
Figure 6.2: Auto tank refilling and hot air drying process.
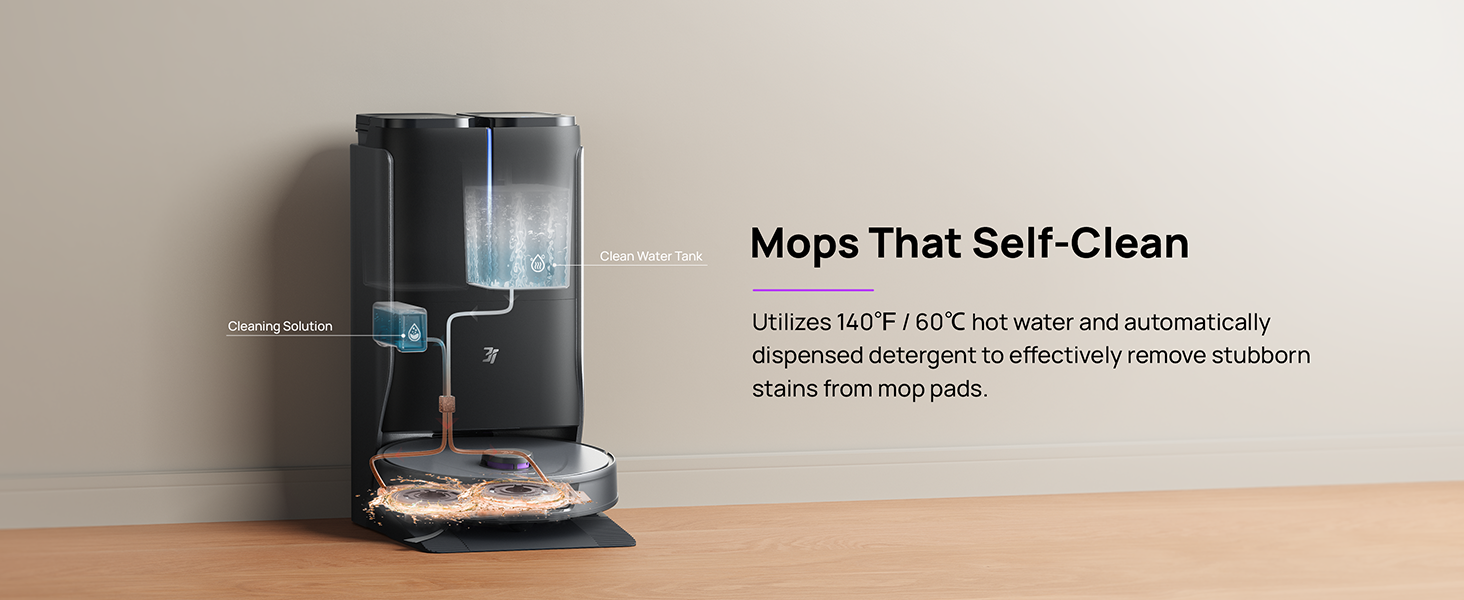
Figure 6.3: Mop self-cleaning function.
6.2 Maintenance des composants du robot
- Brosse principale : Regularly check the main brush for tangled hair or debris. Use the cleaning tool provided to remove any obstructions. The TangleCut blade helps prevent excessive tangling.
- Brosses latérales : Inspect side brushes for wear or damage. Clean them periodically and replace if necessary.
- Tampons de nettoyage : Although self-cleaned, inspect mop pads for excessive wear or stubborn stains. Replace them when their cleaning effectiveness diminishes.
- Filtre: The filter is washable. Remove and rinse it under running water. Allow it to air dry completely before reinstalling.
- Capteurs: Wipe all sensors (LDS, anti-drop, wall-following, charging contacts) with a clean, dry cloth to ensure proper function.
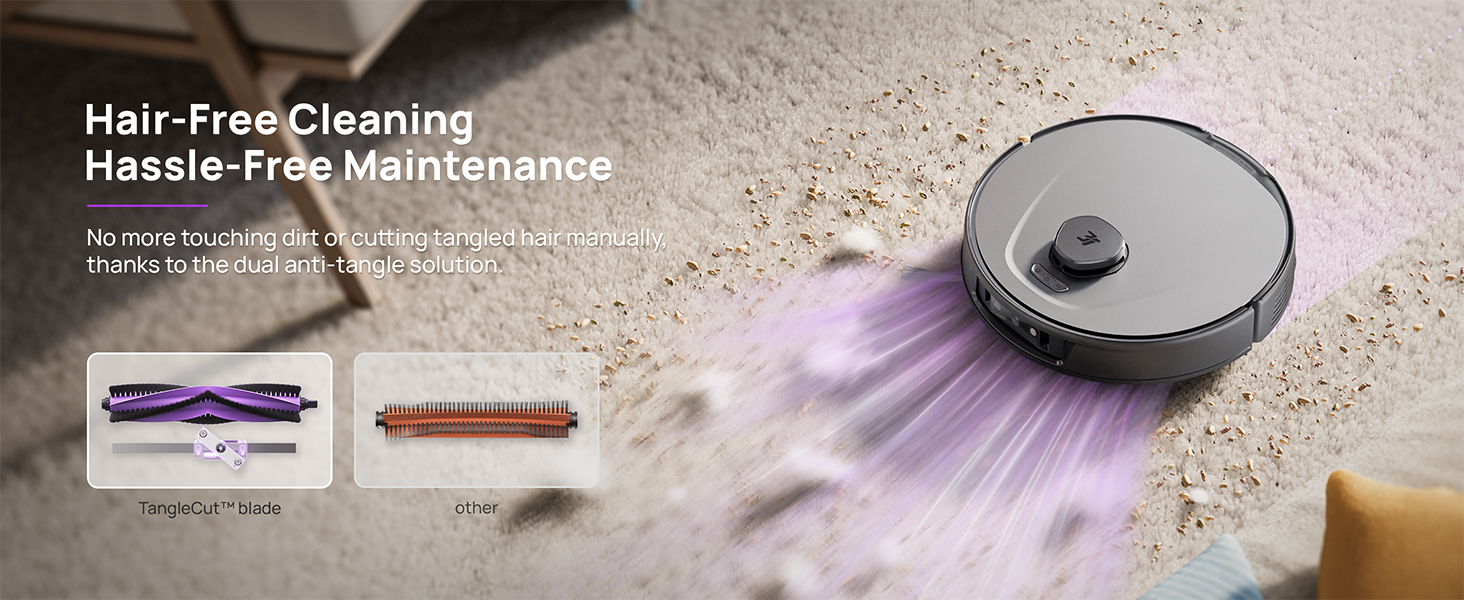
Figure 6.4: Hair-free cleaning with anti-tangle design.
7. Dépannage
If you encounter issues with your 3i P10 Ultra, refer to the following common problems and solutions:
| Problème | Cause possible | Solution |
|---|---|---|
| Le robot ne s'allume pas. | Batterie faible ; le bouton d'alimentation n'est pas enfoncé correctement. | Place robot on charging dock; Press and hold power button for 3 seconds. |
| Le robot ne trouve pas sa station de charge. | Dock is obstructed or too far; Poor Wi-Fi signal. | Ensure dock is in an open area; Check Wi-Fi connection. |
| Les performances de nettoyage sont médiocres. | Poubelle pleine ; brosses emmêlées ; filtre obstrué ; lingettes de la serpillière sales. | Vider la poubelle ; Nettoyer les brosses ; Nettoyer/remplacer le filtre ; Nettoyer/remplacer les lingettes de la serpillière. |
| Le robot se bloque fréquemment. | Obstacles au sol ; capteurs sales. | Clear floor of obstacles; Clean all sensors. |
| Problèmes de connexion à l'application. | Mot de passe Wi-Fi incorrect ; problèmes de routeur ; robot hors ligne. | Verify Wi-Fi password; Restart router; Restart robot; Re-pair device in app. |
For further assistance, please refer to the 3i app's help section or contact customer support.
8. Spécifications
| Fonctionnalité | Détail |
|---|---|
| Marque | 3i |
| Nom du modèle | Aspirateur robot 3i P10 Ultra |
| Dimensions du produit (robot) | 13.78"L x 13.78"l x 3.94"H |
| Dimensions du produit (station) | 12.2"L x 18.43"l x 23.39"H |
| Poids de l'article | 37.3 livres |
| Autonomie de la batterie | 180 minutes |
| Type de filtre | Lavable |
| Recommandation de surface | Carpet, Marble, Wood, Tile |
| Puissance d'aspiration | 18,000 Pa |
| Système de navigation | LDS LiDAR, Dual 3D Structured Light, AI Camera |
| Prise en charge du Wi-Fi | 2.4G et 5G |

Figure 8.1: Dimensions of the 3i P10 Ultra Robot and Base Station.
9. Garantie et assistance
For warranty information, please refer to the warranty card included with your product or visit the official 3i website. For technical support, troubleshooting beyond this manual, or to inquire about replacement parts, please contact 3i customer service through the contact information provided on their official website or within the 3i app.