1. Introduction
Thank you for choosing the FLYLINKTECH 5000A Jump Starter. This portable device is designed to provide instant power to jump-start 12V vehicles, charge electronic devices, and offer emergency lighting. Please read this manual thoroughly before use to ensure safe and optimal performance.
2. Informations importantes sur la sécurité
- Assurez-vous toujours que le démarreur électrique est complètement chargé avant utilisation.
- N’essayez pas de démarrer une batterie gelée à l’aide de câbles.
- Connectez le clamps correctly: red to positive (+), black to negative (-). Reverse polarity can cause damage.
- Ne connectez pas les cl rouge et noiramps ensemble.
- Tenir hors de portée des enfants.
- Utiliser dans un endroit bien ventilé.
- Évitez d'exposer l'appareil à des températures extrêmes ou à la lumière directe du soleil pendant des périodes prolongées.
- If the device becomes excessively hot during use, disconnect it immediately.
- Consultez le manuel du propriétaire de votre véhicule pour connaître les procédures spécifiques de démarrage à l'aide de câbles.
3. Contenu du colis
Vérifiez que tous les éléments sont présents dans votre colis :
- FLYLINKTECH 5000A Jump Starter (Model BD10)
- Câbles de démarrage intelligents
- Câble de chargement USB-C
- Étui de rangement EVA
- Manuel d'utilisation

Image: Contents of the FLYLINKTECH 5000A Jump Starter package, including the jump starter unit, smart jumper cables, USB-C charging cable, and EVA storage case.
4. Produit terminéview
Familiarize yourself with the components and ports of your jump starter:
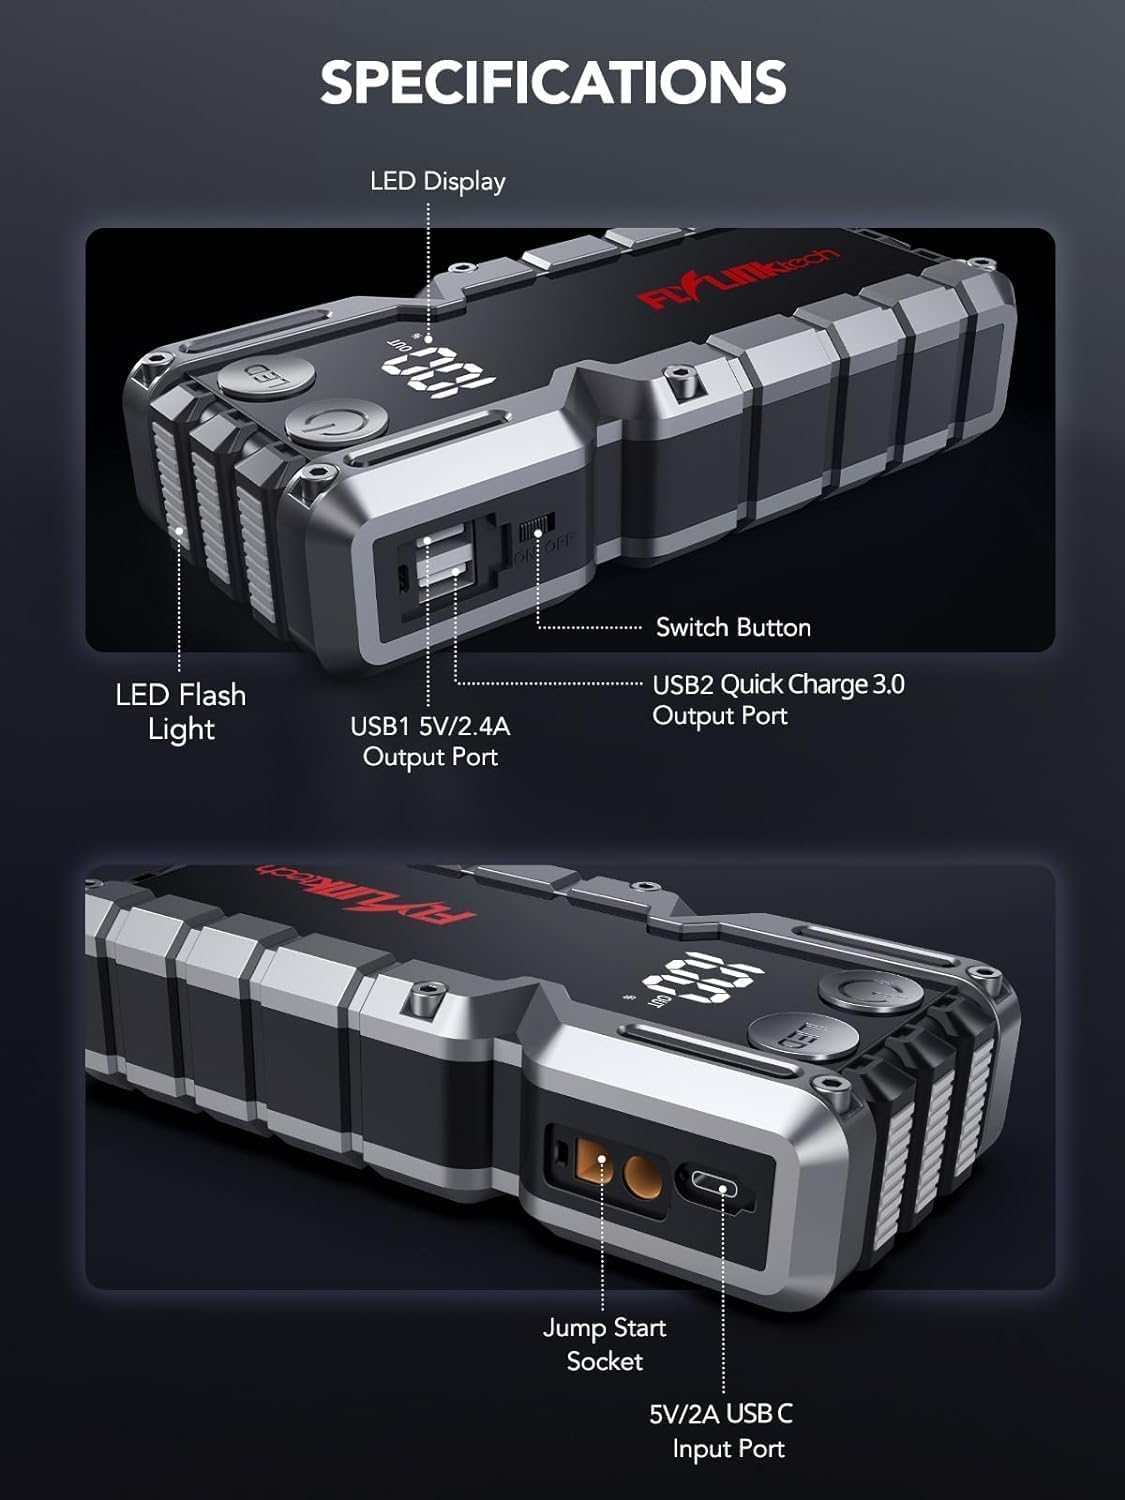
Image : détaillée view of the jump starter showing the LED display, LED flashlight, power button, switch button, USB1 5V/2.4A output port, USB2 Quick Charge 3.0 output port, Jump Start Socket, and 5V/2A USB-C input port.
- Affichage LED: Affiche le pourcentage de batterietage.
- Lampe de poche LED: Fournit un éclairage à modes multiples.
- Bouton d'alimentation : Activates the device and controls flashlight modes.
- Le bouton de l'interrupteur: Commande principale d'alimentation.
- Sortie USB1 (5 V/2.4 A) : Port de chargement USB standard.
- USB2 Output (QC3.0): Quick Charge 3.0 port for faster charging.
- Prise de démarrage d'urgence : Se connecte aux câbles de démarrage intelligents.
- Entrée USB-C (5 V/2 A) : Used to recharge the jump starter.
5. Recharge du démarreur
Avant la première utilisation, chargez complètement le démarreur. Il est recommandé de recharger l'appareil tous les 3 à 6 mois afin de préserver la durée de vie de la batterie.
- Connectez le câble de chargement USB-C fourni au port d'entrée USB-C du démarreur.
- Connectez l'autre extrémité du câble USB-C à un adaptateur mural USB 5V/2A (non inclus) ou à un chargeur de voiture.
- L'écran LED affichera la progression de la charge. L'appareil est complètement chargé lorsque l'écran affiche 100 %.

Image: The jump starter connected via USB to charge a smartphone and a tablet, demonstrating its power bank functionality.
6. Démarrage de votre véhicule à l'aide de câbles de démarrage
Follow these steps carefully to safely jump-start your 12V vehicle:
- Préparer le démarreur : Ensure the jump starter is at least 50% charged. Turn off your vehicle's ignition and all accessories (headlights, radio, etc.).
- Câbles de démarrage intelligents à connecter : Insert the blue plug of the smart jumper cables into the Jump Start Socket on the jump starter. Ensure a firm connection. The indicator light on the smart clamp clignotera en rouge et en vert.
- Se connecter à la batterie du véhicule :
- Attachez le rouge (+) clamp à la borne positive de la batterie de votre véhicule.
- Attachez le noir (-) clamp à la borne négative de la batterie de votre véhicule.
Une fois la connexion correctement établie, le voyant lumineux du boîtier intelligent s'allume.amp deviendra vert uni.
- Démarrez le véhicule : Go into your vehicle and start the engine. If the vehicle does not start immediately, wait 30 seconds and try again. If it still doesn't start, press the "BOOST" button on the smart clamp for 3 seconds until the green light turns solid, then try starting the car again within 30 seconds.
- Retirer les câbles : Once the engine starts, immediately remove the smart jumper cables from the vehicle battery, then disconnect them from the jump starter.

Image: Visual guide for jump-starting: 1. Insert jump clamp into booster. 2. Connect clamps to car battery. 3. Start your car. 4. Remove clamps.

Image : La cl intelligenteamps connected to the jump starter, illustrating the 10-layer safety protections including short circuit, reverse charge, over charge, reverse polarity, over discharge, over current, reverse connection, and high temperature protection.
7. Utilisation comme batterie externe
The jump starter can also be used to charge your electronic devices.
- Connect your device's USB charging cable to either the USB1 (5V/2.4A) or USB2 (QC3.0) output port on the jump starter.
- Le démarreur de secours commencera automatiquement à charger votre appareil.
- The LED display will show the remaining battery capacity of the jump starter.

Image: The jump starter functioning as a portable power bank, with two USB output ports (5V/2.4A and Quick Charge 3.0) actively charging a smartphone and a tablet.
8. Utilisation de la lampe torche LED
The built-in 600-lumen LED flashlight has three modes for various situations:
- Pour activer/désactiver : Press and hold the LED button for 3 seconds.
- Pour faire défiler les modes : Once the light is on, short press the LED button to switch between:
- Allumé en permanence : Pour l'éclairage général.
- Mode SOS : Flashes the international SOS signal for emergencies.
- Mode stroboscopique : Rapid flashing for warning or signaling.

Image: The jump starter with its LED flashlight active, illustrating the three available modes: standard flashlight, SOS signal, and strobe light for emergencies.
9. Entretien
- Nettoyage: Essuyez l'appareil avec un chiffon doux et sec. N'utilisez pas de produits chimiques agressifs ni de matériaux abrasifs.
- Stockage: Store the jump starter in its EVA case in a cool, dry place away from direct sunlight. Ensure it is charged to at least 50% before storing for extended periods. Recharge every 3-6 months.
- Entretien de la batterie: The internal lithium-ion battery is designed for long life. Avoid fully discharging the unit frequently.

Water-resistant design.

Rugged ABS shell for drop resistance.

Operates in extreme temperatures (-4°F to 140°F).
10. Dépannage
| Problème | Cause possible | Solution |
|---|---|---|
| Vehicle won't start after connecting. | Jump starter battery too low; incorrect clamp Connexion ; batterie du véhicule complètement déchargée. | Assurez-vous que le démarreur de secours est complètement chargé. Vérifiez la charge.amp connections (red to +, black to -). Press the "BOOST" button on the smart clamp for 3 seconds and try again. |
| Clé intelligenteamp indicator light is red/flashing. | Inversion de polarité ; court-circuit ; surchauffe. | Déconnecter clamps and re-connect correctly. Check for any short circuits. Allow unit to cool down if overheated. |
| Le démarreur ne charge pas. | Faulty charging cable or adapter; loose connection. | Ensure USB-C cable and adapter are working and connected securely. Try a different cable or adapter. |
| La lampe torche LED ne fonctionne pas. | Not activated correctly; low battery. | Press and hold the LED button for 3 seconds to activate. Ensure the jump starter has sufficient charge. |
11. Spécifications
| Fonctionnalité | Détail |
|---|---|
| Courant de pointe | 5000A |
| Capacité de la batterie | 18000mAh (66.6Wh) |
| Commencer le voltage | 12V |
| Compatibilité moteur | Jusqu'à 9.0 L d'essence / 8.0 L de diesel |
| Sortie USB 1 | 5 V/2.4 A |
| Sortie USB 2 | QC3.0 |
| Entrée USB-C | 5 V/2 A |
| Lampe de poche à LED | 600-Lumen (Constant, SOS, Strobe) |
| Température de fonctionnement | -4°F à 140°F (-20°C à 60°C) |
| Dimensions | 4.2 x 9 x 19 cm |
| Poids | 540 g (1.19 lb) |
| Protections de sécurité | 10-Layer (Short Circuit, Reverse Polarity, Over-Current, etc.) |
12. Garantie et assistance
The FLYLINKTECH 5000A Jump Starter comes with an industry-leading Garantie de 3 ans À compter de la date d'achat, cette garantie couvre les défauts de fabrication et assure un fonctionnement fiable.
For technical support, warranty claims, or any questions regarding your product, please contact FLYLINKTECH customer service through the retailer's platform or visit our official website.
Veuillez conserver votre preuve d'achat pour la validation de la garantie.


