1. Introduction
Welcome to the user manual for your IKIER K1 Pro Max 70W Laser Engraving Machine. This powerful and versatile machine is designed for high-precision engraving and cutting across a wide range of materials, including wood, acrylic, metal, and leather. This manual provides essential information for safe operation, setup, maintenance, and troubleshooting to ensure you get the most out of your device.
Please read this manual thoroughly before operating the machine and keep it for future reference.
2. Consignes de sécurité
AVERTISSEMENT : Le rayonnement laser peut provoquer des lésions oculaires et des brûlures cutanées. Portez toujours des lunettes de protection laser appropriées lorsque vous utilisez l’appareil. Ne regardez jamais directement le faisceau laser.
- Protection des yeux : Always wear certified laser safety goggles (OD6+) when the machine is in operation.
- Ventilation: Ensure adequate ventilation in your workspace to dissipate fumes and smoke produced during engraving and cutting. Some materials can produce toxic fumes.
- Risque d'incendie : Laser processing can ignite flammable materials. Always have a fire extinguisher readily available. Never leave the machine unattended during operation.
- Sécurité matérielle : Only process materials suitable for laser engraving/cutting. Avoid materials that produce hazardous gases or can easily ignite.
- Arrêt d'urgence: Familiarize yourself with the physical emergency stop switch.
- Verrouillage enfant : Utilisez la fonction de verrouillage enfant pour empêcher toute utilisation non autorisée.
- Détection de flamme : The machine is equipped with flame detection. If a flame is detected, the machine will automatically stop.
- Détection d'inclinaison : The machine features tilt detection for added safety. If the machine is tilted during operation, it will stop.

Figure 2.1: Comprehensive safety features of the IKIER K1 Pro Max, including child lock, flame detection, and tilt detection, designed to ensure secure operation.
3. Produit terminéview
The IKIER K1 Pro Max is a state-of-the-art 70W laser engraving and cutting machine, engineered for precision and efficiency. It features a robust design with advanced functionalities to enhance your creative and production capabilities.
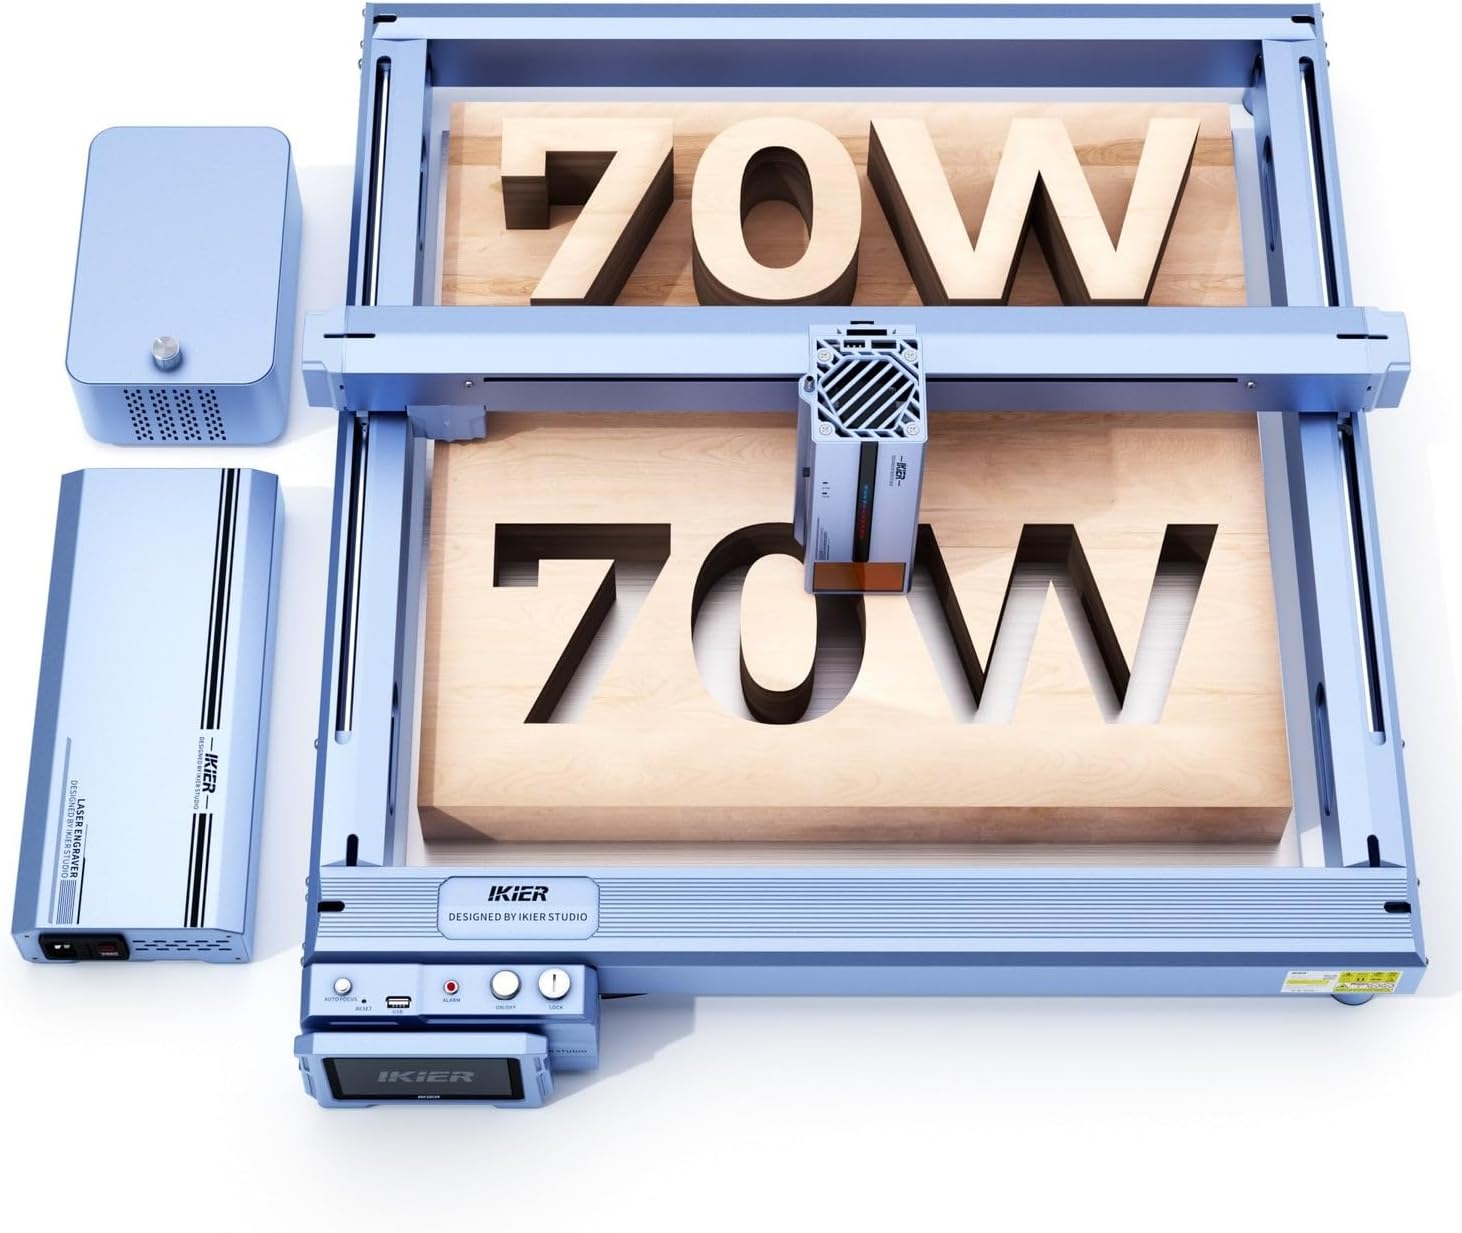
Figure 3.1: The IKIER K1 Pro Max 70W Laser Engraving Machine, showcasing its main components including the laser module and external air assist unit.
Caractéristiques principales :
- Puissance laser de 70 W : Equipped with 14x6W laser diodes, providing exceptional cutting and engraving power, capable of cutting 25mm plywood in a single pass.
- Intelligent Z-Axis: Features both electric and manual settings, enabling automatic focus adjustment in approximately 8 seconds for precise laser positioning.
- Intelligent Air Assist: Integrated double-layer design ensures continuous airflow, preventing blockages and improving cutting performance.
- Sinking Cut Technology: Optimized laser algorithm and intelligent motherboard control automatic laser origin, increasing cutting depth by 30-50%.
- Écran tactile LCD de 4.3 pouces : Allows for convenient offline operation, freeing the machine from constant computer connection.
- Construction robuste : Utilizes an optical axis and linear guide structure for enhanced stability, precision, and speed.
- Cross Positioning System: Provides precise and horizontal output for accurate engraving alignment and observable framing.

Figure 3.2 : Détaillé view of the laser module, illustrating the arrangement of multiple 6W laser diodes that combine to achieve 70W optical power.
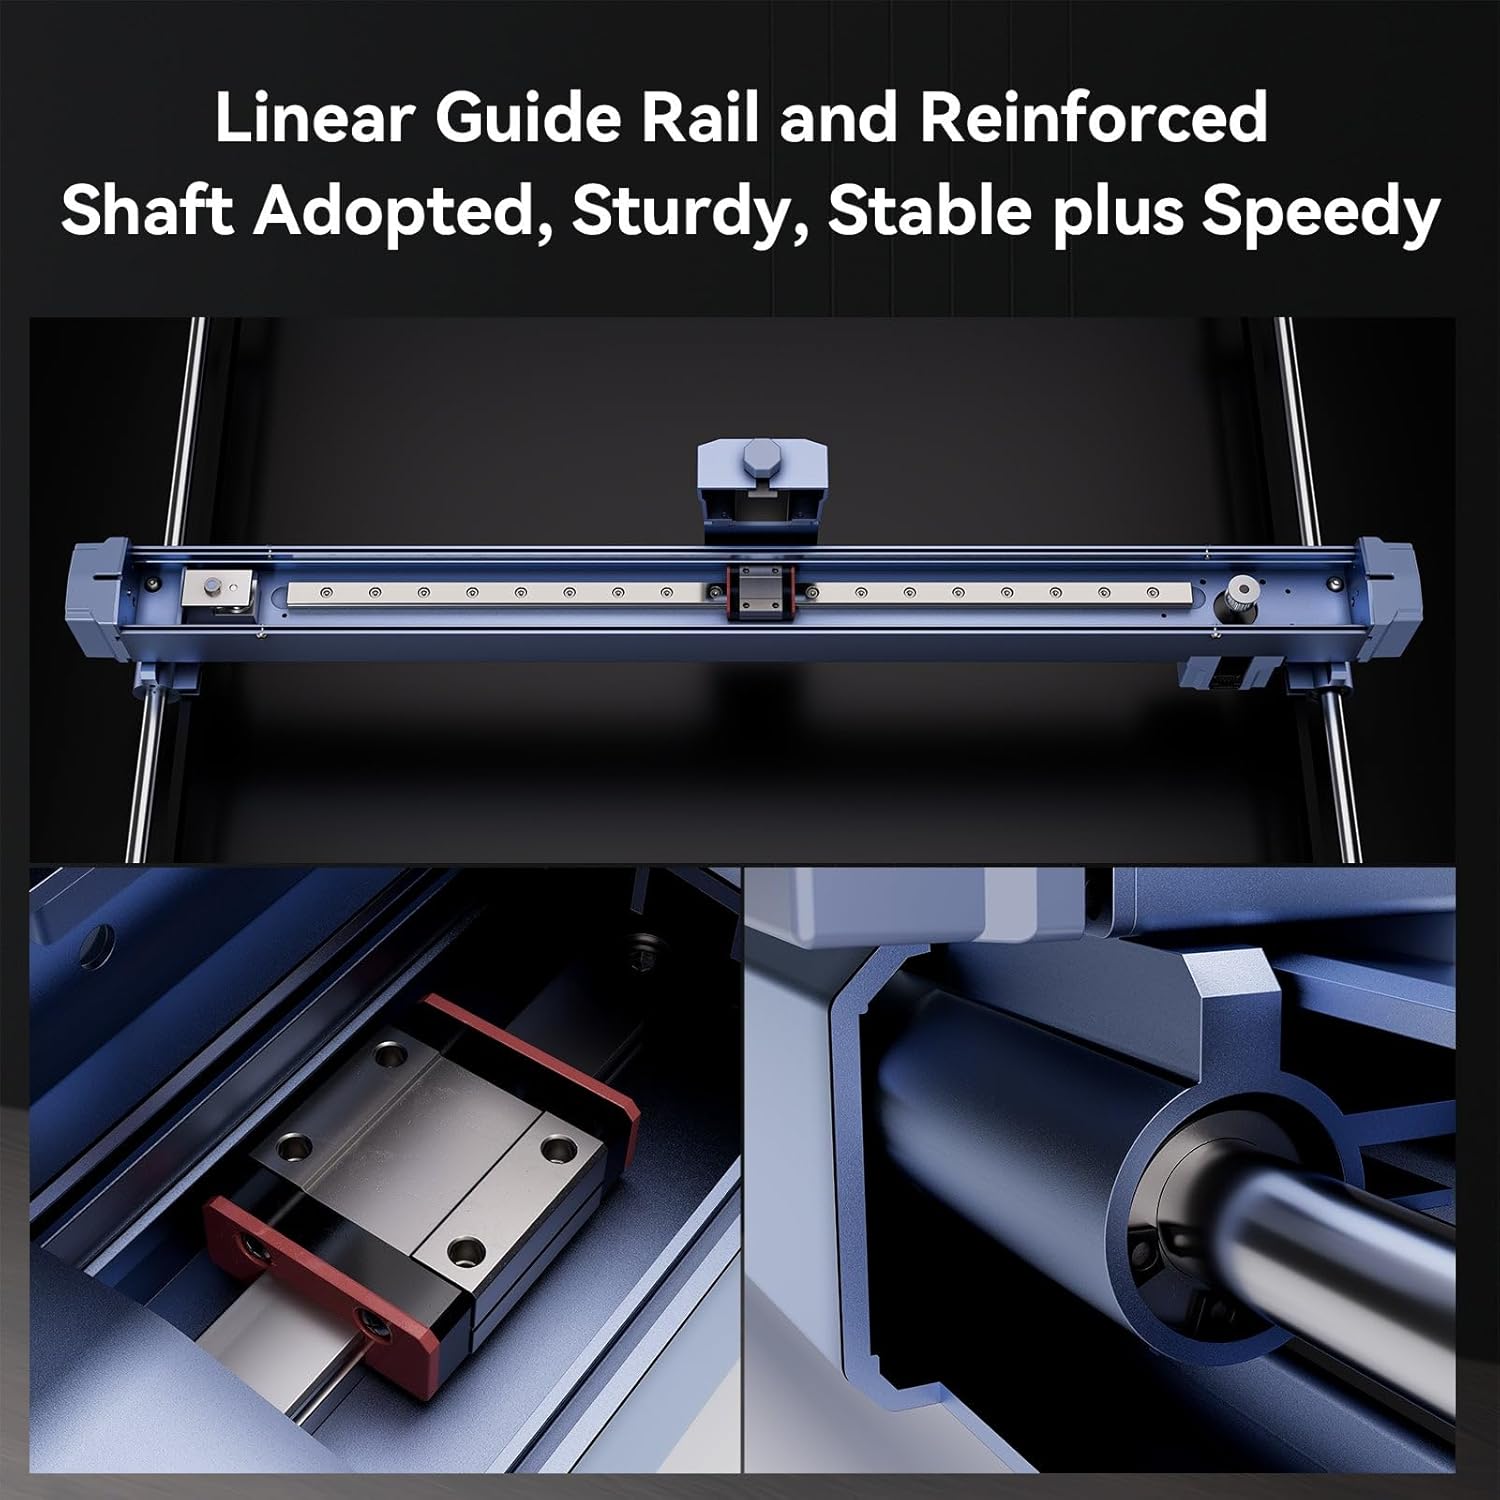
Figure 3.3: Close-up of the linear guide rail and reinforced shaft, highlighting the sturdy and stable mechanical design for precise movement.
4. Installation
The IKIER K1 Pro Max features a modular design for quick and easy assembly, typically within 15 minutes.
4.1 Déballage et montage
- Retirez soigneusement tous les composants de l'emballage.
- Follow the included quick assembly guide to connect the main frame components. Ensure all screws are tightened securely.
- Installez le module laser sur le portique.
- Connect the air assist unit to the designated port on the machine.
4.2 Connexion d'alimentation
Connect the provided DC power adapter to the machine's power input port and then to a suitable power outlet.
4.3 Installation du logiciel
The IKIER K1 Pro Max is compatible with popular laser control software such as LightBurn and LaserGRBL. Download the latest version of your preferred software from the official websites.
- Brûlure légère : Recommended for advanced users, offering comprehensive control and design features.
- LaserGRBL : A free and open-source option, suitable for basic engraving tasks.
4.4 méthodes de connexion
The machine supports multiple connection interfaces:
- USB: Connect directly to your computer via a USB cable.
- WLAN (Wi-Fi) : Connect wirelessly to your network for convenient control.
- Carte TF : Conception de charge files directly onto a TF card for offline operation using the 4.3-inch touch screen.
5. Mode d'emploi
5.1 Mise sous/hors tension
To power on the machine, flip the physical switch located on the control panel. To power off, flip the switch back to the OFF position.
5.2 Préparation du matériel
Place your chosen material flat on the engraving bed. Ensure it is securely positioned to prevent movement during operation. The machine can engrave and cut a variety of materials, including:
- Matériaux de gravure : Wood, bamboo, cardboard, plastic, leather, PCB plate, oxidized aluminum, non-dazzling electroplating and lacquered metal, 304 mirror stainless steel, glass, ceramic, cotton, slate.
- Matériaux de coupe : Cardboard, non-woven fabric, wood, acrylic, thin plastic plates, sponges.

Figure 5.1: Demonstrations of the cutting capability on Paulownia wood and black acrylic, showcasing the machine's ability to cut thick materials in a single pass.
5.3 Focalisation du laser
The IKIER K1 Pro Max features an intelligent Z-axis for automatic focusing:
- Mise au point automatique : Press the auto-focus button on the control panel or via the software. The laser will automatically adjust its height to achieve optimal focus on the material surface. This process takes approximately 8 seconds.
- Mise au point manuelle : For fine adjustments or specific applications, the Z-axis can also be adjusted manually.
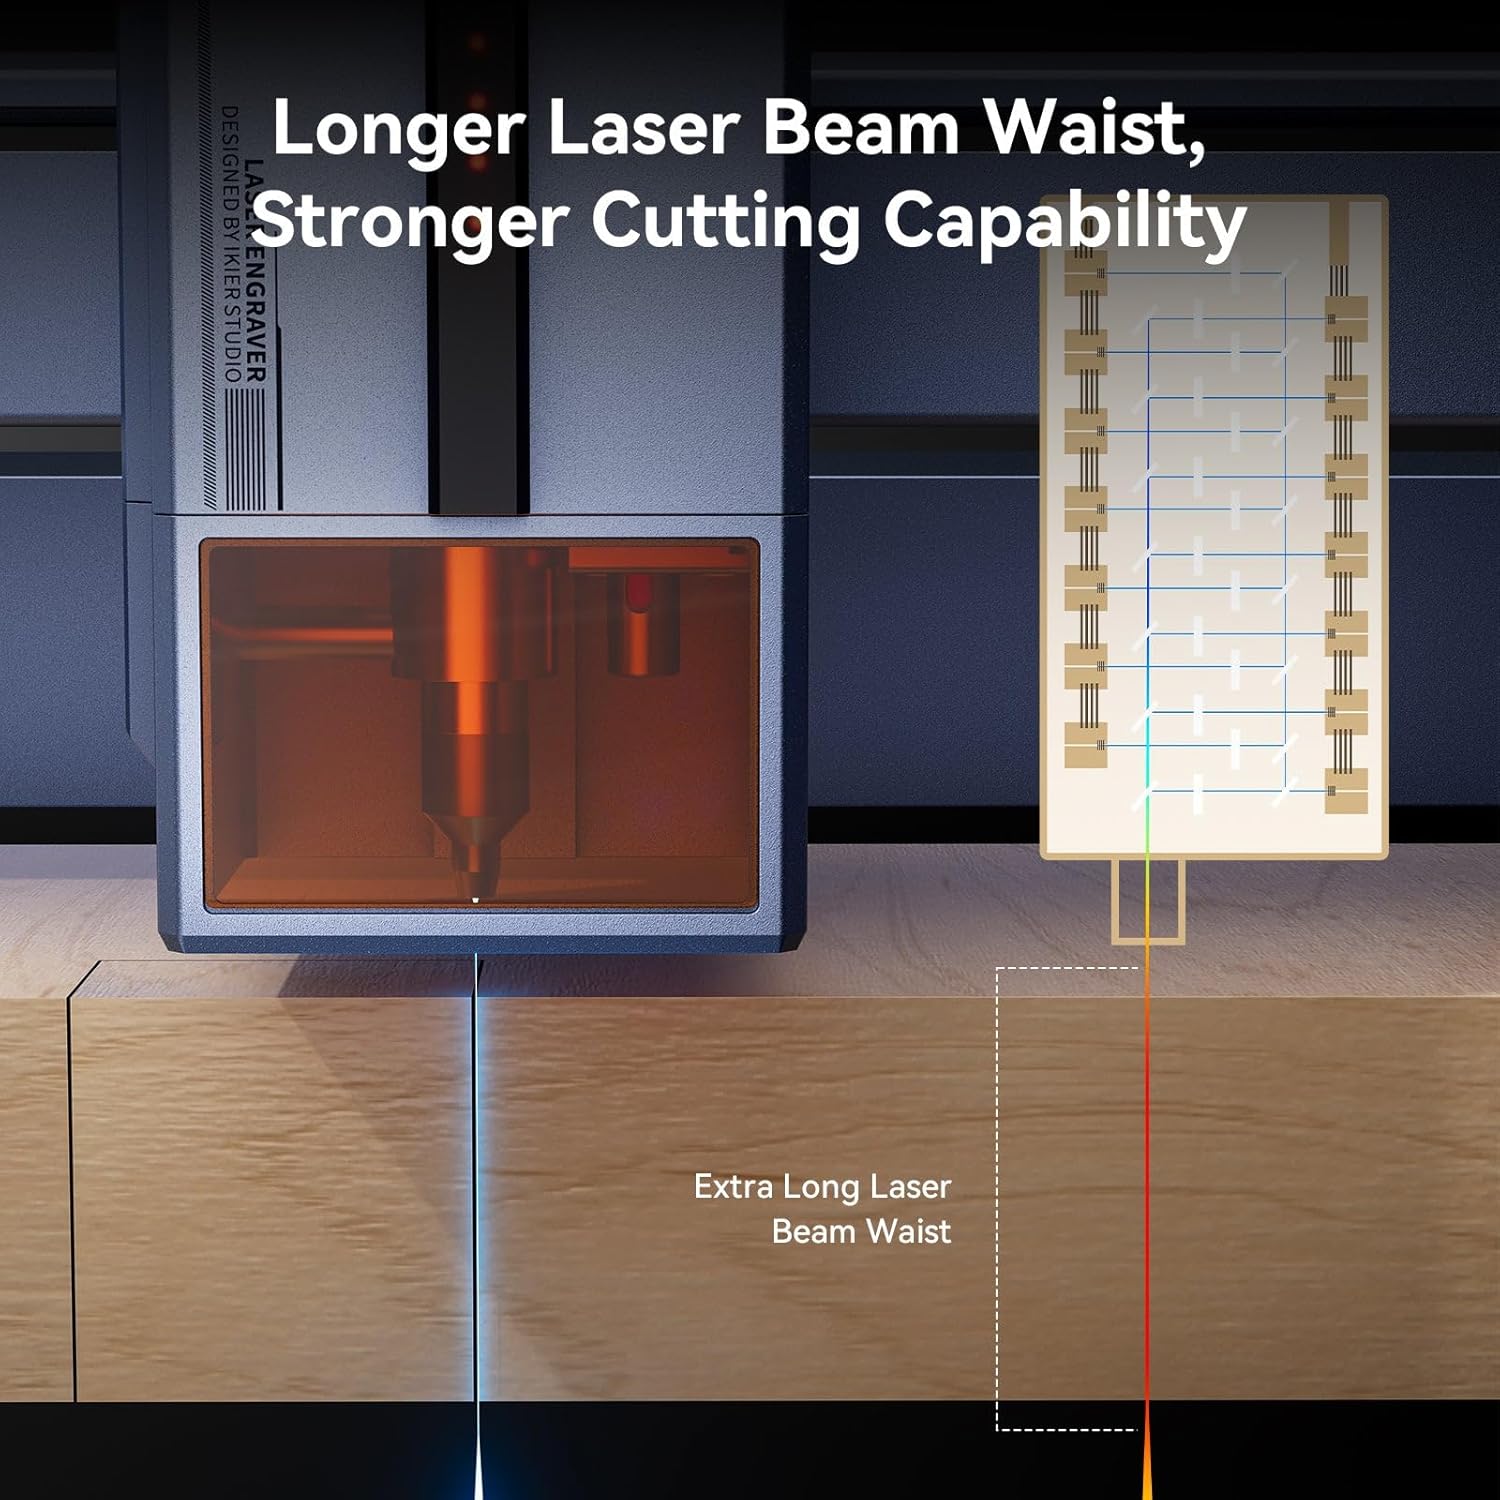
Figure 5.2: Illustration of the extended laser beam waist, which contributes to the machine's enhanced cutting capabilities and deeper penetration.
5.4 Loading Designs and Framing
Préparez votre conception file using compatible software (LightBurn, LaserGRBL). The machine supports various file types including SVG, DXF, JPG, JPEG, PNG, BMP, TIF, CR2, etc.
- Contrôle logiciel: Load your design into the software and use the framing function to preview the engraving area on your material using the laser's cross positioning system.
- Fonctionnement hors ligne : Save your design to a TF card and insert it into the machine. Use the 4.3-inch LCD touch screen to select and initiate the job.

Figure 5.3: The cross positioning system in action, demonstrating its utility for precise alignment and visual framing of the engraving area.
5.5 Adjusting Air Assist
The intelligent air assist system can be adjusted from 0-60 l/min. Adjust the airflow based on the material and desired cutting/engraving effect. Higher airflow generally helps with cleaner cuts and reduces charring.
5.6 Démarrage de l'opération
Once the material is placed, laser is focused, and design is loaded and framed, you can start the engraving or cutting process from your software or the touch screen. Monitor the operation closely, especially for new materials or settings.
6. Entretien
Regular maintenance ensures the longevity and optimal performance of your IKIER K1 Pro Max.
- Nettoyage de la lentille laser : Periodically inspect and clean the laser lens using a lint-free cloth and lens cleaning solution. A dirty lens can significantly reduce laser power and engraving quality.
- Cleaning Air Assist Channels: The intelligent air assist has a double-layer design to prevent blockages, but occasional inspection and cleaning of the air channels are recommended to ensure continuous flow.
- Nettoyage du corps de la machine : Wipe down the machine's exterior and engraving bed regularly to remove dust and debris.
- Linear Rail Inspection: Check the linear guide rails for any debris or wear. Keep them clean and lightly lubricated if necessary, following manufacturer recommendations.
- Mises à jour du micrologiciel : Check the official IKIER webConsultez ce site pour toute mise à jour du micrologiciel disponible afin de garantir que votre machine bénéficie des dernières fonctionnalités et améliorations de performances.
7. Dépannage
Cette section aborde les problèmes courants que vous pourriez rencontrer. Pour les problèmes plus complexes, veuillez contacter le service client.
- La machine ne s'allume pas :
- Vérifiez que le câble d'alimentation est bien branché à la fois à la machine et à la prise de courant.
- Ensure the physical power switch is in the 'ON' position. - Laser non fonctionnel ou faible puissance :
- Verify that the laser module is properly connected.
- Clean the laser lens as described in the Maintenance section.
- Ensure the laser is correctly focused on the material surface.
- Check laser power settings in your control software. - Qualité de gravure/découpe médiocre :
- Adjust laser power and speed settings for the specific material.
- Assurez-vous que le matériau est plat et bien fixé.
- Verify laser focus.
- Nettoyer la lentille laser.
- Check if the air assist is functioning correctly and adjusted appropriately. - Machine Not Connecting to Computer/Software:
- Check USB cable connection or Wi-Fi settings.
- Ensure correct drivers are installed for your operating system.
- Restart both the machine and your computer. - La machine s'arrête inopinément :
- Check for safety feature activation (flame detection, tilt detection). Address the cause (e.g., extinguish flame, ensure stable surface).
- Ensure proper ventilation to prevent overheating. - Air Assist Not Functioning:
- Check the connection of the air assist unit.
- Ensure the air assist current is set correctly (0-60 l/min).
- Inspect air assist channels for blockages.
8. Spécifications
| Fonctionnalité | Spécification |
|---|---|
| Marque | IKIER |
| Modèle | K1 Pro Max 70W |
| Taille de la gravure | 410 mm x 410 mm |
| Puissance de la machine | 360 W |
| Puissance du laser | 70-77W (Output), 35-39W (Diode Power) |
| Maximum Movement Rate | 900 mm/s |
| Taille du spot | 0.15 mm x 0.2 mm (70W), 0.10 mm x 0.15 mm (35W) |
| Précision de la gravure | 0mm (as per manufacturer specification) |
| Onde laser | 455 ± 5 m² |
| Méthode de mise au point | Automatic or Manual Focus with Infrared Positioning |
| Compatibilité du système d'exploitation | Windows, MacOS, Android, iOS |
| Logiciel de contrôle | LightBurn, LaserGRBL |
| Soutenu File Types | SVG, DXF, JPG, JPEG, PNG, BMP, TIF, CR2, etc. |
| Interface de connexion | USB, WLAN, TF card |
| Carte mère | 32-bit control card with Wi-Fi |
| Handlebar Terminal | Écran tactile LCD de 4.3 pouces |
| Interrupteurs de fin de course | 5 (X-axis 2, Y-axis 2, Z-axis 1) |
| Air Support Current | 0-60 l/min (infinitely adjustable) |
| Composants inclus | 1 x IKIER K1 Pro Max 70W Machine |

Figure 8.1: Comparative specifications between the IKIER K1 Pro Max 70W semiconductor laser and a typical 180W CO2 laser, highlighting differences in laser type, weight, cutting capacity, and dimensions.
9. Garantie et assistance
For warranty information, technical support, or service inquiries, please refer to the official IKIER webConsultez notre site web ou contactez votre revendeur agréé. Conservez votre reçu d'achat comme preuve d'achat pour toute réclamation au titre de la garantie.
For the latest drivers, software updates, and additional resources, please visit the official IKIER support page.