1. Introduction
Merci pour votre achatasing the Sony DCR-DVD650 DVD Handycam Camcorder. This manual provides essential information for the safe and efficient operation of your device. Please read it thoroughly before use and retain it for future reference.
The DCR-DVD650 features a 1/6-inch Advanced HAD CCD imager, a Carl Zeiss Vario-Tessar lens with 40x optical zoom, a 2.5-inch touch-panel SwivelScreen LCD, and Super SteadyShot Image Stabilization for clear NTSC recording directly to DVD-R/-RW/+RW and +R DL (Dual Layer) discs.
2. Consignes de sécurité
Respectez toujours les consignes de sécurité de base lors de l'utilisation de ce produit afin de réduire les risques d'incendie, d'électrocution et de blessures.
- Source d'alimentation : Utilisez uniquement l'adaptateur secteur et la batterie spécifiés.
- Eau et humidité : N’exposez pas le caméscope à la pluie ou à l’humidité.
- Chaleur: Keep the camcorder away from heat sources such as radiators, heat registers, stoves, or other products that produce heat.
- Entretien: N'essayez pas de réparer vous-même ce produit. Confiez tous les travaux d'entretien à du personnel de service qualifié.
- Manipulation de la batterie : Handle batteries with care. Improper use may result in fire, explosion, or other hazards.
3. Mise en route
3.1 Déballage et contenu
Vérifiez que tous les éléments sont présents dans le colis :
- Sony DCR-DVD650 Camcorder
- Adaptateur secteur
- Pack de batterie rechargeable
- A/V Connecting Cable
- Câble USB
- Application Software CD-ROM (if included)
3.2 Chargement de la batterie
Before first use, fully charge the supplied rechargeable battery pack. Connect the AC adaptor to the camcorder and a wall outlet. The CHARGE lamp S'allumera pendant la charge et s'éteindra une fois celle-ci terminée.
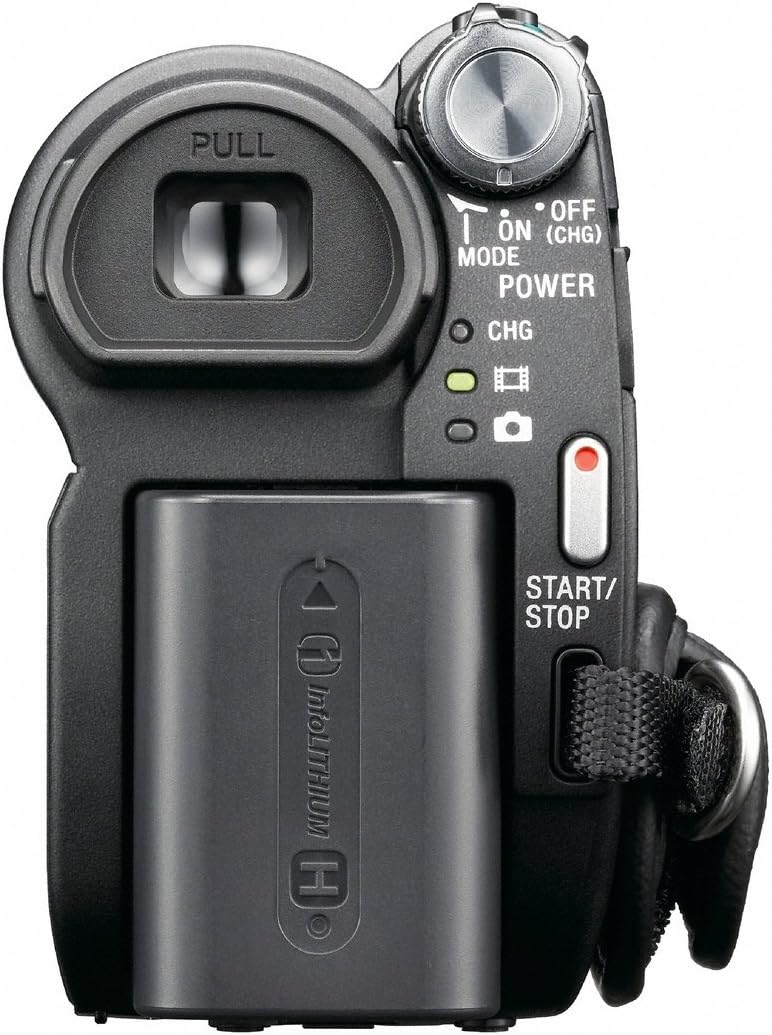
To attach/detach the battery: Slide the battery pack into the battery compartment until it clicks into place. To remove, press the BATT release lever and slide the battery out.
4. Configuration initiale
4.1 Mise sous/hors tension
Pour allumer le caméscope, ouvrez l'écran LCD ou tirez sur le viewPour éteindre l'appareil, fermez l'écran LCD et appuyez sur le bouton. viewchercheur.

4.2 Réglage de la date et de l'heure
Upon first power-on or after the battery has been fully depleted, you may need to set the date and time. Use the touch-panel LCD to navigate to the menu and adjust these settings.
4.3 Inserting a DVD
Open the DVD compartment cover. Insert a compatible DVD-R/-RW/+RW or +R DL disc with the recording side facing the lens. Close the cover firmly until it clicks.

4.4 Inserting a Memory Stick
The camcorder supports Memory Stick media for still image recording. Locate the Memory Stick slot, usually behind the LCD screen, and insert the card until it clicks.
5. Utilisation du caméscope
5.1 Enregistrement vidéo
With a formatted DVD inserted and the camcorder powered on, press the START/STOP button (usually located at the back or on the hand strap) to begin recording. Press it again to stop.
5.2 Utilisation du zoom
Use the zoom lever (W/T) to zoom in (T) or zoom out (W). The DCR-DVD650 features a 40x optical zoom and up to 2000x digital zoom.
5.3 Image Stabilization (Super SteadyShot)
The Super SteadyShot Image Stabilization feature helps reduce blur caused by camera shake. This feature is typically active by default or can be toggled via the menu.
5.4 Lecture
To play back recorded video, switch the camcorder to PLAY/EDIT mode (if available) or select the playback option from the menu. Use the touch-panel LCD to select and play your recordings.
Vidéo: A demonstration of the Sony DCR-DVD610 Camcorder, which shares many operational similarities with the DCR-DVD650. The video showcases the pop-out screen, battery compartment, and DVD loading mechanism.
6. Gestion des médias
6.1 One Touch Disc Burn
The camcorder supports One Touch Disc Burn, allowing you to easily finalize and burn your recordings to a DVD for playback on compatible DVD players.
6.2 Transfert Files
Connect the camcorder to a computer using the supplied USB 2.0 interface cable to transfer videos and still images from the DVD or Memory Stick.
7. Connexion à d'autres appareils
- USB: Use the USB cable to connect to a computer for data transfer.
- A/V Cable: Connect the A/V connecting cable to a television or monitor to view your recordings directly from the camcorder.
8. Entretien
- Nettoyage: Use a soft, dry cloth to clean the camcorder body. For the lens, use a lens cleaning cloth and specialized lens cleaning fluid.
- Stockage: Store the camcorder in a cool, dry place away from direct sunlight and extreme temperatures. Remove the battery pack if storing for extended periods.
9. Dépannage
| Problème | Cause/solution possible |
|---|---|
| La caméra ne s'allume pas. | La batterie est déchargée ou mal insérée. Assurez-vous que la batterie est chargée et correctement positionnée. |
| Impossible d'enregistrer une vidéo. | No DVD inserted, DVD is full, or DVD is not finalized. Insert a new, formatted DVD. |
| Image is blurry or shaky. | Ensure Super SteadyShot is enabled. Check lens for smudges. |
| Impossible de transférer files à l'ordinateur. | Ensure USB cable is connected correctly. Install necessary drivers/software (if applicable). |
10. Spécifications
- Modèle: DCR-DVD650
- Imageur : 1/6-inch Advanced HAD CCD
- Lentille: Carl Zeiss Vario-Tessar
- Zoom optique : 40x
- Zoom numérique : 2000x
- Écran LCD : 2.5-inch touch-panel SwivelScreen
- Stabilisation d'image : Super SteadyShot
- Support d'enregistrement : DVD-R/-RW/+RW, +R DL, Memory Stick
- Résolution de capture vidéo : 480p
- Connectivité : USB 2.0
- Dimensions: 7.6 x 6.3 x 4.7 pouces
- Poids: 2.65 livres
11. Garantie et assistance
Pour obtenir des informations sur la garantie et l'assistance clientèle, veuillez consulter la documentation fournie avec votre achat ou visiter le site d'assistance officiel de Sony. website. As this is a renewed product, specific warranty terms may vary; please consult your retailer for details.


