Introduction
This manual provides essential information for the setup, operation, maintenance, and troubleshooting of your Pro-Ject Debut EVO 2 Audiophile Turntable. Please read these instructions carefully before using the turntable to ensure proper function and longevity of the product.
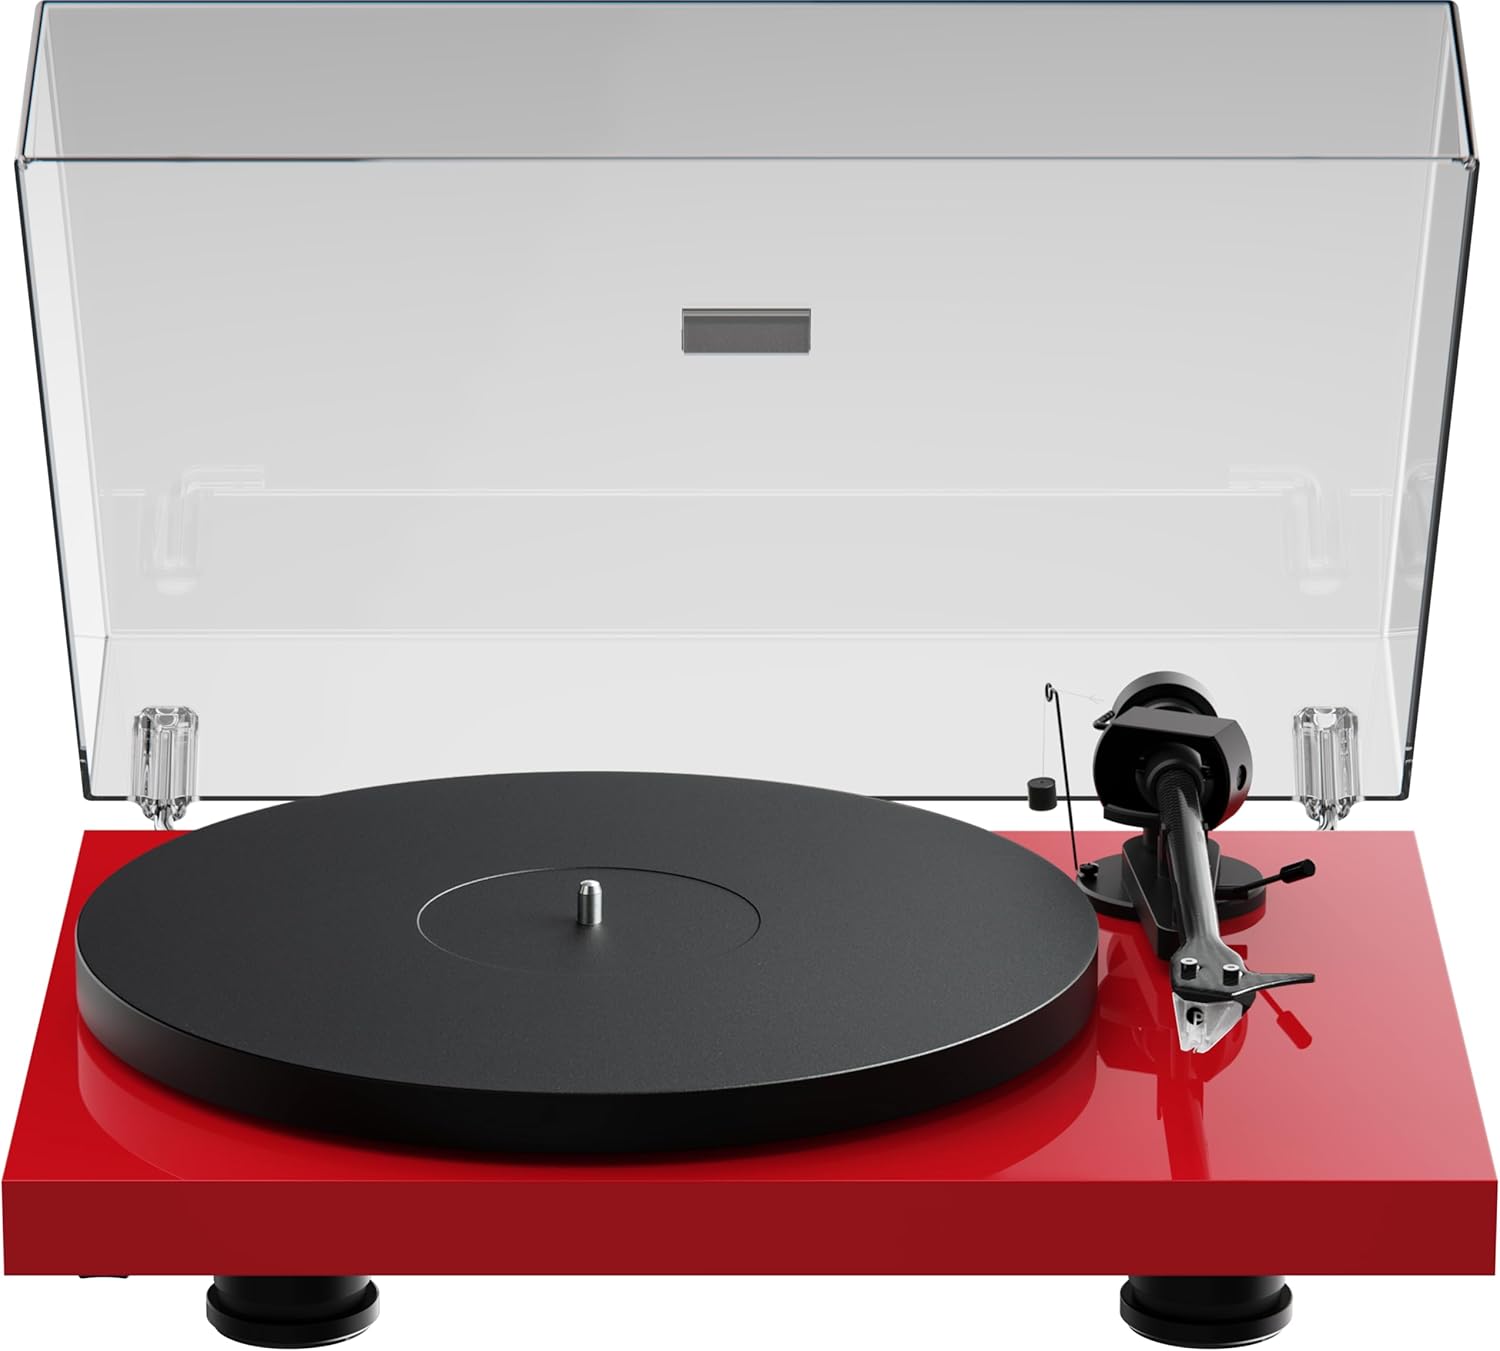
Image: The Pro-Ject Debut EVO 2 turntable in High Gloss Red, featuring a clear dust cover, platter, and tonearm.
Consignes de sécurité
- Always disconnect the turntable from the power supply before cleaning or maintenance.
- Ne touchez pas le câble d'alimentation avec les mains mouillées.
- Avoid placing the turntable near water or excessive moisture.
- Ensure the turntable is placed on a stable, level surface to prevent vibrations and ensure proper operation.
- Gardez les emballages, notamment les sacs en plastique, hors de portée des enfants.
Qu'y a-t-il dans la boîte
Carefully unpack all items from the packaging. Please ensure all components listed below are present and undamaged.
- Platine vinyle Pro-Ject Debut EVO 2
- Transparent Dustcover
- Connection Cable (RCA)
- Adaptateur secteur
- Rapporteur d'alignement
- Single Adapter (for 45 RPM records with large center holes)
- Plat
- courroie
- Contrepoids
- Poids anti-patinage
- Pick it MM EVO Cartridge (pre-mounted)
Installation
1. Placement
Place the turntable on a firm, level surface, away from direct sunlight, heat sources, and excessive vibration. Ensure adequate ventilation around the unit.
2. Installation du plateau et de la courroie
- Place the main platter onto the sub-platter spindle.
- Carefully loop the drive belt around the sub-platter and the motor pulley. Ensure the belt is not twisted.

Image : Une image détaillée view of the turntable's belt drive system, showing the belt wrapped around the sub-platter and motor pulley.
3. Tonearm Balance and Tracking Force
The Pick it MM EVO cartridge is pre-mounted. Follow these steps to set the tracking force:
- Retirez le protecteur du stylet.
- Place the counterweight onto the rear of the tonearm.
- Adjust the counterweight until the tonearm floats freely and is perfectly balanced horizontally.
- Rotate the tracking force dial (the numbered ring on the counterweight) to '0' without moving the counterweight itself.
- Rotate the entire counterweight counter-clockwise until the desired tracking force is set. Refer to the cartridge specifications for the recommended tracking force (typically 1.8g for the Pick it MM EVO).
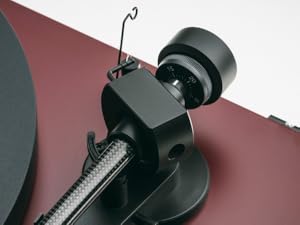
Image: A close-up of the carbon fiber tonearm, illustrating its construction and connection points.
4. Ajustement anti-patinage
The anti-skating mechanism counteracts the inward force on the tonearm. Attach the anti-skating weight's thread to the second groove of the anti-skating stub for the recommended tracking force.

Image: The anti-skating weight hanging from its thread, attached to the tonearm's anti-skating stub.
5. Connexion à un Amplifier
Connectez les câbles de sortie RCA de la platine à l'entrée « Phono » de votre appareil. amplifier. Si votre ampL'amplificateur ne possède pas d'entrée phono dédiée ; vous aurez besoin d'un préamplificateur phono externe.amplifier.
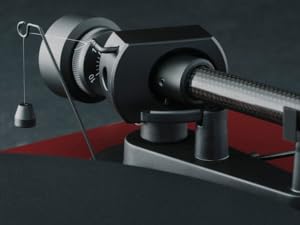
Image: The rear panel of the turntable, displaying the RCA output jacks for audio connection and the power input.
6. Installation du couvercle anti-poussière
Insert the hinges of the transparent dust cover into the designated slots at the rear of the turntable plinth.
Opérationnel
1. Marche/Arrêt
Connect the power adapter to the turntable and a wall outlet. The turntable is powered on by pressing the power button, usually located on the underside or side of the plinth.
2. Sélection de la vitesse
The Debut EVO 2 features electronic speed selection. Use the speed selector switch (often a button on the plinth) to switch between 33 1/3 RPM and 45 RPM. For 78 RPM records, a special belt and stylus may be required (not included).
3. Lecture d'un disque
- Placez un disque sur le plateau.
- Sélectionnez la vitesse de lecture appropriée.
- Soulevez le bras de lecture à l'aide du levier de levage.
- Positionnez le bras de lecture au-dessus du sillon de départ souhaité du disque.
- Abaissez délicatement le bras de lecture à l'aide du levier de levage. Le diamant commencera alors à lire le disque.
4. Arrêt de la lecture
At the end of a record, or when you wish to stop playback:
- Soulevez le bras de lecture à l'aide du levier de levage.
- Remettez le bras de lecture sur son support.
- Abaissez le levier de commande.
- Turn off the turntable if not playing another record.
Entretien
1. Nettoyage
- Turntable Plinth and Dust Cover: Use a soft, lint-free cloth to wipe surfaces. For stubborn marks, a slightly damp cloth can be used, followed by a dry one. Avoid abrasive cleaners.
- Plat: Clean the platter surface with a soft, dry cloth.
2. Entretien du stylet
- Regularly clean the stylus using a dedicated stylus cleaning brush, brushing gently from back to front.
- Évitez de toucher le stylet avec vos doigts.
- Replace the stylus when signs of wear are apparent (e.g., distorted sound, increased surface noise). The Pick it MM EVO cartridge is designed for easy stylus replacement.

Image : Une image détaillée view of the Pick it MM EVO cartridge mounted on the tonearm, highlighting its design.
3. Remplacement de la courroie
The drive belt may stretch or degrade over time. If you notice inconsistent speed or reduced torque, the belt may need replacement. Contact Pro-Ject support or an authorized dealer for a replacement belt.
Dépannage
If you encounter issues with your turntable, consult the following table before contacting support.
| Problème | Cause possible | Solution |
|---|---|---|
| Pas de courant | Câble d'alimentation non branché ; prise de courant défectueuse | Vérifiez les branchements électriques ; essayez une autre prise. |
| Pas de son ou volume faible | Entrée incorrecte sélectionnée sur amplifier; Cables loose; Stylus protector still on; Amplifier not set to 'Phono' input | Select correct input; Check all cable connections; Remove stylus protector; Use a phono preamplifier si besoin |
| Son déformé | Incorrect tracking force; Damaged stylus; Dirty stylus; Incorrect anti-skating setting | Adjust tracking force; Inspect/clean/replace stylus; Adjust anti-skating |
| Vitesse irrégulière | Drive belt worn or loose; Motor pulley dirty | Replace drive belt; Clean motor pulley |
| Bruit de bourdonnement | Ground wire not connected; Interference from other electronics | Ensure ground wire is connected; Move turntable away from other electronics |
Caractéristiques
- Nom du modèle : Débuts EVO 2
- Marque: Projet
- Numéro de modèle de l'article : 9120129864930
- Dimensions du produit : 16.4 x 12.6 x 4.5 pouces (41.6 x 32 x 11.4 cm)
- Poids de l'article : 13.2 livres (6 kilogramme)
- Matériel: Carbon Fiber (tonearm)
- Type de moteur : Ceinture de sécurité
- Format des signaux : Phono
- Composants inclus : Turntable, transparent dustcover, connection cable, power adapter, alignment protractor, single adapter
- Appareils compatibles : Amplificateur, Orateur
- Fabricant: Systèmes audio Pro-Ject
Garantie
Pro-Ject Audio Systems offers a warranty for this product. Please refer to the warranty card included with your purchase or visit the official Pro-Ject webConsultez le site pour connaître les conditions générales de garantie détaillées. Conservez votre preuve d'achat pour toute réclamation au titre de la garantie.
Key Warranty Feature: 25-year spare parts availability guarantee, ensuring long-term support for your turntable.
Soutien
For further assistance, technical support, or spare parts, please contact your authorized Pro-Ject dealer or visit the official Pro-Ject Audio Systems website:
- Pro-Ject Store: Visit the Pro-Ject Store on Amazon
- Fabricant: Systèmes audio Pro-Ject


