Introduction
This manual provides detailed instructions for the installation, operation, and maintenance of your darkFlash DB330M Micro-ATX PC Case. Please read this manual thoroughly before beginning assembly to ensure proper setup and safe usage. The DB330M case features a 270° panoramic tempered glass panel, pre-installed PWM ARGB fans, and a high-speed I/O panel.
Consignes de sécurité
- Débranchez toujours l'alimentation de la prise murale avant d'installer ou d'entretenir un composant quelconque à l'intérieur du boîtier du PC.
- Handle tempered glass panels with care to prevent breakage. Avoid impacts or sharp objects.
- Portez des gants antistatiques ou utilisez un bracelet antistatique pour éviter les dommages causés par les décharges électrostatiques (ESD) aux composants sensibles.
- Gardez les petites pièces et les vis hors de portée des enfants.
- Assurez une ventilation adéquate autour du boîtier du PC pour éviter toute surchauffe.
Contenu du colis
Vérifiez que tous les éléments sont présents dans le colis :
- darkFlash DB330M Micro-ATX PC Case
- 3 ventilateurs ARGB PWM préinstallés
- Boîte d'accessoires (vis, serre-câbles, etc.)
- Manuel de l'utilisateur (ce document)
Fonctionnalités terminéesview
- 270° Panoramic Tempered Glass: Offre un vaste view des composants internes et de l'éclairage RGB.
- Panneau d'E/S haute vitesse : Includes USB 3.0 and Type-C ports for fast data transfer.
- Vertical Airflow Cooling: Optimized design with pre-installed fans for efficient heat dissipation.
- Filtres à poussière magnétiques : Located on top and bottom to keep components clean.
- Installation facile : User-friendly design for hassle-free assembly and maintenance.
Caractéristiques
| Fonctionnalité | Spécification |
|---|---|
| Nom du modèle | DB330M PC CASE |
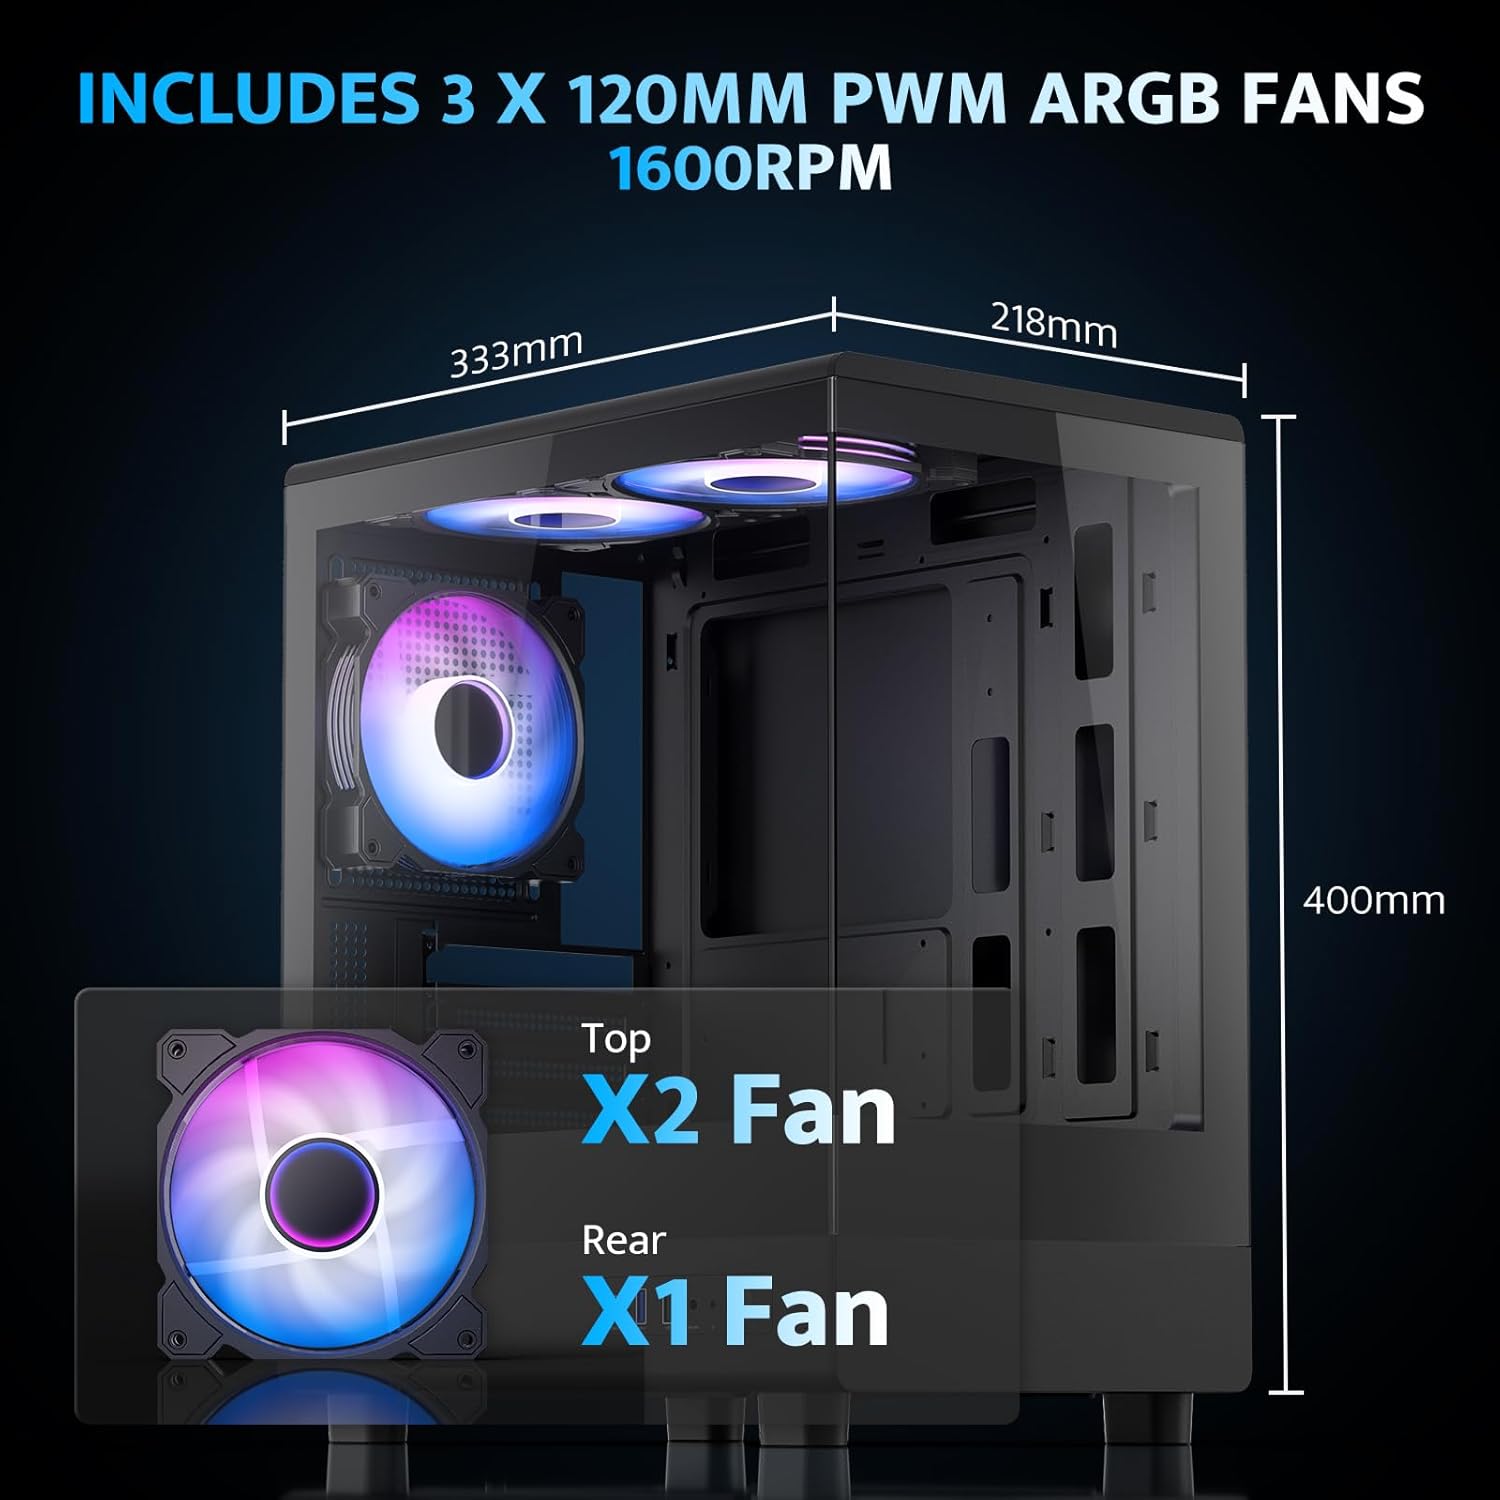
| Dimensions (L x l x H) | 8.58"P x 13.11"L x 15.75"H (218 mm x 333 mm x 400 mm) |
| Compatibilité de la carte mère | Micro ATX, ITX |
| Type de cas | Tour Midi |
| Matériel | Plastique, verre trempé |
| Ventilateurs préinstallés | 3 ventilateurs ARGB PWM de 120 mm |
| Hauteur maximale du refroidisseur de processeur | 180 mm |
| Espace maximal du GPU | 305 mm |
| Support de radiateur (supérieur) | Jusqu'à 240 mm |
| Type de montage de l'alimentation | Bottom Mount (Max 140mm PSU length) |
| Ports d'E/S | 1 x USB 3.0, 1 x Type-C, Audio In/Out |
Configuration et installation
1. Accessing the Interior (Quick Release Design)
The darkFlash DB330M features a quick-release design for easy access to internal components. The tempered glass panels can be removed by gently pulling them away from the chassis. The top panel also detaches for fan/radiator installation.

2. Installation de la carte mère
Install your Micro-ATX or ITX motherboard into the designated area. Ensure standoffs are correctly aligned and secured. The case supports CPU coolers up to 180mm in height and GPUs up to 305mm in length.

3. Fan and Cooling System Installation
The case comes with three pre-installed 120mm PWM ARGB fans. Two fans are located at the top, and one at the rear. Additional fan mounts are available at the bottom (up to 2 x 120mm) for enhanced airflow. The case supports a 240mm AIO radiator on the top panel.
The pre-installed fans are PWM ARGB type, offering speed adjustment and rich lighting modes with motherboard synchronization. Note: An RGB hub controller is not included.

4. Installation de l'alimentation électrique et du système de stockage
Install your power supply unit (PSU) in the bottom mount. The case supports PSUs up to 140mm in length. Utilize the standard hard drive cage for storage devices.
5. Connecting Front I/O Panel
Connect the front I/O panel cables to your motherboard. The panel includes a Type-C port, USB 3.0 port, and USB 2.0 port for various connectivity needs.

6. Gestion des câbles
Utilize the cable routing options and tie-downs behind the motherboard tray to ensure clean cable management. This improves airflow and aesthetics.
Mode d'emploi
1. Mise sous tension
After all components are securely installed and connected, plug in the power cable to your PSU and press the power button on the front I/O panel to start your system.
2. Contrôle du ventilateur ARGB
The pre-installed ARGB fans can be controlled via compatible motherboard software (if connected to an ARGB header) to customize lighting effects and fan speeds. Refer to your motherboard manual for specific software instructions.
3. Airflow Configuration
The DB330M is designed with optimized airflow channels. The pre-installed fans facilitate vertical airflow, with the fan above the PSU directing air towards the graphics card. Ensure no obstructions block the airflow paths.


Entretien
1. Nettoyage du filtre à poussière
Regularly clean the magnetic dust filters located on the top and bottom of the case. Gently remove the filters and clean them with compressed air or a soft brush. Reattach them securely after cleaning.
2. Nettoyage général
Utilisez un chiffon doux et sec pour nettoyer l'extérieur du boîtier. Pour les panneaux en verre trempé, utilisez un nettoyant pour vitres et un chiffon en microfibre. Évitez les nettoyants abrasifs et les solvants.
Dépannage
- Mon PC ne s'allume pas :
- Ensure the power supply is properly connected to the wall and the PSU switch is in the 'ON' position.
- Verify all power cables from the PSU are securely connected to the motherboard and components.
- Vérifiez la connexion de l'interrupteur d'alimentation du panneau avant à la carte mère.
- Ventilateurs non fonctionnels/RGB non fonctionnels :
- Vérifiez que les câbles d'alimentation du ventilateur sont bien connectés à la carte mère ou au contrôleur du ventilateur.
- Ensure ARGB cables are connected to a compatible ARGB header on the motherboard or an ARGB controller.
- Check motherboard software settings for fan speed and RGB control.
- Ports USB non fonctionnels :
- Verify the front panel USB 3.0 and Type-C cables are correctly plugged into the corresponding headers on your motherboard.
- Assurez-vous que les pilotes de la carte mère sont à jour.
Garantie et assistance
darkFlash fournit un Garantie d'un an for this computer case. For technical support, warranty claims, or further assistance, please contact darkFlash customer service through their official webLe site ou le détaillant où le produit a été acheté. Veuillez conserver votre preuve d'achat pour faire valoir la garantie.
DarkFlash officiel Website: www.darkflash.com