1. Introduction
The INKBIRD INK-VS04 Home Food Vacuum Sealer Machine is designed to preserve food freshness by removing air from specially designed bags and containers. This manual provides essential information for safe and effective operation, maintenance, and troubleshooting of your device.
2. Consignes de sécurité
- Lisez toutes les instructions avant d’utiliser l’appareil.
- Ne plongez pas l'appareil, le cordon d'alimentation ou la prise dans l'eau ou tout autre liquide.
- Tenir hors de portée des enfants. Une surveillance étroite est nécessaire lors de l'utilisation à proximité d'enfants.
- Débranchez l'appareil de la prise lorsqu'il n'est pas utilisé et avant de le nettoyer.
- N’utilisez pas d’appareil dont le cordon ou la fiche est endommagé, ou après un dysfonctionnement de l’appareil ou après qu’il a été endommagé de quelque manière que ce soit.
- Utilisez uniquement les accessoires recommandés par le fabricant.
- Ne pas utiliser à l'extérieur.
- Évitez tout contact avec les pièces mobiles.
- Ne pas utiliser à des fins autres que celles prévues.
- Exercise caution when handling the sealing strip, as it can become hot during operation.
- Veillez à placer l'appareil sur une surface stable et plane pendant son utilisation.
3. Contenu du colis
The INKBIRD INK-VS04 Home Food Vacuum Sealer Machine comes with the following items:
- INK-VS04 Vacuum Sealer Machine (x1)
- 11''x16.4' / 28x500cm Bag Roll (x1)
- 8''x11.8'' / 22x30cm Food Bags (x5)
- Air Suction Tube (x1)
- Câble d'alimentation (x1)
- Sticky Note (x1)
- Manuel d'utilisation (x1)

Image: All accessories included with the INKBIRD INK-VS04 Vacuum Sealer Machine.
4. Caractéristiques et composants du produit
The INKBIRD INK-VS04 is equipped with advanced features for efficient food preservation:
- Dual Motor, Dual Pump: Achieves a high vacuum speed of 22-25L/min for quick and stable operation.
- Wide Sealing: Features a 32cm sealing length and 5mm sealing width for secure bag closure.
- Countdown LED Display: Provides real-time progress of the vacuum process.
- Protection contre la surchauffe : Ensures safe operation during extended use.
- Couteau intégré et rangement pour sacs : Conveniently stores bag rolls up to 11''x16.4' (28x500cm) and allows custom bag sizing.
- Removable Water Drip Tray: Collects excess liquid during vacuuming and is easy to clean.
- Plusieurs modes alimentaires : DRY, MOIST, LIQUID settings for various food types.
- Vacuum Strength Modes: GENTLE and NORMAL options to protect delicate foods.
- Modes de fonctionnement : Vac & Seal, Seal Only, Pulse, and Canister modes for versatile use.

Image: Control panel highlighting various food and operation modes.

Image : détaillée view of variable settings for vacuum strength and sealing time.
5. Installation
- Déballez l'appareil : Retirez soigneusement la machine sous vide et tous ses accessoires de l'emballage.
- Inspecter les dommages : Vérifiez que l'appareil ne présente aucun signe de dommage. Ne l'utilisez pas s'il est endommagé.
- Placement: Place the vacuum sealer on a dry, flat, and stable surface. Ensure there is enough space around the unit for proper operation.
- Connexion électrique : Plug the power cable into the appliance and then into a suitable electrical outlet (220V).
- Installer le rouleau de sac (facultatif) : If using a bag roll, open the lid and place the roll into the internal bag storage compartment. Pull out the desired length of bag material.
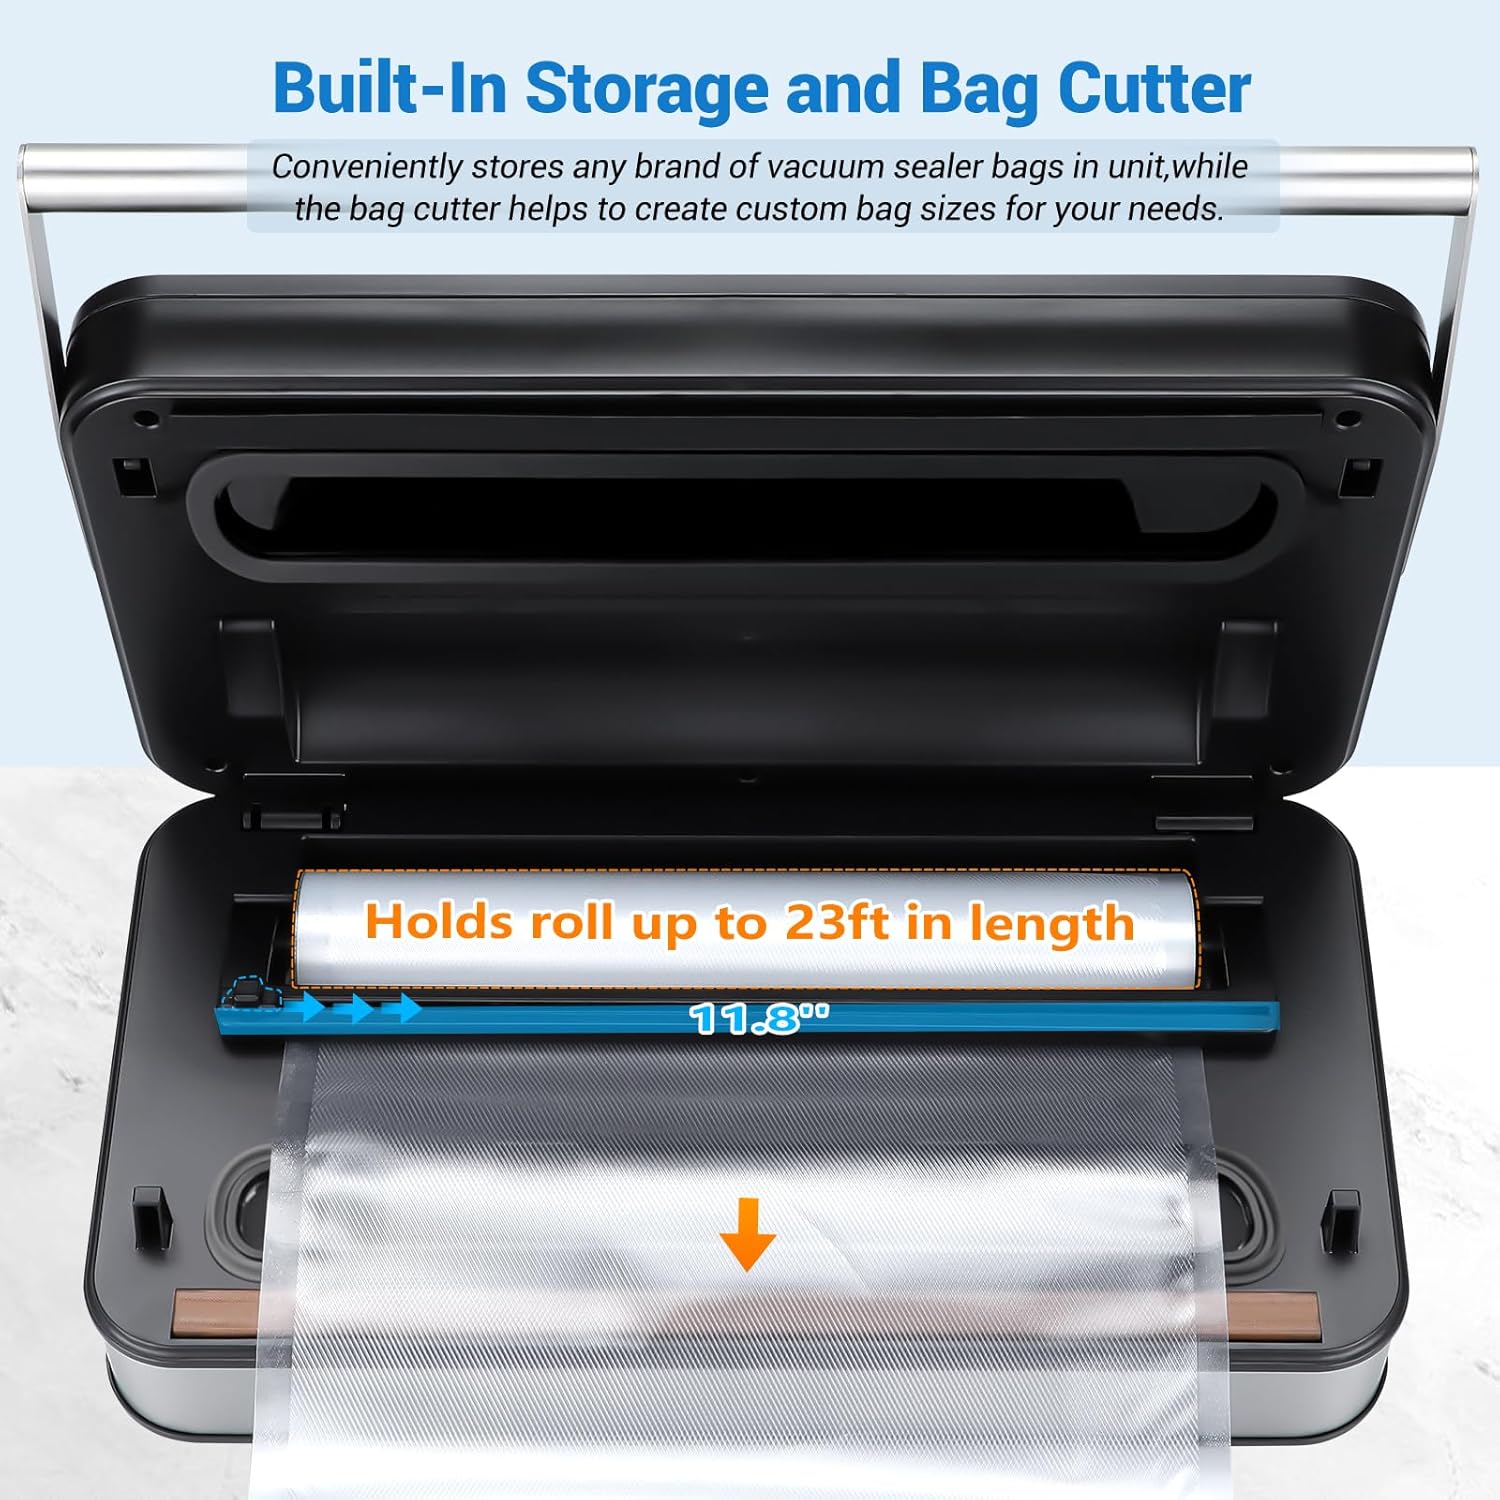
Image: Built-in bag storage and cutter for convenient bag preparation.
6. Mode d'emploi
6.1. Basic Vacuum Sealing (Bags)
- Préparez le sac : Place the food item into a vacuum sealer bag, leaving at least 3 inches of space between the food and the top edge of the bag. Ensure the bag opening is clean and dry.
- Positionnez le sac : Open the lid of the vacuum sealer. Place the open end of the bag into the vacuum channel, ensuring it lies flat across the sealing strip.
- Ferme la couverture: Close the lid firmly until it locks automatically. The machine is designed for one-handed operation.
- Sélectionnez le mode: Choose the appropriate food mode (DRY, MOIST, LIQUID) and vacuum strength (GENTLE or NORMAL) based on your food item.
- Démarrer l'opération : Press the 'Vac & Seal' button. The machine will automatically vacuum the air and then seal the bag. The LED display will show a countdown.
- Libérer et retirer : Once the process is complete, the machine will release the lid. Carefully remove the sealed bag.

Image: Automatic locking and one-handed operation for vacuum sealing.
Video: Demonstration of an INKBIRD vacuum sealer (model IVS-011) in operation, showing the vacuum and seal process. While the model may differ slightly, the operational principles are similar.
6.2. Fonction d'étanchéité uniquement
Use this function to seal bags without vacuuming, ideal for delicate items or creating custom-sized bags from a roll.
- Positionnez le sac : Placez l'extrémité ouverte du sac sur la bande de fermeture.
- Ferme la couverture: Fermez fermement le couvercle jusqu'à ce qu'il se verrouille.
- Commencer à sceller : Press the 'Seal Only' button. The machine will create a seal without removing air.
- Retirer le sac : Once the sealing is complete, remove the bag.
6.3. Fonction d'impulsion
The Pulse function allows manual control over the vacuum process, suitable for delicate or fragile foods that could be crushed by full vacuum pressure.
- Positionnez le sac : Placez l'extrémité ouverte du sac dans le canal d'aspiration.
- Ferme la couverture: Fermez fermement le couvercle jusqu'à ce qu'il se verrouille.
- Control Vacuum: Press and hold the 'Pulse' button to start vacuuming. Release the button to stop. Repeat until desired vacuum level is reached.
- Sceller le sac : Once the desired vacuum is achieved, quickly press the 'Seal Only' button to seal the bag.
6.4. Canister Function
Use the included air suction tube to vacuum seal compatible canisters and containers.
- Prepare Canister: Place food into a vacuum-sealable canister and secure its lid.
- Raccordez le tube : Insert one end of the air suction tube into the accessory port on the vacuum sealer and the other end onto the canister's vacuum port.
- Démarrer le vide : Press the 'Canister' button. The machine will automatically remove air from the canister.
- Déconnecter: Once vacuuming is complete, the machine will stop. Remove the air suction tube from both the machine and the canister.
Video: General demonstration of vacuum sealer bags, showing various types and uses. This video is from a different brand (Lerway) but illustrates the concept of vacuum sealer bags.
7. Entretien et nettoyage
7.1. Nettoyage de l'appareil
- Débrancher: Débranchez toujours l’appareil avant de le nettoyer.
- Essuyer l'extérieur : Utilisez un chiffon doux et sec.amp cloth with mild soap to wipe down the exterior of the machine. Do not use abrasive cleaners.
- Canal d'aspiration propre : Wipe the vacuum channel and sealing strip area with a damp chiffon. S'assurer qu'il ne reste aucun résidu alimentaire.
- Bien sécher : S'assurer que toutes les pièces sont parfaitement sèches avant de les ranger ou de les réutiliser.
7.2. Cleaning the Water Drip Tray
The removable water drip tray is designed to collect liquids extracted during vacuuming, preventing them from entering the machine.
- Retirer le plateau : Gently pull out the water drip tray located near the sealing strip.
- Laver: Wash the tray with warm, soapy water.
- Séchage et réinstallation : Dry thoroughly and reinsert it into its slot.

Image: Detachable drip tray being cleaned under running water.
8. Dépannage
| Problème | Cause possible | Solution |
|---|---|---|
| La machine ne s'allume pas. | Le cordon d'alimentation n'est pas correctement connecté. | Ensure the power cord is securely plugged into the machine and the outlet. |
| La machine aspire le vide mais ne ferme pas hermétiquement. | Sealing strip is dirty or wet. Bag is not positioned correctly. | Clean and dry the sealing strip. Reposition the bag, ensuring it is flat and smooth. |
| Machine seals but does not vacuum properly. | Bag is not properly placed in the vacuum channel. Bag has a hole or tear. | Ensure the bag opening is fully inside the vacuum channel. Check the bag for damage and use a new one if necessary. |
| Le vide est faible ou irrégulier. | Food contents are too wet (for DRY mode). Overheating protection activated. | Use MOIST or LIQUID mode for wet foods. Allow the machine to cool down if it has been used continuously. |
| Lid does not close or open easily. | Le couvercle n'est pas correctement aligné. | Ensure the lid is properly aligned before pressing down to lock. Do not force it. |
9. Spécifications
| Fonctionnalité | Détail |
|---|---|
| Marque | Oiseau d'encre |
| Modèle | ENCRE-VS04 |
| Voltage | 220V |
| Quoitage | 120 watts |
| Mode de fonctionnement | Semi-automatique |
| Source d'énergie | Électrique avec fil |
| Poids de l'article | 3740 gramme |
| Dimensions du produit | 43L x 27.3L x 17H cm |
| Couleur | Mèche |
| Matériel | Acier inoxydable |
10. Garantie et assistance
INKBIRD products are designed and manufactured to the highest quality standards. This product is covered by a limited warranty from the date of purchase. For detailed warranty information, product support, or to register your product, please visit the official INKBIRD website ou contacter le service client.
Officiel Website: www.inkbird.com
Assistance clientèle : Veuillez vous référer aux coordonnées fournies sur le site officiel. website or in your product packaging for assistance.


