1. Introduction
This manual provides detailed instructions for the installation, operation, and maintenance of your GAMEON Midnight I Series Mid Tower Gaming PC Case. Please read this manual thoroughly before beginning installation to ensure proper setup and to maximize the performance and lifespan of your product. Keep this manual for future reference.
2. Consignes de sécurité
- Always disconnect the power supply from the wall outlet before performing any installation or maintenance inside the PC case.
- Handle the tempered glass panels with care. Tempered glass, while durable, can shatter if dropped or subjected to sharp impacts.
- Avoid exposing the case to extreme temperatures or high humidity.
- Ne tentez pas de modifier le boîtier ni ses composants. Toute modification non autorisée peut annuler votre garantie et présenter des risques pour votre sécurité.
- Gardez les petites pièces et les vis hors de portée des enfants.
3. Contenu du colis
Veuillez vérifier que tous les articles énumérés ci-dessous sont présents dans votre colis :
- GAMEON Midnight I Series Mid Tower Gaming PC Case
- 7 x 120mm ARGB PWM Cooling Fans (pre-installed)
- Accessory Box (containing screws, cable ties, and other mounting hardware)
- ARGB/PWM Fan Controller and Remote Control
- Manuel de l'utilisateur (ce document)
4. Produit terminéview
The GAMEON Midnight I Series PC case is designed for optimal cooling and aesthetic appeal, featuring tempered glass panels and pre-installed ARGB PWM fans.

Figure 4.1: Internal layout of the PC case, highlighting the spacious interior for component installation.

Figure 4.2: Rear and top internal view, illustrating fan placement and overall structure.
4.1 ARGB+PWM Case Fans
The case comes with 7 pre-installed 120mm ARGB PWM fans, providing efficient cooling and customizable lighting. The fans are controlled via an included ARGB/PWM controller and remote.

Figure 4.3: ARGB+PWM fan features and fan mounting support. The front supports 360mm water cooling. Fan mounts include 3x120mm for PSU cover, 3x120mm for bottom, 3x120mm for top, and 1x120mm for rear.
4.2 Ports d'E/S avant
Le panneau avant offre un accès pratique aux ports essentiels pour la connectivité.
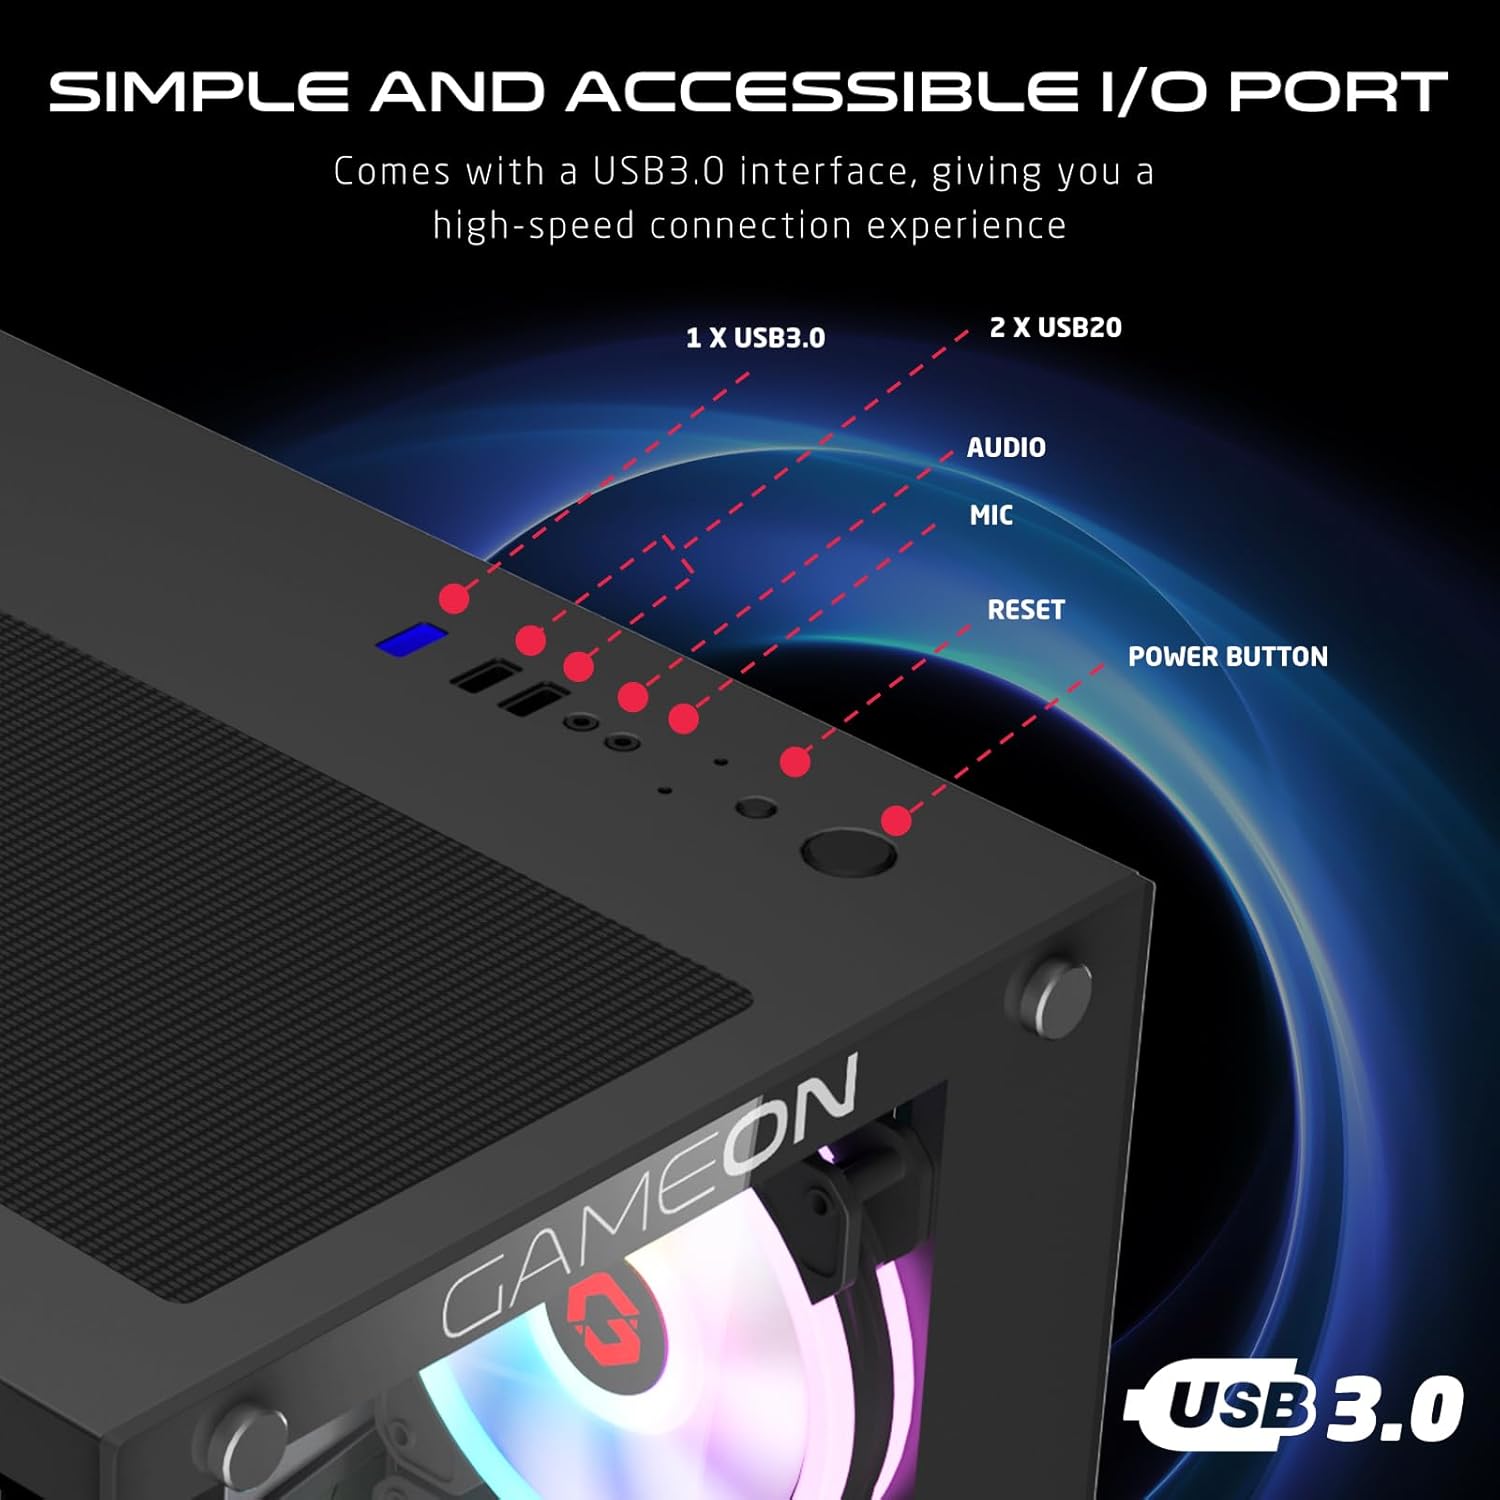
Figure 4.4: Front I/O ports, including 1x USB 3.0, 2x USB 2.0, Audio jack, Microphone jack, Reset button, and Power button.
4.3 Cooling and Construction
The case is designed with an optimized cooling solution, featuring multiple fan mounts and durable tempered glass panels.

Figure 4.5: Optimized cooling solution with massive air intake and exhaust. Features 7 pre-installed fans and durable tempered glass construction.
4.4 Compatibility and Drive Support
The case offers wide compatibility for various motherboard form factors and ample drive bay support.

Figure 4.6: Motherboard compatibility includes ATX, M-ATX, and ITX. Drive bay support for 2x HDD and 2x SSD. Also shown are the front panel header connections.
5. Instructions de configuration
Follow these steps to install your components into the GAMEON Midnight I Series PC case.
5.1 Préparation du dossier
- Placez l'étui sur une surface plane et stable.
- Carefully remove the tempered glass side panel(s) by unscrewing the thumb screws and gently sliding the panel off. Set them aside in a safe place.
- Retirez tous les matériaux d'emballage internes.
5.2 Installation de la carte mère
- Installez la plaque d'E/S (si elle n'est pas préinstallée sur votre carte mère) dans l'ouverture arrière du boîtier.
- Align your motherboard with the standoffs inside the case. Ensure the standoffs match your motherboard's form factor (ATX, M-ATX, ITX).
- Fixez la carte mère à l'aide des vis fournies.
5.3 Installation du bloc d'alimentation (PSU)
- Repérez la zone de montage du bloc d'alimentation à l'arrière, en bas du boîtier.
- Slide your PSU into position from the rear of the case.
- Fixez le bloc d'alimentation avec les vis fournies.
5.4 Installation du disque (HDD/SSD)
Le boîtier prend en charge 2 disques durs de 3.5 pouces et 2 disques SSD de 2.5 pouces.
- For 3.5" HDDs: Locate the drive cage, typically near the PSU shroud. Slide the HDD into the drive bay and secure it with screws.
- For 2.5" SSDs: Mount the SSDs to the designated mounting points, usually on the back of the motherboard tray or within the drive cage, using the provided screws.
5.5 Installation de la carte graphique et de la carte d'extension
- Retirez les caches des emplacements PCIe nécessaires à l'arrière du boîtier.
- Insérez votre carte graphique ou autres cartes d'extension dans les emplacements PCIe appropriés de votre carte mère.
- Fixez les cartes avec des vis.
5.6 Gestion des câbles
Utilisez les ouvertures et les points de fixation situés derrière le plateau de la carte mère pour gérer les câbles. Cela améliore la circulation de l'air et l'esthétique.
5.7 Connecting Front Panel I/O and Fans
- Connect the front panel cables (Power SW, Reset SW, HDD LED, Power LED, USB 3.0, USB 2.0, HD Audio) to their corresponding headers on your motherboard. Refer to your motherboard manual for header locations.
- Ensure the pre-installed ARGB fans are connected to the included ARGB/PWM controller. Connect the controller to a SATA power connector from your PSU and a 3-pin ARGB header (if available) and a 4-pin PWM header on your motherboard for software control, or use the remote for standalone control.
6. Mode d'emploi
6.1 Mise sous/hors tension
- After all components are installed and cables connected, replace the side panels.
- Connect your monitor, keyboard, mouse, and power cable to the PSU.
- Press the Power button on the front panel to turn on your PC.
- To turn off, use the operating system's shutdown function or press and hold the Power button for several seconds.
6.2 Contrôle du ventilateur ARGB
Les ventilateurs ARGB préinstallés peuvent être contrôlés de deux manières :
- Télécommande: Use the included remote to cycle through various lighting effects, adjust brightness, and change fan speed.
- Logiciel de la carte mère : If the ARGB controller is connected to a compatible 3-pin ARGB header on your motherboard, you can synchronize lighting effects with your motherboard's RGB software (e.g., ASUS Aura Sync, MSI Mystic Light Sync, ASRock Polychrome RGB, Gigabyte RGB Fusion).
7. Entretien
Un entretien régulier contribue à garantir des performances optimales et une longue durée de vie à votre boîtier PC.
7.1 Nettoyage du filtre à poussière
The case includes dust filters to prevent dust buildup. It is recommended to clean them every 1-3 months, depending on your environment.
- Locate the dust filters (e.g., top, bottom, front).
- Retirez délicatement les filtres.
- Clean them using compressed air, a soft brush, or by rinsing with water (ensure they are completely dry before re-installing).
- Re-attach the dust filters.
7.2 Nettoyage général
- Utilisez un chiffon doux et sec.amp cloth to wipe down the exterior surfaces of the case. Avoid abrasive cleaners.
- For tempered glass panels, use a glass cleaner and a microfiber cloth to avoid streaks.
7.3 Nettoyage du ventilateur
Periodically inspect the fan blades for dust accumulation. Use compressed air to gently clear dust from the fan blades and grilles.
8. Dépannage
Si vous rencontrez des problèmes avec le boîtier de votre PC, consultez les problèmes et solutions courants suivants.
8.1 Fans Not Spinning or ARGB Not Working
- Vérifiez la connexion électrique : Ensure the ARGB/PWM controller is properly connected to a SATA power connector from your PSU.
- Vérifiez les connexions du ventilateur : Verify that all fans are securely connected to the ARGB/PWM controller.
- Pile de la télécommande : Si vous utilisez la télécommande, vérifiez si sa pile doit être remplacée.
- Logiciel de la carte mère : If using motherboard software for control, ensure the controller is connected to the correct ARGB header and the software is installed and configured correctly.
- Direction des ventilateurs : Veillez à ce que les ventilateurs soient correctement orientés pour une circulation d'air optimale (entrée/sortie).
8.2 Ports d'E/S avant non fonctionnels
- Check Motherboard Connections: Ensure all front panel cables (USB 3.0, USB 2.0, HD Audio) are correctly and securely connected to their respective headers on the motherboard. Refer to your motherboard manual.
8.3 L'ordinateur ne s'allume pas
- Power Button Connection: Verify the Power SW cable from the front panel is correctly connected to the motherboard's front panel header.
- PSU Connection: Assurez-vous que le bloc d'alimentation est correctement branché à la prise murale et que l'interrupteur d'alimentation du bloc d'alimentation est en position « ON ».
- Internal Power Cables: Check that all necessary power cables (24-pin ATX, CPU, GPU) are securely connected to the motherboard and components.
9. Spécifications
| Fonctionnalité | Spécification |
|---|---|
| Nom du modèle | GO-EMPERORII-M (Midnight I Series) |
| Type de cas | Mid Tower |
| Matériel | Verre trempé |
| Couleur | Noir |
| Dimensions du produit (L x l x H) | 44 x 28 x 42.7 cm |
| Poids de l'article | 6.45 kg |
| Prise en charge de la carte mère | ATX, Micro ATX, ITX |
| Ventilateurs préinstallés | 7 x 120mm ARGB PWM Fans |
| Taille du ventilateur | 120 mm |
| Méthode de refroidissement | Air, Water (supports up to 360mm radiator in front) |
| Baies de lecteur | 2 disques durs 3.5", 2 disques SSD 2.5". |
| Ports d'E / S avant | 1 x USB 3.0, 2 x USB 2.0, Audio, Mic, Reset, Power |
| Fonctionnalités supplémentaires | Dust Filters, ARGB Controller with Remote |
10. Garantie et assistance
This product comes with a standard manufacturer's warranty. For specific warranty terms and conditions, please refer to the documentation provided with your purchase or contact GAMEON customer support. For technical assistance or further inquiries, please visit the official GAMEON webconsultez le site ou contactez leurs services d'assistance.


