1. Introduction
Merci pour votre achatasing the KIMO Cordless Electric Tacker, Model QIMO-9419. This manual provides essential information for the safe operation, maintenance, and troubleshooting of your tool. Please read this manual thoroughly before use and keep it for future reference.

Description de l'image : The KIMO QIMO-9419 Cordless Electric Tacker in green and black, shown with two batteries, a charger, a carrying bag, and various sizes of nails/staples. This image provides an overview du produit et de ses accessoires inclus.
2. Consignes de sécurité
To prevent accidental firing and ensure safe operation, the KIMO QIMO-9419 Cordless Electric Tacker incorporates a three-step safety mechanism. Always follow these steps:
- Step 1: Engage Safety Lock. Before operating, ensure the safety lock is pushed upwards to the "locked" position.
- Step 2: Unlock and Prepare. Once the safety lock is disengaged (moved to the "unlocked" position), the trigger button can be pulled.
- Step 3: Activate Safety Pin. The tool will only fire a fastener when the safety pin at the nose of the tool is pressed completely against the workpiece.
Adhering to these three steps is crucial to avoid potential safety hazards from unintended operation.

Description de l'image : A diagram showing the KIMO tacker and its three safety features: the trigger button, the safety lock, and the safety pin. Insets demonstrate the locked and unlocked states of the safety lock and the firing mechanism when the safety pin is depressed.
3. Produit terminéview
The KIMO QIMO-9419 is a cordless electric tacker designed for various fastening tasks. Key components include:
- Compartiment à piles : Houses the 12V Lithium-ion battery.
- Bouton de déclenchement : Active le mécanisme de mise à feu.
- Verrouillage de sécurité : Prevents accidental firing.
- Épingle de sûreté: Must be depressed against the workpiece for firing.
- Revue: Holds fasteners (nails/staples).
- Bouton de réglage de la profondeur : Allows modification of fastener driving depth.
- Lampe de travail à LED : Éclaire la zone de travail.
- Crochet de ceinture : Pour faciliter le transport et le stockage temporaire.

Description de l'image : A user on a ladder with the KIMO tacker attached to their belt via a hook. An inset shows a close-up of the metal belt hook attachment. This highlights the portability and convenience of the tool.
4. Installation
4.1 Installation et charge de la batterie
The tacker operates on 12V 2000mAh Lithium-ion batteries. Ensure batteries are fully charged before use.
- To install: Align the battery with the battery compartment and slide it in until it clicks into place.
- Pour retirer la batterie : appuyez sur le bouton de déverrouillage et faites glisser la batterie vers l’extérieur.
- To charge: Connect the battery to the provided charger and plug the charger into a power outlet. Refer to the charger's instructions for charging indicators.

Description de l'image : Two KIMO 12V MAX Lithium-ion batteries, each with a capacity of 2000mAh, indicating the power source for the tacker.
4.2 Fixations de chargement
This tacker uses F10-30 type fasteners, with dimensions of 1.26mm length and 1.05mm width. The magazine capacity is 100 fasteners.
- Ensure the tool is disconnected from the battery before loading.
- Open the magazine latch and pull out the pusher.
- Insert a strip of fasteners into the magazine with the points facing down.
- Push the pusher back until it locks into place.

Description de l'image : A diagram illustrating the magazine capacity of 100 fasteners and a firing speed of 80 shots per minute. It also details the compatible fastener types (F10-30) and their dimensions (1.26mm length, 1.05mm width).
5. Mode d'emploi
5.1 Single Shot / Continuous Firing Mode
The tacker offers both single shot and continuous firing modes, selectable via a button on the tool. Choose the appropriate mode for your task to enhance efficiency.
- Mode prise de vue unique : For precise fastener placement. Each pull of the trigger fires one fastener.
- Continuous Firing Mode: For rapid fastening. Hold the trigger down, and the tool will fire fasteners as the safety pin is repeatedly depressed against the workpiece.

Description de l'image : A diagram illustrating the difference between single shot mode (for precise placement) and continuous firing mode (for increased speed, approximately 30% faster). The images show the tacker firing fasteners onto a wooden surface in both modes.
5.2 Driving Depth Adjustment
The driving depth of the fasteners can be adjusted to suit different material thicknesses and desired finishes. This is achieved by adjusting the length of the safety pin.
- To increase driving depth: Adjust the safety pin to a shorter length.
- To decrease driving depth: Adjust the safety pin to a longer length.
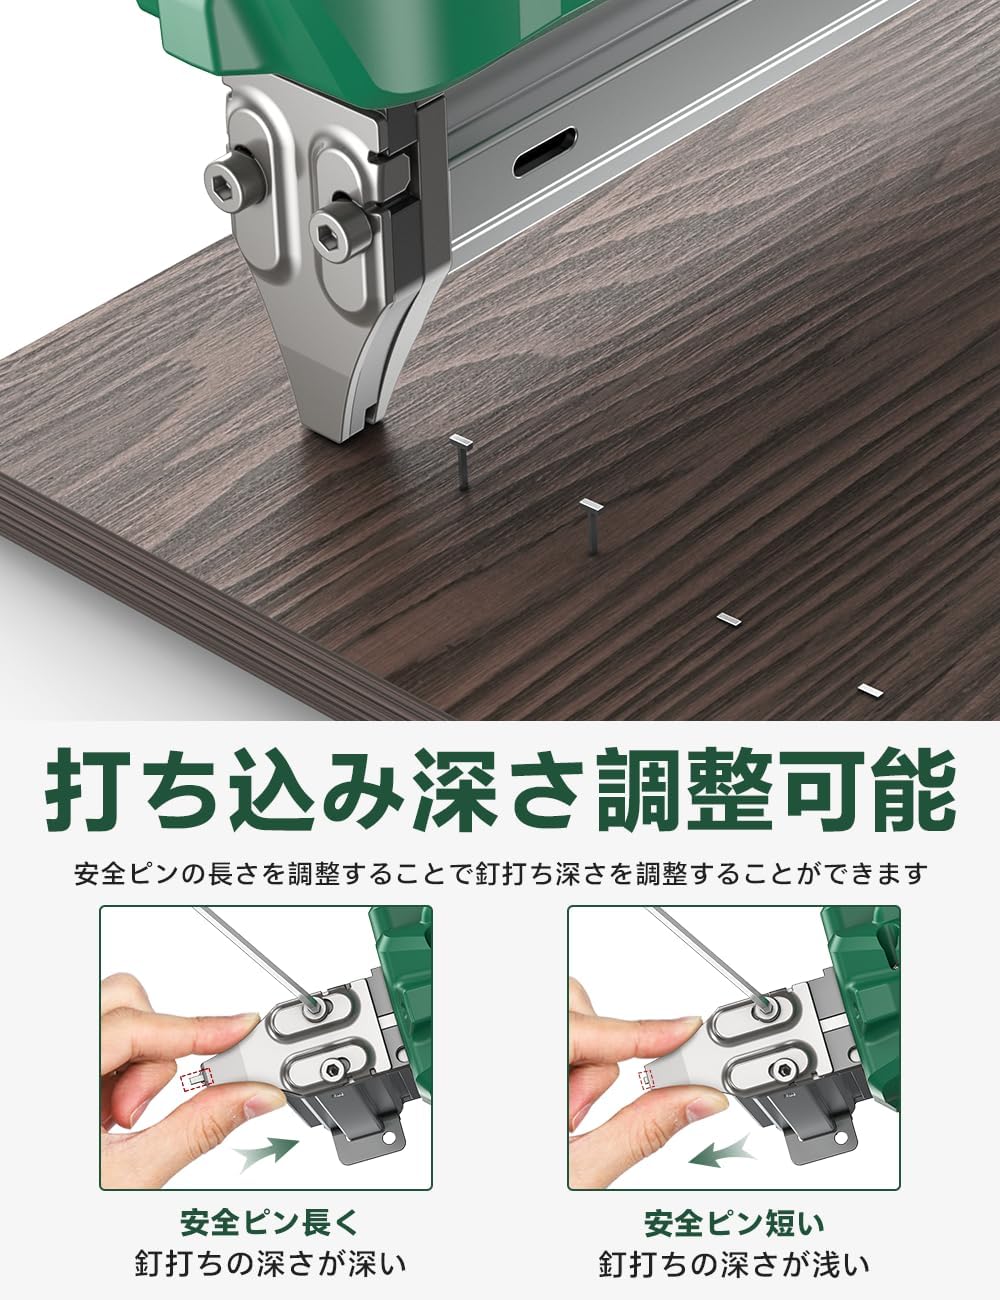
Description de l'image : A diagram demonstrating how to adjust the fastener driving depth. It shows two settings: one where the safety pin is shorter, resulting in deeper fastener penetration, and another where the safety pin is longer, resulting in shallower penetration.
5.3 Lampe de travail à DEL
The tacker is equipped with an integrated LED light. When the power is on, the LED light at the front of the tool illuminates the work area, allowing for operation in low-light conditions.

Description de l'image : A close-up image of the KIMO tacker's front, showing the LED light activated and illuminating a dark work surface, indicating its utility in low-light environments.
6. Entretien
Regular maintenance ensures the longevity and optimal performance of your KIMO Cordless Electric Tacker.
- Nettoyage: Veillez à ce que l'outil reste propre et exempt de poussière et de débris. Essuyez l'extérieur avec un chiffon sec. N'utilisez ni solvants ni produits chimiques agressifs.
- Magazine Fastener : Vérifiez régulièrement le magasin de fixations pour détecter toute obstruction ou fixation tordue susceptible de provoquer des blocages.
- Entretien de la batterie: Conservez les piles dans un endroit frais et sec. Ne les exposez pas à des températures extrêmes. Chargez-les complètement avant un stockage prolongé.
- Inspection: Inspectez régulièrement l'outil afin de déceler tout signe de dommage, de vis desserrées ou de pièces usées. N'utilisez pas un outil endommagé.
7. Dépannage
This section addresses common issues you might encounter with your tacker.
| Problème | Cause possible | Solution |
|---|---|---|
| L'outil ne démarre pas |
|
|
| Les fixations ne s'enfoncent pas complètement |
|
|
| L'outil se bloque fréquemment |
|
|
8. Spécifications
| Fonctionnalité | Détail |
|---|---|
| Marque | KIMO |
| Modèle | QIMO-9419 |
| Source d'énergie | Électrique sans fil |
| Type de batterie | Batterie lithium-ion 12 V 2000 mAh (x2 incluses) |
| Type de fixation | F10-30 (1.26mm length, 1.05mm width) |
| Capacité du chargeur | 100 attaches |
| Firing Speed | Up to 80 shots/min |
| Poids du corps de l'outil | Environ 1.8 kg |
| Dimensions du colis | 38 x 28 x 9.5 cm |
| Poids du colis | 4.2 kg |
9. Garantie et assistance
Specific warranty information is not provided in the product details. For warranty claims, technical support, or service inquiries, please contact KIMO customer service directly or refer to the official KIMO website pour des informations détaillées.
You can visit the KIMO store on Amazon for more products and support information: KIMO Store


