Introduction
Thank you for choosing the RAINPOINT Digital Sprinkler Timer, Model ITV105. This programmable 1-outlet automatic hose water timer is designed to provide convenient and precise control over your watering schedule, ensuring optimal moisture levels for your lawn and garden. This manual provides detailed instructions for setup, operation, maintenance, and troubleshooting to help you get the most out of your new device.
Produit terminéview et fonctionnalités clés
The RAINPOINT ITV105 Sprinkler Timer is engineered for durability and ease of use, offering a reliable solution for automated garden irrigation.
- Compatibilité standard : Features a 3/4" inlet and outlet thread, compatible with most standard garden hoses.
- Résistance aux intempéries : IP54 waterproof rating and heavy-duty weather-resistant ABS housing ensure durability for outdoor use.
- Programmation personnalisable : Easy-to-use interface allows customization of start time, watering frequency, and duration for automated irrigation.
- Filtre intégré : Includes a built-in metal filter to improve water quality and protect plants from debris.
- Leakage Prevention: Upgraded strong and durable ABS material and water inlet thread, paired with Teflon tape and rubber washer to prevent water leakage.
- Grand écran LCD : Displays detailed information such as watering time, frequency, power, and battery life for easy readability.
- Notification de batterie faible : Powered by 2 AAA batteries (not included), with a low battery notification and automatic valve shut-off to prevent water waste.
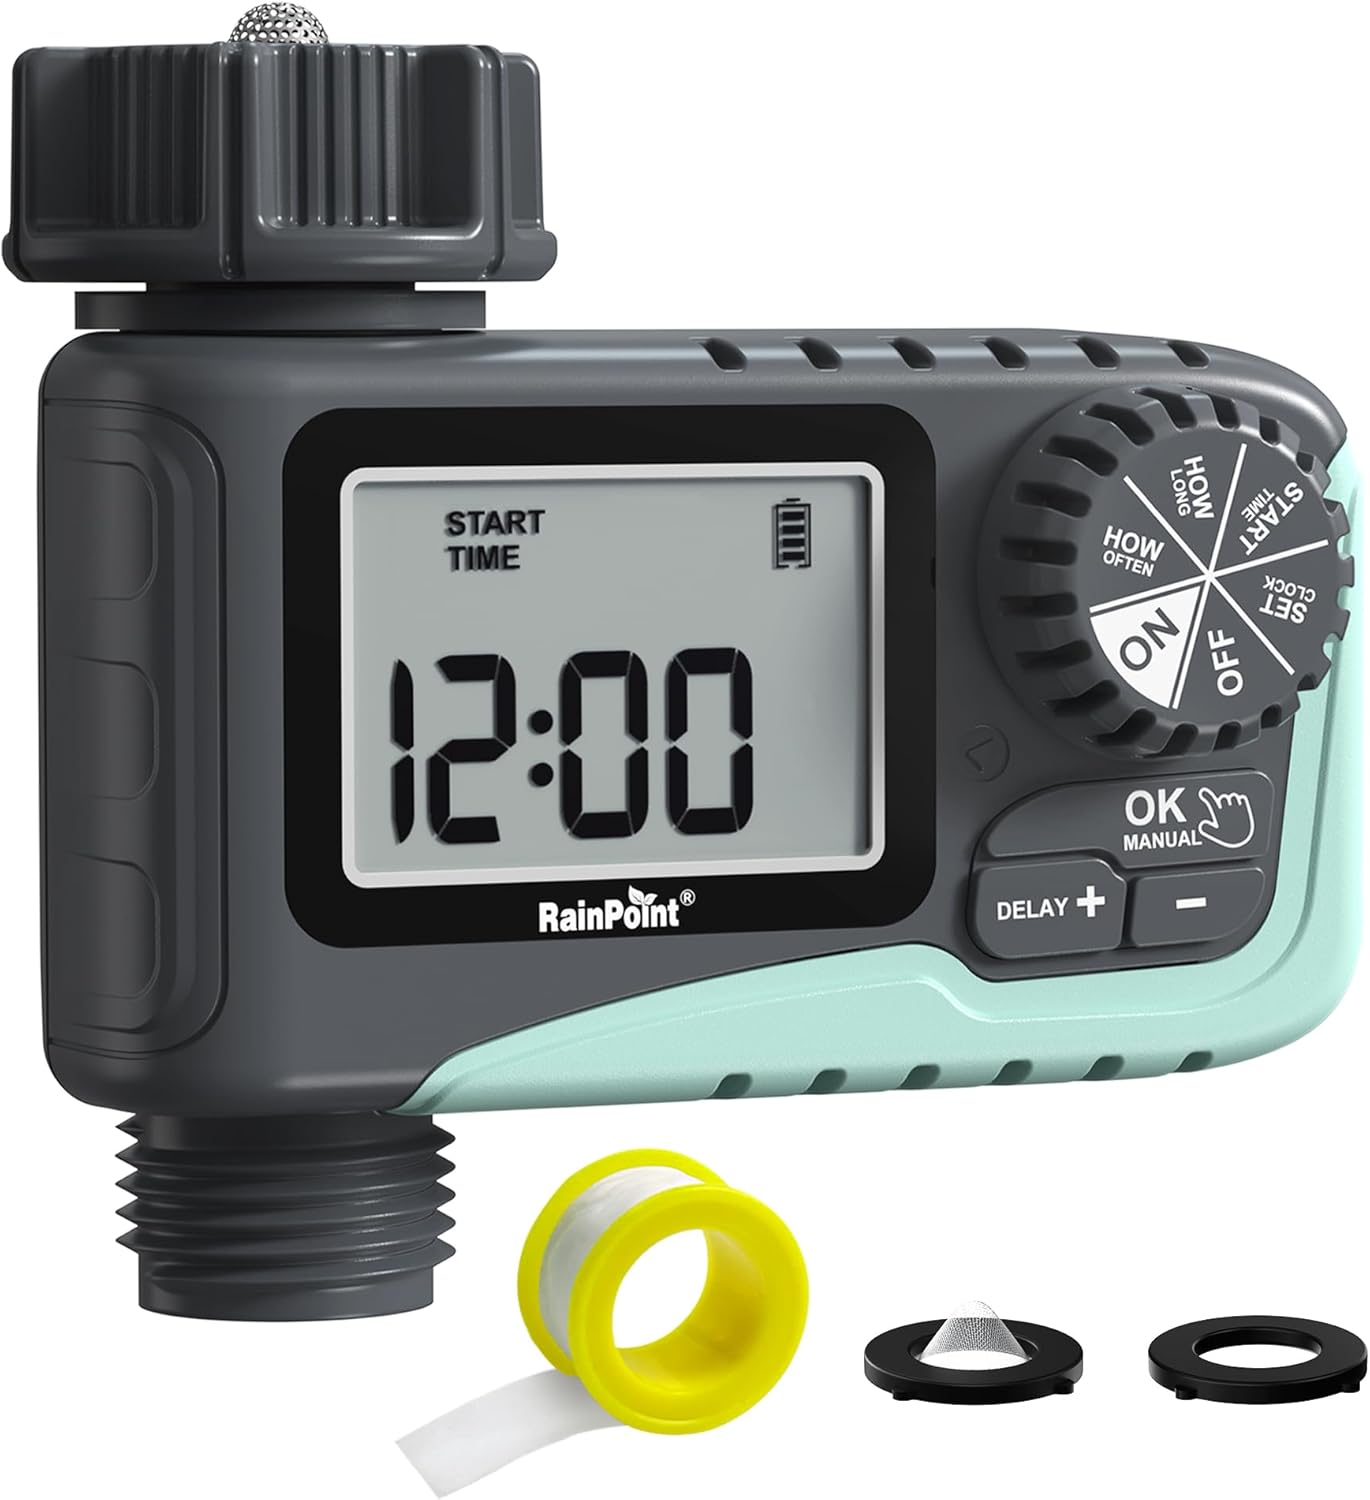
Figure 1 : Face avant view of the RAINPOINT Digital Sprinkler Timer (ITV105) showing the large LCD screen, control dial, and buttons.
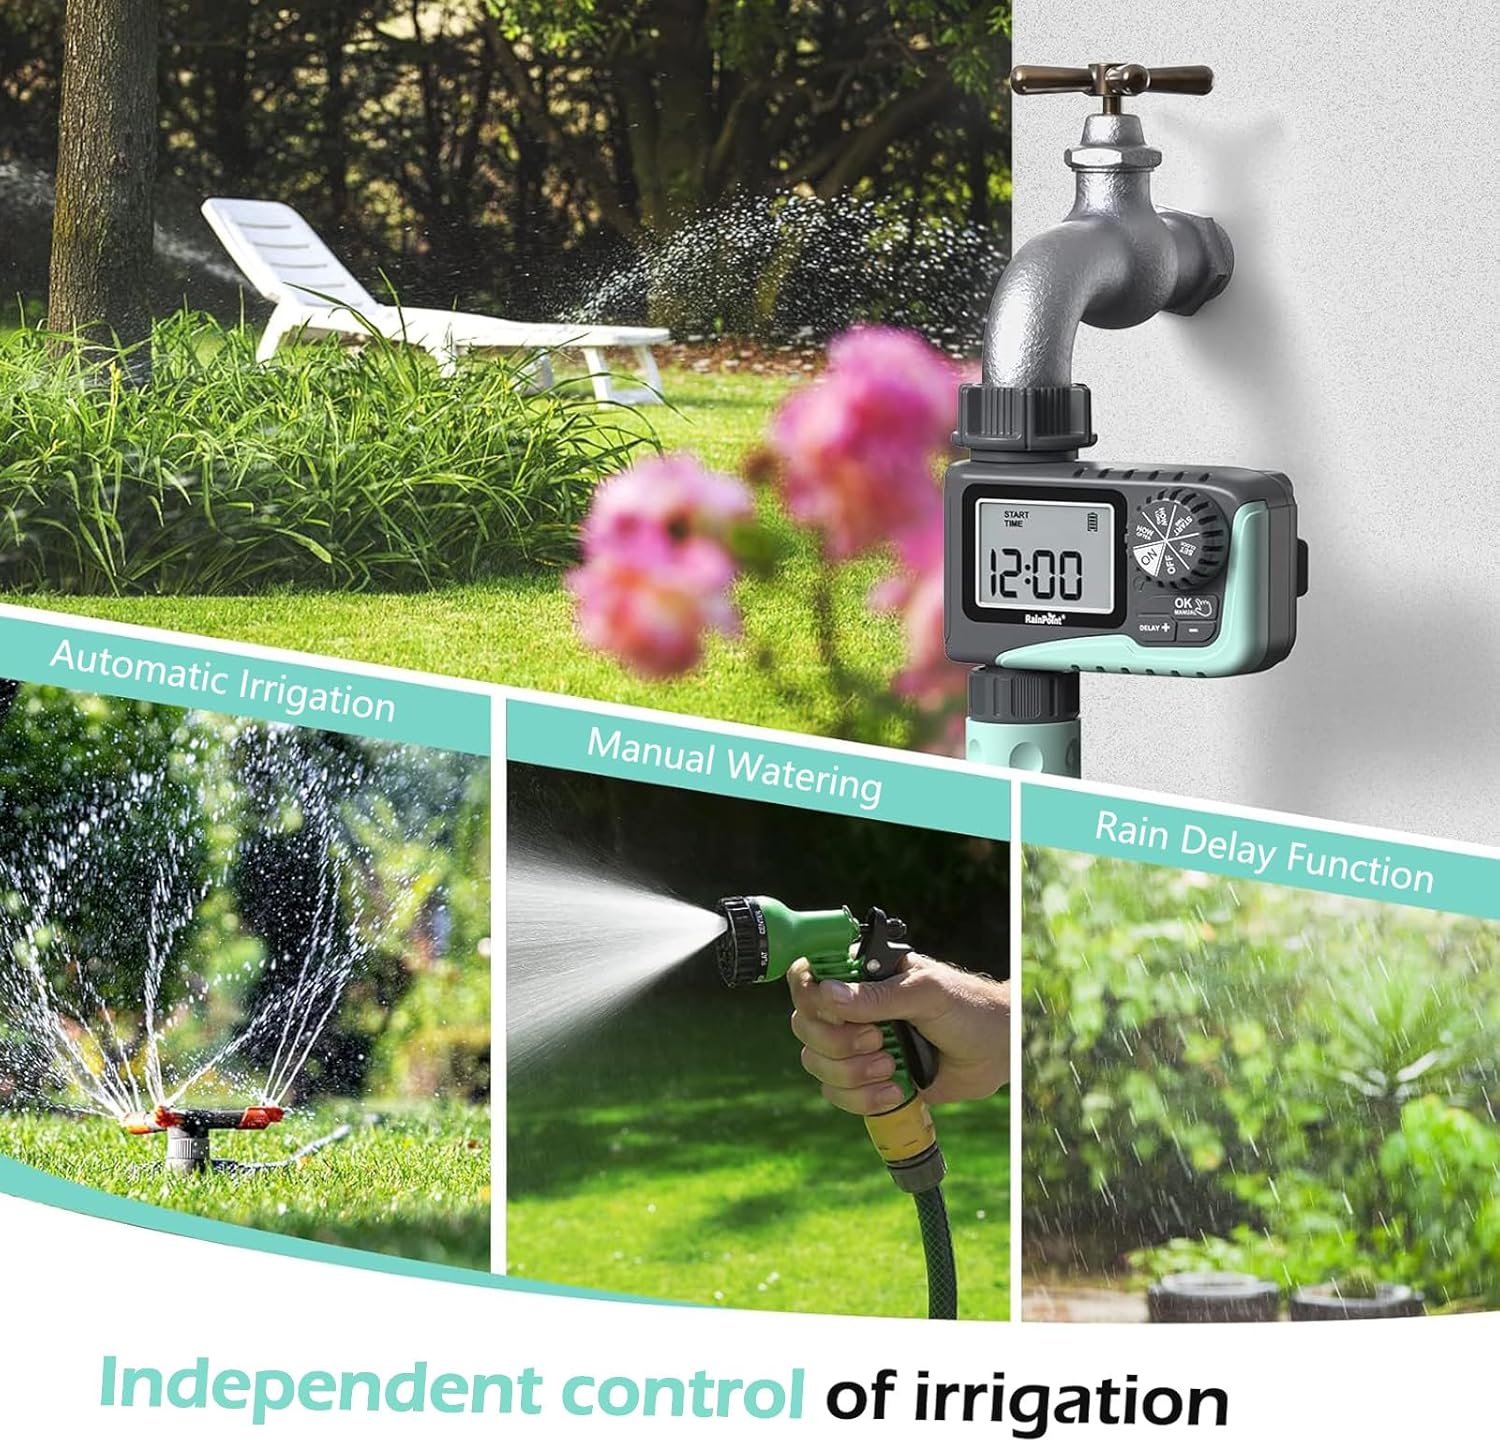
Figure 2: Illustration of the timer's three main functions: automatic irrigation, manual watering, and rain delay.
Contenu du colis
Veuillez vérifier le contenu du colis à l'ouverture afin de vous assurer que tous les articles sont présents :
- 1 x RAINPOINT Digital Sprinkler Timer (ITV105)
- 1 x Manuel d'utilisation (ce document)
- 1 x ruban de téflon
- 1 x Rubber washer
- 1 x Spare filter
Configuration et installation
Follow these steps to properly set up your sprinkler timer:
- Installer les piles :
Locate the battery compartment on the back of the timer. Insert 2 new AAA (1.5V) alkaline batteries, ensuring correct polarity. Close the battery compartment securely. The LCD screen will power on.
- Préparer le robinet :
Ensure your outdoor hose faucet is clean and free of debris. If necessary, apply the included Teflon tape to the faucet threads for a watertight seal.
- Attach Timer to Faucet:
Screw the timer's inlet (top connector) onto your 3/4" outdoor hose faucet. Hand-tighten firmly. Ensure the rubber washer is properly seated inside the timer's inlet to prevent leaks. The timer features a 360° rotating connector for easy positioning.
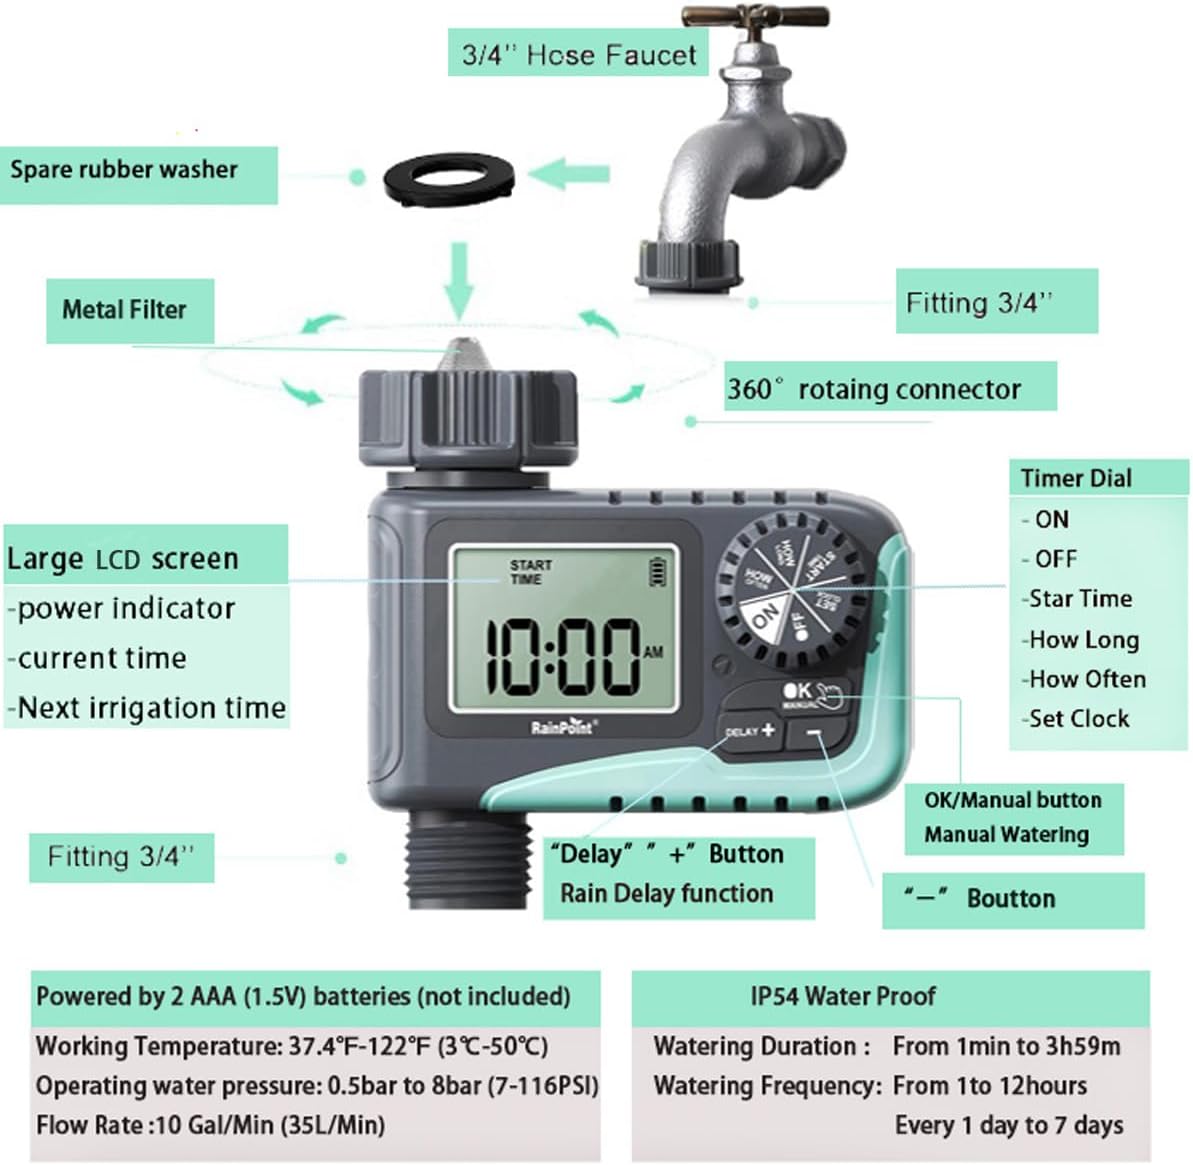
Figure 3: Diagram illustrating the components of the sprinkler timer, including the 3/4" hose faucet connection, metal filter, and LCD screen.
- Raccorder le tuyau :
Attach your garden hose to the timer's outlet (bottom connector). Hand-tighten securely. Ensure a proper washer is in place at the hose connection point.
- Open Faucet:
Fully open your outdoor hose faucet. The timer is designed to withstand water pressure from 0.5 bar to 8 bar (7-116 PSI). The timer will control the water flow, not the faucet.
Mode d'emploi
The RAINPOINT ITV105 timer features a large dial and intuitive buttons for easy programming.
Positions du cadran de contrôle :
- SUR: Activates the timer for automatic watering.
- OFF: Deactivates the timer, stopping all watering.
- RÉGLAGE DE L'HORLOGE: Régler l'heure actuelle.
- HEURE DE DÉBUT: Set the desired start time for watering cycles.
- COMBIEN DE TEMPS: Set the duration of each watering cycle.
- À QUELLE FRÉQUENCE: Set the frequency of watering cycles.
Boutons:
- OK/MANUAL: Confirms settings or initiates manual watering.
- DELAY +: Increases values during setting or activates/adjusts rain delay.
- -: Diminue les valeurs lors du réglage.
Setting the Current Time (SET CLOCK):
- Tournez le cadran pour RÉGLER L'HORLOGE.
- Utilisez le + et - boutons pour régler l'heure. Appuyez sur OK pour confirmer.
- Utilisez le + et - boutons pour régler les minutes. Appuyez sur OK pour confirmer.
- Tournez le cadran pour ON to save the time and return to normal operation.
Setting Automatic Watering Program:
This timer allows you to set a start time, duration, and frequency for automated watering.
- Set Start Time (START TIME):
Tournez le cadran pour HEURE DE DÉBUT. Utiliser + et - to set the desired watering start hour and minute. Press OK pour confirmer chaque réglage.
- Set Watering Duration (HOW LONG):
Tournez le cadran pour COMBIEN DE TEMPS. Utiliser + et - to set the watering duration from 1 minute to 3 hours and 59 minutes. Press OK pour confirmer.

Figure 4: Screen showing settings for "HOW OFTEN" (frequency) and "HOW LONG" (duration) for automatic watering.
- Set Watering Frequency (HOW OFTEN):
Tournez le cadran pour À QUELLE FRÉQUENCE. Utiliser + et - to set the frequency:
- Every 1 hour to 12 hours.
- Every 1 day to 7 days.
Presse OK pour confirmer.
- Programme d'activation :
Tournez le cadran pour ONLa minuterie fonctionnera désormais selon votre programmation.
Arrosage manuel :
Pour arroser immédiatement sans perturber votre programme d'arrosage :
- Assurez-vous que le cadran est dans la position ON position.
- Appuyez sur le OK/MANUEL button. The display will show the default manual watering duration (e.g., 10 minutes).
- Utilisez le + et - boutons permettant de régler la durée d'arrosage manuel de 1 minute à 8 heures.
- Presse OK again to start manual watering. The timer will count down the set duration.
- Pour arrêter l'arrosage manuel prématurément, appuyez sur OK/MANUEL encore.

Figure 5: Display showing the manual watering duration setting, adjustable from 1 minute to 8 hours.
Fonction de retard de pluie :
The rain delay function allows you to pause your watering schedule for a set period due to rain or other reasons, preventing overwatering.
- Assurez-vous que le cadran est dans la position ON position.
- Appuyez sur le DELAY + button. The display will show a default delay time (e.g., 24H).
- Presse DELAY + repeatedly to cycle through delay options (e.g., 24H, 48H, 72H).
- Once you select the desired delay, the timer will enter rain delay mode. The display will show the remaining delay time.
- After the delay period ends, the timer will automatically resume its programmed watering schedule.
- Pour annuler le retard dû à la pluie, appuyez sur DELAY + button until the delay time disappears, or rotate the dial to OFF and then back to ON.

Figure 6: The timer displaying the rain delay countdown, highlighting its IP54 waterproof rating.
Entretien
Proper maintenance ensures the longevity and optimal performance of your RAINPOINT Sprinkler Timer.
- Nettoyer le filtre : Periodically check and clean the metal filter located at the timer's inlet. Remove the timer from the faucet, unscrew the filter, rinse it under running water to remove any debris, and reinsert it.
- Remplacement de la batterie : When the low battery indicator appears on the LCD screen, replace the 2 AAA batteries promptly. Always use new alkaline batteries.
- Hivérisation: Before the first frost, remove the timer from the faucet and store it indoors in a dry, frost-free location. Remove the batteries before storage.
- Vérifiez les fuites : Regularly inspect all connections (faucet to timer, timer to hose) for any signs of leakage. Ensure all connections are hand-tightened and that rubber washers are properly seated.

Figure 7: Visual representation of the built-in metal filter and durable plastic material designed for anti-leakage and longer service life.
Dépannage
If you encounter issues with your RAINPOINT Sprinkler Timer, refer to the following common problems and solutions:
| Problème | Cause possible | Solution |
|---|---|---|
| Timer not turning on / LCD blank. | Piles mortes ou mal installées. | Replace with 2 new AAA alkaline batteries, ensuring correct polarity. |
| Pas de débit d'eau. |
|
|
| Fuite d'eau au niveau des raccords. |
|
|
| La minuterie ne respecte pas l'horaire. |
|
|
Caractéristiques
| Fonctionnalité | Spécification |
|---|---|
| Modèle | ITV105 |
| Dimensions du produit | 10.5 x 10.3 x 5 cm (4 x 4 x 2 pouces) |
| Matériel | Acrylonitrile butadiène styrène (ABS) |
| Watering Duration (Automatic) | 1 minute à 3 heures 59 minutes |
| Watering Frequency (Automatic) | Every 1 hour to 12 hours, or every 1 day to 7 days |
| Watering Duration (Manual) | 1 minute to 8 hours (Default: 10 minutes) |
| Débit max. | 10 gal/min (35 L/min) |
| Plage de pression d'eau | 0.5 bar to 8 bar (7-116 PSI) |
| Température de fonctionnement | 3 ℃ -50 ℃ (37.4 ℉ -122 ℉) |
| Source d'énergie | 2 x AAA (1.5V) batteries (not included) |
| Indice d'étanchéité | IP54 |
Garantie et assistance
RAINPOINT products are manufactured to high-quality standards. For specific warranty details, please refer to the warranty card included with your product or visit the official RAINPOINT website. If you encounter any issues or have questions not covered in this manual, please contact RAINPOINT customer support through their official weble site ou le détaillant où vous avez acheté le produit.
Pour plus d'informations et d'assistance, vous pouvez consulter le site web suivant : RAINPOINT Store on Amazon.


