1. Introduction
The Trevi DAB 7F80 R is a portable digital radio offering DAB, DAB+, and FM reception, along with Bluetooth connectivity. It features a high-readability Dot Matrix display, a programmable alarm clock, and a headphone jack. This manual provides instructions for the proper setup, operation, and maintenance of your device.
2. Consignes de sécurité
- Lisez attentivement toutes les instructions avant d'utiliser l'appareil.
- N’exposez pas l’appareil à l’eau, à l’humidité ou à des températures extrêmes.
- Use only the specified power source (4 x AAA batteries or a compatible 5V DC adapter, not included).
- Ne tentez pas de démonter, de réparer ou de modifier l'appareil. Confiez toute intervention à un personnel qualifié.
- Jetez les piles de manière responsable, conformément à la réglementation locale.
- Gardez l'appareil à l'écart des champs magnétiques puissants.
3. Contenu du colis
Veuillez vérifier que les éléments suivants sont inclus dans votre colis :
- Trevi DAB 7F80 R Main Unit
- Manuel de l'utilisateur (ce document)
- Certificat de garantie
4. Produit terminéview
Familiarize yourself with the components and controls of your Trevi DAB 7F80 R radio.
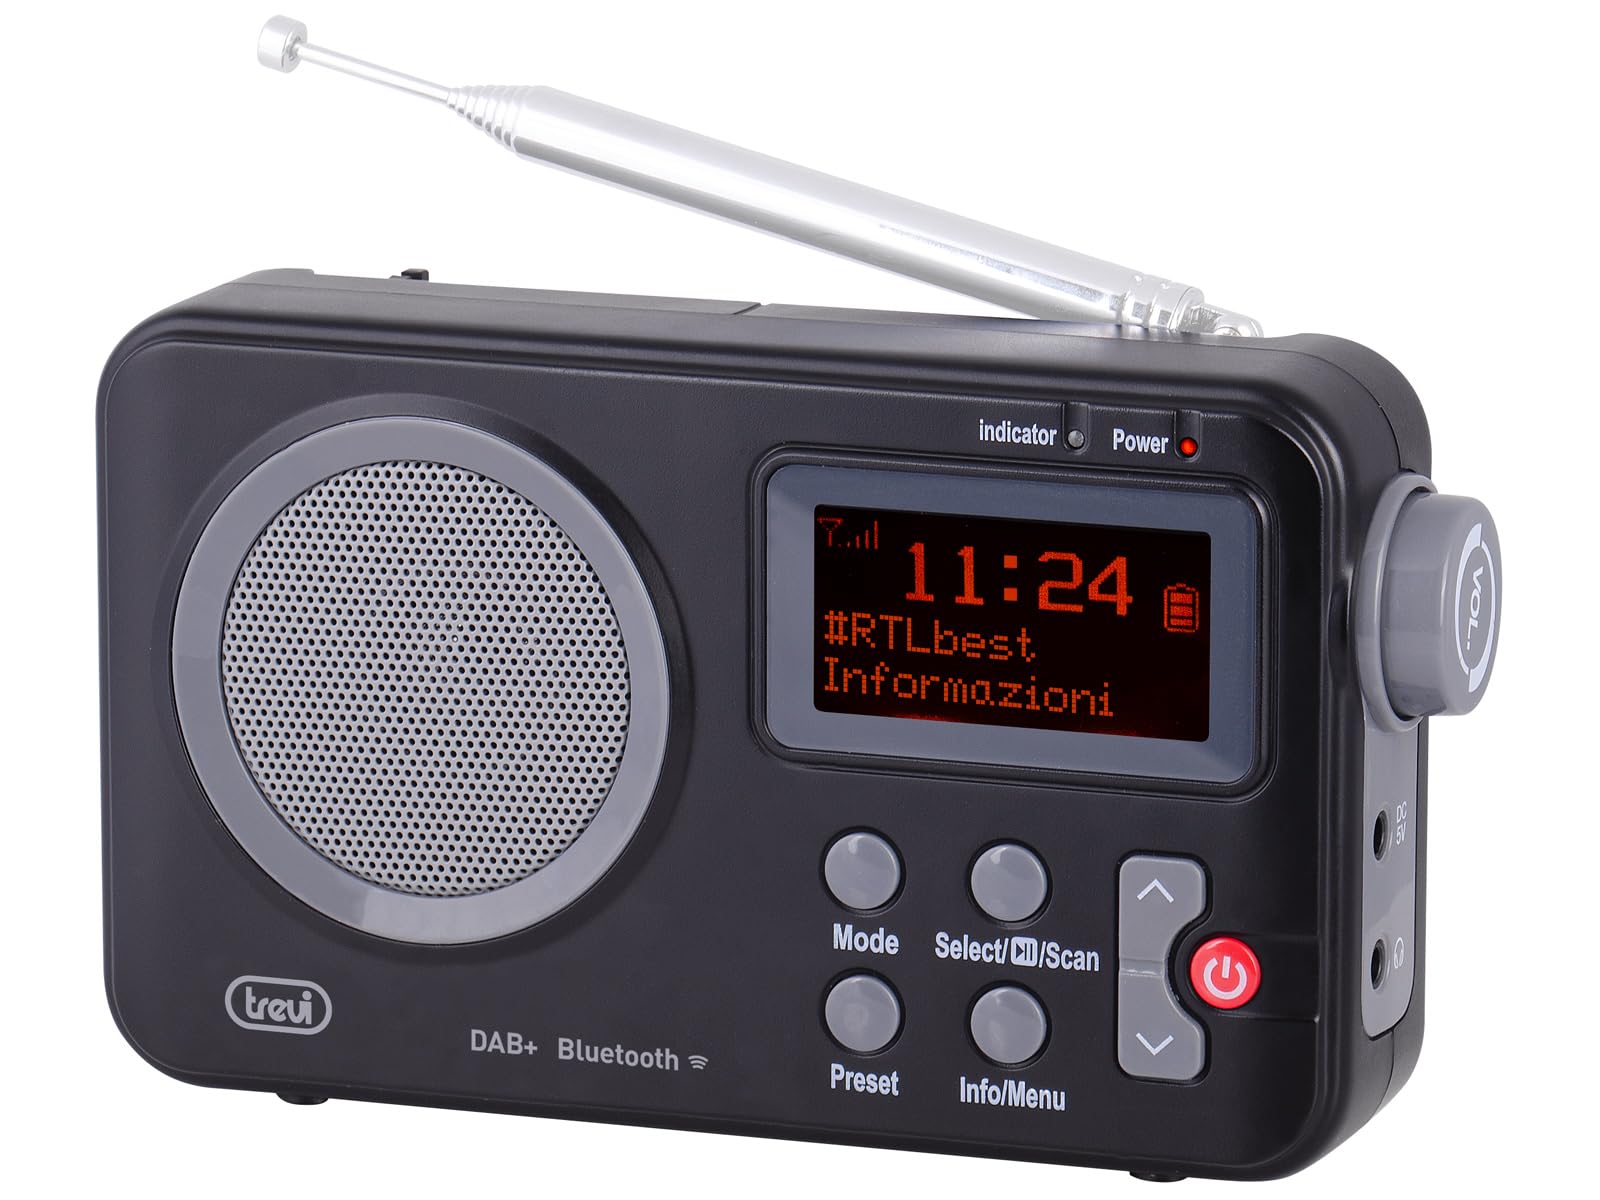
Figure 1 : Devant view of the Trevi DAB 7F80 R radio. This image displays the Dot Matrix screen, the main speaker grille, and the primary control buttons including Mode, Select/Scan, Preset, Info/Menu, and Power. The extendable telescopic antenna is visible at the top.
Contrôles et fonctionnalités :
- Afficher: High-readability Dot Matrix screen for station information, time, and menu navigation.
- Conférencier: Haut-parleur intégré pour la sortie audio.
- Bouton d'alimentation : Allume/éteint la radio.
- Bouton Mode : Switches between DAB/DAB+, FM, and Bluetooth modes.
- Select/Scan Button: Confirms selections in menus, initiates station scans.
- Bouton de préréglage : Accesses and stores favorite radio stations.
- Bouton Info/Menu : Displays station information and accesses system settings.
- Boutons fléchés haut/bas : Navigates through menus, adjusts volume, changes stations.
- Prise casque: Sortie 3.5 mm pour une écoute privée.
- Antenne: Antenne télescopique extensible pour une meilleure réception radio.
5. Installation
5.1 Alimentation de l'appareil
The Trevi DAB 7F80 R can be powered by batteries or an external AC adapter.
- Installation de la batterie : Open the battery compartment cover on the back of the unit. Insert 4 x AAA batteries (not included), ensuring correct polarity (+/-). Close the cover securely.
- Adaptateur secteur (en option) : For continuous power, connect a compatible 5V DC, 1A AC adapter (not included) to the DC IN port on the side of the radio.
Avertissement important: Do not use batteries in the device when it is connected to an AC adapter for extended periods. This may lead to battery leakage or damage to the unit. If using the AC adapter, remove the batteries. If using batteries, disconnect the AC adapter.
5.2 Initial Power On and Station Scan
- Déployez complètement l'antenne télescopique pour une réception optimale.
- Appuyez sur le Pouvoir bouton pour allumer la radio.
- Lors de la première utilisation, la radio peut vous inviter à sélectionner une langue. Utilisez le Flèche haut / bas boutons pour naviguer et Sélectionner/Scanner pour confirmer.
- The radio will automatically perform a full scan for DAB/DAB+ stations. This process may take a few minutes. Once complete, the first available station will begin playing.
6. Mode d'emploi
6.1 Radio Mode (DAB/DAB+, FM)
- Modes de commutation: Appuyez sur le Mode button repeatedly to cycle between DAB, FM, and Bluetooth modes.
- Recherche de stations :
- In DAB mode, a full scan is usually performed on first use. To perform a new scan, press and hold Sélectionner/Scanner.
- En mode FM, appuyez sur Sélectionner/Scanner pour rechercher automatiquement la prochaine station disponible.
- Sélection des stations : Utilisez le Flèche haut / bas boutons pour parcourir les stations disponibles.
- Stockage des préréglages: The radio can store up to 20 DAB/DAB+ and 20 FM stations.
- Syntonisez la station souhaitée.
- Appuyez et maintenez enfoncé le Préréglage appuyez sur le bouton jusqu'à ce que « Preset Store » apparaisse à l'écran.
- Utilisez le Flèche haut / bas boutons pour sélectionner un numéro prédéfini (1-20).
- Presse Sélectionner/Scanner pour confirmer et sauvegarder la station.
- Rappel des préréglages: Appuyez sur le Préréglage button briefly. Use the Flèche haut / bas appuyez sur les boutons pour sélectionner le numéro prédéfini souhaité, puis appuyez sur Sélectionner/Scanner.
- RDS/DLS Information: In FM or DAB mode, press the Infos/Menu button repeatedly to cycle through available information such as station name, program type, time, and song title (if broadcast).
6.2 Mode Bluetooth
- Appuyez sur le Mode button until 'Bluetooth' appears on the display. The radio will enter pairing mode, indicated by a flashing Bluetooth icon.
- Sur votre smartphone, tablette ou ordinateur portable, activez le Bluetooth et recherchez les appareils disponibles.
- Select 'Trevi DAB 7F80 R' from the list of devices to pair. Once connected, the Bluetooth icon will stop flashing.
- You can now play audio from your connected device through the radio. Use your device's controls for playback and the radio's volume controls for audio level.
6.3 Fonctions Horloge et Alarme
The radio features an integrated clock and two programmable alarms.
- Réglage de l'heure :
- Appuyez et maintenez enfoncé le Infos/Menu bouton pour entrer dans le menu principal.
- Utiliser Flèche haut / bas buttons to navigate to 'Time/Date' and press Sélectionner/Scanner.
- Select 'Set Time/Date' and adjust the hour, minute, day, month, and year using the Flèche haut / bas boutons et confirmation de chaque étape avec Sélectionner/Scanner.
- Setting Alarms (Alarm 1 / Alarm 2):
- From the main menu, navigate to 'Alarm' and press Sélectionner/Scanner.
- Select 'Alarm 1 Setup' or 'Alarm 2 Setup'.
- Configure the alarm settings: 'On Time' (hour/minute), 'Duration', 'Source' (Buzzer or last used radio station), 'Volume', and 'Frequency' (Daily, Weekdays, Weekends, Once). Use Flèche haut / bas boutons pour ajuster les valeurs et Sélectionner/Scanner pour confirmer chaque réglage.
- Ensure the alarm is set to 'On' in the alarm setup menu.
- Deactivating a sounding alarm: Appuyez sur le Pouvoir bouton pour éteindre l'alarme.
6.4 Utilisation des écouteurs
To listen privately, insert standard 3.5mm headphones into the headphone jack located on the side of the radio. The internal speaker will automatically mute.
7. Entretien
- Nettoyage: Essuyez la radio avec un chiffon doux, sec et non pelucheux. N’utilisez pas de nettoyants abrasifs, de cires ni de solvants.
- Remplacement de la batterie : When the low battery indicator appears on the display, replace all four AAA batteries with new ones.
- Stockage: If the radio will not be used for an extended period, remove the batteries to prevent leakage and potential damage. Store the device in a cool, dry place.
8. Dépannage
If you encounter issues with your Trevi DAB 7F80 R, please refer to the following common problems and solutions:
- La radio ne s'allume pas :
- Vérifiez que les piles sont correctement insérées et qu'elles ne sont pas déchargées. Remplacez-les si nécessaire.
- Si vous utilisez un adaptateur secteur, assurez-vous qu'il est correctement branché et que la prise de courant est fonctionnelle.
- Aucun son ou mauvaise qualité sonore :
- Régler le volume.
- Assurez-vous que les écouteurs ne sont pas connectés si vous souhaitez entendre le son provenant du haut-parleur.
- Check radio reception. Extend and adjust the antenna. Try moving the radio to a different location.
- For Bluetooth, ensure the device is paired and audio is playing from the source.
- Clock resets after power loss or battery change:
- This model does not feature a backup battery for the clock. It is normal for the time to reset when power is completely removed (e.g., batteries removed or AC adapter unplugged). You will need to re-set the time manually as described in section 6.3.
- Autonomie courte de la batterie :
- Battery life can vary depending on usage and battery quality. Use high-quality alkaline batteries for best performance.
- For prolonged use, consider using a compatible 5V DC AC adapter (not included).
- Difficulty with setup or navigation (e.g., station search, alarm setup):
- The radio uses a limited number of buttons for various functions. Refer to the specific operating instructions in section 6 for detailed, step-by-step guidance. Some functions may require pressing buttons multiple times or holding them down.
- Radio turns off when switching between battery and AC power:
- This is expected behavior. The radio will power cycle when changing its primary power source. Ensure you have saved any settings or presets before switching.
9. Spécifications
| Marque | Trévi |
| Modèle | DAB7F80R |
| Couleur | Noir |
| Technologie de réglage | DAB/DAB+, FM |
| Bandes radio prises en charge | DAB, DAB+, FM (3 bands) |
| Bluetooth | Oui |
| Afficher | High-readability Dot Matrix |
| Alarmes | 2 alarmes programmables |
| Préréglages | 20 DAB/DAB+, 20 FM |
| Source d'énergie | 4 x AAA batteries (not included) or 5V DC adapter (not included) |
| Appareils compatibles | Smartphone, tablet, laptop |
| Dimensions du produit (L x l x H) | 14 x 3.5 x 8.5 cm |
| Composants inclus | Main unit, user manual, warranty certificate |
10. Garantie et assistance
This product is supplied with a warranty certificate. For detailed information regarding warranty terms and conditions, please refer to the certificate included in your package.
For technical support, troubleshooting beyond this manual, or warranty claims, please contact your retailer or the manufacturer's customer service using the contact information provided with your purchase.