1. Introduction
This manual provides essential instructions for the safe and efficient operation, maintenance, and troubleshooting of your KIMO Electric Tacker, Model QM-9418. This cordless tool is designed for various fastening tasks, offering both finish nailing and stapling capabilities. Please read this manual thoroughly before initial use and retain it for future reference.

Figure 1: KIMO Electric Tacker QM-9418 and included accessories.
2. Consignes de sécurité
La sécurité doit toujours être votre priorité lorsque vous utilisez des outils électriques. Le non-respect de ces instructions peut entraîner des blessures ou endommager l'outil.
- Portez un équipement de protection individuelle (EPI) : Always wear safety glasses, hearing protection, and gloves when operating the tacker.
- Sécurité de la zone de travail : Gardez la zone de travail propre et bien éclairée. Les zones encombrées ou sombres favorisent les accidents.
- Mis-fire Prevention Device: The tool is equipped with a mis-fire prevention mechanism. It will only fire when the contact arm is fully pressed against the workpiece. Do not attempt to bypass this safety feature.
- Three-Step Operation: For precise and safe nailing, follow the three-step process: 1) Press the nailer front against the material, 2) Press the cartridge, 3) Lock with the lock lever.
- Empty Shot Prevention: The tool features an empty shot prevention function, which prevents firing when the magazine is empty, reducing wear and tear and preventing damage to the workpiece.
- Sécurité des batteries : Use only KIMO-approved batteries and chargers. Do not expose batteries to extreme temperatures or moisture.
- Manipulation des outils : Always hold the tool firmly with both hands during operation. Keep fingers away from the firing mechanism.
3. Produit terminéview
The KIMO Electric Tacker QM-9418 is a versatile cordless tool designed for various fastening applications. It combines the functionality of a finish nailer and a stapler.
3.1 Composants
- KIMO Electric Tacker Main Unit
- 20V/2.0Ah Lithium-ion Battery (x2)
- Chargeur de batterie
- Étui de protection
- Finish Nails (700 pieces, 20-50mm)
- Staples (300 pieces, 4x19-40mm)
- Allen Wrench (for jam clearing)
- Manuel d'instructions
3.2 Principales caractéristiques
- Fonctionnement sans fil : Powered by 20V 2.0Ah lithium-ion batteries, eliminating the need for air compressors or power cords.
- Fonctionnalité 2 en 1 : Supports both finish nails (20-50mm) and staples (4x19-40mm).
- Réglage de la profondeur : Easily adjust the nailing depth to suit different materials and desired finishes.
- Modes de tir doubles : Switch between single-shot mode for precision and continuous-shot mode for rapid fastening (up to 80 nails/minute).
- Lumière LED intégrée : Éclaire la zone de travail pour une meilleure visibilité dans des conditions de faible luminosité.
- Conception ergonomique : Lightweight (2.8kg main unit) and compact with a comfortable grip for extended use.
- Verrouillage de sécurité : Prevents accidental firing.
- High-Efficiency Heat Dissipation: Designed for stable performance during continuous operation.
4. Installation
4.1 Chargement et installation de la batterie
- Ensure the battery is fully charged before use. Connect the charger to a power outlet and insert the battery. The charger indicator will show the charging status.
- Once charged, slide the battery into the battery slot at the base of the tacker until it clicks securely into place.
- Pour retirer la batterie, appuyez sur le bouton de déverrouillage et faites glisser la batterie.

Figure 2: Battery installation and charge indicator.
4.2 Chargement des clous ou des agrafes
The KIMO Electric Tacker supports both finish nails and staples. Follow these steps to load fasteners:
- Release the Magazine: Operate the lever to release the magazine.
- Insérer les fixations : Place the strip of nails or staples into the magazine, ensuring they are oriented correctly with the points facing forward.
- Sécuriser le chargeur : Push the magazine back until the snap lock securely engages.

Figure 3: Three-step fastener loading process.
4.3 Adjusting Nailing Depth
The nailing depth can be adjusted to prevent damage to the material surface and achieve the desired finish.
- Repérez la molette ou le levier de réglage de la profondeur sur l'outil.
- Rotate the dial or move the lever to increase or decrease the nailing depth. Test on a scrap piece of material to ensure the correct depth is set.
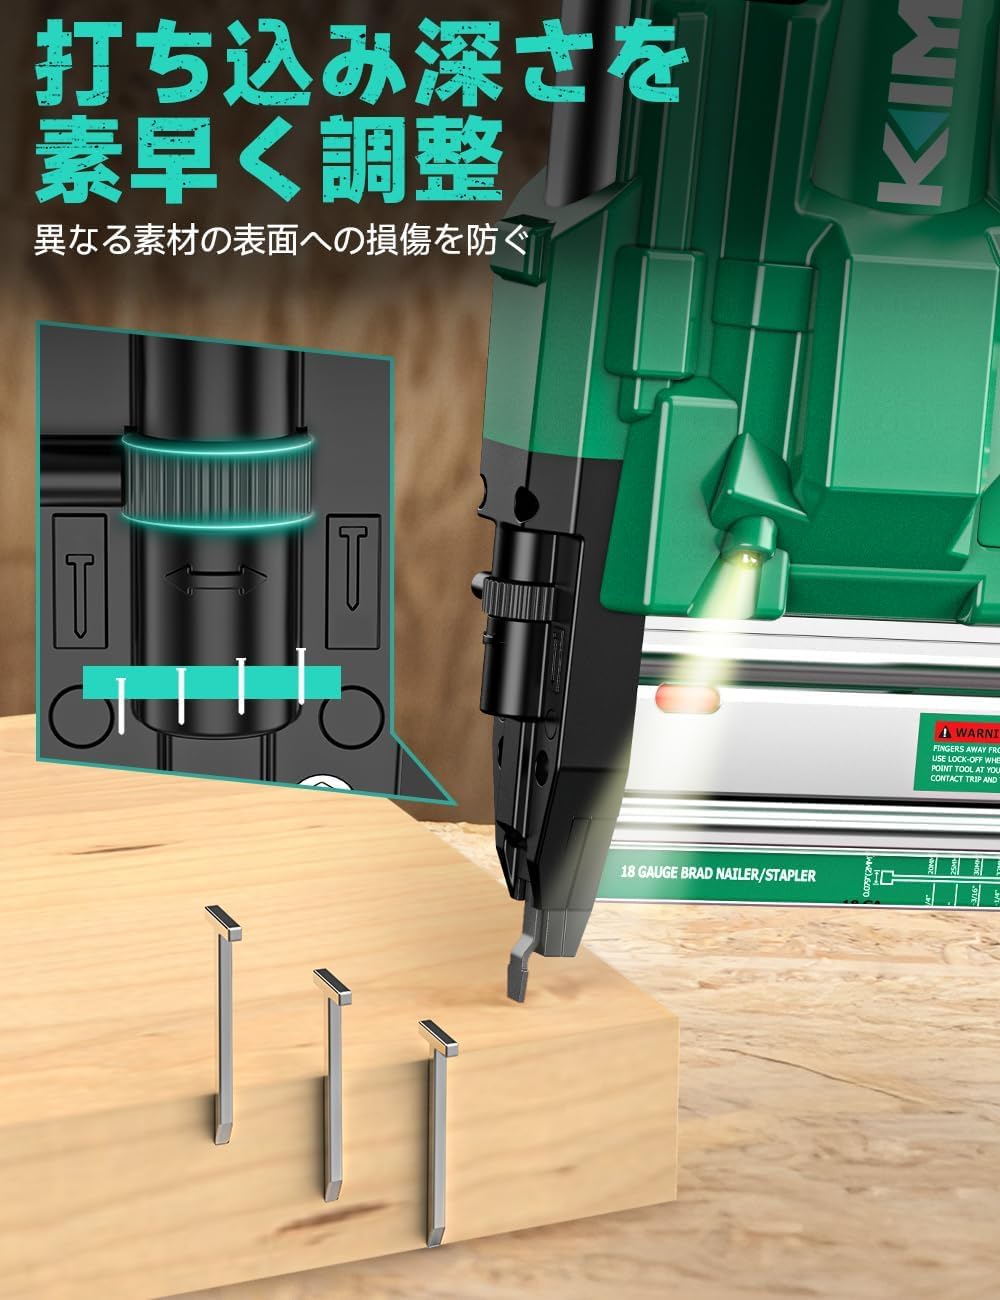
Figure 4: Depth adjustment mechanism.
5. Mode d'emploi
5.1 Sélection du mode de tir
The tacker offers two firing modes: single-shot and continuous-shot.
- Locate the mode selection switch on the tool.
- Déplacez le commutateur sur le mode souhaité :
- Single-Shot Mode: For precise fastening, one fastener is driven per trigger pull.
- Continuous-Shot Mode: For rapid fastening, fasteners are driven continuously as long as the trigger is held and the contact arm is pressed.
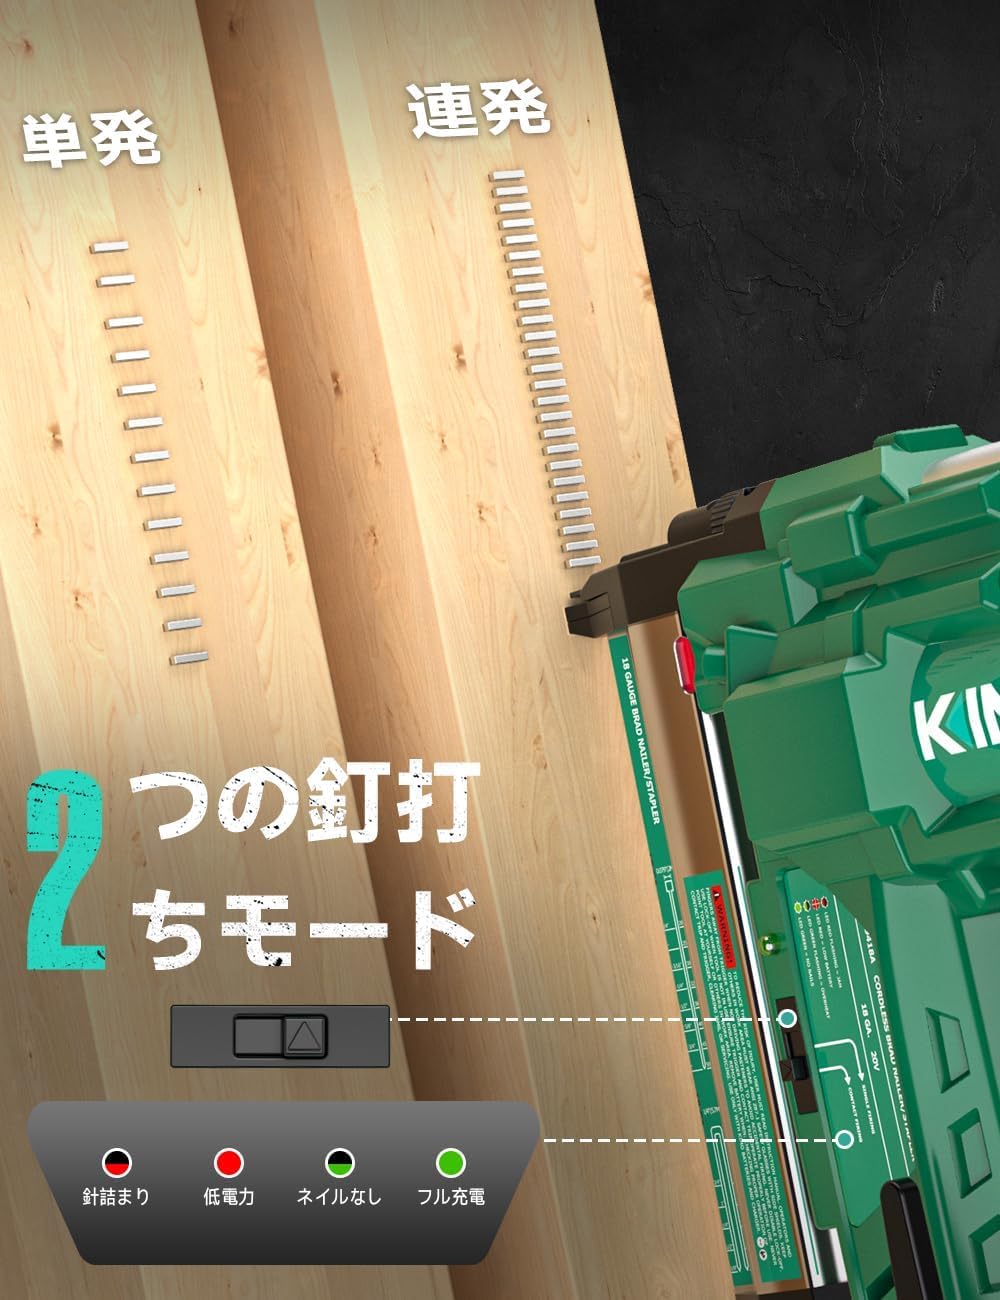
Figure 5: Firing mode selection switch.
5.2 Procédure de clouage
- Vérifiez que la batterie est installée et que les fixations sont en place.
- Select the appropriate firing mode.
- Place the nose of the tacker firmly against the workpiece where the fastener is to be driven. Ensure the contact arm is fully depressed.
- Tirez sur la gâchette pour enfoncer l'attache.
- Relâchez la gâchette et retirez l'outil de la pièce à usiner.
5.3 Lampe de travail à DEL
The integrated LED light automatically illuminates the work area when the tool is in operation, providing better visibility in low-light conditions.
5.4 Applicable Materials and Uses
This tacker is suitable for a wide range of materials and applications, including:
- Woodworking (e.g., furniture assembly, decorative trim)
- Construction (e.g., securing plasterboard, insulation, temporary fixtures)
- Projets DIY
- Décoration intérieure
- Cardboard pallet reinforcement
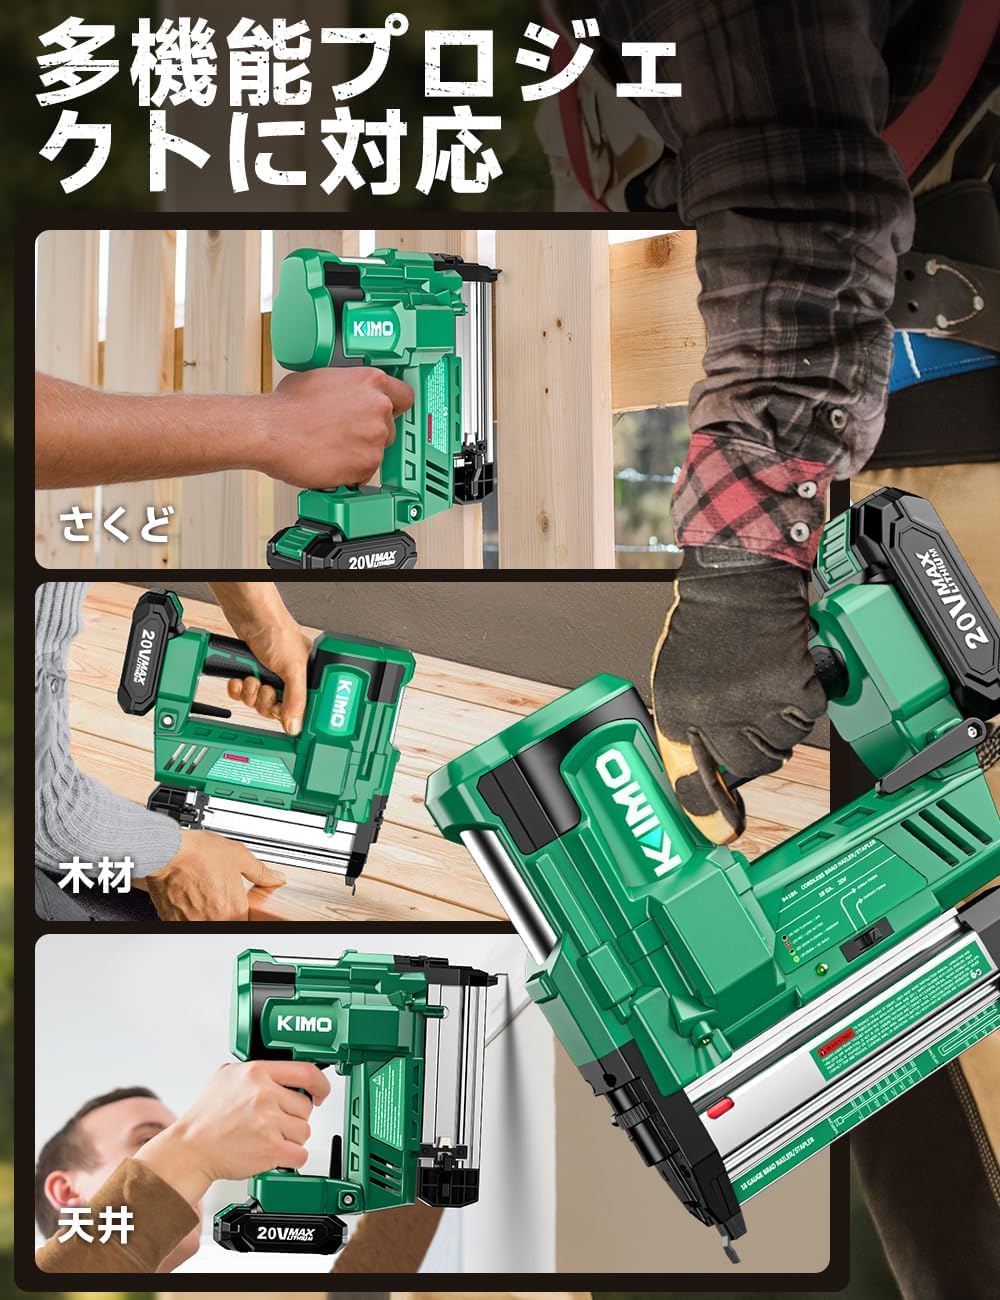
Figure 6 : Examples of tacker applications.
6. Entretien
6.1 Clearing Fastener Jams
In the event of a fastener jam, follow these steps:
- Débrancher l'alimentation : Always remove the battery before attempting to clear a jam.
- Ouvrez le magazine : Release the magazine as if loading new fasteners.
- Remove Jammed Fastener: Use the provided Allen wrench or pliers to carefully remove any jammed nails or staples from the firing mechanism or magazine. Do not force them out.
- Inspecter: Check for any damage to the magazine or firing pin.
- Close Magazine : Fermez soigneusement le chargeur.
6.2 Nettoyage et stockage généraux
- Veillez à ce que l'outil reste propre et exempt de poussière et de débris. Essuyez l'extérieur avec un chiffon sec.
- Rangez l'outil et les piles dans un endroit sec et frais, à l'abri de la lumière directe du soleil et de l'humidité.
- Retirez la batterie de l'outil lorsqu'il n'est pas utilisé pendant une période prolongée.
7. Dépannage
This section addresses common issues you might encounter with your KIMO Electric Tacker.
| Problème | Cause possible | Solution |
|---|---|---|
| L'outil ne démarre pas | Batterie non installée ou déchargée Contact arm not fully depressed Magazine empty (empty shot prevention) Blocage de la fermeture | Installer/charger la batterie Press tool firmly against workpiece Load fasteners Confiture transparente (voir section 6.1) |
| Fasteners not driven fully | Nailing depth set too shallow Charge de batterie faible Incorrect fastener size for material | Adjust depth setting deeper Recharger la batterie Use appropriate fastener size |
| Les fixations se bloquent fréquemment | Fixations endommagées Taille de fixation incorrecte Magazine or firing mechanism dirty | Use new, undamaged fasteners Ensure correct fastener size Clean magazine and firing area |
| L'outil surchauffe | Utilisation continue prolongée | Allow the tool to cool down. The high-efficiency heat dissipation design helps manage temperature, but breaks are recommended during extended use. |
If you encounter a problem not listed here or if the issue persists after attempting the solutions, please contact KIMO customer support.
8. Spécifications
| Fonctionnalité | Détail |
|---|---|
| Marque | KIMO |
| Numéro de modèle | QM-9418 |
| Vol batterietage | 20V |
| Capacité de la batterie | 2.0Ah Lithium-ion (x2 included) |
| Finish Nail Length | 20mm - 50mm (700 pcs included) |
| Taille de l'agrafe | Width 4mm, Length 19mm - 40mm (300 pcs included) |
| Max Firing Speed | 80 nails/minute (continuous mode) |
| Tool Weight (main unit) | 2.8 kg |
| Certification | Certifié PSE |
| Code UPC | 731029251059 |
9. Garantie et assistance
9.1 Garantie du fabricant
The KIMO Electric Tacker QM-9418 comes with a 1-year manufacturer's warranty. This warranty covers defects in materials and workmanship under normal use. Please retain your proof of purchase for warranty claims.
If a battery becomes unusable within one year of purchase, contact after-sales service for a replacement.
9.2 Assistance clientèle
For any questions, technical assistance, or warranty claims, please contact KIMO customer support through the retailer where the product was purchased or visit the official KIMO website pour les coordonnées.


