1. Introduction
Thank you for choosing the ADE CK2310 Digital Radio Alarm Clock. This device offers precise timekeeping via DCF radio signal, dual alarm settings, temperature and humidity display, and a convenient backlight function. Its compact design makes it suitable for both home use and travel. Please read this manual carefully to ensure proper use and optimal performance of your new alarm clock.

Image 1.1: The ADE CK2310 Digital Radio Alarm Clock is designed for portability, making it an ideal travel companion.
2. Consignes de sécurité
- Gardez l'appareil à l'écart de l'eau et de l'humidité élevée.
- N'exposez pas l'appareil à des températures extrêmes ou à la lumière directe du soleil.
- Évitez de faire tomber l'appareil ou de le soumettre à des chocs violents.
- N’essayez pas de démonter ou de réparer l’appareil vous-même. Contactez un technicien qualifié.
- Jetez les piles usagées conformément aux réglementations locales.
- Gardez les piles hors de portée des enfants.
3. Contenu du colis
Veuillez vérifier le contenu du colis lors du déballage :
- ADE CK2310 Digital Radio Alarm Clock
- 2 piles AAA
- Manuel d'instructions

Image 3.1: The package includes the ADE CK2310 alarm clock and two AAA batteries.
4. Produit terminéview
Familiarize yourself with the various components and display elements of your alarm clock.
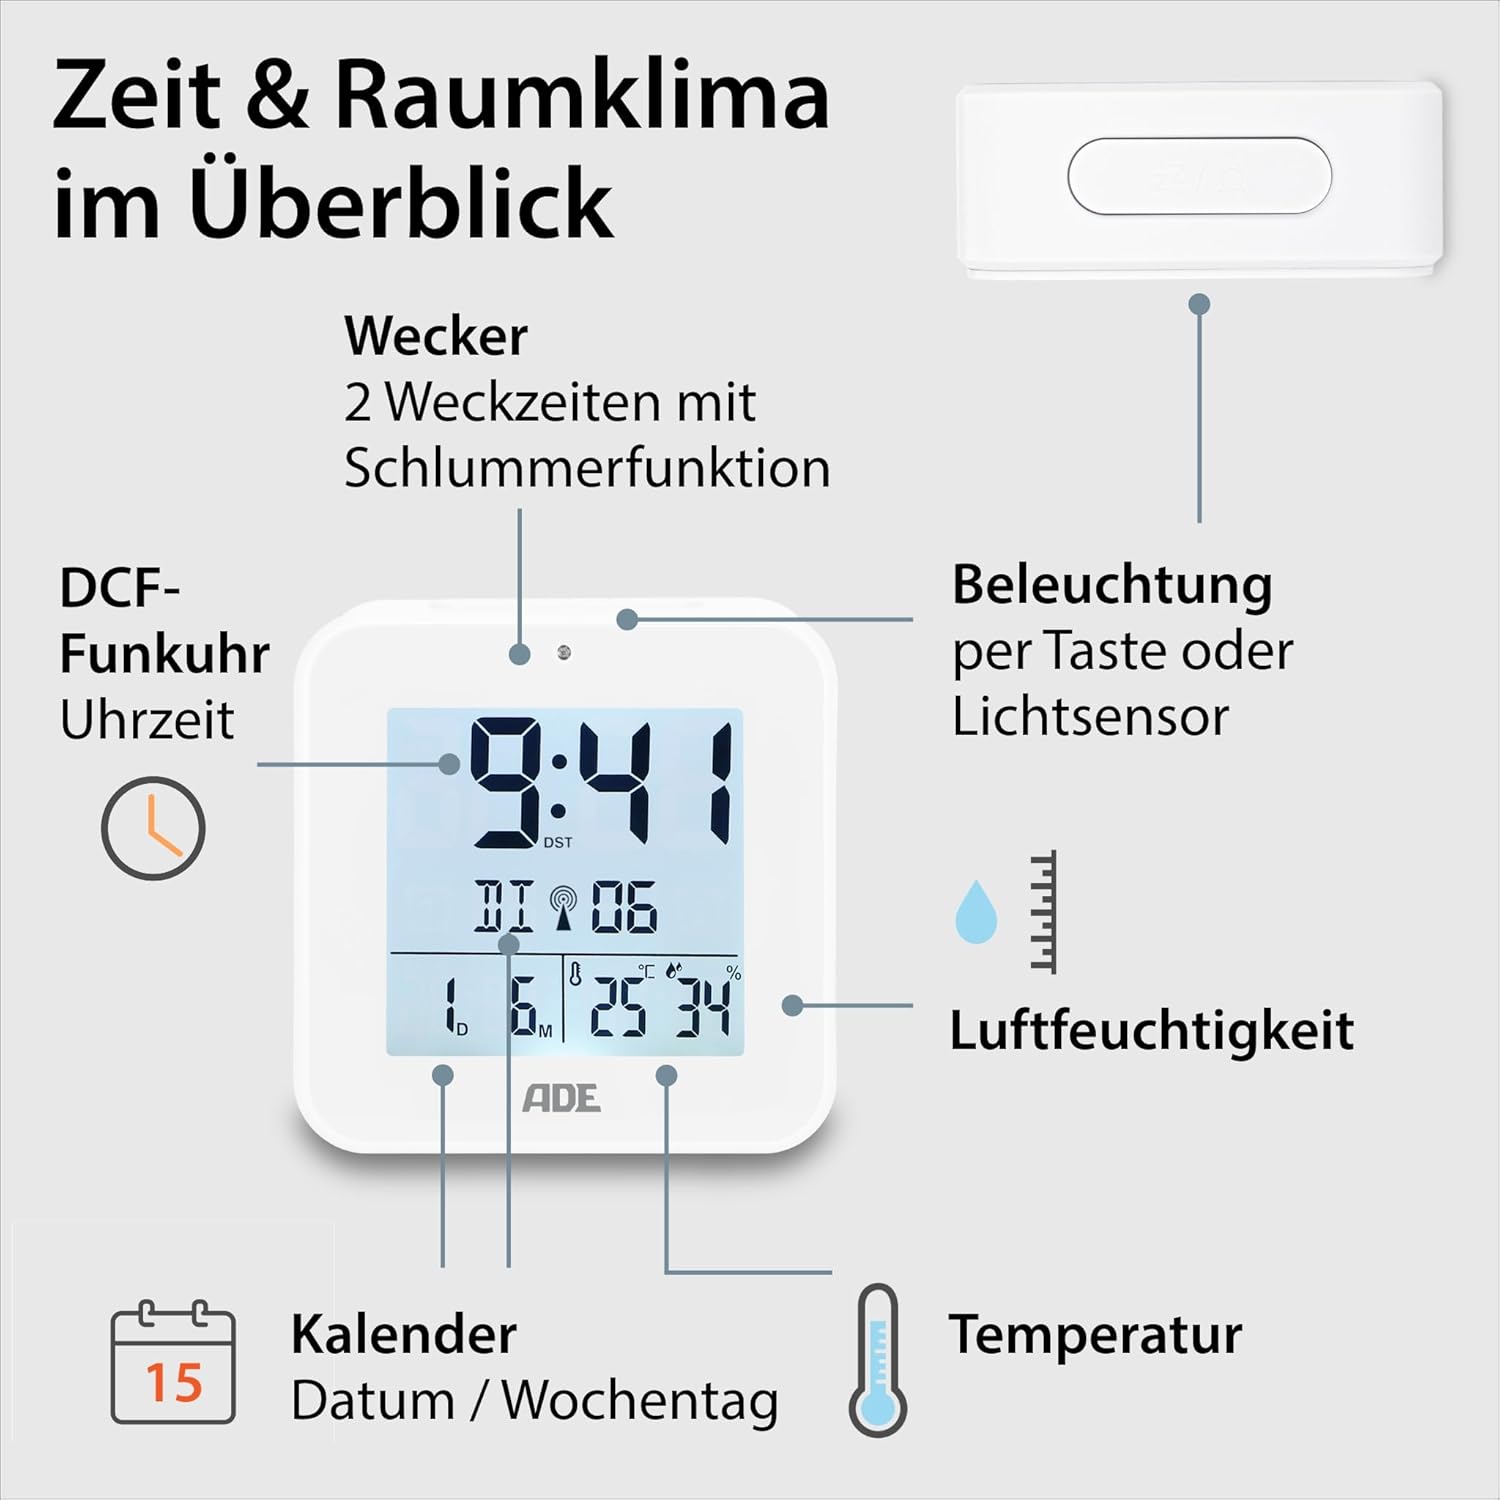
Image 4.1: Front display and key features of the ADE CK2310.
- Affichage de l'heure : Affiche l'heure actuelle (heures, minutes).
- Indicateur de signal DCF : Indique la réception réussie du signal horaire radio.
- Indicateurs d'alarme : Shows if Alarm 1 or Alarm 2 is active.
- Date and Day of Week: Displays the current date and day.
- Affichage de la température: Affiche la température ambiante en degrés Celsius ou Fahrenheit.
- Affichage de l'humidité : Shows ambient relative humidity.
- Bouton Snooze/Lumière : Activates snooze during an alarm or backlight manually.
- Boutons de fonction : Buttons for setting time, alarms, and other functions (located on the back/side).
- Capteur de lumière : Automatically activates backlight in dark environments.

Image 4.2 : Arrière view avec commandes et compartiment à piles.
The compact dimensions of the alarm clock are approximately 7.2 x 3.8 x 7.2 cm (width x depth x height).

Image 4.3: Dimensions of the ADE CK2310 alarm clock.
5. Installation
5.1. Installation de la batterie
- Open the battery compartment cover on the back of the alarm clock (refer to Image 4.2).
- Insérez les deux piles AAA en respectant la polarité (+ et -).
- Fermez soigneusement le couvercle du compartiment à piles.
The alarm clock will power on automatically and begin searching for the DCF radio signal.
5.2. DCF Radio Signal Reception
Upon initial power-on or after battery replacement, the alarm clock will automatically attempt to receive the DCF radio time signal. This process can take several minutes. During reception, a signal icon may flash on the display. Once the signal is successfully received, the time will be set automatically, and the signal icon will appear steadily. For best reception, place the alarm clock near a window and away from electronic devices that may cause interference.
The DCF signal also ensures automatic adjustment for daylight saving time (summer/winter time).
5.3. Réglage manuel de l'heure (facultatif)
Si le signal DCF n'est pas disponible ou si vous préférez régler l'heure manuellement :
- Press and hold the "SET" button (or equivalent, refer to specific button labels on your device) for a few seconds until the time display starts flashing.
- Use the "+" or "-" buttons to adjust the hours.
- Press "SET" again to confirm the hours and move to minutes.
- Utilisez les boutons « + » ou « - » pour régler les minutes.
- Press "SET" to confirm and exit manual setting mode.
- Repeat similar steps to set the date and year if necessary.
6. Mode d'emploi
6.1. Réglage des alarmes (Alarme 1 et Alarme 2)
The ADE CK2310 features two independent alarm times. This is useful for different wake-up times on weekdays and weekends.

Image 6.1: The alarm clock supports two independent alarm times.
- Press the "ALARM 1" or "ALARM 2" button (usually located on the side or back) once to display the current alarm time.
- Press and hold the respective "ALARM" button until the alarm time starts flashing.
- Use the "+" or "-" buttons to adjust the alarm hours.
- Press the "ALARM" button again to confirm hours and move to minutes.
- Utilisez les boutons « + » ou « - » pour régler les minutes de l'alarme.
- Press the "ALARM" button to confirm and exit alarm setting mode.
- To activate or deactivate an alarm, use the dedicated ON/OFF switch for Alarm 1 and Alarm 2 (refer to Image 6.1 for typical switch location). An alarm icon will appear on the display when active.
6.2. Fonction Snooze
When an alarm sounds, press the large "SNOOZE/LIGHT" button on top of the alarm clock. The alarm will pause for approximately 5 minutes and then sound again. To turn off the alarm completely, press any other button or let it ring for its full duration.
6.3. Affichage de la température et de l'humidité
The alarm clock continuously displays the indoor temperature and relative humidity. You can switch between Celsius (°C) and Fahrenheit (°F) for temperature display by pressing a dedicated button (often labeled "°C/°F" or integrated with another setting button).
6.4. Fonction de rétroéclairage
The backlight can be activated in two ways:
- Activation manuelle: Press the "SNOOZE/LIGHT" button on top. The backlight will illuminate for approximately 8 seconds.
- Automatic Activation (Light Sensor): Slide the "AUTO LIGHT" switch on the back of the device to the "ON" position (refer to Image 4.2). The built-in light sensor will detect low ambient light conditions and automatically activate a soft backlight, making the display visible in the dark. Slide the switch to "OFF" to disable this feature.
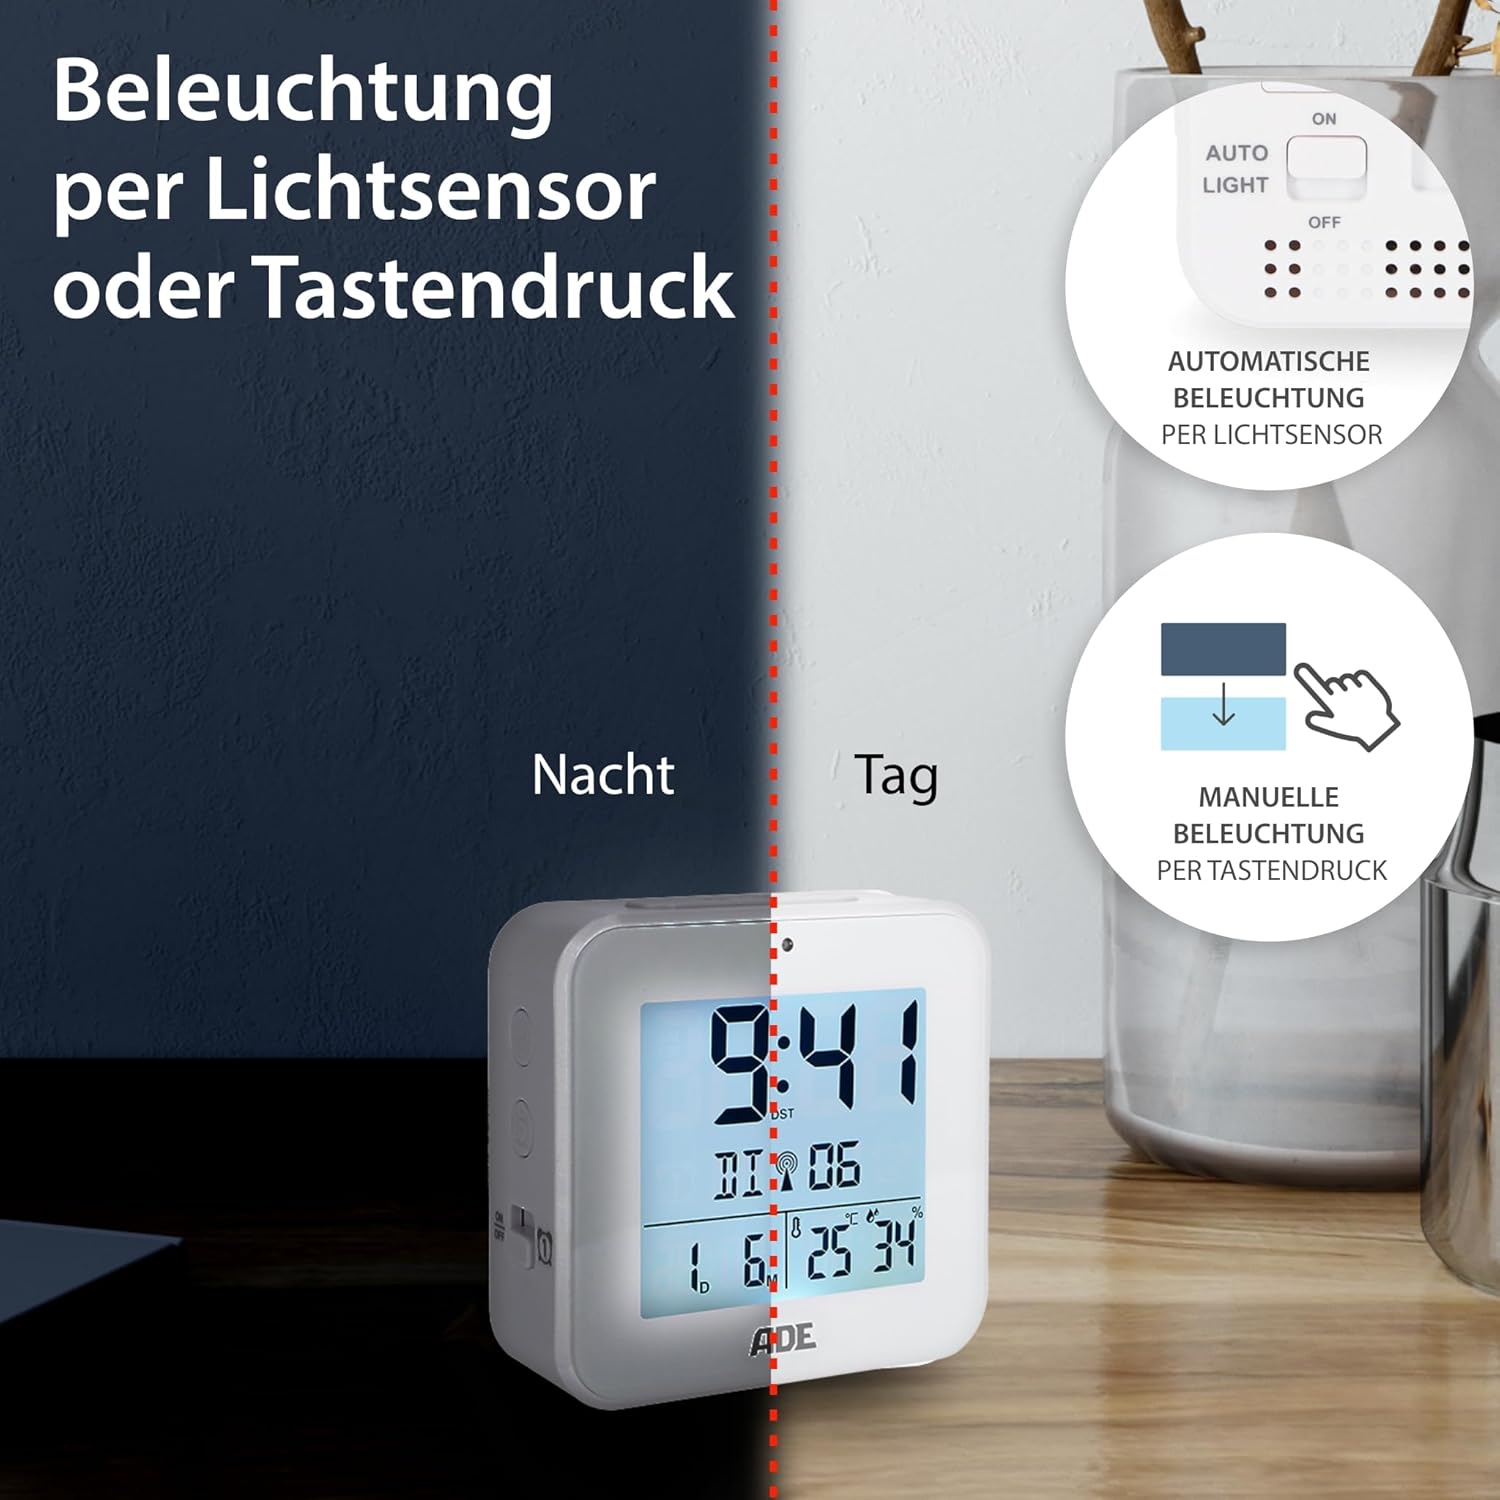
Image 6.2: Backlight can be activated manually or automatically via the light sensor.
7. Entretien
- Nettoyage: Essuyez l'appareil avec un chiffon doux et sec. N'utilisez pas de nettoyants abrasifs ni de solvants.
- Remplacement de la batterie : When the display becomes dim or functions are erratic, replace both AAA batteries. Ensure correct polarity. If the device will not be used for an extended period, remove the batteries to prevent leakage.
8. Dépannage
| Problème | Cause possible | Solution |
|---|---|---|
| L'écran est vide ou sombre. | Les piles sont faibles ou mal insérées. | Remplacez les piles par des neuves en respectant la polarité. |
| L'heure est incorrecte ou ne se règle pas automatiquement. | Mauvaise réception du signal DCF ou interférences. | Move the alarm clock to a location with better reception (e.g., near a window, away from electronics). Allow time for signal acquisition. Manually set the time if necessary. |
| L'alarme ne sonne pas. | L'alarme n'est pas activée ou est mal réglée. | Ensure the alarm is switched "ON" and the alarm time is set correctly. Check for the alarm icon on the display. |
| Le rétroéclairage ne fonctionne pas. | AUTO LIGHT switch is OFF, or batteries are low. | Check if the "AUTO LIGHT" switch is in the "ON" position. Press the SNOOZE/LIGHT button manually. Replace batteries if needed. |
9. Spécifications
- Modèle: CK2310
- Dimensions: 8 x 3.81 x 8 cm (approx. W x D x H)
- Poids: 100 g
- Source d'alimentation : 2 piles AAA (incluses)
- Type d'affichage : Numérique
- Matériel: Plastique ABS
- Caractéristiques spéciales : DCF Radio Signal, 2 Alarm Times, Snooze Function, Temperature Display (°C/°F), Humidity Display, Calendar Display, Automatic Backlight (Light Sensor), Manual Backlight.
- Utilisation intérieure/extérieure : Intérieur
10. Garantie et assistance
ADE products are manufactured with quality and reliability in mind. For information regarding warranty terms and conditions, please refer to the warranty card included with your purchase or visit the official ADE website. For technical support or service inquiries, please contact your retailer or the ADE customer service department.
Fabricant: ADE


