Introduction
Welcome to the user manual for your TAB Fairy10 Robot Vacuum and Mop Combo. This advanced cleaning device is designed to provide comprehensive floor care with its powerful 6000 Pa suction, hidden LiDAR navigation for precise mapping, and intelligent features such as self-drying, auto-empty, and auto-refill capabilities. Its 15mm auto-lift dual mops and AI 3.0 obstacle avoidance ensure efficient and thorough cleaning across various floor types.
Contenu du colis
Veuillez vérifier que tous les éléments énumérés ci-dessous sont inclus dans votre colis :
- Robot Vacuum × 1
- Base de chargement × 1
- Adaptateur × 1
- HEPA Filters × 4 (2 pairs)
- Brosse de nettoyage × 1
- Side Brushes × 4 (2 pairs)
- Manuel de l'utilisateur × 1
- Câble d'alimentation × 1
- Disposable Dust Bags × 2
- Mop Cloths × 2 Pairs

Figure 1: All included components in the TAB Fairy10 package.
Installation
1. Déballage et placement
- Remove all packaging materials and protective films from the robot and the charging base.
- Place the charging base against a wall on a hard, level surface. Ensure there is at least 0.5 meters (1.6 feet) of clear space on both sides and 1.5 meters (4.9 feet) in front of the base.
- Connect the power cable to the charging base and plug it into a power outlet.
2. Charger le robot
- Placez le robot sur sa base de chargement. Assurez-vous que les contacts de chargement du robot sont alignés avec ceux de la base.
- The robot will automatically begin charging. For first-time use, fully charge the robot before operation (approximately 6 hours).
3. Remplissage des réservoirs d'eau
- Open the top cover of the charging base to access the clean water tank and dirty water tank.
- Remove the clean water tank and fill it with clean tap water. You may add a small amount of non-foaming, robot-safe cleaning solution if desired.
- Assurez-vous que le réservoir d'eau sale est vide avant de démarrer un cycle de nettoyage.
- Return both tanks to their respective slots in the charging base.

Figure 2: The TAB Fairy10 Robot Vacuum and its comprehensive charging station.

Figure 3 : Plusview of the station's automated functions: self-cleaning, self-emptying, self-drying, and self-refilling.
Mode d'emploi
1. Mise sous/hors tension
- To power on, press and hold the power button on the robot for 3 seconds until the indicator lights up.
- To power off, press and hold the power button for 3 seconds while the robot is stationary.
2. Connexion à l'application mobile
- Download the official TAB app from your smartphone's app store.
- Follow the in-app instructions to connect your robot to your home Wi-Fi network. This will enable remote control, scheduling, map management, and cleaning mode selection.
3. Modes de nettoyage
The TAB Fairy10 supports various cleaning modes, selectable via the mobile app:
- Mode vide : Pour la collecte des débris secs.
- Mode vadrouille : Pour le nettoyage humide des sols durs.
- Mode aspirateur et serpillère : Passer l'aspirateur et laver les sols simultanément.
- Nettoyage des taches : Nettoyage ciblé des zones particulièrement sales.
- Nettoyage de zone : Nettoie les zones définies par l'utilisateur sur la carte.
4. Navigation et évitement des obstacles
The robot utilizes hidden LiDAR navigation to create precise maps of your home, ensuring efficient cleaning paths. Its AI 3.0 obstacle avoidance technology helps it detect and navigate around common household items, reducing the chance of getting stuck.
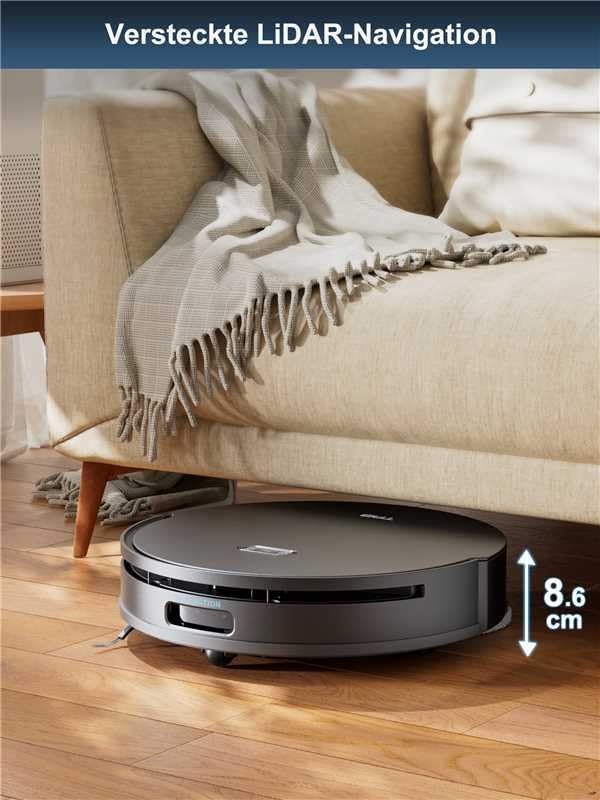
Figure 4: The robot's hidden LiDAR navigation allows it to clean under furniture effectively.
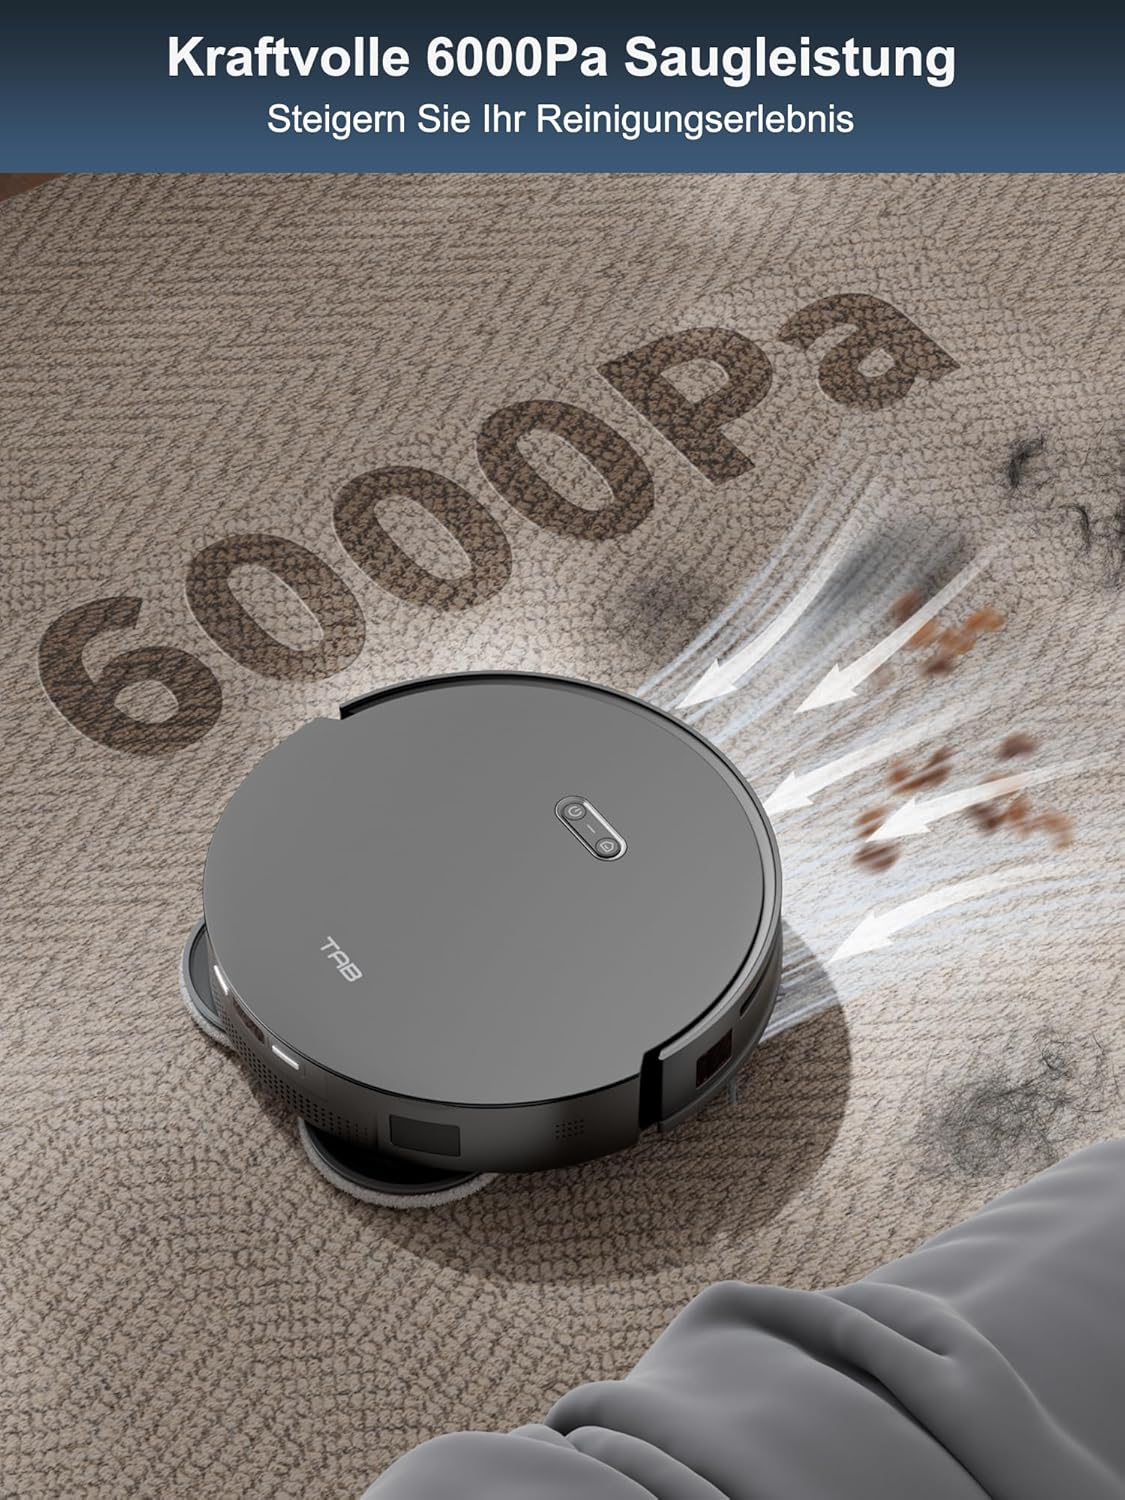
Figure 5: The powerful 6000Pa suction ensures thorough cleaning of various debris.

Figure 6: AI 3.0 obstacle avoidance helps the robot navigate around household items.
5. Automatic Mop Lifting and Dual Dirt Solution
The robot features automatic mop lifting by 15mm when it detects carpets, preventing wetting. For mopping, it applies 10N pressure and rotates at 180 rpm, providing effective scrubbing for stubborn dirt.

Figure 7: The automatic 15mm mop lifting feature protects carpets during mopping cycles.

Figure 8: The dual dirt solution combines high-speed rotation and pressure for effective mopping.
Entretien
Un entretien régulier garantit des performances optimales et prolonge la durée de vie de votre aspirateur robot.
1. Emptying the Dustbin and Replacing Dust Bag
- The robot automatically empties its internal dustbin into the disposable dust bag in the charging base.
- Replace the disposable dust bag in the charging base when the indicator light or app notification indicates it is full.
2. Nettoyage des lingettes de balai
- The charging base automatically cleans and dries the mop pads after each mopping cycle.
- Periodically remove the mop pads and hand wash them with water and mild detergent to remove any residual dirt. Allow them to air dry completely before reattaching.
3. Nettoyage des filtres
- Tap the HEPA filters gently to remove loose dust. Do not wash HEPA filters with water.
- Remplacez les filtres HEPA tous les 3 à 6 mois, ou plus souvent si nécessaire, en fonction de l'utilisation.
4. Brosses de nettoyage
- Remove the main brush and side brushes. Use the provided cleaning tool to cut and remove any tangled hair or debris.
- Wipe the brushes with a dry cloth.
5. Nettoyage des capteurs et des contacts de charge
- Wipe all sensors (cliff sensors, wall sensor, LiDAR sensor window) and charging contacts on both the robot and the charging base with a clean, dry cloth.
Dépannage
| Problème | Cause possible | Solution |
|---|---|---|
| Le robot ne s'allume pas et ne se charge pas. | Battery low; charging contacts dirty; power cable disconnected. | Ensure robot is on charging base; clean charging contacts; check power cable connection. |
| Le robot se bloque fréquemment. | Obstacles sur le chemin ; capteurs sales. | Clear cables, small objects, and thick rugs; clean all sensors. |
| Mauvaise performance de nettoyage. | Dustbin full; brushes tangled; filters clogged; water tank empty. | Empty dustbin; clean/replace brushes; clean/replace filters; refill clean water tank. |
| Problèmes de connexion à l'application. | Incorrect Wi-Fi password; robot too far from router; app outdated. | Verify Wi-Fi credentials; move robot closer to router; update app; restart robot and router. |
| Les lingettes de la serpillière ne sèchent pas correctement. | Insufficient airflow; station vents blocked. | Ensure station is in a well-ventilated area; clear any obstructions around station vents. |
Caractéristiques
| Fonctionnalité | Spécification |
|---|---|
| Marque | LANGUETTE |
| Nom du modèle | Fairy 10 (M50-PT-US) |
| Dossier spécial | Auto-Docking, Self-Drying, Auto Empty & Refill, 15mm Auto-Lift Dual Mops, Obstacle Avoidance |
| Couleur | Noir |
| Dimensions du produit (L x l x H) | 18.8" x 18.8" x 19.2" |
| Type de filtre | Cartouche (HEPA) |
| Autonomie de la batterie | 120 minutes |
| Source d'énergie | Alimenté par batterie |
| Volume de la batterie au lithiumtage | 3.6 volts |
| Facteur de forme | Rectangular (Base), Round (Robot) |
| Poids de l'article | 41.5 livres |
| Fabricant | SHENZHEN FENGCHAO NEW TECHNOLOGY CO., LTD |
| Date de première disponibilité | 7 novembre 2024 |
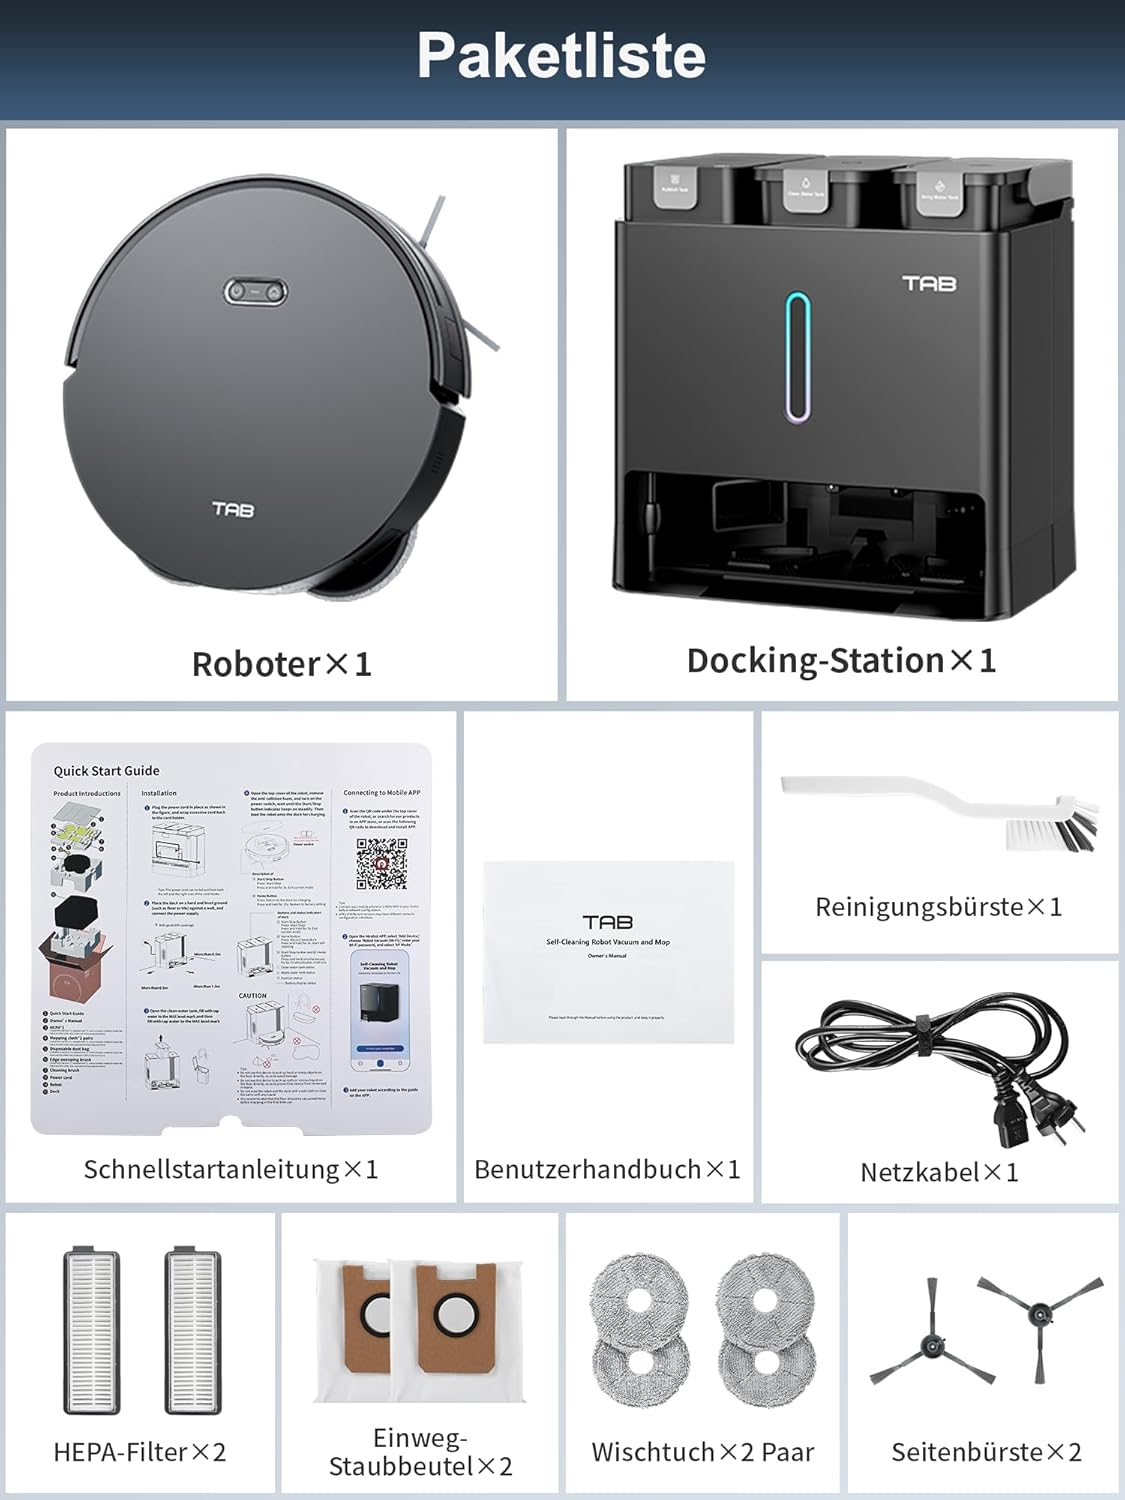
Figure 9: Regulatory and manufacturing information.
Garantie et assistance
The TAB Fairy10 Robot Vacuum and Mop Combo comes with a manufacturer's warranty. For specific warranty terms and conditions, please refer to the warranty card included in your package or contact TAB customer support.
For technical assistance, troubleshooting, or spare parts inquiries, please contact the manufacturer or your point of purchase. Keep your purchase receipt and product serial number handy when contacting support.