1. Introduction
Thank you for choosing the Crivit Auriol Radio-Controlled Projection Alarm Clock. This device combines a precise radio-controlled clock with a clear LCD display, dual alarms, and a convenient projection feature. This manual will guide you through the setup, operation, and maintenance of your new alarm clock.

Devant view of the alarm clock displaying time, date, and temperature.
2. Consignes de sécurité
- Lisez attentivement toutes les instructions avant utilisation et conservez-les pour référence future.
- N’exposez pas l’appareil à des températures extrêmes, à la lumière directe du soleil ou à une forte humidité.
- Évitez de laisser tomber ou de soumettre l'appareil à des impacts violents.
- N’essayez pas de démonter ou de réparer l’appareil vous-même. Contactez un technicien qualifié.
- Tenir les piles hors de portée des enfants. Jeter les piles usagées conformément à la réglementation locale.
- Use only the provided AC adapter or one with identical specifications.
3. Contenu du colis
Veuillez vérifier que le colis contient les éléments suivants :
- Crivit Auriol Radio-Controlled Projection Alarm Clock (Model 373928)
- Adaptateur secteur
- Piles (préinstallées ou séparées)
- Manuel de l'utilisateur (ce document)

Included AC power adapter.
4. caractéristiques du produit
- Heure radiocommandée : Automatic time synchronization for precise timekeeping.
- Fonction de projection : Projects time, alarm times, or ambient temperature onto a wall or ceiling.
- Pivoting Projection Arm: Adjustable projection angle with easy focus adjustment.
- Écran LCD : Clear screen showing time, day, month, week number/day of the week, and indoor temperature.
- Double alarme : Two independent alarm settings with snooze function.
- Capteur tactile : Activates short-term projection and screen backlight.
- Options d'alimentation : Operates via AC adapter or batteries.
- Port de charge USB-A : Convenient 5V, 800mA output for charging external devices.
- Luminosité réglable : Customizable display brightness.
5. Identification des composants
Devant View:
Devant view avec écran LCD.
- Écran LCD : Shows time, date, temperature, alarm status, and radio control signal.
- Zone du capteur tactile : Located above the display, for temporary backlight and projection.
- Projection Indicator: Icon indicating projection is active.
- Indicateurs d'alarme : Icônes pour l'alarme 1 et l'alarme 2.
- Bouton de rotation : Adjusts projection orientation.
Côté View (Projection Arm):
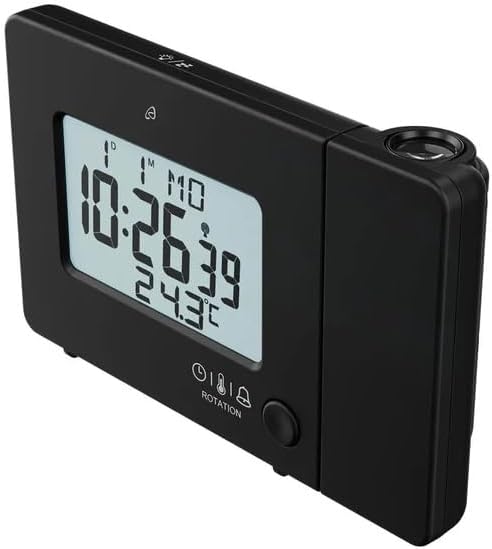
Côté view with projection arm extended.
- Bras de projection : Pivots to direct the projection.
- Molette de mise au point : Ajuste la netteté de l'image projetée.
- Objectif de projection : Emits the time/temperature display.
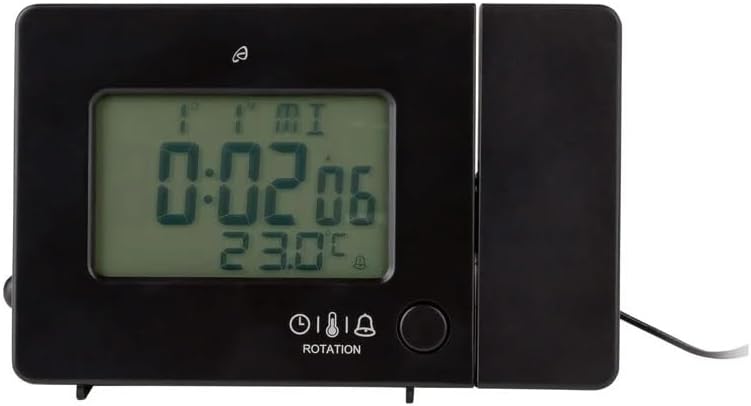
Arrière View:

Arrière view with control buttons and ports.
- -/WEEK Button: Decreases values, sets week display.
- +/ZONE Button: Increases values, sets time zone.
- Touche °C/°F : Permet de changer l'unité de température.
- LANG Button: Selects display language for day of the week.
- Bouton 12/24 : Toggles 12/24 hour format.
- Bouton MODE : Cycles through settings modes (Time, Alarm 1, Alarm 2).
- Bouton de réglage: Enters setting mode for current display.
- Bouton de réinitialisation: Resets the device to factory defaults (use a pointed object).
- Compartiment à piles : Pour les batteries de secours.
- Port d'entrée CC : Pour brancher l'adaptateur secteur.
- Port de sortie USB-A : Pour recharger des appareils externes.
6. Installation
6.1. Mise sous tension
The alarm clock can be powered by either the included AC adapter or batteries for backup.
- Installation de la batterie : Open the battery compartment on the rear of the unit. Insert the included batteries, observing the correct polarity (+/-). Batteries primarily serve as backup in case of power outage.
- Connexion de l'adaptateur secteur : Connect the small plug of the AC adapter into the DC IN port on the back of the alarm clock. Plug the AC adapter into a standard wall outlet. The display will light up.
Alarm clock connected to power.
6.2. Initial Setup and Radio Control Synchronization
Upon first power-up or after a reset, the clock will automatically attempt to synchronize with the radio-controlled time signal (DCF77). This process can take several minutes to an hour, depending on your location and signal strength. During synchronization, a radio tower icon will flash on the display.
- Placez l'horloge près d'une fenêtre pour une meilleure réception du signal.
- Évitez de le placer à proximité d'appareils électroniques susceptibles de provoquer des interférences.
- Once synchronized, the radio tower icon will appear solid on the display.
If the radio signal is not received, you may need to set the time manually (see Section 7.1).
6.3. Basic Settings (if not automatically set or for adjustment)
Appuyez sur le ENSEMBLE bouton pour accéder au mode de réglage. Utilisez le -/WEEK et +/ZONE buttons to adjust values, and ENSEMBLE pour confirmer et passer au réglage suivant.
- Fuseau horaire: Adjust if you are not in the standard time zone for the radio signal.
- Format 12/24 heures : Appuyez sur le 12/24 button to toggle between 12-hour (with AM/PM) and 24-hour formats.
- Unité de température: Appuyez sur le ° C / ° F bouton pour basculer entre Celsius et Fahrenheit.
- Langue d'affichage : Appuyez sur le LANG button to select the language for the day of the week display (5 languages available).
7. Mode d'emploi
7.1. Régler l'heure manuellement
If the radio-controlled time signal is weak or unavailable, you can set the time manually:
- Appuyez et maintenez enfoncé le ENSEMBLE appuyer sur le bouton jusqu'à ce que les chiffres de l'heure clignotent.
- Utilisez le -/WEEK et +/ZONE boutons pour régler l'heure.
- Presse ENSEMBLE to confirm and move to minutes, then year, month, and day.
- Presse ENSEMBLE again to exit manual time setting.
7.2. Réglage des alarmes (Alarme 1 et Alarme 2)
Cette horloge est dotée de deux alarmes indépendantes.
- Appuyez sur le MODE button once to display Alarm 1 time, or twice for Alarm 2 time. The corresponding alarm icon (e.g., A1) will flash.
- Pendant que l'heure de l'alarme s'affiche, appuyez et maintenez enfoncé le bouton ENSEMBLE appuyer sur le bouton jusqu'à ce que les chiffres de l'heure clignotent.
- Utilisez le -/WEEK et +/ZONE boutons pour régler l'heure.
- Presse ENSEMBLE to confirm and move to minutes. Adjust minutes using -/WEEK et +/ZONE.
- Presse ENSEMBLE again to confirm and exit alarm setting.
- Pour activer/désactiver une alarme, appuyez sur le bouton. MODE button to display the desired alarm, then press the +/ZONE button. The alarm icon (bell) will appear/disappear on the display.
7.3. Fonction Snooze
Lorsqu'une alarme retentit, touchez le Zone du capteur tactile ou appuyez sur la touche SNOOZE / LUMIÈRE button (if available, otherwise use the touch sensor) to activate the snooze function. The alarm will pause for approximately 5 minutes and then sound again. To stop the alarm completely, press any other button.
7.4. Fonction de projection
The alarm clock can project the time, alarm times, or ambient temperature onto a wall or ceiling.
- Activer la projection : The projection is continuously active when powered by the AC adapter. If running on batteries, touch the Zone du capteur tactile for short-term projection.
- Ajuster l'angle de projection : Pivot the projection arm to direct the image to your desired location.
- Ajuster la mise au point : Utilisez le Molette de mise au point on the projection arm to sharpen the projected image.
- Change Projected Content: Appuyez sur le MODE button repeatedly to cycle through projecting Time, Alarm 1, Alarm 2, or Temperature.
- Faire pivoter la projection : Appuyez sur le ROTATION button to rotate the projected image by 90-degree increments (4 orientations available).

Time projected onto a surface.
7.5. Rétroéclairage de l'écran
When powered by the AC adapter, the display backlight is continuously on. When running on batteries, touch the Zone du capteur tactile to activate the backlight for a few seconds.
7.6. Sortie de chargement USB
The USB-A port on the back of the unit provides a 5V, 800mA output for charging small electronic devices like smartphones or tablets. Connect your device's USB charging cable to this port.
8. Entretien
- Nettoyage: Essuyez l'appareil avec un chiffon doux et sec. N'utilisez pas de nettoyants abrasifs ni de solvants.
- Remplacement de la batterie : If using batteries for backup, replace them annually or when the display becomes dim during power outages. Assurez-vous de la polarité correcte.
- Stockage: Si vous devez stocker l'appareil pendant une période prolongée, retirez les piles pour éviter les fuites.
9. Dépannage
| Problème | Cause possible | Solution |
|---|---|---|
| L'écran est vide ou sombre. | No power, dead batteries, or AC adapter not connected. | Ensure AC adapter is securely connected. Replace batteries if using for backup. |
| Radio-controlled time not synchronizing. | Weak signal, interference, or incorrect time zone. | Move the clock to a window or open area. Avoid electronic devices. Manually set time if necessary. Check time zone setting. |
| La projection est floue. | Mise au point non réglée. | Ajustez le Molette de mise au point on the projection arm. |
| L'alarme ne sonne pas. | Alarme non activée ou mal réglée. | Ensure the alarm icon is visible on the display. Recheck alarm time settings. |
| Le chargement USB ne fonctionne pas. | Device not properly connected, or device requires more power than 800mA. | Ensure the USB cable is securely connected. Check if your device's charging requirements exceed 5V/800mA. |
10. Spécifications

Dimensions du produit.
- Numéro de modèle : 373928
- Dimensions (L x l x H) : 15 x 3.81 x 9.5 cm (approx. 15l x 9.5H centimeters)
- Matériel: Plastique
- Type d'affichage : LCD numérique
- Source d'alimentation : AC Adapter (included) or Batteries (included)
- Sortie USB : 5 V, 800 mA
- Caractéristiques spéciales : Adjustable brightness, Snooze, Projection, Radio-controlled time
- Type de mouvement : Quartz
- Type de montage : Dessus de table
- Utilisation intérieure/extérieure : Intérieur
11. Garantie et assistance
This Crivit Auriol Projection Alarm Clock comes with a standard manufacturer's warranty. Please refer to the warranty card included in your package or contact your retailer for specific warranty terms and conditions.
For technical support or inquiries, please contact the customer service department of your retailer or the Crivit support line as indicated on the product packaging or official website.


