Introduction
Thank you for choosing the Epson EB-L210SF projector. This manual provides essential information for the safe and efficient use of your projector. Please read it thoroughly before operating the device and keep it for future reference.
The Epson EB-L210SF is a 3LCD Full-HD projector designed for clear and vibrant image projection. It features a laser light source for long-lasting performance.
Informations importantes sur la sécurité
- Sécurité laser: Do not look directly into the projector lens when the laser light source is active. Avoid direct eye exposure to the laser beam.
- Ventilation: Ensure adequate ventilation around the projector. Do not block ventilation openings. Overheating can cause damage.
- Source d'alimentation : Use only the power supply specified for this projector.
- Manutention: Manipulez le projecteur avec précaution. Évitez de le faire tomber ou de le soumettre à des chocs violents.
- Nettoyage: Débranchez le cordon d'alimentation avant de nettoyer l'appareil. Utilisez un chiffon doux et sec. N'utilisez pas de nettoyants liquides ni en aérosol.
Installation
1. Déballage et placement
Carefully remove the projector and all accessories from the packaging. Place the projector on a stable, level surface. Ensure there is sufficient space around the projector for proper ventilation.

Figure 1 : Avant et côté view of the Epson EB-L210SF projector, showing the lens and ventilation grilles.
2. Connexion de l'alimentation
- Connect the supplied power cord to the projector's AC inlet.
- Branchez l'autre extrémité du cordon d'alimentation dans une prise électrique mise à la terre.
3. Connexion des sources d'entrée
The projector supports various input sources. Connect your device (computer, Blu-ray player, etc.) to the appropriate port on the projector's rear panel.

Figure 2: Rear panel of the projector, displaying various input and output ports including HDMI, Computer (VGA), Video, USB, and Audio connections.
- HDMI: Connect an HDMI cable from your device to one of the HDMI ports (HDMI 1 or HDMI 2).
- Computer (VGA): Connect a VGA cable from your computer to the Computer 1 or Computer 2 port. For audio, connect a separate audio cable to Audio 1 or Audio 2.
- Vidéo: Connect composite video and audio cables to the Video and Audio (R/L) ports.
- USB: Use the USB-A port for connecting USB storage devices or the USB-B port for display over USB.
- LAN: Connectez un câble Ethernet pour le contrôle et la surveillance du réseau.
4. Mise sous tension initiale et réglage de l'image
- Press the power button on the projector or remote control to turn on the device. The power indicator will illuminate.
- Ajustez le bague de mise au point around the lens until the image is sharp and clear.
- Utilisez le zoom lever (if available) to adjust the image size.
- Si l'image apparaît trapézoïdale, utilisez le correction trapézoïdale feature (manual or automatic) to square the image. Refer to the Operating section for details on menu navigation.
Utilisation du projecteur
1. Panneau de configuration terminéview
The control panel on top of the projector allows access to various functions and settings.
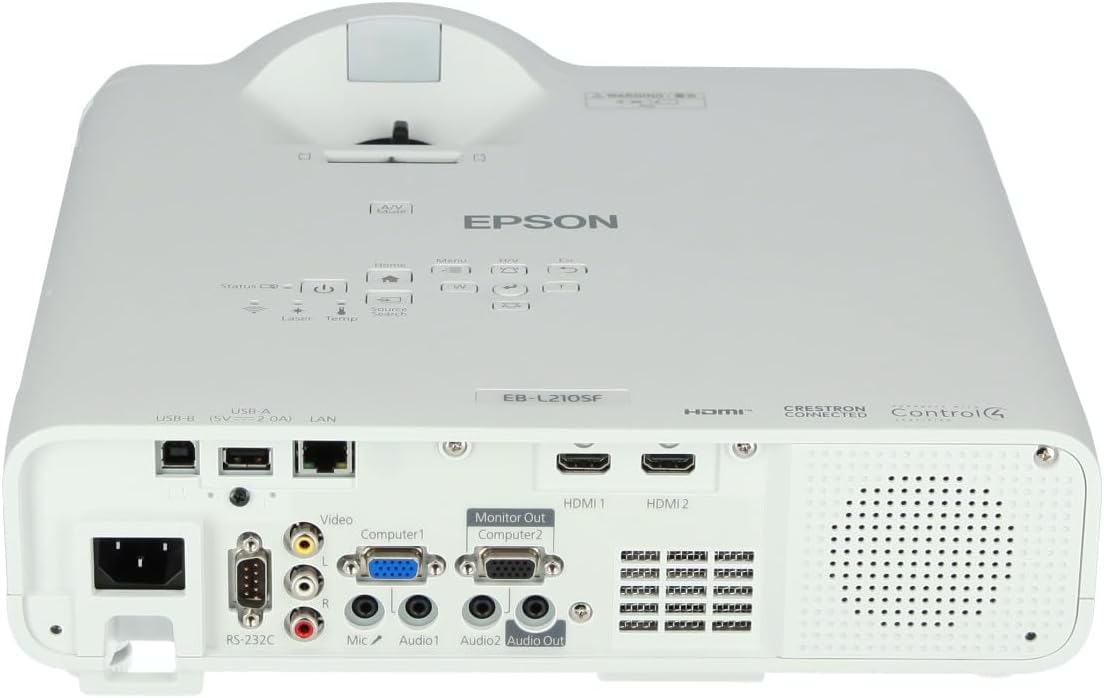
Figure 3 : Haut view of the projector, highlighting the control panel with buttons for power, menu, source selection, and navigation.
- Bouton d'alimentation : Allume ou éteint le projecteur.
- Source Search: Parcourt les sources d'entrée disponibles.
- Bouton Menu : Ouvre le menu d'affichage à l'écran (OSD).
- Navigation Buttons (Arrow keys): Permet de naviguer dans les options du menu.
- Bouton Entrée : Confirme les sélections effectuées dans le menu.
- Touche Échap : Permet de quitter le menu actuel ou de revenir à l'écran précédent.
- Bouton d'accueil: Accesses the home screen or quick settings.
- Muet A/V : Temporarily mutes audio and blanks the screen.
2. Sélection d'une source d'entrée
Appuyez sur le Recherche de source button on the control panel or remote control to cycle through the connected input sources (e.g., HDMI 1, HDMI 2, Computer 1, Video). The projector will automatically detect and display the active source.
3. Adjusting Image and Audio Settings
Appuyez sur le Menu button to access the projector's on-screen display (OSD) menu. Use the navigation buttons to browse categories such as:
- Image: Adjust brightness, contrast, color, tint, sharpness, and color temperature.
- signal: Configure input signal settings, aspect ratio, and overscan.
- Paramètres: General projector settings like language, display options, and power management.
- Audio: Adjust volume, mute, and audio input selection.
Sélectionnez une option et appuyez sur Entrer to modify its value. Press Échap pour quitter le menu.
Entretien
1. Nettoyage du projecteur
- Extérieur: Wipe the projector's exterior with a soft, dry, lint-free cloth. For stubborn dirt, dampHumidifiez légèrement le chiffon avec de l'eau, puis essuyez-le.
- Lentille: Essuyez délicatement la lentille avec un chiffon ou du papier optique. Évitez d'utiliser des matériaux abrasifs ou une force excessive.
- Filtre à air : Regularly check and clean the air filter to prevent dust buildup, which can affect performance and cause overheating. Refer to the projector's on-screen menu for filter maintenance reminders.
2. Source de lumière laser
The Epson EB-L210SF uses a laser light source, which offers a long operational life and does not require lamp replacement. No user maintenance is typically required for the laser light source itself.
Dépannage
Si vous rencontrez des problèmes avec votre projecteur, consultez les problèmes et solutions courants suivants :
| Problème | Cause/solution possible |
|---|---|
| Aucune image projetée |
|
| L'image est floue ou hors de la mise au point |
|
| L'image est déformée (trapézoïdale) |
|
| Pas de son |
|
| Projector is not wireless | The Epson EB-L210SF is not inherently a wireless projector. Wireless functionality typically requires an optional external wireless adapter, which is sold separately. Please consult Epson's official website or your retailer for compatible wireless adapters. |
| Overheating warning (Temp indicator) |
|
Caractéristiques
| Fonctionnalité | Détail |
|---|---|
| Numéro de modèle | V11HA75080 |
| Résolution d'affichage | 1920 x 1080 (Full HD) |
| Technologie de connectivité | HDMI, VGA, USB, LAN |
| Dimensions du produit | 11.81 x 11.81 x 11.81 pouces |
| Poids de l'article | 10.14 livres |
| Source de lumière | Laser |
| Fabricant | Epson |
| Utilisations recommandées | Surveillance |
| Dossier spécial | Léger |
| Piles requises | 1 AAAA (for remote control, not included with projector unit) |
| Date de première disponibilité | 14 novembre 2023 |
Garantie et assistance
Pour obtenir des informations détaillées sur la garantie, veuillez consulter la carte de garantie fournie avec votre produit ou visiter le site officiel d'Epson. webLes conditions de garantie peuvent varier selon la région.
For technical support, product registration, or to download the latest drivers and software, please visit the official Epson support website or contact Epson customer service in your region. Contact information can typically be found on the Epson website.


