1. Introduction
The SATLINK SP-2100 is a DVB-S/S2 and MPEG-2/4 H.264 compliant handheld digital satellite finder meter. Designed for ease of use, this compact and lightweight device provides essential functions for the installation and verification of digital satellite TV services. It is suitable for both residential homes and multi-dwelling units, offering signal measurement, channel management, and system configuration capabilities.
2. Consignes de sécurité
- Alimentation: Use only the provided DC12V/1.5A power adapter. Using an incorrect adapter may damage the device or cause fire.
- Entretien de la batterie: The device contains a Li-Ion battery. Do not expose it to extreme temperatures, puncture, or disassemble. Dispose of batteries according to local regulations.
- Humidité: Keep the device away from water and high humidity. Do not operate with wet hands.
- Ventilation: Assurez une ventilation adéquate pour éviter toute surchauffe. Ne bloquez pas les ouvertures de ventilation.
- Protection contre les courts-circuits LNB : The device features LNB short protection. If a short circuit is detected, disconnect the LNB immediately.
- Nettoyage: Débranchez l'appareil avant de le nettoyer. Utilisez un chiffon doux et sec. N'utilisez pas de nettoyants liquides ni d'aérosols.
3. Produit terminéview
3.1 Panneau avant et commandes
The front panel features a 3.5-inch TFT LCD screen for displaying menus and signal information, along with various control buttons and indicator lights.

Image 3.1: Devant view of the SP-2100, highlighting the display and control interface.
- Écran LCD : 3.5-inch High Definition TFT LCD (320x240 RGB) for menu navigation and signal display.
- Indicateurs : Power (red), 13V/18V (green for LNB power), Lock (signal lock), Charge (battery charging status).
- Boutons de navigation: MENU, OK, Directional Arrows (Up, Down, Left, Right), EXIT.
- Touches de fonction : F1, F2, F3, F4 (context-sensitive functions).
- Clavier numérique: 0-9 for data entry.
- Boutons de fonction spéciale : MUTE, SCAN, SAT, BACK, PAUSE, INFO, TV/R.
3.2 Panneau arrière
The rear panel includes product information and the integrated speaker.

Image 3.2: Arrière view of the SP-2100, indicating the speaker and product label.
3.3 Side and Top Ports
Various input and output ports are located on the sides and top of the device.
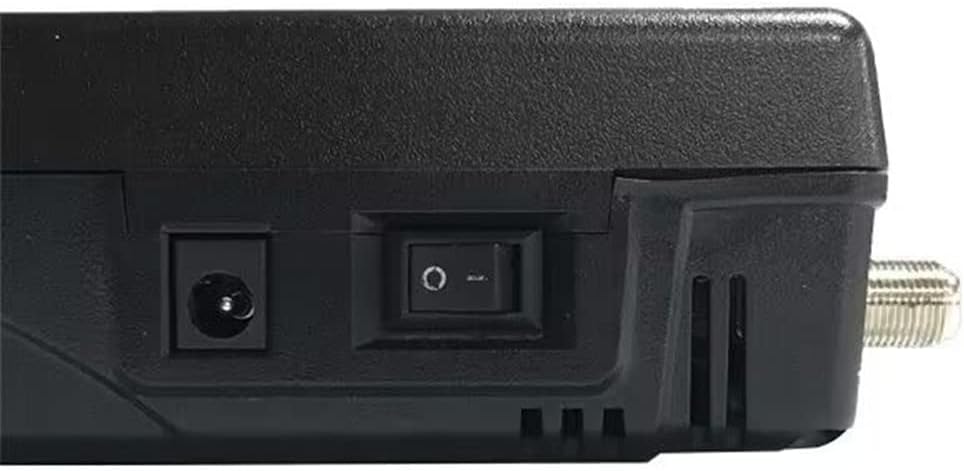
Image 3.3: Côté view with HDMI, AV OUT, and AV IN ports.
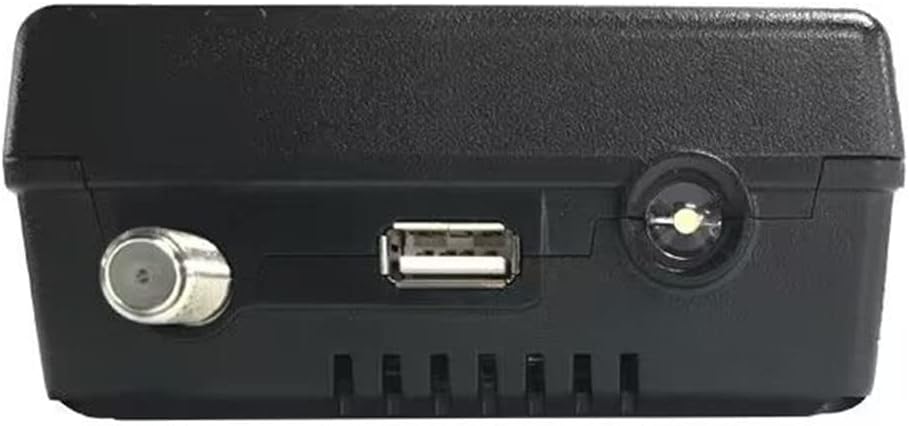
Image 3.4: Haut view with F-connector, USB Type A, and DC power input.
- F-Male Connector: Satellite input (950-2150 MHz).
- USB type A : For software upgrades and file transfer (USB 2.0).
- DC IN: Power adapter input (DC12V/1.5A).
- Interrupteur: Interrupteur marche/arrêt de l'appareil.
- HD-MI OUT: HD-MI 1.3a output for connecting to an external display.
- SORTIE AV : 3.5mm jack for composite video (CVBS) and stereo audio (L/R) output.
- ENTRÉE AV : 3.5mm jack for composite video (CVBS) and stereo audio (L/R) input.
4. Installation
4.1 Chargement de la batterie
Before first use, fully charge the internal Li-Ion battery. Connect the provided DC12V/1.5A power adapter to the DC IN port on the device and plug it into a power outlet. The 'Charge' indicator light will illuminate during charging. A full charge typically takes several hours and provides approximately 3 hours of operation time.
4.2 Mise sous/hors tension
Locate the power switch on the side of the device. Toggle the switch to the 'ON' position to power on the meter. The 'Power' indicator light will turn red. To power off, toggle the switch to the 'OFF' position.
4.3 Connecting to LNB
Connect the satellite cable from your LNB (Low Noise Block) to the F-Male connector on the top of the SP-2100. Ensure the connection is secure. The device will supply 13V or 18V to the LNB, indicated by the green '13V/18V' light.

Image 4.1: Connection diagram showing LNB, power, and AV/HDMI connections.
5. Mode d'emploi
5.1 Navigation dans les menus
Utilisez le MENU button to access the main menu. Navigate through options using the directional arrow buttons (Up, Vers le bas, Gauche, Droite). Presse OK to confirm a selection or enter a submenu. Press EXIT pour revenir à l'écran précédent ou quitter le menu.
5.2 Fonctions du menu principal
- Installation: This section is used for satellite dish alignment and signal acquisition.
- Select a satellite from the predefined list or add a new one.
- Configure LNB type, frequency, and DiSEqC settings (1.0 / 1.1 / 1.2 and 22 kHz Tone supported).
- Perform signal measurement to view signal strength and quality. Adjust the dish until optimal signal levels are achieved. The 'Lock' indicator will illuminate when a signal is acquired.
- Supports Auto, Manual, and NIT Scan modes for channel searching.
- Modification de la chaîne : Manage TV and radio channels. You can move, delete, or lock channels.
- Paramétrage du système : Configure device settings such as OSD language, time, display brightness, and factory reset options.
- Utilitaire: Access additional tools or features.
- Centre des médias : Jouez au multimédia files (wma, mp3, mp4, avi, jpg, jpeg, bmp, img) from a USB storage device connected to the USB Type A port.
- À propos de: Displays device information, including software version and hardware details.
5.3 Signal Measurement
In the 'Installation' menu, after selecting the satellite and transponder, the screen will display real-time signal strength and quality bars. Adjust your satellite dish azimuth and elevation slowly while observing these values. The goal is to maximize both strength and quality. The device will emit an audible tone and the 'Lock' LED will light up when a signal is successfully locked.
5.4 AV In/Out and HD-MI Output
- ENTRÉE AV : Connect an external video source (e.g., CCTV camera) to the AV IN port to display its output on the SP-2100's screen.
- AV OUT / HD-MI OUT: Connect the SP-2100 to an external display (TV, monitor) using the AV OUT or HD-MI OUT ports to view the meter's screen on a larger display.
6. Entretien
6.1 Nettoyage
Ensure the device is powered off and disconnected from all cables before cleaning. Use a soft, dry, lint-free cloth to wipe the screen and casing. Do not use abrasive cleaners, solvents, or spray directly onto the device.
6.2 Entretien de la batterie
To prolong battery life, avoid fully discharging the battery frequently. If storing the device for an extended period, charge the battery to approximately 50% and store it in a cool, dry place. Recharge every few months to prevent deep discharge.
6.3 Mise à niveau du logiciel
Software upgrades can be performed via the USB Type A port. Download the latest firmware from the official Satlink webplacer. Copier le firmware file to a USB flash drive, insert it into the SP-2100, and follow the on-screen instructions in the 'System Setting' or 'Utility' menu to initiate the upgrade process. Do not power off the device during an upgrade.
7. Dépannage
- Pas d'alimentation :
- Vérifiez si l'interrupteur d'alimentation est en position « MARCHE ».
- Ensure the battery is charged. Connect the power adapter and check the 'Charge' indicator.
- Verify the power adapter is correctly connected and functioning.
- No Signal / Low Signal Quality:
- Ensure the LNB cable is securely connected to the F-connector.
- Check LNB settings (type, frequency) in the 'Installation' menu.
- Verify DiSEqC settings if using multiple LNBs or a DiSEqC switch.
- Adjust the satellite dish alignment (azimuth, elevation, LNB skew) slowly and observe signal readings.
- Vérifiez qu'aucun obstacle ne se trouve entre la parabole et le satellite.
- No Picture/Sound on External Display:
- Ensure the AV or HD-MI cable is correctly connected to both the SP-2100 and the external display.
- Select the correct input source on your external display (e.g., HDMI 1, AV).
- Périphérique USB non reconnu :
- Ensure the USB device is formatted to NTFS, FAT32, or FAT16.
- Essayez un autre périphérique USB.
8. Spécifications
| Fonctionnalité | Spécification |
|---|---|
| Normes de transmission | DVB-S/S2, MPEG-2, MPEG-4, H.264 |
| Connector Type (Satellite Input) | F Male |
| Fréquence d'entrée | 950 2150 à XNUMX XNUMX MHz |
| Niveau d'entrée du signal | -65 à -25 dBm |
| Commande de commutation de bande | 22KHz |
| Alimentation LNB | 13 V/18 V, IMax 400 mA |
| Type de démodulation | QPSK, 8PSK, 16APSK, 32APSK |
| Débit de symboles | 2 Msps to 45 Msps |
| Type d'écran LCD | TFT transmissif |
| Nombre de points | 320 x 240 (RVB) |
| Active Area (WxH) | 70.0 x 52.5 mm |
| AV Output Connector | 3.5mm jack (CVBS Video, Stereo L/R Audio) |
| Connecteur d'entrée AV | 3.5mm jack (CVBS Video, Stereo L/R Audio) |
| HD-MI Output Format | HD-MI 1.3a |
| Interface USB | USB Type A (USB2.0) |
| File Système de gestion | NTFS, FAT32, FAT16 |
| Soutenu File Formats | wma, mp3, mp4, avi, jpg, jpeg, bmp, img |
| Batterie Li-Ion | 7.4 V/2600 XNUMX mAh |
| Sortie de l'adaptateur | DC12V/1.5A |
| Entrée d'adaptateur | 100-240 VCA, 50/60 Hz |
| Consommation d'énergie | Maximum 10 W |
| Dimensions | 86 x 150 x 40 mm |
| Poids net | 0.37 kg |
9. Contenu du colis
The SATLINK SP-2100 package includes the following items:
- 1x SP-2100 Digital Satellite Meter
- Câble AV 1x
- 1x Power Adapter (DC12V/1.5A)
- 1x sac de transport
- 1x Manuel d'utilisation en anglais (ce document)
10. Garantie et assistance
For warranty information and technical support, please refer to the documentation provided with your purchase or contact your local dealer. Keep your purchase receipt as proof of purchase for warranty claims. Software updates and additional resources may be available on the official Satlink website.


