1. Introduction
This user manual provides essential information for the safe and efficient operation of your HYCHIKA 3.6V Cordless Electric Rechargeable Screwdriver Drill Set. Please read this manual thoroughly before first use and keep it for future reference.
The HYCHIKA 3.6V Cordless Electric Screwdriver is designed for various screwing and light drilling tasks around the home. It features a maximum torque of 6 N-m, a 6.35 mm quick-change chuck, and a versatile design that allows for both pistol and straight grip configurations.
2. Consignes de sécurité
Respectez toujours les consignes de sécurité de base lorsque vous utilisez des outils électriques afin de réduire les risques d'incendie, d'électrocution et de blessures.
- Sécurité de la zone de travail : Maintenez votre espace de travail propre et bien éclairé. Les zones encombrées ou sombres favorisent les accidents. N'utilisez pas d'outils électriques dans des atmosphères explosives, par exemple en présence de liquides, de gaz ou de poussières inflammables.
- Sécurité électrique : Évitez tout contact corporel avec les surfaces mises à la terre ou reliées à la terre, telles que les tuyaux, les radiateurs, les cuisinières et les réfrigérateurs. N’exposez pas les outils électriques à la pluie ou à l’humidité.
- Sécurité personnelle : Always wear eye protection. Use safety glasses, goggles, or a face shield. Wear hearing protection when operating noisy tools. Dress properly; avoid loose clothing or jewelry.
- Utilisation et entretien des outils : N’utilisez pas l’outil électrique de force. Utilisez l’outil électrique adapté à votre application. Débranchez la prise de la source d’alimentation et/ou retirez la batterie avant tout réglage, changement d’accessoires ou rangement de l’outil électrique.
- Utilisation et entretien de la batterie : Rechargez uniquement avec le chargeur spécifié par le fabricant. N’utilisez pas ces batteries avec d’autres outils électriques. Lorsqu’elles ne sont pas utilisées, tenez la batterie éloignée des objets métalliques.
3. Contenu du colis
Veuillez vérifier que tous les articles listés ci-dessous sont inclus dans votre colis. Si un article est manquant ou endommagé, veuillez contacter le service client.
- 1 x HYCHIKA 3.6V Cordless Screwdriver
- 19 x embouts de tournevis
- 1 x Barre d'extension
- 1 x adaptateur de charge
- 1 x Manuel d'utilisation

Figure 3.1: Contents of the HYCHIKA 3.6V Cordless Screwdriver package, including the screwdriver, various bits, and charging adapter.
4. Caractéristiques et composants du produit
Familiarize yourself with the different parts of your cordless screwdriver.

Figure 4.1: Key components of the screwdriver, including the magnetic chuck, PUSH button, front LED light, On/Off switch, LED charger indicator, 3.5mm charger port, and forward & reverse button.
- Mandrin magnétique : 1/4 inch (6.35mm) quick-change chuck for easy bit installation and removal.
- Éclairage LED avant : Éclaire la zone de travail pour une meilleure visibilité dans les environnements sombres.
- Interrupteur marche/arrêt : Activates and deactivates the screwdriver.
- Forward & Reverse Button: Contrôle le sens de rotation pour le vissage et le dévissage.
- LED Charger Indicator: Provides status of battery charging.
- 3.5mm Charger Port: Point de connexion pour l'adaptateur de charge.
- Bouton PUSH : Used to adjust the grip configuration from pistol to straight.
5. Installation
5.1 Chargement de la batterie
The screwdriver is powered by a 3.6V 2000 mAh Lithium-Ion battery. Before first use, fully charge the battery.
- Connect the charging adapter to the 3.5mm charger port on the screwdriver.
- Branchez l'adaptateur de charge sur une prise électrique standard.
- The LED charger indicator will illuminate during charging. Once fully charged, the indicator may change color or turn off depending on the model.
- Débranchez le chargeur une fois la charge terminée.

Figure 5.1: The screwdriver connected to its charging adapter, indicating a full charge.
The screwdriver is designed to maintain full power output even when the battery is low, ensuring consistent performance until the battery is depleted.
5.2 Installation des embouts de tournevis
The screwdriver features a 1/4 inch (6.35mm) magnetic quick-change chuck for easy bit installation.
- Sélectionnez l'embout de tournevis approprié pour votre tâche.
- Insert the bit into the magnetic chuck until it is securely seated. The magnetic chuck will hold the bit firmly in place.
- To remove a bit, simply pull it out of the chuck. Bits with grooves are designed for easier removal.

Figure 5.2: Visual guide for inserting a bit into the magnetic chuck and removing it.
6. Mode d'emploi
6.1 Adjusting Grip Configuration
The screwdriver can be used in two grip configurations: pistol grip or straight grip, for enhanced versatility and comfort.
- To change the grip, press and hold the "PUSH" button located at the top of the screwdriver.
- While holding the button, rotate the handle ninety degrees to switch between pistol and straight configurations.
- Release the "PUSH" button once the desired configuration is achieved. The handle will lock into place.
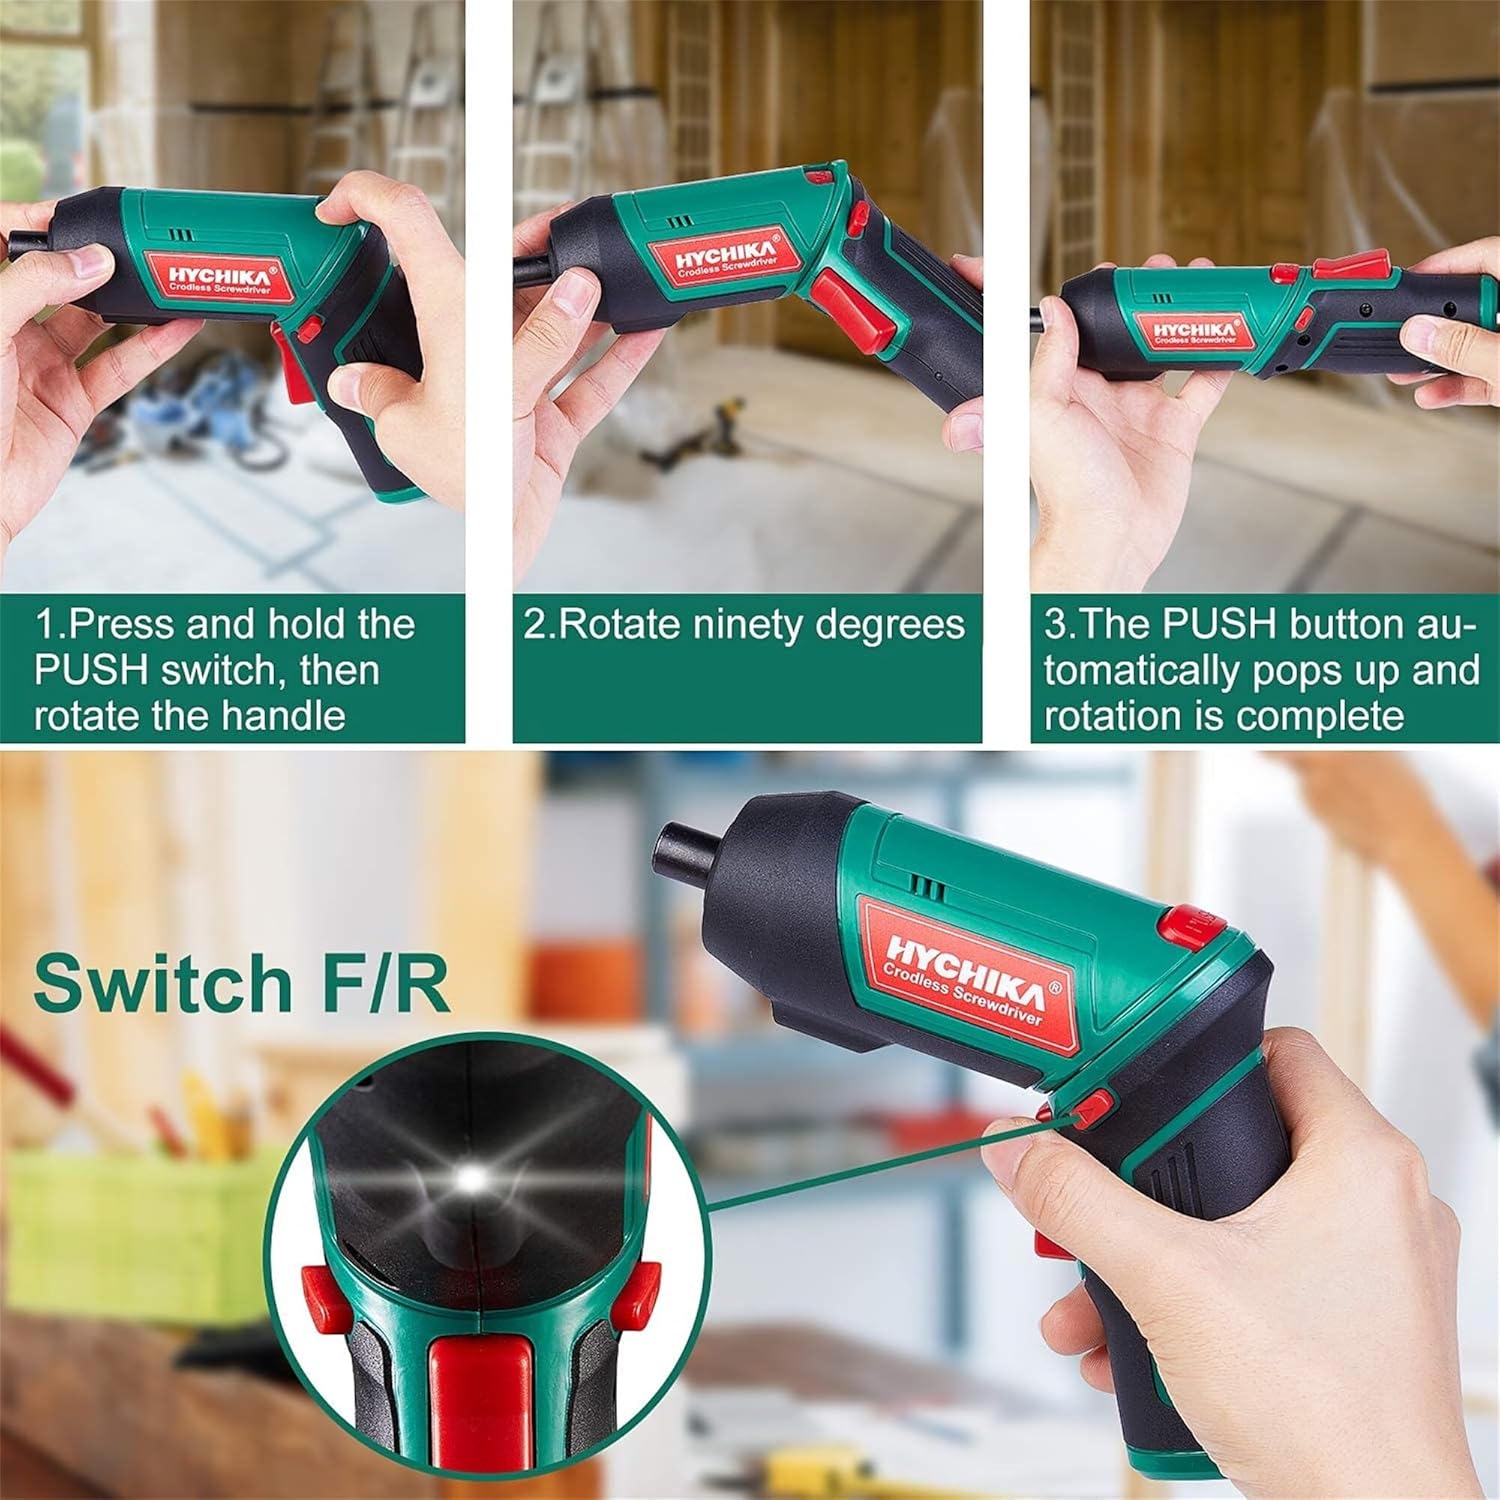
Figure 6.1: Demonstrates the process of transforming the screwdriver's grip by pressing the PUSH button and rotating the handle.
6.2 Fonctionnement en marche avant et en marche arrière
The forward/reverse button controls the direction of rotation for screwing and unscrewing.
- To drive screws (forward rotation), push the forward/reverse button to the left (when viewl'arrière de l'outil).
- To remove screws (reverse rotation), push the forward/reverse button to the right.
- When the button is in the center position, the tool is locked, preventing accidental activation.
6.3 Utilisation de la lampe de travail à DEL
The built-in LED light automatically illuminates when the screwdriver is in operation, providing visibility in dimly lit areas.

Figure 6.2: The integrated LED light provides clear illumination for working in dark environments.
7. Entretien
Regular maintenance ensures the longevity and optimal performance of your screwdriver.
- Nettoyage: Veillez à ce que les ouvertures de ventilation soient propres et exemptes de poussière. Utilisez un chiffon doux et sec.amp chiffon pour nettoyer l'outil casing. N’utilisez pas de produits chimiques agressifs ni de nettoyants abrasifs.
- Bit Care : Clean screwdriver bits after use. Store them in the provided case to prevent loss and damage.
- Stockage de la batterie : If storing the tool for an extended period, ensure the battery is partially charged (around 50%) and store it in a cool, dry place. Recharge the battery every 3-6 months to maintain its health.
- Inspection générale: Periodically check for any loose screws, damaged cords, or worn parts. Do not use the tool if any damage is observed.
8. Dépannage
This section addresses common issues you might encounter with your screwdriver.
| Problème | Cause possible | Solution |
|---|---|---|
| Le tournevis ne s'allume pas. | La batterie est épuisée. Forward/Reverse switch is in the center (locked) position. | Chargez complètement la batterie. Poussez l'interrupteur avant/arrière vers la gauche ou vers la droite. |
| Screwdriver loses power quickly. | La batterie n'est pas complètement chargée. Battery life degraded. | Assurez-vous que la batterie est complètement chargée avant utilisation. If battery life is significantly reduced, contact customer support for replacement options. |
| Bits are not held securely in the chuck. | Bit is not fully inserted. Chuck is dirty or damaged. | Push the bit firmly into the chuck until it clicks into place. Clean the chuck area. If damage is visible, contact customer support. |
Si le problème persiste après avoir essayé ces solutions, veuillez contacter le service client.
9. Spécifications
| Fonctionnalité | Spécification |
|---|---|
| Marque | Overstock (HYCHIKA) |
| Numéro de modèle | c131a012-0da9-4306-aeab-b1d9ff5cd4b7 |
| Voltage | 3.6 volts |
| Source d'énergie | Alimenté par batterie |
| Vitesse | 180 tr/min |
| Article Couple | 6 Newton Meters (6 N-m) |
| Type de batterie | Lithium-ion |
| Capacité de la batterie | 2000 mAh |
| Taille du mandrin | 1/4 pouce (6.35 mm) |
| Matériel | Plastique, caoutchouc |
| Couleur | Vert |
| Code UPC | 616859793583 |
10. Garantie et assistance
Overstock offers lifetime after-sales service for this product. For any questions, concerns, or technical assistance, please contact our customer support team.
Please have your model number (c131a012-0da9-4306-aeab-b1d9ff5cd4b7) and purchase information ready when contacting support.