1. Introduction
This manual provides detailed instructions for the installation, operation, and maintenance of your darkFlash Aquarius Mesh Computer Case. Please read this manual thoroughly before beginning installation to ensure proper setup and safe use of your new computer chassis.
2. Consignes de sécurité
Respectez toujours les consignes de sécurité suivantes :
- Disconnect all power sources before installing or removing any components.
- Portez un bracelet antistatique pour éviter les dommages causés par les décharges électrostatiques (ESD) aux composants.
- Manipulez les composants avec précaution afin d'éviter tout dommage physique.
- Gardez les petites pièces et outils hors de portée des enfants.
- Ensure proper ventilation around the computer case.
3. Contenu du colis
Vérifiez que tous les éléments sont présents dans votre colis :
- darkFlash Aquarius Mesh Computer Case
- Boîte d'accessoires (vis, entretoises, serre-câbles, etc.)
- Manuel de l'utilisateur (ce document)
4. Configuration et installation
Follow these steps for proper component installation.
4.1. Préparation du dossier
Before installing components, remove the side panels. The Aquarius Mesh case typically features a tempered glass side panel and a solid metal panel.
- Locate the thumbscrews on the rear of the case securing the side panels.
- Unscrew the thumbscrews and carefully slide the panels backward, then lift them off.

Figure 1 : Avant et côté view of the darkFlash Aquarius Mesh case. Note the mesh front panel and tempered glass side panel.

Figure 2 : Arrière view of the darkFlash Aquarius Mesh case, showing expansion slots and rear fan mount.
4.2. Installation de la carte mère
The Aquarius Mesh supports ATX, Micro-ATX, and Mini-ITX motherboards.
- Installez la plaque d'E/S dans l'encoche située à l'arrière du boîtier.
- Align your motherboard with the pre-installed standoffs. Ensure the I/O ports align with the I/O shield.
- Fixez la carte mère avec les vis appropriées fournies dans la boîte d'accessoires.
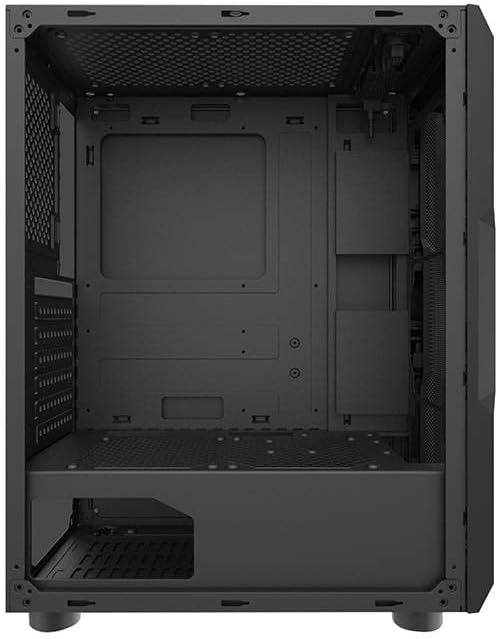
Figure 3 : Intérieur view of the darkFlash Aquarius Mesh case, highlighting the motherboard tray and cable routing options.
4.3. Installation du bloc d'alimentation (PSU)
The PSU mounts at the bottom rear of the case.
- Glissez le bloc d'alimentation dans son compartiment prévu à cet effet par l'arrière du boîtier.
- Align the screw holes and secure the PSU with screws.
4.4. Installation du disque de stockage
The case provides mounting options for 3.5-inch HDDs and 2.5-inch SSDs.
- Disques durs 3.5 pouces : Locate the drive cage usually beneath the PSU shroud or behind the motherboard tray. Slide the HDD into the bay and secure it with screws.
- SSD 2.5 pouces : Mount SSDs to dedicated brackets behind the motherboard tray or on the PSU shroud. Secure with screws.

Figure 4 : Intérieur arrière view of the darkFlash Aquarius Mesh case, showing the motherboard cutout and potential SSD mounting points.
4.5. Installation de la carte d'extension (ex. : GPU)
- Retirez les caches des emplacements d'extension nécessaires à l'arrière du boîtier.
- Insert the expansion card into the appropriate PCIe slot on the motherboard.
- Secure the card with the provided screws or retention clips.
4.6. Gestion des câbles
Utilisez les ouvertures et les points de fixation situés derrière le plateau de la carte mère pour organiser les câbles. Cela améliore la circulation de l'air et l'esthétique.
4.7. Reassembling the Case
Once all components are installed and cables are managed:
- Carefully reattach the side panels, ensuring they slide into place correctly.
- Secure the side panels with the thumbscrews.
5. Mode d'emploi
After assembly, connect your peripherals and power cable.
- Connect your monitor, keyboard, mouse, and other peripherals to the motherboard's I/O ports.
- Branchez le câble d'alimentation au bloc d'alimentation et à une prise murale.
- Press the power button located on the top panel of the case to start your computer.

Figure 5 : Haut view of the darkFlash Aquarius Mesh case, showing the front I/O panel with power button, reset button, USB ports, and audio jacks.
6. Entretien
Un entretien régulier contribue à garantir des performances optimales et une longue durée de vie aux composants de votre ordinateur.
- Filtres à poussière : The Aquarius Mesh case features removable dust filters (e.g., on the front, top, and bottom). Regularly remove and clean these filters with water and mild soap, or by vacuuming, to maintain good airflow. Ensure they are completely dry before reinstallation.
- Nettoyage intérieur: Periodically open the case and use compressed air to remove dust buildup from fans, heatsinks, and other components.
- Nettoyage extérieur : Essuyez les surfaces extérieures avec un chiffon doux, damp tissu. Évitez les produits chimiques agressifs.
7. Dépannage
En cas de problème, voici quelques solutions courantes :
- Pas d'alimentation :
- Assurez-vous que l'interrupteur du bloc d'alimentation est en position « MARCHE ».
- Vérifiez toutes les connexions d'alimentation de la carte mère et des composants.
- Verify the power cable is securely plugged into the wall outlet and PSU.
- Ventilateurs non fonctionnels :
- Check fan connections to the motherboard or fan controller.
- Ensure fans are not obstructed by cables or dust.
- Entrées/sorties du panneau avant non fonctionnelles :
- Verify that the front panel connectors (USB, audio, power/reset switches) are correctly connected to the motherboard headers. Refer to your motherboard manual for header locations.
8. Spécifications
| Fonctionnalité | Détail |
|---|---|
| Marque | Flash sombre |
| Numéro de modèle | Aquarius Mesh |
| Type de cas | Tour intermédiaire |
| Matériel | Acier allié |
| Couleur | Noir |
| Méthode de refroidissement | Air |
| Utilisation recommandée | Ordinateur |
| Format du disque dur | 3.5 pouces |
9. Garantie et assistance
For warranty information or technical support, please refer to the official darkFlash webConsultez leur site web ou contactez leur service client. Conservez votre preuve d'achat pour toute réclamation au titre de la garantie.
Pour obtenir de l'aide supplémentaire, vous pouvez consulter le darkFlash official website.


