Introduction
Thank you for choosing the Baseus Super Energy Pro 1600A Car Jump Starter. This device is designed to provide a reliable and powerful solution for starting vehicles with dead batteries, and also functions as a portable power bank. Please read this manual thoroughly before use to ensure safe and proper operation. Keep this manual for future reference.
Consignes de sécurité
- Always read the vehicle's owner's manual before attempting to jump start it.
- N'essayez pas de redémarrer une batterie gelée.
- Assurez une ventilation adéquate lors de l'utilisation de l'appareil.
- Gardez l’appareil hors de portée des enfants et des animaux domestiques.
- N’exposez pas l’appareil à la pluie ou à des températures extrêmes.
- Évitez de court-circuiter le cavalier.amps. Do not connect the red and black clamps ensemble.
- If the device or cables are damaged, do not use them. Contact support.
- Toujours connecter le clamps aux bornes de batterie appropriées (rouge au positif, noir au négatif).
- Retirez immédiatement le démarreur d'appoint après le démarrage du véhicule.
Contenu du colis
Vérifiez que tous les éléments sont présents dans votre colis :
- Baseus Super Energy Pro Car Jump Starter Unit
- Câbles de démarrage intelligents avec Clamps
- Câble de chargement USB-C
- Manuel de l'utilisateur (ce document)

Image: Contents of the Baseus Super Energy Pro Car Jump Starter package, showing the main unit, smart jumper cables, and a USB-C charging cable.
Produit terminéview
Familiarize yourself with the components of your Baseus Super Energy Pro Car Jump Starter:
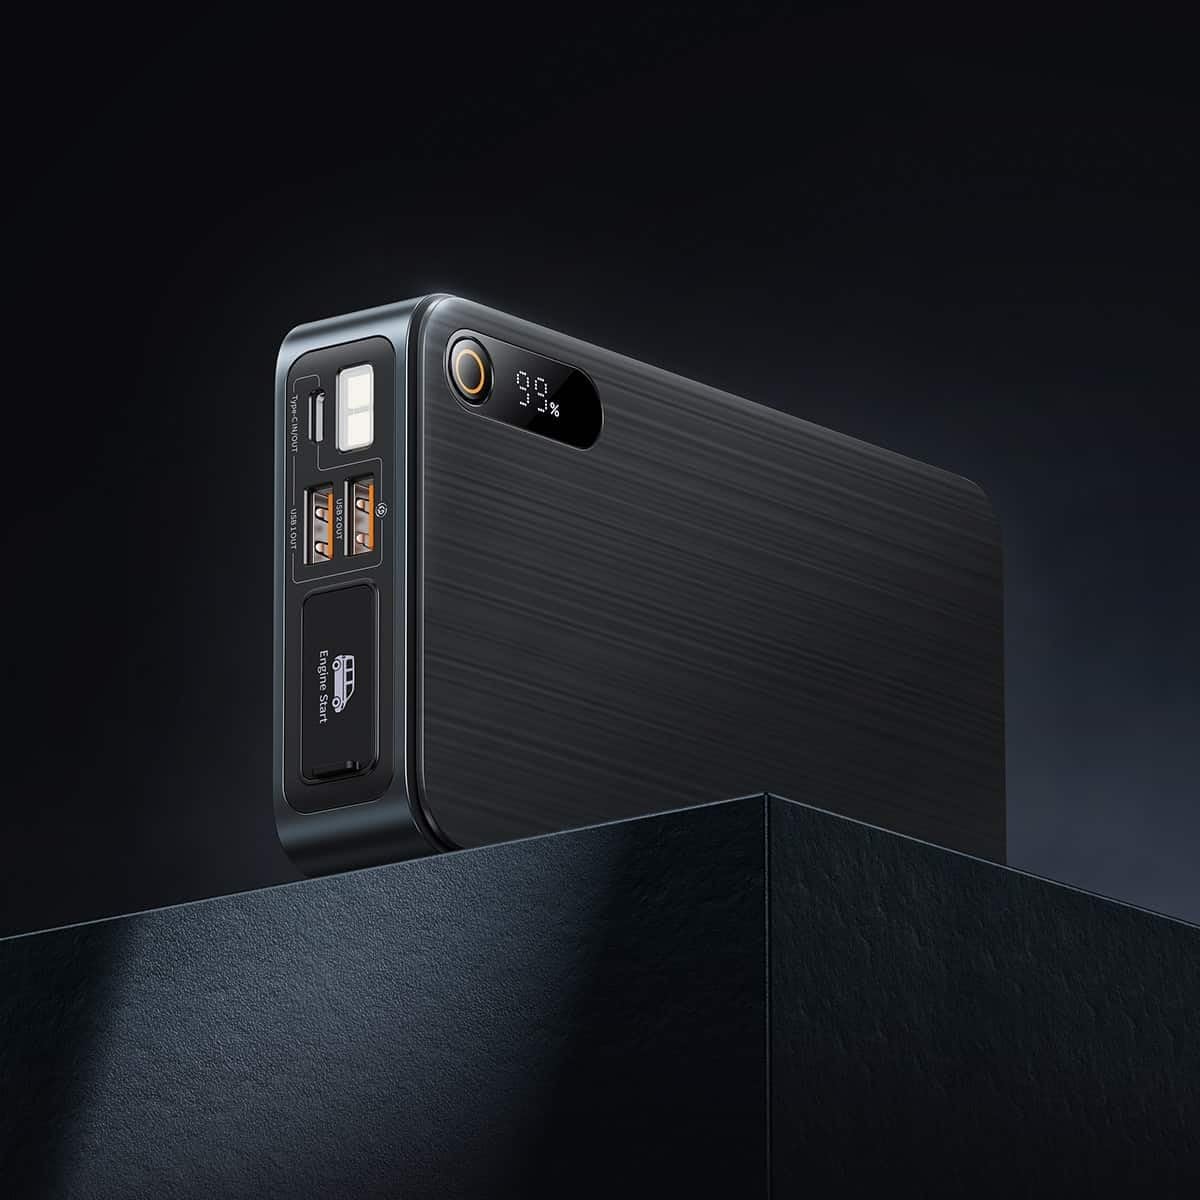
Image: Close-up of the jump starter's side panel, highlighting the various ports and the digital display.
- Affichage numérique: Affiche le pourcentage de batterie restanttage.
- Bouton d'alimentation : Activates the device and turns on the LED light.
- Ports de sortie USB-A : For charging external devices like smartphones or tablets.
- Port d'entrée/sortie de type C : Used for charging the jump starter itself or charging other devices.
- Port de démarrage du moteur : Dedicated port for connecting the smart jumper cables.
- Lampe de poche LED: Fournit un éclairage dans les environnements sombres.

Image: The Baseus Super Energy Pro Car Jump Starter unit, displaying its digital battery indicator.
Charger l'appareil
Before first use, fully charge the Baseus Super Energy Pro Car Jump Starter. It is recommended to keep the device charged above 50% for optimal performance and longevity.
- Connectez le câble de chargement USB-C fourni au port Type-C du démarreur.
- Connectez l'autre extrémité du câble USB-C à un adaptateur secteur USB approprié (non inclus).
- The digital display will show the charging progress. The device is fully charged when the display shows 100%.
Setup for Jump Starting
Ensure your vehicle is in Park (P) or Neutral (N) and the parking brake is engaged. Turn off all vehicle accessories (headlights, radio, air conditioning).
- Assurez-vous que le démarreur électrique a une charge suffisante (au moins 50 %).
- Connect the blue end of the smart jumper cables into the Engine Start port on the jump starter. Ensure it is firmly seated.
Instructions d'utilisation (démarrage par câbles)
Suivez attentivement ces étapes pour démarrer votre véhicule à l'aide de câbles :
- Connectez Rouge Clamp: Fixez la cl rouge (+)amp of the jumper cables to the positive (+) terminal of your vehicle's dead battery.
- Connecter Black Clamp: Fixez la clé noire (-)amp of the jumper cables to the negative (-) terminal of your vehicle's dead battery.
- Indicateur de contrôle : Observe the indicator light on the smart jumper cable. A solid green light indicates a correct connection and that the device is ready to start. If it's red or flashing, check connections or refer to troubleshooting.
- Démarrer le véhicule : Once the indicator is green, start your vehicle's engine.
- Retirez les câbles de démarrage : As soon as the engine starts, immediately remove the blue plug of the jumper cables from the jump starter.
- Déconnecter Clamps: Ensuite, déconnectez le fil noir (-).amp à partir de la batterie du véhicule, suivi du fil rouge (+)amp.
Allow your vehicle's engine to run for at least 20-30 minutes to recharge its battery.
Entretien
- Stockage: Rangez le démarreur dans un endroit frais et sec, à l'abri de la lumière directe du soleil et de l'humidité.
- Chargement : Pour une durée de vie optimale de la batterie, rechargez l'appareil tous les 3 à 6 mois, même s'il n'est pas utilisé.
- Nettoyage: Nettoyez l'appareil avec un chiffon doux et sec. N'utilisez pas de produits chimiques agressifs ni de matériaux abrasifs.
- Élimination des piles : Do not dispose of the device in household waste. Follow local regulations for proper disposal of lithium-ion batteries.
Dépannage
| Problème | Cause possible | Solution |
|---|---|---|
| Le véhicule ne démarre pas | La batterie du démarreur est faible. Connexion du câble incorrecte. La batterie du véhicule est gravement endommagée. | Rechargez le démarreur. Chèque clamp connections to battery terminals. Consultez un mécanicien professionnel. |
| Le démarreur ne charge pas | Câble de charge ou adaptateur défectueux. Type-C port damaged. | Essayez un autre câble USB-C et un autre adaptateur secteur. Contactez le support client. |
| Smart cable indicator is red/flashing | Connexion à polarité inversée. Court-circuit détecté. Surintensité/survoltage. | Déconnecter et reconnecter clamps correctement (rouge à +, noir à -). Assurez-vous que clampIls ne se touchent pas. Disconnect and try again after a few minutes. If problem persists, contact support. |
Caractéristiques
| Fonctionnalité | Détail |
|---|---|
| Marque | Baseus |
| Numéro de modèle | CGNL070001 |
| Courant de pointe | 1600 A |
| Composition de la batterie | Lithium-ion |
| Type de service de véhicule | Voiture |
| Dimensions du produit (L x l x H) | 10 x 5 x 1.27 cm |
| Poids de l'article | 920 g |
| Entrée/Sortie | USB-A Output, Type-C Input/Output |
Garantie et assistance
For warranty information or technical support, please refer to the warranty card included with your product or contact the retailer where you purchased the device. You may also visit the official Baseus webConsultez ce site pour obtenir de l'aide supplémentaire et nos coordonnées.


