1. Introduction
Thank you for choosing the AM alphamount TV Wall Mount. This full motion articulating arm bracket is designed to securely hold most 26-60 inch flat or curved televisions weighing up to 77 lbs. Its robust construction and versatile adjustability provide an optimal viewing experience from various angles in your room. This manual provides detailed instructions for safe installation, operation, and maintenance of your TV wall mount.

Image 1.1: AM alphamount Full Motion TV Wall Mount
2. Informations importantes sur la sécurité
Please read all instructions carefully before installation. If you do not understand these instructions, or have doubts about the safety of the installation, please contact a qualified installer or customer service.
- Do not install this product on walls that are not structurally sound. Ensure the mounting surface can safely support the combined weight of the mount and the television.
- This mount is intended for use with TVs weighing up to 77 lbs (35 kg). Exceeding this weight limit may result in instability and potential injury.
- Verify your TV's VESA mounting pattern (distance between mounting holes on the back of the TV) is within the supported range of 75x75mm to 400x400mm.
- Always use a stud finder to locate wood studs for secure mounting. For concrete or brick walls, use appropriate anchors (not always included, check package contents).
- Do not overtighten screws. Overtightening can damage the mounting surface or the TV.
- Tenir les enfants et les animaux domestiques éloignés pendant l’installation.
- Periodically check the mount for any signs of wear, loose screws, or damage.
3. Contenu du colis
Please check to ensure all components are present and undamaged. If any parts are missing or defective, contact customer service for assistance.
- TV Wall Mount Assembly (Wall Plate and Articulating Arm)
- Supports TV (2 pièces)
- Kit de fixation (vis, rondelles et entretoises diverses pour téléviseur et mur)
- Niveau à bulle
- Modèle d'installation (le cas échéant)
- Manuel d'instructions (ce document)
4. Spécifications du produit
| Fonctionnalité | Spécification |
|---|---|
| Marque | AM alphamount |
| Numéro de modèle | APMF5 |
| Compatibilité de la taille du téléviseur | 26 à 60 pouces |
| Capacité de poids | Jusqu'à 77 lb (35 kg) |
| Compatibilité VESA | 75x75mm à 400x400mm |
| Angle de pivotement | 180° (depending on TV size) |
| Angle d'inclinaison | +5° / -15° |
| Extension du mur | 2.3 pouces (rétracté) à 18.7 pouces (déployé) |
| Matériel | Acier allié |
| Couleur | Noir |

Image 4.1: Compatibility for TV sizes and VESA patterns.

Image 4.2: Comparison of arm thickness for stability.
5. Configuration et installation
5.1 Liste de contrôle de pré-installation
- Ensure you have all necessary tools: stud finder, drill, level, Phillips head screwdriver, socket wrench, pencil.
- Identify your wall type: wood stud, concrete, or brick. Different hardware and drilling methods apply.
- Determine the desired TV height. The center of the TV should ideally be at eye level when seated.
- Check for any electrical wires or plumbing behind the wall in the intended mounting area.
5.2 Fixation des supports de télévision au téléviseur
- Placez soigneusement votre téléviseur face contre une surface douce et propre afin d'éviter d'endommager l'écran.
- Identifiez les trous de montage VESA à l'arrière de votre téléviseur.
- Select the correct diameter and length of screws from the hardware kit that fit your TV's mounting holes. Use washers and spacers if needed to ensure a snug fit without overtightening.
- Attach the two TV brackets to the back of your TV, ensuring they are level and securely fastened. The open ends of the brackets should face downwards.
5.3 Montage de la plaque murale
- For wood stud installation: Use a stud finder to locate the center of a wood stud. Mark the drilling locations for the wall plate.
- Drill pilot holes at the marked locations. The drill bit size will be specified in the included hardware instructions.
- Align the wall plate with the pilot holes and secure it to the wall using the lag bolts and washers. Use the included bubble level to ensure the wall plate is perfectly horizontal before fully tightening.
- For concrete/brick wall installation: Mark the drilling locations. Drill holes using a masonry drill bit. Insert concrete anchors into the drilled holes. Then, attach the wall plate using the lag bolts and washers, ensuring it is level.

Image 5.1: Illustration of single stud mounting and post-installation leveling.
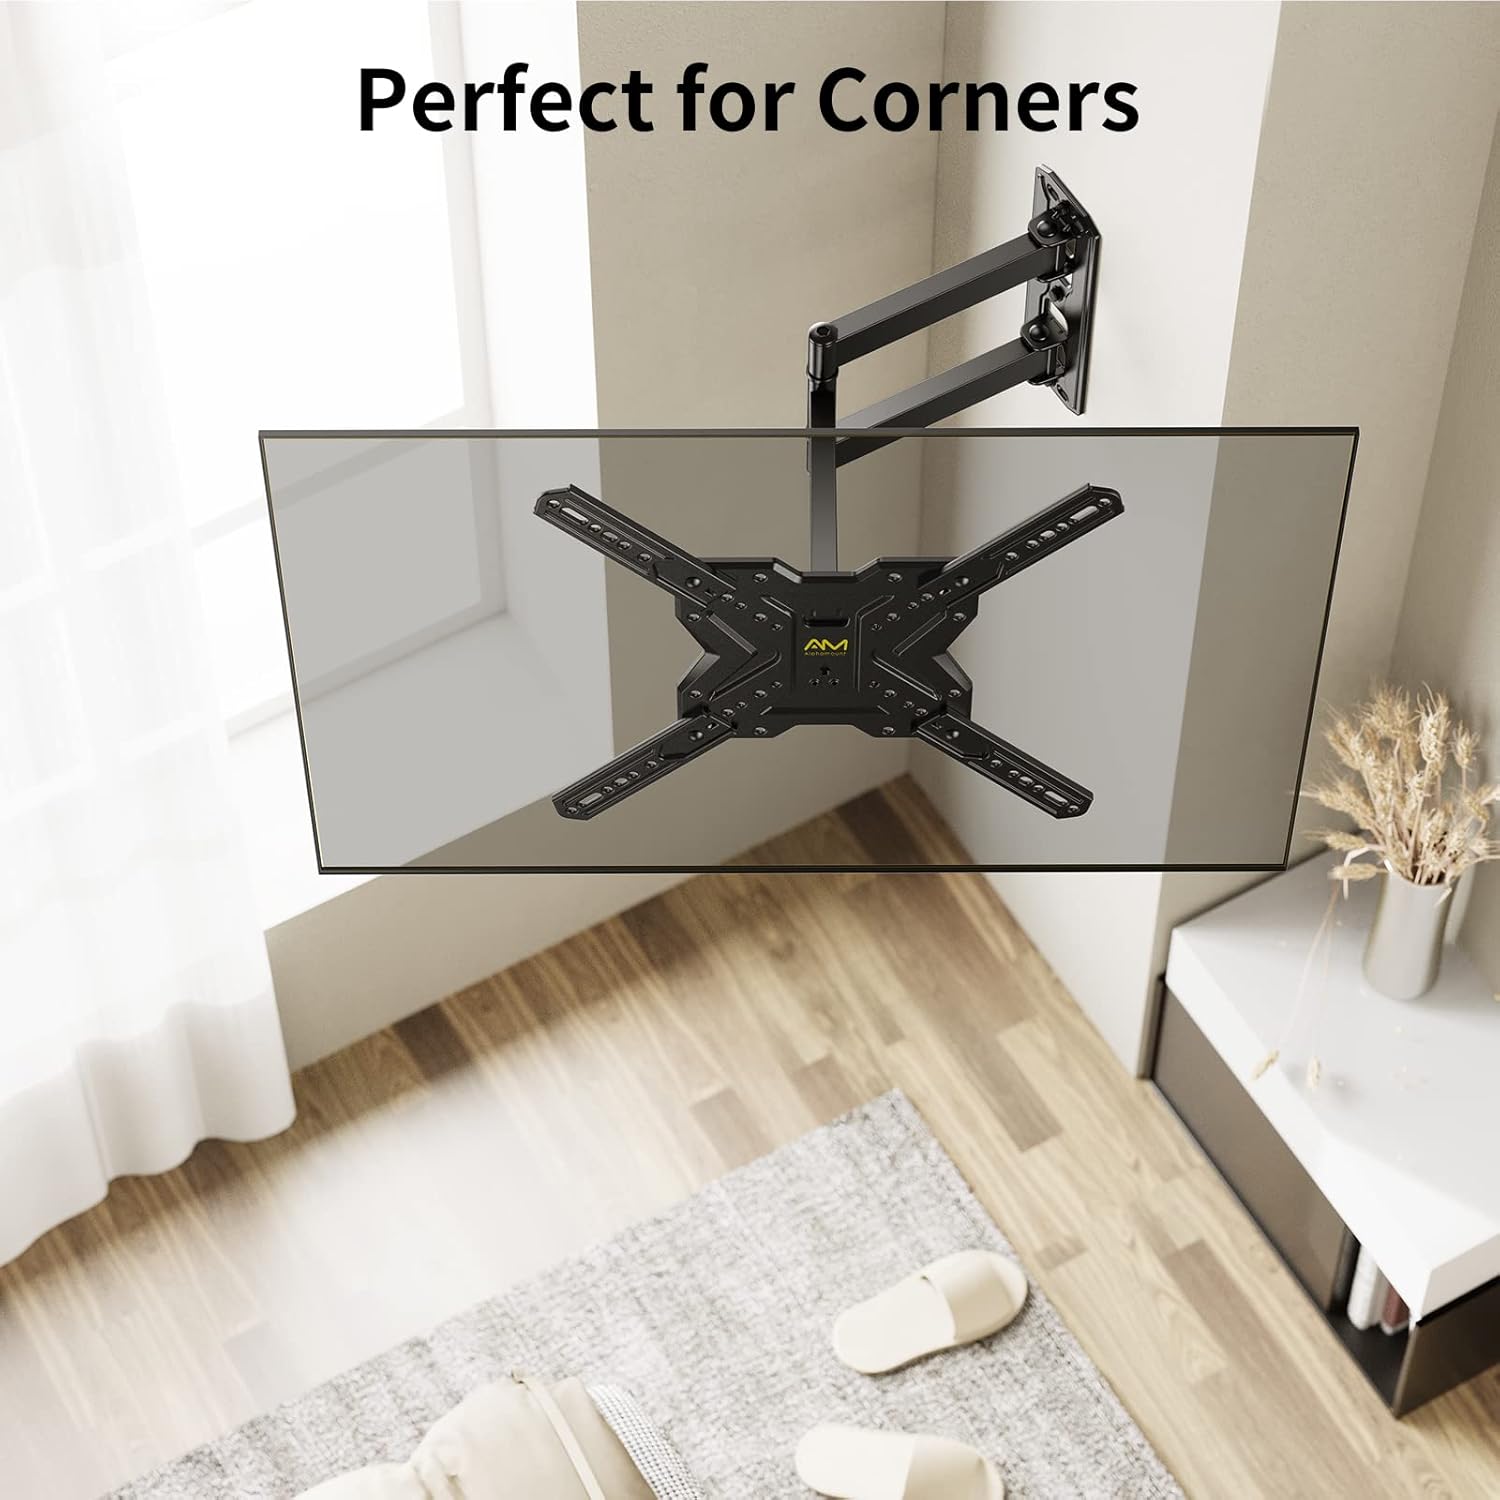
Image 5.2: The mount's design allows for effective corner placement.
5.4 Accrocher le téléviseur
- Avec l'aide d'une autre personne, soulevez délicatement le téléviseur muni de ses supports et accrochez-les à la plaque murale.
- Assurez-vous que le téléviseur est bien fixé sur la plaque murale.
- Engage the safety locking screws or mechanisms on the TV brackets to prevent accidental dislodging.
6. Operating Your TV Mount
Your AM alphamount TV wall mount offers flexible adjustments to achieve the best viewangle de vue.
6.1 Réglage pivotant
Gently push or pull the TV screen to the desired left or right angle. The articulating arm allows for up to 180° of swivel, depending on your TV size and wall clearance.

Image 6.1: Adjusting the TV for optimal viewdepuis n'importe quelle position.
6.2 Réglage de l'inclinaison
To adjust the vertical tilt, loosen the tilt knobs or bolts on the TV brackets (if applicable), tilt the screen to your preferred angle (+5° up to -15° down), and then re-tighten the knobs/bolts to secure the position. This helps reduce glare and improve viewconfort.

Image 6.2: Tilting the TV to minimize screen glare.
6.3 Extension et rétraction
The articulating arm allows you to extend the TV up to 18.7 inches from the wall or retract it back to a slim 2.3 inches. Gently pull or push the TV to achieve the desired distance.
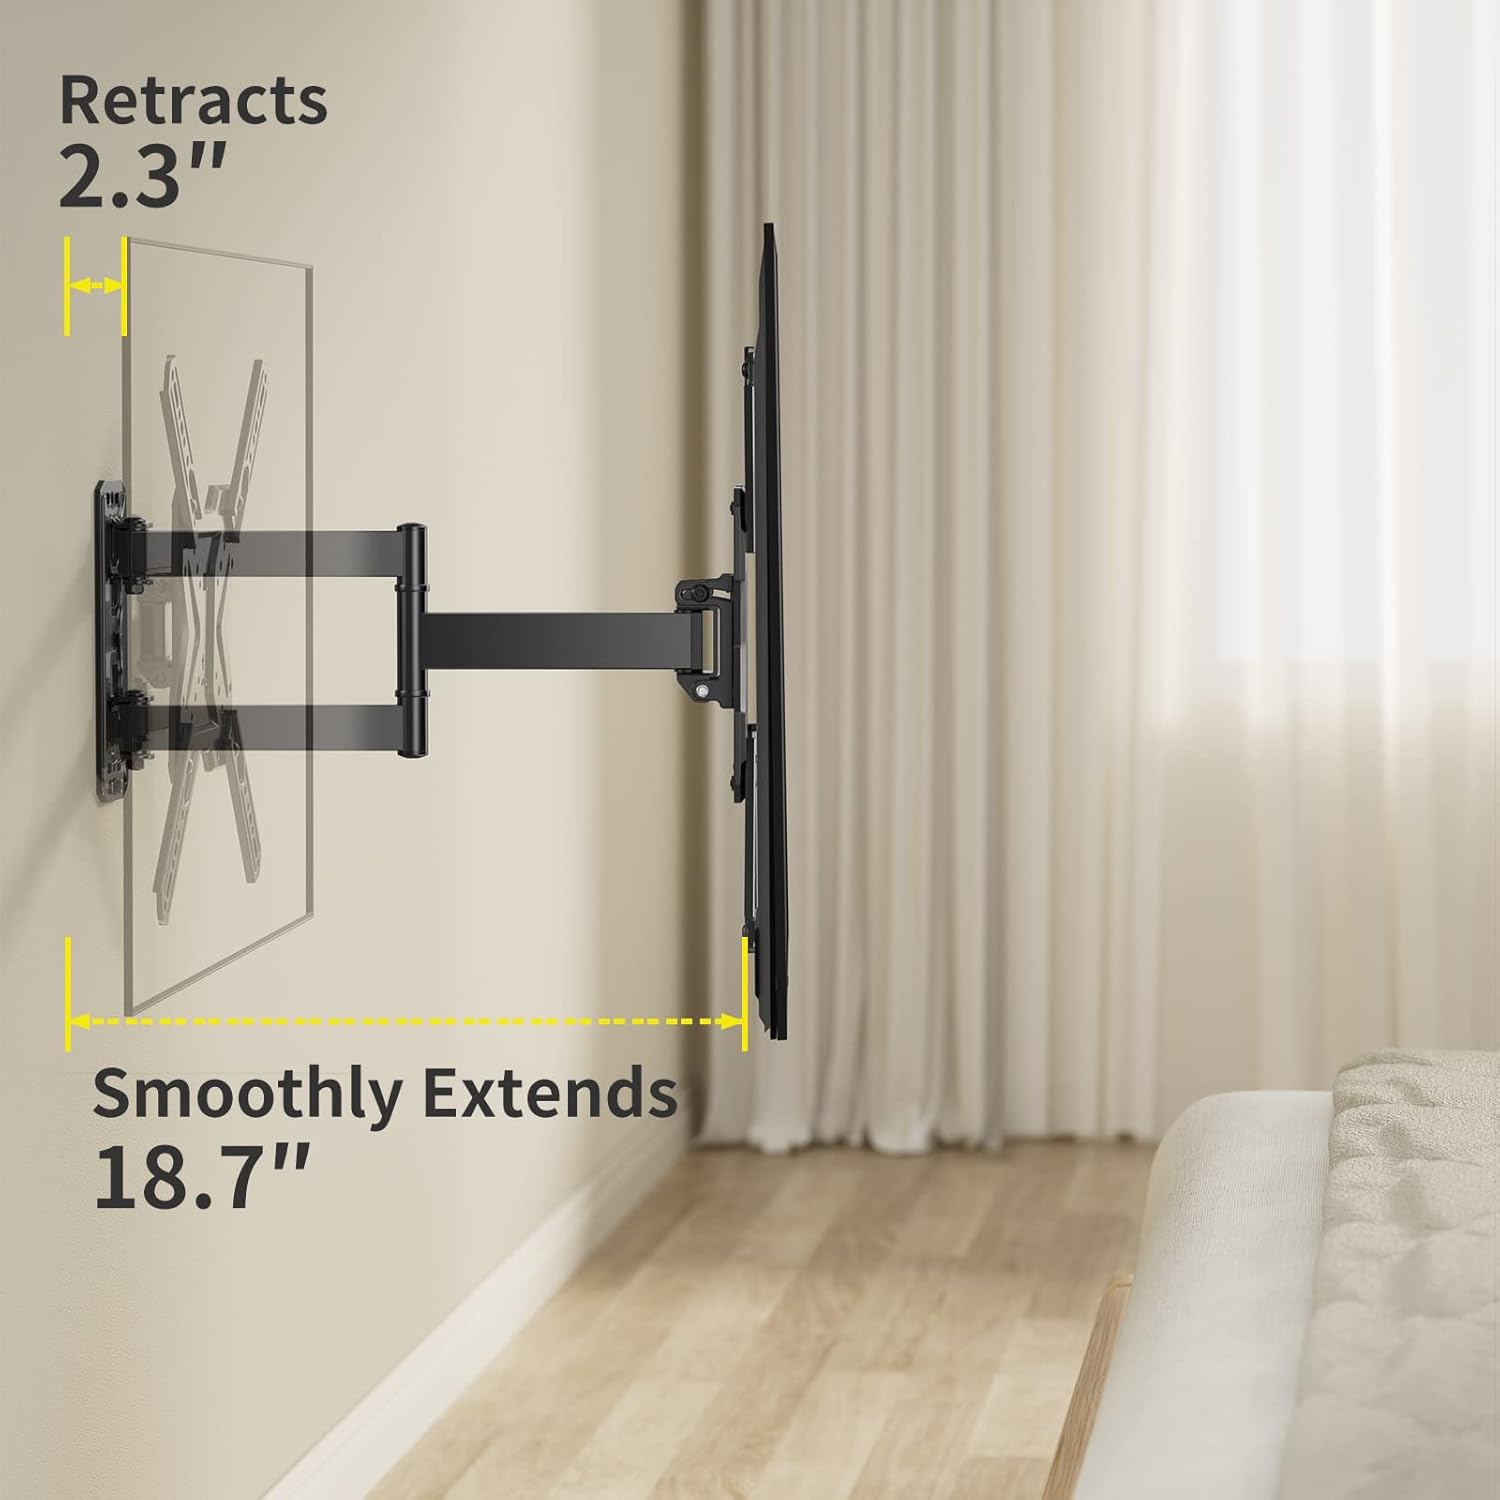
Image 6.3: Demonstrating the mount's extension and retraction capabilities.
7. Entretien
- Nettoyage: Utilisez un chiffon doux et sec pour nettoyer le support. Évitez les nettoyants abrasifs ou les solvants qui pourraient endommager la finition.
- Inspection périodique: Every 6-12 months, check all screws and bolts to ensure they are still tight and secure. Re-tighten if necessary.
- Lubrification: The articulating joints are designed for smooth movement and generally do not require lubrication. If movement becomes stiff, contact customer support.
8. Dépannage
| Problème | Cause/solution possible |
|---|---|
| Le téléviseur n'est pas de niveau après l'installation. | The mount has a post-installation leveling feature (+/-3°). Loosen the leveling screws slightly, adjust the TV, and re-tighten. |
| Mount feels wobbly or unstable. | Ensure all wall plate bolts are securely tightened into a stud or appropriate anchors. Verify TV weight is within limits. Re-check all connections. |
| Cannot tilt or swivel the TV. | Check if tilt knobs/bolts are too tight. Loosen them slightly to allow movement, then re-tighten to secure. Ensure no cables are obstructing movement. |
| Le téléviseur ne convient pas au support. | Verify your TV's VESA pattern and weight are within the mount's specifications (75x75mm to 400x400mm, up to 77 lbs). |
9. Garantie et assistance
AM alphamount is committed to providing high-quality products. For specific warranty details, please refer to the product packaging or the official AM alphamount website. If you encounter any issues or require technical assistance, please contact AM alphamount customer support through their official channels or visit their Amazon store page:
10. Ressources supplémentaires
For a downloadable PDF version of this user manual and other product information, please visit: