1. Introduction
This manual provides essential information for the safe installation, operation, and maintenance of your Philips LED Slim Flood Light, model PTF150-NW-G1-Y-FL-8-BZ. Please read this manual thoroughly before installation and retain it for future reference.
The Philips LED Slim Flood Light is designed for outdoor applications such as sign lighting, building facades, security lighting, and general area illumination. Its robust construction and efficient LED technology ensure reliable performance.
2. Consignes de sécurité
WARNING: Risk of electric shock. Installation should be performed by a qualified electrician or trained personnel in accordance with all applicable electrical codes.
- Coupez l'alimentation au niveau du disjoncteur ou du tableau électrique avant toute installation ou intervention.
- Assurer le vol d'alimentationtage est compatible avec les exigences du luminaire (120V AC).
- N’utilisez pas l’appareil si le câblage ou les composants sont endommagés.
- Évitez toute exposition directe des yeux à la source lumineuse lorsqu'elle est allumée.
- The fixture's housing acts as a heat sink and may become hot during operation. Allow adequate cooling time before handling.
- Ensure all connections are secure and properly sealed, especially the IP66 liquid-tight connector for the power cord, to maintain water resistance.
- Ne modifiez pas le dispositif. Toute modification peut annuler la garantie et engendrer des risques pour la sécurité.
3. Contenu du colis
Vérifiez que tous les composants sont présents avant de commencer l'installation :
- Philips LED Slim Flood Light (1 unit)
- Integrated Yoke Mount (pre-attached)
- Power Cord (3-foot, STW 16 gauge)
- IP66 Liquid Tight Connector (pre-attached to cord exit)

Image 1: Philips LED Slim Flood Light. This image shows the front view of the flood light with its integrated yoke mount and power cord connection point.
4. Spécifications
| Spécification | Détail |
|---|---|
| Numéro de modèle | PTF150-NW-G1-Y-FL-8-BZ |
| Marque | Signify (Philips) |
| Quoitage | 150 watts |
| Rendement lumineux | 18600 lumens |
| Température de couleur | Blanc froid 4000K |
| Efficacité | 124 lumens par watt |
| Voltage | 120 Volts (CA) |
| Type de montage | Yoke Mount (Surface Mount) |
| Finition | Bronze |
| Matériel | Die-cast aluminum housing, tempered glass lens |
| Indice de protection IP (Ingress Protection) | IP65 (fixture), IP66 (connector) |
| Poids de l'article | 4 livres |
| Dimensions (environ) | 16.93" H x 11.41" W x 2.36" D (430mm H x 289.8mm W x 59.9mm D) |
5. Configuration et installation
The Philips LED Slim Flood Light is designed for surface mounting using its integrated yoke. Follow these steps for proper installation:
- Préparation: Ensure power is disconnected at the main circuit breaker. Gather necessary tools (drill, screwdriver, wire strippers, electrical tape, mounting hardware suitable for your surface).
- Emplacement de montage : Select a sturdy surface (wall, pole, ground) capable of supporting the fixture's weight and providing adequate clearance for light distribution.
- Marquage et perçage : Use the yoke mount as a template to mark the drilling points on the mounting surface. Drill appropriate pilot holes for your chosen mounting hardware. Refer to the dimension diagram for precise measurements.
- Fixer le luminaire : Attach the yoke mount securely to the prepared surface using appropriate screws or bolts (not included). Ensure the fixture is stable and cannot vibrate loose. The yoke includes a bolt to lock in the aiming angle after adjustment.
- Connexion électrique :
- The fixture comes with a 3-foot watertight STW 16 gauge cord exiting the housing via an IP66 liquid-tight connector.
- Connect the fixture's power cord to your main power supply wiring. This connection must be made by a qualified electrician and comply with all local and national electrical codes.
- Ensure all wire connections are properly insulated and protected from moisture.
- Aiming Adjustment: Loosen the bolt on the yoke mount, adjust the flood light to the desired aiming angle, and then securely tighten the bolt to lock the position.
- Restaurer l'alimentation : Une fois l'installation terminée et toutes les connexions sécurisées, rétablissez le courant au niveau du disjoncteur.
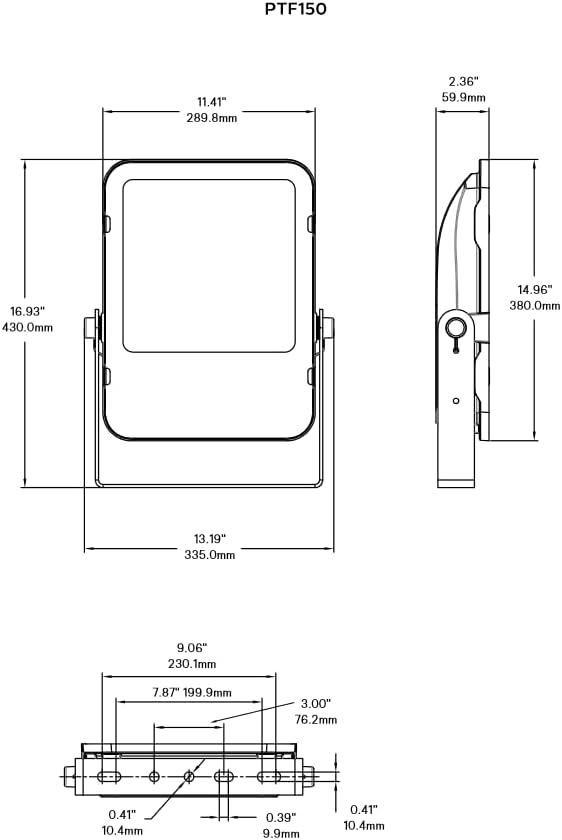
Image 2: Philips LED Slim Flood Light Dimension Diagram. This diagram provides detailed measurements for the flood light, including height, width, depth, and mounting hole spacing, crucial for accurate installation.
6. Mode d'emploi
The Philips LED Slim Flood Light operates upon receiving power. There are no user-adjustable controls on the fixture itself.
- Marche/Arrêt : Control the light by switching the connected power circuit on or off. This can be done via a wall switch, timer, or photocell (not included).
- Opération automatique: For automated operation, connect the flood light to an external timer, motion sensor, or photocell switch (purchased separately) according to their respective installation instructions.
7. Entretien
The Philips LED Slim Flood Light is designed for minimal maintenance. Regular inspection and cleaning will ensure optimal performance and longevity.
- Nettoyage: Nettoyez périodiquement la lentille et le boîtier avec un chiffon doux et sec.amp cloth to remove dirt, dust, and debris. Do not use abrasive cleaners or solvents, as these can damage the finish or lens. Ensure power is off before cleaning.
- Inspection: Annually inspect the fixture for any signs of damage, loose connections, or wear on the power cord. Address any issues promptly.
- Remplacement des composants : The LED light source is integrated and not user-replaceable. If the fixture malfunctions, contact customer support.
8. Dépannage
If your Philips LED Slim Flood Light is not functioning as expected, refer to the following common issues and solutions:
| Problème | Cause possible | Solution |
|---|---|---|
| La lumière ne s'allume pas. | Pas d'alimentation à l'appareil. Connexion de câblage desserrée. Faulty circuit breaker/fuse. | Vérifiez l'alimentation électrique. Vérifiez que tous les branchements électriques sont bien fixés (consultez un électricien qualifié). Réinitialisez le disjoncteur ou remplacez le fusible. |
| La lumière vacille ou est faible. | Alimentation électrique instable. Câblage lâche. Dommages causés aux installations. | Assurez une alimentation électrique stable. Vérifiez les connexions de câblage. If damage is suspected, discontinue use and contact support. |
| De l'eau à l'intérieur du dispositif. | Raccordements mal étanches. Damaged housing/lens. | Immediately disconnect power. Inspect and re-seal all connections, especially the IP66 connector. If housing or lens is damaged, the IP rating may be compromised; contact support. |
Si les étapes de dépannage ne résolvent pas le problème, contactez le service client.
9. Garantie et assistance
For warranty information and technical support, please refer to the official Signify (Philips) webConsultez leur site web ou contactez leur service client. Conservez votre reçu d'achat comme preuve d'achat.
Fabricant: Signifier
Numéro de modèle : PTF150-NW-G1-Y-FL-8-BZ
Coordonnées: Please visit the official Signify website pour obtenir les coordonnées et les ressources d'assistance les plus récentes.


