Introduction
This manual provides detailed instructions for the setup, operation, and maintenance of your Amazon Basics Projection Alarm Clock. Please read this manual thoroughly before using the product to ensure proper function and to prevent damage.

Image: The Amazon Basics Projection Alarm Clock, showing its digital display and projection lens.
Consignes de sécurité
- N'exposez pas l'appareil à des températures extrêmes, à la lumière directe du soleil, à la poussière ou à l'humidité.
- Assurez-vous que l'adaptateur secteur est compatible avec votre alimentation électrique locale.
- Tenez l'appareil éloigné de l'eau ou de tout autre liquide.
- Ne tentez pas de démonter ou de modifier l'appareil. Cela annulera la garantie.
- Clean the unit only with a soft, dry cloth. Do not use liquid cleaners.
- Éliminez les piles conformément aux réglementations locales.
Contenu du colis
- Amazon Basics Projection Alarm Clock
- Adaptateur secteur
- Manuel d'utilisation
Caractéristiques du produit
- Projection of time onto a wall or ceiling.
- FM Radio with automatic/manual scan and up to 15 preset stations.
- USB port for charging mobile phones or tablets.
- 7-inch high-definition LED display with adjustable brightness.
- Dual alarms for separate wake-up times.
- Snooze function with adjustable duration (2 to 60 minutes).
- Sleep timer for automatic radio shut-off (5 to 90 minutes).
- DST button for Daylight Saving Time adjustment.
- Battery backup (requires 2 AAA batteries, not included) to maintain time settings during power outaget.

Image : Terminéview of key features including sleep timer, radio presets, and snooze function.
Commandes et affichage
Familiarize yourself with the buttons and ports on your alarm clock for optimal use.

Image : Côté view illustrating the location of controls, USB charging port, and projection lens.
- Bouton de réglage de l'heure : Utilisé pour régler l'heure actuelle.
- Boutons d'alarme 1/2 : Used to set and activate Alarm 1 and Alarm 2.
- Bouton Snooze/Variateur : Activates snooze during an alarm; adjusts display brightness when not alarming.
- Radio/Sleep Button: Turns FM radio on/off; sets sleep timer.
- Volume/Tune Dial: Adjusts radio volume and tunes FM frequencies.
- Projection On/Off/Flip Button: Controls the projection feature and flips the projected time.
- Projection Focus Wheel: Adjusts the clarity of the projected time.
- Projection Angle Adjuster: Changes the angle of the projected time.
- Port de charge USB: Pour recharger des appareils externes.
- Bouton DST : Toggles Daylight Saving Time.
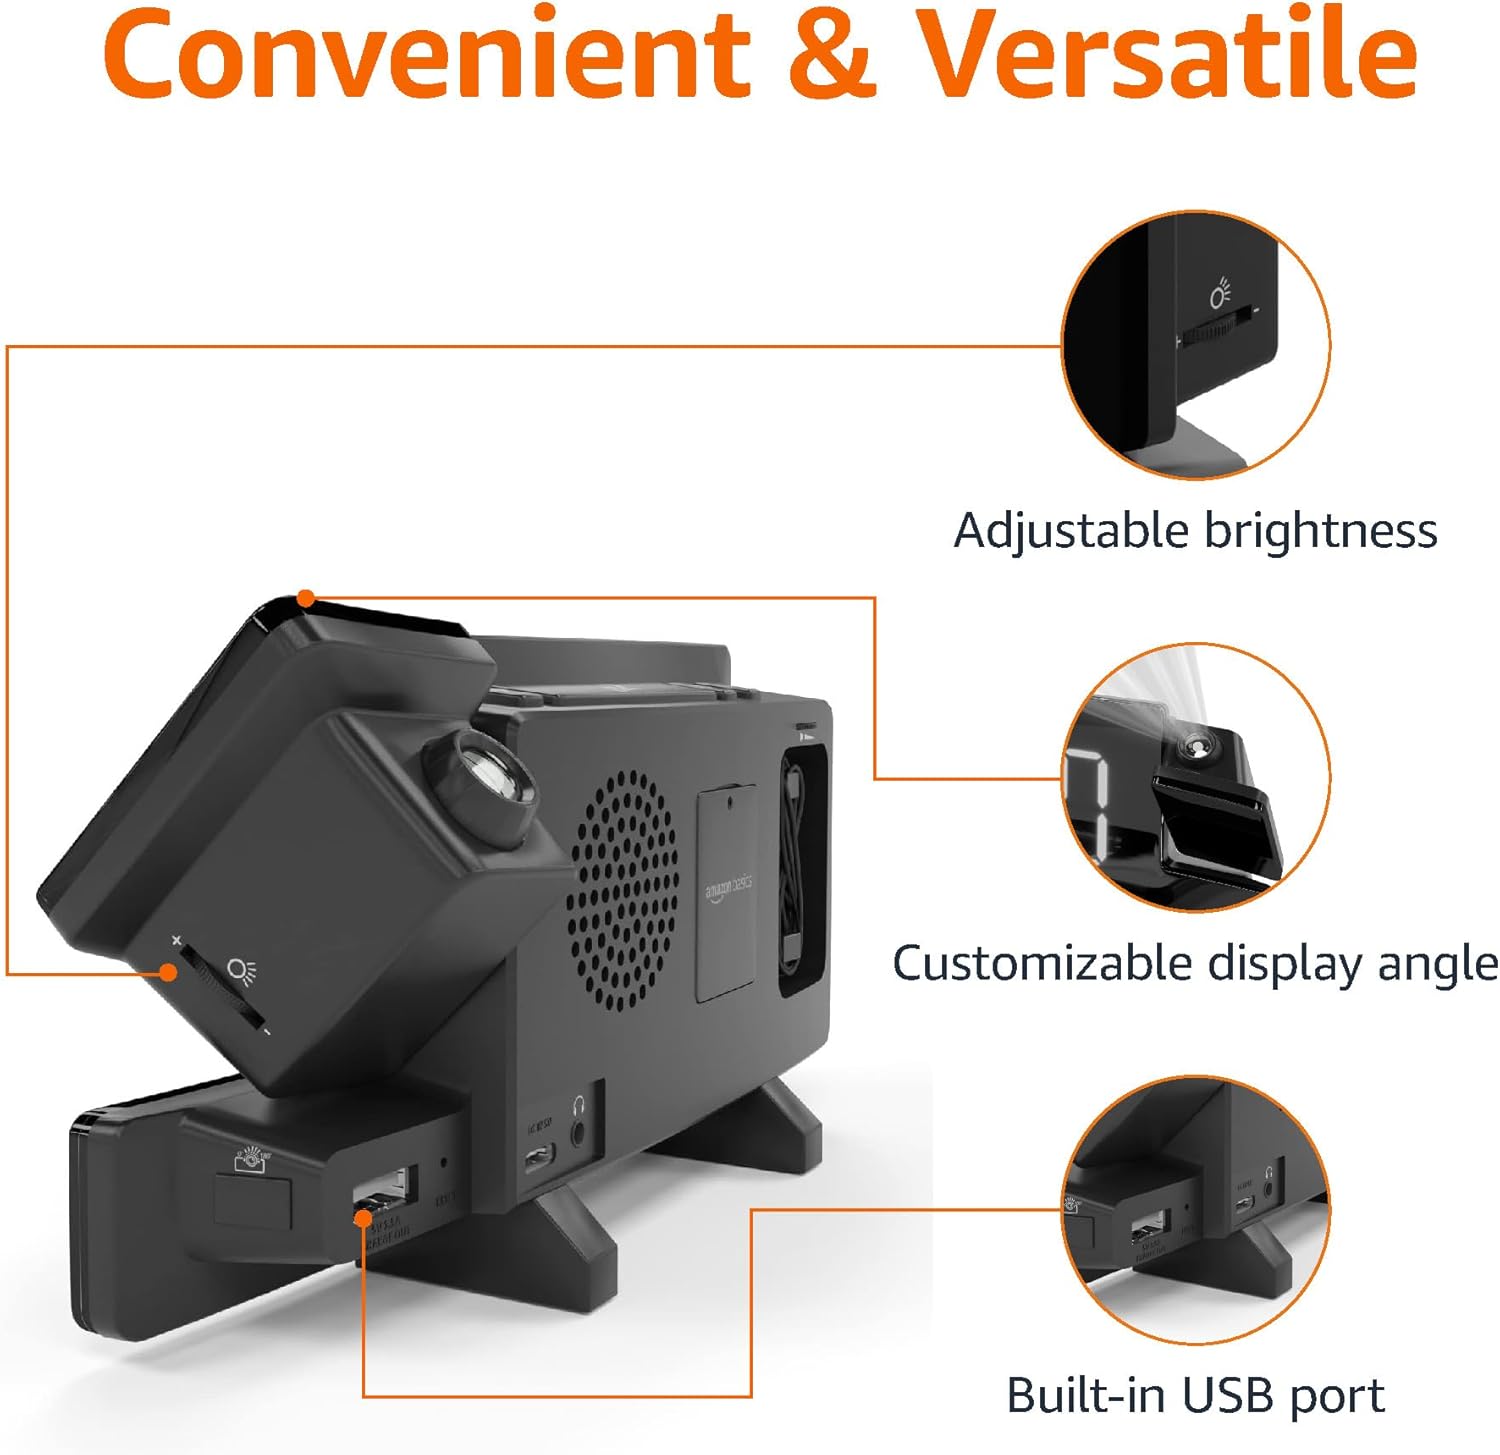
Image: Diagram highlighting the adjustable brightness, customizable projection angle, and USB charging port.
Installation
1. Connexion électrique
Connect the AC power adapter to the DC IN port on the back of the alarm clock and plug it into a standard wall outlet. The display will light up.
2. Installation de la batterie de secours
For battery backup, open the battery compartment on the bottom of the unit. Insert 2 AAA batteries (not included), ensuring correct polarity (+/-). Close the compartment. The battery backup maintains time settings during power outages but does not power the display or alarm functions.
3. Réglage initial de l'heure
- Appuyez et maintenez enfoncé le Réglage de l'heure bouton. Les chiffres des heures clignoteront.
- Utilisez le Volume/Tune Dial pour régler l'heure. presse Réglage de l'heure encore une fois pour confirmer.
- Les chiffres des minutes clignoteront. Utilisez le Volume/Tune Dial pour ajuster les minutes. presse Réglage de l'heure encore une fois pour confirmer.
- The time format (12H/24H) will flash. Use the Volume/Tune Dial pour sélectionner le format souhaité. Appuyez sur Réglage de l'heure pour confirmer et quitter le mode de réglage de l'heure.
4. Heure d'été (DST)
Appuyez sur le Heure d'été button to toggle Daylight Saving Time on or off. The DST indicator will appear or disappear on the display.
Mode d'emploi
1. Réglage des alarmes (Alarme 1 et Alarme 2)
- Appuyez et maintenez enfoncé le Alarme 1 or Alarme 2 bouton. Les chiffres de l'heure de l'alarme clignoteront.
- Utilisez le Volume/Tune Dial to adjust the alarm hour. Press the respective Alarme Appuyez à nouveau sur le bouton pour confirmer.
- Les chiffres des minutes de l'alarme clignoteront. Utilisez le Volume/Tune Dial to adjust the alarm minutes. Press the respective Alarme Appuyez à nouveau sur le bouton pour confirmer.
- The alarm source (FM radio or buzzer) will flash. Use the Volume/Tune Dial to select your preference. Press the respective Alarme button to confirm and activate the alarm. An alarm icon will appear on the display.
- Pour désactiver une alarme, appuyez sur le bouton correspondant. Alarme Appuyez une fois sur le bouton. L'icône d'alarme disparaîtra.
2. Using Snooze
Lorsqu'une alarme retentit, appuyez sur le Répéter/Gradateur button to temporarily silence the alarm. The alarm will sound again after the set snooze duration. The default snooze duration is 9 minutes. To adjust the snooze duration, press and hold the Répéter/Gradateur bouton, puis utilisez le Volume/Tune Dial to select a duration between 2 and 60 minutes. Press Répéter/Gradateur encore une fois pour confirmer.
3. Fonctionnement de la radio FM
- Activer/désactiver : Appuyez sur le Radio/Sleep bouton pour allumer ou éteindre la radio FM.
- Stations de syntonisation : Utilisez le Volume/Tune Dial to manually tune to a desired FM frequency.
- Scan automatique: Appuyez et maintenez enfoncé le Radio/Sleep button to automatically scan and save available FM stations as presets.
- Sélectionner les préréglages : Once stations are saved, short press the Radio/Sleep button to cycle through the preset stations.
- Régler le volume : Faites pivoter le Volume/Tune Dial pour régler le volume de la radio.
4. Minuterie de veille
Pendant que la radio FM est allumée, appuyez sur Radio/Sleep button repeatedly to set the sleep timer. Options typically range from 5 to 90 minutes. The radio will automatically turn off after the selected duration.
5. Fonction de projection

Image: The alarm clock projecting the time onto a bedroom ceiling.
- Activer/Désactiver : Appuyez sur le Projection On/Off/Flip bouton permettant d'activer ou de désactiver la projection de l'heure.
- Ajuster l'angle : Manually adjust the projection arm to direct the time onto your desired surface (wall or ceiling).
- Se concentrer: Faites pivoter le Projection Focus Wheel to achieve a clear image.
- Écran rabattable : Appuyez sur le Projection On/Off/Flip button repeatedly to rotate the projected time 180 degrees, ensuring correct orientation.

Image: The alarm clock on a nightstand, projecting the time onto a wall, demonstrating its use in a bedroom setting.
6. Chargement USB
Connect your mobile phone or tablet's USB charging cable to the Port de chargement USB on the back of the alarm clock. The device will begin charging. This port is for charging only and does not support data transfer.
7. Réglage de la luminosité de l'affichage
Appuyez sur le Répéter/Gradateur button (when no alarm is sounding) to cycle through different brightness levels for the main LED display.
Entretien
1. Nettoyage
Wipe the unit with a soft, dry, lint-free cloth. Do not use abrasive cleaners, waxes, or solvents as they may damage the surface.
2. Remplacement de la batterie
If the battery backup is not functioning correctly (e.g., time resets after a power outage), replace the 2 AAA batteries in the battery compartment, ensuring correct polarity.
Dépannage
| Problème | Cause possible | Solution |
|---|---|---|
| L'affichage est vide. | Pas de connexion électrique. | Assurez-vous que l'adaptateur secteur est correctement branché à l'appareil et à une prise murale fonctionnelle. |
| L'alarme ne sonne pas. | L'alarme n'est pas activée ou le volume est trop faible. | Check if the alarm icon is visible on the display. Re-set the alarm if necessary. Increase radio volume if FM is selected as alarm source. |
| Le calendrier prévu est flou. | Projection focus is not adjusted. | Faites pivoter le Projection Focus Wheel jusqu'à ce que l'image soit claire. |
| Projected time is not visible. | Projection is off or room is too bright. | Appuyez sur le Projection On/Off/Flip button to activate. The projection is best viewed in a dark room. |
| La réception radio est mauvaise. | Position de l'antenne ou interférences. | Adjust the position of the FM antenna wire. Move the unit away from other electronic devices that may cause interference. |
| Le chargement USB ne fonctionne pas. | Problème de câble ou incompatibilité de l'appareil. | Ensure the USB cable is functional and properly connected. Try a different cable or device. |
Caractéristiques
- Modèle: MET8831-US
- Puissance d'entrée : Adaptateur secteur (inclus)
- Batterie de secours: 2 piles AAA (non incluses)
- Afficher: LED 7 pouces
- Fréquence radio: FM
- Sortie USB : 5V, 1A (for charging)
- Dimensions (L x l x H) : 7.1 x 1.6 x 3.7 pouces (18.03 x 4.06 x 9.4 cm)
- Poids: Environ 0.59 lb (267.62 g)

Image: Product dimensions for the Amazon Basics Projection Alarm Clock.
Informations sur la garantie
This product is covered by the Amazon Basics warranty. For detailed information regarding warranty terms and conditions, please refer to the official Amazon Basics website ou contacter le support client.
Assistance clientèle
For further assistance, troubleshooting, or product inquiries, please contact Amazon Basics customer support through the Amazon website or your purchase platform. Have your product model number (MET8831-US) and purchase details ready.


