1. Consignes de sécurité importantes
Please read this manual carefully before operating your AireMax APH10CE Portable Air Conditioner. Keep these instructions for future reference. Failure to follow these instructions may result in electric shock, fire, or personal injury.
- Always connect the unit to a properly grounded 115V/60Hz electrical outlet.
- Ne faites pas fonctionner l'appareil avec un cordon ou une prise endommagés.
- Do not block air inlets or outlets. Ensure at least 12 inches (30 cm) of clearance around the unit for proper airflow.
- N’insérez pas vos doigts ni d’objets étrangers dans les grilles d’aération.
- N’utilisez pas l’appareil à proximité de gaz inflammables ou de matériaux combustibles.
- Débranchez toujours l'appareil avant de le nettoyer ou d'effectuer toute opération de maintenance.
- Cet appareil n'est pas destiné à être utilisé par des personnes (y compris les enfants) ayant des capacités physiques, sensorielles ou mentales réduites, ou manquant d'expérience et de connaissances, à moins qu'elles ne bénéficient d'une surveillance ou d'instructions concernant l'utilisation de l'appareil par une personne responsable de leur sécurité.
- Les enfants doivent être surveillés pour s’assurer qu’ils ne jouent pas avec l’appareil.
2. Produit terminéview
The AireMax APH10CE is a portable air conditioner designed to provide efficient cooling and dehumidification for spaces up to 600 square feet (approximately 55 m²). It features a self-evaporative system, three fan speeds, and a sleep function for enhanced comfort.
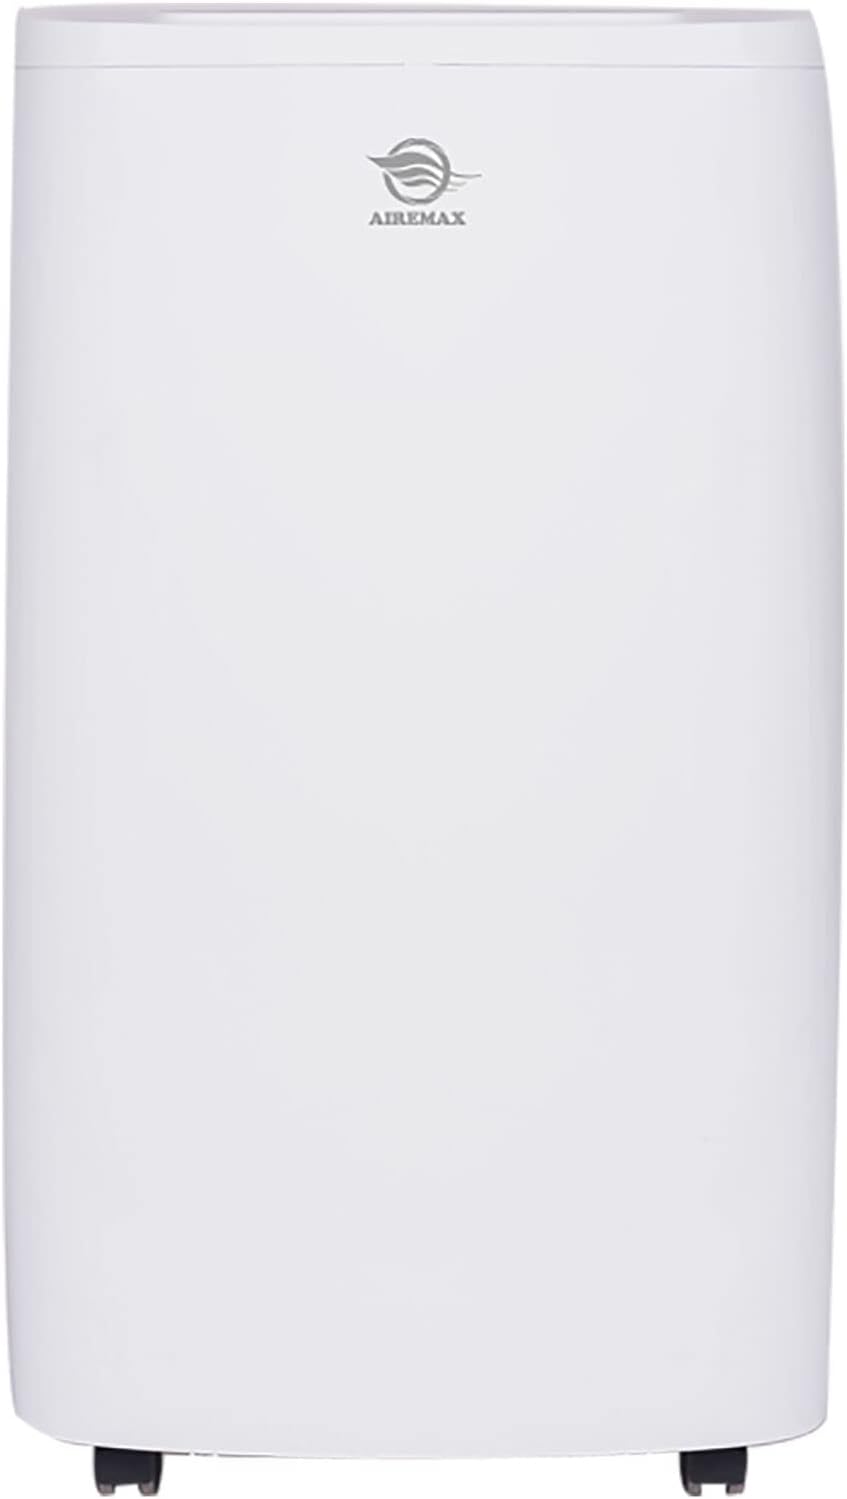
Figure 2.1 : Devant view of the AireMax APH10CE Portable Air Conditioner. This image shows the sleek, white design of the unit with the AireMax logo prominently displayed at the top.

Figure 2.2 : Incliné view of the AireMax APH10CE Portable Air Conditioner. This perspective highlights the side vents and the overall compact design, suitable for various room settings.
Panneau de contrôle

Figure 2.3 : Close-up of the AireMax APH10CE control panel. The panel features an LED display and touch buttons for various functions including Timer, Fan speed, Temperature Up/Down, Mode, and Power.
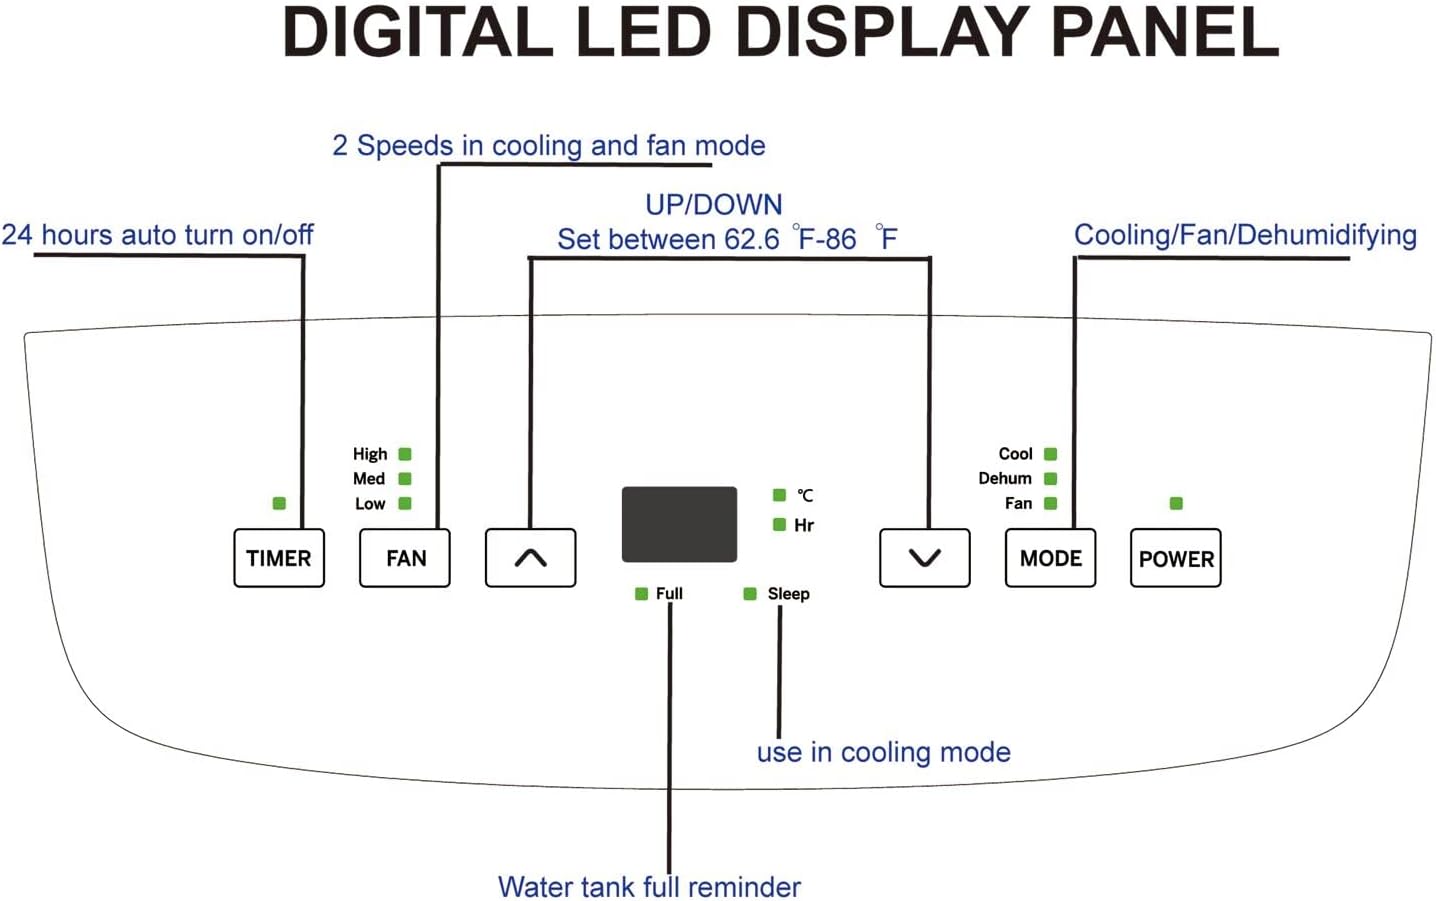
Figure 2.4 : Diagram illustrating the functions of the Digital LED Display Panel. It shows controls for Timer (24 hours auto on/off), Fan (High, Med, Low speeds), Up/Down buttons for temperature (62.6°F - 86°F), Mode (Cooling, Dehumidifying, Fan), and Power. Indicators for "Full" (water tank) and "Sleep" mode are also visible.
Arrière View et composants

Figure 2.5 : Arrière view of the AireMax APH10CE with key components labeled. This includes the Filter Frame, Dust Removing Filter, Exhaust Connector, and Double Drainage Hoses, indicating options for water removal.

Figure 2.6 : Arrière view of the AireMax APH10CE, providing a clearer look at the air vents and the integrated power cord storage area, designed for neat organization when not in use.
3. Composants inclus
Your AireMax APH10CE Portable Air Conditioner package should contain the following items:
- AireMax APH10CE Portable Air Conditioner Unit
- Télécommande
- Batterie (pour télécommande)
- Kit de fenêtre (pour l'installation du tuyau d'échappement)
- Tuyau d'échappement
- Connecteur rond
- Adaptateur
- Manuel du propriétaire (ce document)
- Informations sur la garantie
If any components are missing or damaged, please contact AireMax customer support.
4. Configuration et installation
Une installation correcte est essentielle au bon fonctionnement de votre climatiseur portable.
4.1 Placement des unités
- Placez l'appareil sur une surface plane et stable.
- Veillez à laisser un espace d'au moins 30 cm (12 pouces) autour de l'appareil pour une bonne circulation de l'air.
- Positionnez l'appareil près d'une fenêtre ou d'une porte coulissante pour l'installation du tuyau d'évacuation.
- The unit is designed for rooms up to 600 sq ft (approx. 55 m²).
- The unit is equipped with 4-direction casters and side handles for easy transport within your home.
4.2 Installation du kit de fenêtre
The window kit allows you to vent the hot air outside, which is essential for effective cooling.
- Assemble the window kit components according to the diagrams provided in the separate window kit instructions (if applicable) or by connecting the adapter to the exhaust hose.
- Extend the window kit to fit your window opening. Secure it in place.
- Attach the exhaust hose to the unit's exhaust connector (refer to Figure 2.5).
- Connect the other end of the exhaust hose to the adapter in the window kit.
- Assurez-vous que tous les raccords sont bien fixés afin d'empêcher l'air chaud de pénétrer à nouveau dans la pièce.
4.3 Installation du drainage
The AireMax APH10CE features a self-evaporative system, which typically means most condensed water is recycled for cooling and expelled with the exhaust air. However, in high humidity conditions, manual drainage may be required.
- For continuous drainage (especially in dehumidifier mode or high humidity), connect a drainage hose (not always included, check components list) to one of the double drainage hoses outlets at the rear of the unit (refer to Figure 2.5).
- Route the hose to a floor drain or a suitable collection container.
- Ensure the hose is sloped downwards to allow gravity drainage.
- The unit has a "Water tank full reminder" indicator on the control panel (Figure 2.4). When this illuminates, the unit will stop operating until the water tank is drained manually.
5. Mode d'emploi
Familiarize yourself with the control panel (Figure 2.3 and 2.4) and remote control for optimal operation.
5.1 Mise sous/hors tension
- Appuyez sur le POUVOIR bouton sur le panneau de commande ou la télécommande pour allumer ou éteindre l'appareil.
5.2 Sélection du mode
Appuyez sur le MODE Appuyez plusieurs fois sur le bouton pour parcourir les modes disponibles :
- Mode de refroidissement : For air conditioning. Set your desired temperature using the HAUT/BAS buttons. The temperature range is 62.6°F (17°C) to 86°F (30°C).
- Mode déshumidification : For removing excess moisture from the air. The unit can remove up to 90 pints of moisture per day. Fan speed is typically fixed in this mode.
- Mode ventilateur : For air circulation without cooling. You can adjust the fan speed.
5.3 Réglage de la vitesse du ventilateur
En mode Refroidissement ou Ventilation, appuyez sur FAN bouton permettant de sélectionner la vitesse du ventilateur (élevée, moyenne ou faible).
5.4 Fonction minuterie
The timer allows you to set the unit to automatically turn on or off after a specified period (up to 24 hours).
- Avec l'appareil allumé, appuyez sur la touche MINUTEUR bouton.
- Utilisez le HAUT/BAS buttons to set the desired number of hours for the unit to turn off.
- L'appareil étant éteint, appuyez sur la touche MINUTEUR bouton.
- Utilisez le HAUT/BAS buttons to set the desired number of hours for the unit to turn on.
5.5 Fonction Sommeil
The Sleep function is designed for comfortable overnight operation in cooling mode. It gradually increases the set temperature by a few degrees over several hours to save energy and prevent overcooling.
- Activate the Sleep function by pressing the dedicated button on the remote control (if available) or by selecting it via the control panel (refer to Figure 2.4 for indicator).
5.6 Redémarrage automatique
The unit features an automatic restart function. In case of a power outagL'appareil reprendra automatiquement son fonctionnement avec les derniers réglages une fois le courant rétabli.
6. Entretien
Regular maintenance ensures optimal performance and extends the lifespan of your AireMax APH10CE.
6.1 Nettoyage du filtre à air
The unit is equipped with removable mesh filters (refer to Figure 2.5). Clean them regularly, especially if the unit is used frequently.
- Débranchez le climatiseur de la prise électrique.
- Locate and remove the filter frame from the rear of the unit.
- Gently remove the mesh filter from the frame.
- Vacuum any loose dust from the filter.
- Wash the filter under warm, running water with a mild detergent if necessary.
- Rincez abondamment et laissez le filtre sécher complètement à l'air libre avant de le réinsérer.
- Reinstall the filter into the frame and then back into the unit.
6.2 Évacuation de l'eau accumulée
While the unit has a self-evaporative system, manual drainage may be necessary if the "Water tank full reminder" indicator illuminates.
- Débranchez le climatiseur.
- Place a shallow pan or tray beneath the drainage outlet(s) at the rear of the unit.
- Remove the drain plug(s) to allow water to flow out.
- Once all water has drained, replace the drain plug(s) securely.
6.3 Nettoyage de l'extérieur de l'unité
- Essuyez l'extérieur de l'appareil avec un chiffon doux.amp tissu.
- N’utilisez pas de produits chimiques agressifs, d’abrasifs ou de solvants.
6.4 Stockage
Si vous stockez l'appareil pendant une période prolongée :
- Évacuer complètement toute l'eau accumulée.
- Nettoyer le filtre à air.
- Store the power cord neatly in its designated storage area (Figure 2.6).
- Conservez l'appareil dans un endroit frais et sec, à l'abri de la lumière directe du soleil et des températures extrêmes.
7. Dépannage
Avant de contacter le service client, veuillez consulter le guide de dépannage suivant pour les problèmes courants.
| Problème | Cause possible | Solution |
|---|---|---|
| L'unité ne s'allume pas. | Pas d'alimentation électrique ; cordon d'alimentation non branché ; disjoncteur déclenché ; réservoir d'eau plein. | Ensure unit is plugged into a live 115V/60Hz outlet; Check circuit breaker; Drain water tank if "Full" indicator is on. |
| L'appareil fonctionne mais ne refroidit pas. | Air filter clogged; Exhaust hose not properly installed or blocked; Room too large; Doors/windows open; Temperature setting too high. | Clean air filter; Check exhaust hose for proper installation and obstructions; Close doors and windows; Lower temperature setting. |
| "Full" indicator is on. | Le réservoir d'eau est plein. | Drain the water tank as described in Section 6.2. |
| L'unité est bruyante. | L'appareil n'est pas installé sur une surface plane ; la vitesse du ventilateur est trop élevée ; le ventilateur est obstrué. | Place unit on a level surface; Reduce fan speed; Check for obstructions. (Note: Normal operating noise level is 64 dB). |
| La télécommande ne fonctionne pas. | Piles déchargées ou mal insérées ; Obstruction entre la télécommande et l’appareil. | Replace batteries; Ensure line of sight to unit's receiver. |
8. Spécifications
Detailed technical specifications for the AireMax APH10CE Portable Air Conditioner.
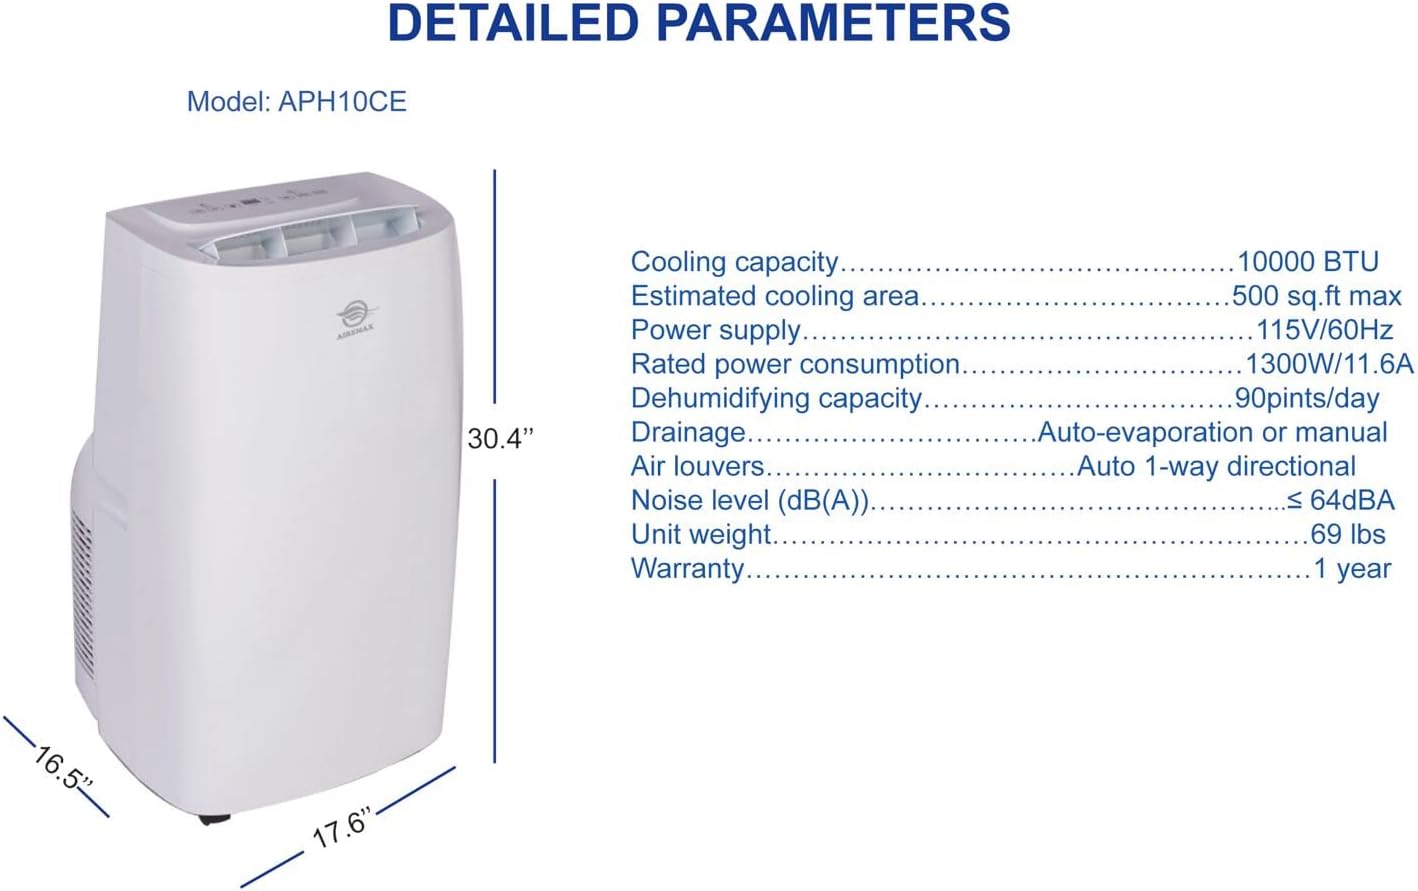
Figure 8.1 : Diagram showing detailed parameters and dimensions of the AireMax APH10CE. This includes cooling capacity, power supply, dehumidifying capacity, and physical dimensions.
| Paramètre | Valeur |
|---|---|
| Numéro de modèle | APH10CE |
| Capacité de refroidissement (SACC) | 10,000 XNUMX BTU |
| Capacité de refroidissement (ASHRAE) | 15,000 XNUMX BTU |
| Surface de refroidissement estimée | Up to 600 sq ft (approx. 55 m²) |
| Alimentation électrique | 115V / 60Hz |
| Consommation électrique nominale | 1300W / 11.6A |
| Capacité de déshumidification | 90 pintes / jour |
| Niveau de bruit | 64 dB |
| Dimensions (L x l x H) | 16.54 x 17.64 x 30.39 pouces (42.01 x 44.81 x 77.19 cm) |
| Poids unitaire | 72.5 livres (32.89 kg) |
| Caractéristiques spéciales | Dehumidifier, Rapid Cooling, Auto-evaporation, Auto restart after power failure |
| Grilles d'aération | Direction automatique unidirectionnelle |
| Drainage | Évaporisation automatique ou manuelle |
9. Garantie et assistance
Your AireMax APH10CE Portable Air Conditioner comes with a manufacturer's warranty. Please refer to the separate warranty information included in your package for details on coverage and terms.
For technical assistance, troubleshooting beyond this manual, or to inquire about replacement parts, please contact AireMax customer support. Contact information can typically be found on the product packaging, the official AireMax website, or the warranty document.
Please have your model number (APH10CE) and purchase date ready when contacting support.


