Introduction
This manual provides instructions for the proper use and maintenance of your Alecto AK-20 Alarm Clock with Thermometer. Please read these instructions carefully before operating the device and retain them for future reference. The AK-20 is designed to display time, date, day, and indoor temperature, featuring multiple alarms, a snooze function, and radio-controlled time synchronization.
Consignes de sécurité
- N’exposez pas l’appareil à des températures extrêmes, à la lumière directe du soleil ou à une forte humidité.
- Évitez de faire tomber l'appareil ou de le soumettre à des chocs violents.
- N’essayez pas de démonter ou de réparer l’appareil vous-même. Confiez toute intervention à un personnel qualifié.
- Jetez les piles usagées de manière responsable conformément aux réglementations locales.
Contenu du colis
Vérifiez que tous les articles sont présents et en bon état lors du déballage :
- Alecto AK-20 Alarm Clock
- User Manual (NL/EN/DE/FR)
Produit terminéview
The Alecto AK-20 features a clear digital display and intuitive controls for easy operation.

Figure 1 : Face avant view of the Alecto AK-20 Alarm Clock, showing the large digital display with time, date, day, and temperature, along with control buttons at the bottom.

Figure 2 : Angulaire view of the Alecto AK-20, highlighting the main display and the alarm ON/OFF switches on the right side.
Éléments de commande et d'affichage :
- Grand écran numérique : Shows time (AM/PM indicator), date, day of the week, and indoor temperature.
- Bouton RÉGLAGE DE L'HEURE : Permet d'accéder au mode de réglage de l'heure.
- Boutons - / + : Used to adjust values (decrease/increase).
- Bouton RÉGLAGE D'ALARME : Permet d'accéder au mode de réglage de l'alarme.
- ALARM 1-4 ON/OFF Switches: Located on the side for individual alarm activation.
- Bouton SNOOZE / LUMIÈRE : Située sur le dessus, elle active le rétroéclairage et la fonction de répétition d'alarme.
- AUTO LIGHT Switch: Located on the back, controls automatic backlight.
- Bouton de réinitialisation: Located on the back, for factory reset.

Figure 3 : Côté droit view of the alarm clock, showing the physical ON/OFF switches for Alarm 3 and Alarm 4.

Figure 4 : Retour view of the alarm clock, showing the battery compartment, RESET button, and AUTO LIGHT switch.
Installation
1. Installation de la batterie
- Repérez le compartiment à piles à l'arrière du réveil (voir figure 4).
- Ouvrez le couvercle du compartiment à piles.
- Insérez deux piles AA en respectant la polarité (+ et -).
- Fermez soigneusement le couvercle du compartiment à piles.
The display will light up, and the clock will begin searching for the DCF radio signal for automatic time synchronization.
2. Initial Time and Date Synchronization (DCF)
The AK-20 is a radio-controlled clock. Upon battery installation, it will automatically attempt to synchronize with the DCF signal. This process may take several minutes. A signal icon on the display indicates successful reception.
- Placez l'horloge près d'une fenêtre pour une meilleure réception du signal.
- Évitez de le placer à proximité d'appareils électroniques susceptibles de provoquer des interférences.
3. Manual Time and Date Setting (Optional)
If DCF synchronization is not desired or unsuccessful, you can set the time and date manually:
- Appuyez et maintenez enfoncé le RÉGLAGE DE L'HEURE Appuyez sur le bouton jusqu'à ce que les chiffres de l'heure commencent à clignoter.
- Utilisez le - or + boutons pour régler l'heure.
- Presse RÉGLAGE DE L'HEURE à nouveau pour confirmer l'heure et passer aux minutes.
- Répétez le processus pour les minutes, l'année, le mois et le jour.
- Presse RÉGLAGE DE L'HEURE une dernière fois pour quitter le mode de réglage.
4. Sélection de la langue
The device supports multiple languages for day display. To change the language:
- En mode d'affichage de l'heure normal, appuyez sur - Appuyez plusieurs fois sur le bouton.
- The day of the week will cycle through available languages (Dutch, French, German, English, Spanish, Italian, Danish, Russian).
- Stop when your desired language is displayed.
Mode d'emploi
1. Réglage des alarmes
The AK-20 allows setting up to four independent alarms.
- Appuyez et maintenez enfoncé le ENSEMBLE D'ALARME button until the alarm time (e.g., ALARM-1) starts flashing.
- Utilisez le - or + boutons permettant de régler l'heure de l'alarme souhaitée.
- Presse ENSEMBLE D'ALARME à nouveau pour confirmer l'heure et passer aux minutes.
- Utilisez le - or + boutons permettant de régler la durée de l'alarme (en minutes).
- Presse ENSEMBLE D'ALARME to confirm and move to the next alarm (ALARM-2, ALARM-3, ALARM-4).
- Repeat steps 2-4 for each alarm you wish to set.
- After setting all desired alarms, press ENSEMBLE D'ALARME pour quitter le mode de réglage de l'alarme.
2. Activation/Désactivation des alarmes
Each alarm has a dedicated ON/OFF switch on the side of the unit (refer to Figure 3).
- Slide the corresponding switch to ON to activate an alarm. An alarm icon will appear on the display.
- Faites glisser le commutateur sur DÉSACTIVÉ to deactivate an alarm. The alarm icon will disappear.
3. Fonction Snooze
Lorsqu'une alarme retentit, appuyez sur le SNOOZE / LUMIERE button on top of the clock. The alarm will temporarily stop and sound again after a few minutes (typically 5-10 minutes, depending on the model's default setting).
4. Fonction de rétroéclairage
L'écran est doté d'un rétroéclairage pour une visibilité optimale dans des conditions de faible luminosité.
- Rétroéclairage manuel : Appuyez brièvement sur la touche SNOOZE / LUMIERE bouton pour activer le rétroéclairage pendant quelques secondes.
- Rétroéclairage automatique : On the back of the unit, slide the ÉCLAIRAGE AUTOMATIQUE passer à ON. The backlight will automatically illuminate in dark environments. Slide to DÉSACTIVÉ pour désactiver cette fonctionnalité.
5. Affichage de la température
The integrated thermometer displays the indoor temperature.
- Pour basculer entre Celsius (°C) et Fahrenheit (°F), appuyez sur + bouton en mode d'affichage de l'heure normal.
Entretien
- Nettoyez l'appareil avec un chiffon doux et sec. N'utilisez pas de nettoyants abrasifs ni de solvants.
- Si l'appareil n'est pas utilisé pendant une période prolongée, retirez les piles pour éviter les fuites.
Dépannage
| Problème | Cause possible | Solution |
|---|---|---|
| L'écran est vide ou sombre. | Les piles sont faibles ou mal insérées. | Remplacez les piles par des piles AA neuves, en respectant la polarité. |
| L'heure est incorrecte. | Signal DCF non reçu ou heure manuelle non réglée. | Ensure the clock is in an area with good signal reception. Manually set the time if necessary. |
| L'alarme ne sonne pas. | L'alarme n'est pas activée ou est mal réglée. | Check the alarm ON/OFF switch on the side. Verify alarm time settings. |
| Le rétroéclairage ne fonctionne pas. | AUTO LIGHT switch is OFF or batteries are low. | Check the AUTO LIGHT switch on the back. Replace batteries if needed. |
Si le problème persiste après avoir essayé ces solutions, veuillez contacter le service client.
Caractéristiques
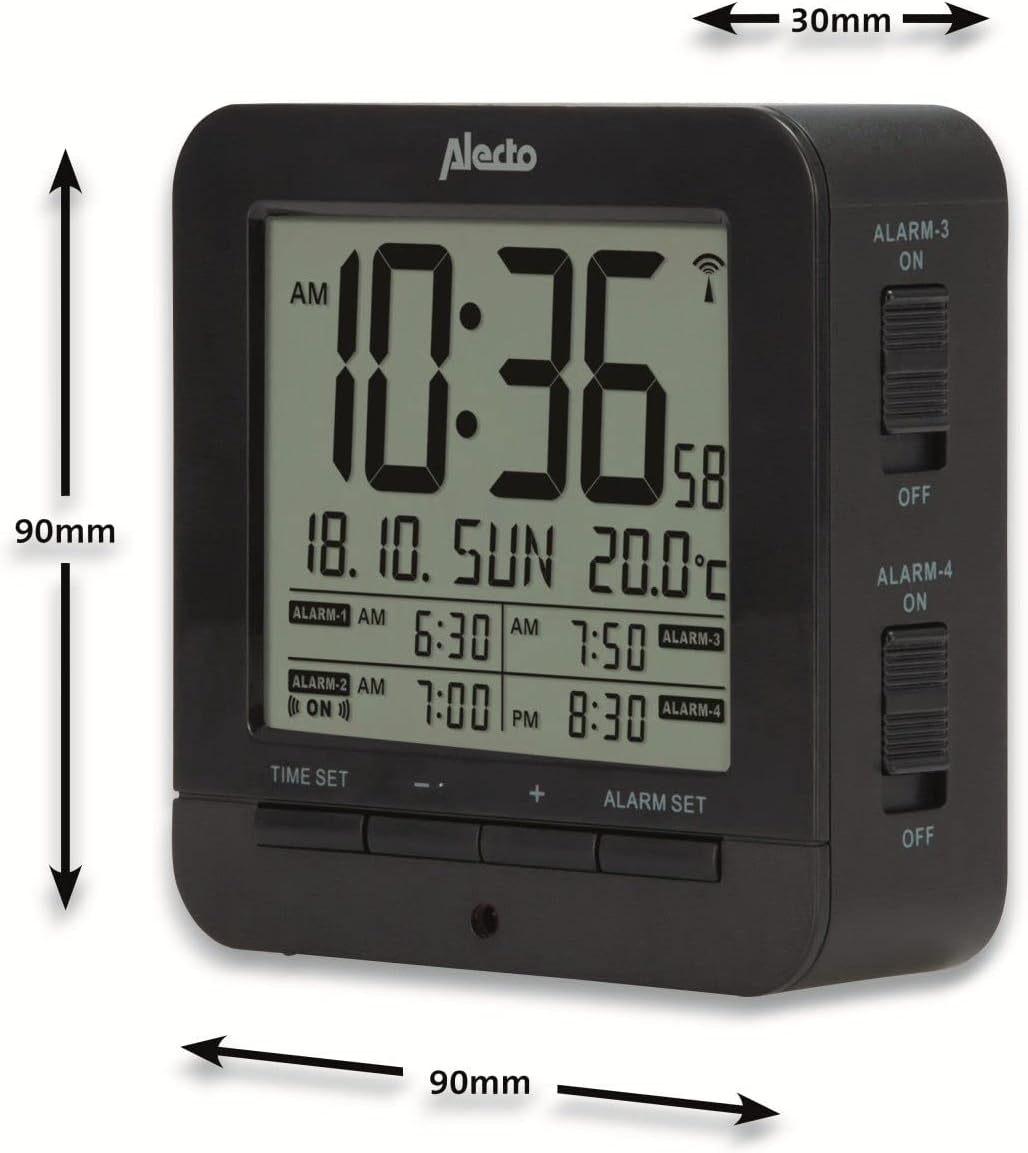
Figure 5: Alecto AK-20 Alarm Clock showing its approximate dimensions: 90mm height, 90mm width, and 30mm depth.
| Fonctionnalité | Détail |
|---|---|
| Numéro de modèle | AK-20 (A003319) |
| Marque | Alecto |
| Couleur | Noir |
| Matériel | Acrylonitrile butadiène styrène (ABS) |
| Dimensions (H x L x P) | 9 x 9 x 3 cm (environ 3.54 x 3.54 x 1.18 pouces) |
| Dimensions de l'écran | 6.4 x 5.4 cm (environ 2.52 x 2.13 pouces) |
| Poids | 231 g (environ 0.51 lb) |
| Source d'énergie | 2 piles AA (non incluses) |
| Type d'affichage | Numérique |
| Caractéristiques spéciales | Temperature Display, 4 Alarms, Snooze Function, Backlight, DCF Radio Control |
| Unités de température | °C / °F sélectionnable |
| Langues prises en charge | Dutch, French, German, English, Spanish, Italian, Danish, Russian |
Garantie et assistance
Alecto products are manufactured to high quality standards. For information regarding warranty terms and conditions, please refer to the documentation provided with your purchase or visit the official Alecto website. For technical support or service inquiries, please contact your retailer or the Alecto customer service department.


