1. Consignes de sécurité
Please read and understand all instructions completely before beginning installation. Failure to follow these instructions may result in electric shock, fire, or other hazards that could cause property damage or personal injury.
- Risque d'incendie : Supply conductors (power wiring) connecting to the fixture must be rated 90°C. If you are uncertain, consult a qualified electrician.
- Risque de choc électrique : L’installation du kit de modernisation LED nécessite une connaissance des systèmes électriques des luminaires. Si vous n'êtes pas qualifié, ne tentez pas l'installation. Contactez un électricien qualifié.
- Install this kit only in luminaires that have the construction features and dimensions shown in the product documentation.
- To prevent wiring harness or abrasion, do not expose wiring to edges of sheet metal or other sharp objects.
- Ce lamp is not intended for use with emergency exit luminaires or emergency lights.
- Avant de tenter l'installation, vérifiez votre code électrique local, car il définit les normes de câblage pour votre localité.
- The fixture is designed to be switched from a wall switch. Ensure the black power supply wire is connected to the switch. Do NOT connect the white supply wire to the switch.
- Do not leave bare wires or exposed outside the wire nut connectors.
- Ne faites pas et ne modifiez pas de trous ouverts dans un boîtier de câblage ou de composants électriques pendant l'installation du kit.
- This product is ETL Listed and operates at 120VAC.
2. Produit terminéview
The Maxxima 2-inch Ultra-Thin Recessed Anti-Glare LED Downlight is a canless, IC rated lighting fixture designed for various indoor applications. It features a round black trim and offers customizable lighting with 5 selectable color temperatures and dimming capabilities.
- Efficacité énergétique : 9W LED, equivalent to 40W, consuming less power.
- Luminosité: 550 Lumens with anti-glare lighting and a 36° beam spread.
- Color Temperature Selectable (CCT): Choose from 2700K (Soft White), 3000K (Warm White), 3500K (Bright White), 4000K (Neutral White), or 5000K (Daylight).
- Gradable : Compatible with most standard LED dimmers, offering a 20%-100% dimmable range.
- IRC élevé : 90 CRI rating for accurate color appearance.
- Construction durable : Features a durable cast aluminum body and deep recessed trim.
- Damp Noté: Convient pour une utilisation en damp locations such as bathrooms and kitchens.

Figure 2.1: Maxxima 2-inch Ultra-Thin Recessed LED Downlight, Black
3. Liste des pièces
Assurez-vous que tous les composants sont présents avant de commencer l'installation :
- LED Downlight with spring clips
- Junction Box (with integrated CCT selection switch)
- Connector cable (pre-attached to downlight and junction box)
- Joint en mousse
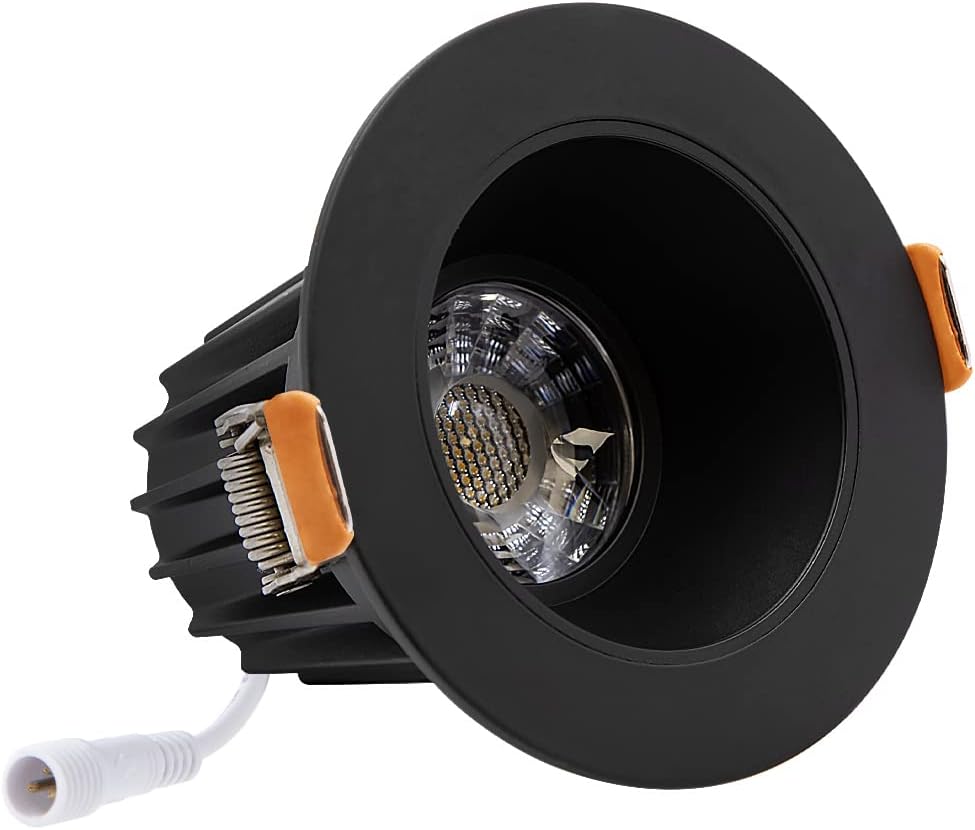
Figure 3.1 : Côté view of the Maxxima 2-inch Ultra-Thin Recessed LED Downlight, showing the heat sink and connector.
4. Configuration et installation
This downlight is designed for easy installation without the need for a traditional recessed can or housing.
- Préparez l'ouverture : Cut a hole in the ceiling drywall with a recommended diameter of 2.5 inches. Ensure there are no obstructions in the ceiling space.
- Connecter le câblage : Open the junction box. Connect the building's supply wires (typically black for live, white for neutral, and green/bare copper for ground) to the corresponding wires inside the junction box using appropriate wire connectors. Ensure all connections are secure and comply with local electrical codes.
- Sélectionnez la température de couleur : Before closing the junction box, use the CCT selection switch located inside the junction box to choose your desired color temperature (2700K, 3000K, 3500K, 4000K, or 5000K).
- Boîte de jonction de position : Place the junction box into the ceiling beam or through the cutout hole into the ceiling cavity.
- Connecter le spot encastré : Connect the downlight's cable to the junction box's cable using the provided quick connector. Ensure a firm connection.
- Installer un spot encastré : Gently push the spring clips on the sides of the downlight upwards. Insert the downlight into the cutout hole. The spring clips will automatically secure the fixture against the ceiling. Ensure the foam gasket creates a tight seal.

Figure 4.1 : Dimensions du produit pour la planification de l'installation.

Figure 4.2: CCT selection switch inside the junction box.
Video 4.1: Official product video demonstrating the features and installation of the Maxxima 2-inch Anti-Glare 5 CCT Slim LED Downlight.
5. Mode d'emploi
Once installed, operating your Maxxima LED downlight is straightforward.
5.1. Sélection de la température de couleur
The desired color temperature (CCT) must be selected using the switch inside the junction box avant installation or by accessing the junction box after installation. The available options are 2700K, 3000K, 3500K, 4000K, and 5000K.

Figure 5.1: Visual comparison of selectable color temperatures.
5.2. Gradation
This downlight is dimmable from 20% to 100% with most standard LED dimmers. Ensure your dimmer switch is compatible with LED fixtures for optimal performance and to prevent flickering.

Figure 5.2: Downlight installed in a ceiling, demonstrating illumination.
6. Entretien
The Maxxima LED downlight requires minimal maintenance.
- Nettoyage: Pour nettoyer le luminaire, assurez-vous qu'il est hors tension. Essuyez la surface avec un chiffon doux, sec ou légèrement humidifié.amp tissu. N'utilisez pas de produits chimiques agressifs ou de nettoyants abrasifs.
- Aucune pièce réparable par l'utilisateur : The LED light source is integrated and not replaceable. Do not attempt to open or repair the fixture.
7. Dépannage
Si vous rencontrez des problèmes avec votre spot encastré, consultez les problèmes et solutions courants suivants :
| Problème | Cause possible | Solution |
|---|---|---|
| La lumière ne s'allume pas | No power supply; Loose wiring; Incorrect CCT setting; Faulty fixture | Check circuit breaker; Verify all wire connections are secure; Ensure CCT switch is set to a valid position; Contact support if fixture is faulty. |
| La lumière scintille | Variateur incompatible ; câblage desserré ; circuit surchargé | Ensure dimmer is LED compatible; Check all electrical connections; Reduce load on circuit. |
| La lumière est trop faible ou trop brillante | Dimmer setting; CCT setting | Adjust dimmer to desired level; Verify CCT setting is as intended. |
| La lumière fait un bruit de bourdonnement | Incompatible dimmer; Loose wiring | Replace with an LED-compatible dimmer; Check and secure all wiring connections. |
8. Spécifications
| Spécification | Détail |
|---|---|
| Marque | Maxime |
| Nom du modèle | MRL-S20803B |
| Dimensions du produit | 3.16"L x 3.16"l x 2.6"H |
| Poids de l'article | 13.1 onces |
| Couleur | Noir |
| Matériel | Aluminium |
| Formulaire de luminaire | Encastré |
| Type d'installation | Plafonnier |
| Découpe recommandée | 2.5 pouces |
| Source d'énergie | Électrique avec fil |
| Voltage | 120 volts |
| Quoitage | 9 watts |
| Luminosité | 550 lumens |
| Efficacité | 61 lm/W |
| Température de couleur | 2700K, 3000K, 3500K, 4000K, 5000K Selectable |
| CRI | 90 |
| Gradable | Oui (20%-100%) |
| Utilisation intérieure/extérieure | Intérieur (Damp (Évalué) |
| Certification | Répertorié ETL |
9. Garantie et assistance
This Maxxima LED downlight is covered by a Garantie de 3 ans à compter de la date d'achat.
For warranty claims, technical support, or any questions regarding your product, please contact Maxxima customer service. Refer to the product packaging or the official Maxxima website pour les informations de contact actuelles.
Veuillez conserver votre preuve d'achat à des fins de garantie.


