1. Informations importantes sur la sécurité
Read all instructions carefully before using the appliance. Keep this manual for future reference. Improper use can cause damage to the appliance and injury to the user.
1.1 Sécurité générale
- Sécurité électrique : Ensure the oven is correctly installed and earthed by a qualified electrician. Do not use adapters or extension cords.
- Surfaces chaudes : The oven and its accessible parts become very hot during use. Always use oven mitts when handling hot items or surfaces. Keep children away.
- Enfants et personnes vulnérables : Cet appareil peut être utilisé par des enfants âgés de 8 ans et plus et par des personnes ayant des capacités physiques, sensorielles ou mentales réduites ou manquant d'expérience et de connaissances s'ils sont sous surveillance ou ont reçu des instructions concernant l'utilisation de l'appareil de manière sûre et s'ils comprennent les risques encourus. Les enfants ne doivent pas jouer avec l'appareil. Le nettoyage et l'entretien par l'utilisateur ne doivent pas être effectués par des enfants sans surveillance.
- Matériaux inflammables : Ne stockez pas de matériaux inflammables dans ou à proximité du four.
- Nettoyage: Débranchez toujours l'appareil de l'alimentation électrique avant de le nettoyer.
1.2 Pyrolytic Cleaning Safety
- Remove all accessories, food residues, and large spills from the oven cavity before starting a pyrolytic cycle.
- Ensure adequate ventilation during and after the pyrolytic cycle.
- The oven door will lock during the pyrolytic cycle and remain locked until the temperature has cooled sufficiently. Do not attempt to force it open.
2. Produit terminéview
The Candy FCTS896XWIFI is a built-in pyrolytic electric oven designed for modern kitchens. It features multiple cooking functions, including convection, and a self-cleaning pyrolytic function for easy maintenance. Its sleek design integrates seamlessly into your cabinetry.

Image 2.1: The Candy FCTS896XWIFI built-in electric oven, shown installed in a kitchen cabinet, featuring a black glass door and a stainless steel control panel.
3. Configuration et installation
This appliance must be installed by a qualified technician in accordance with local regulations and safety standards. Incorrect installation can lead to injury or damage.
3.1 Déballage
Carefully remove the oven from its packaging. Inspect for any damage during transit. Report any damage to your retailer immediately. Keep packaging materials away from children.
3.2 Connexion électrique
Assurez-vous que l'alimentation électrique corresponde au volumetage and frequency specified on the rating plate of the oven. The oven must be connected to a properly earthed electrical outlet.
3.3 Nettoyage initial
Before first use, clean the oven interior and all accessories with warm soapy water. Then, run the oven empty at maximum temperature for approximately 30 minutes to burn off any manufacturing residues. Ensure good ventilation during this process.
4. Mode d'emploi
Familiarize yourself with the control panel and various functions before cooking.
4.1 Panneau de configuration terminéview

Image 4.1: The oven's control panel, featuring three rotary knobs for temperature, timer, and cooking function selection, alongside a digital display.
- Bouton gauche : Sélection de la température (par exemple, de 50°C à 250°C).
- Bouton central : Timer and clock settings.
- Bouton droit : Cooking function selection (e.g., Convection, Grill, Bottom Heat, Pyrolytic).
4.2 Réglage de l'heure
Lors de la première connexion ou après une coupure de couranttage, the display will flash. Use the middle knob to set the current time. Press the knob to confirm.
4.3 Sélection d'une fonction de cuisson et de la température
- Turn the right knob to select the desired cooking function (e.g., Convection for even cooking, Grill for browning).
- Turn the left knob to set the desired temperature.
- The oven will begin to preheat. The indicator light will turn off when the set temperature is reached.
4.4 Utilisation du minuteur
The middle knob allows you to set a cooking duration or a delayed start. Refer to the full manual for detailed timer programming instructions.
5. Pyrolytic Cleaning Function
The pyrolytic cleaning function uses high temperatures to burn off food residues, turning them into ash that can be easily wiped away.
5.1 Preparing for Pyrolytic Cleaning
- Remove all oven accessories (racks, trays, side supports) from the oven cavity.
- Wipe away any large food spills or loose debris.
- Assurez-vous que la porte du four est bien fermée.
5.2 Starting a Pyrolytic Cycle
- Turn the right knob to the pyrolytic cleaning symbol.
- The oven will automatically select a cleaning duration. You may be able to adjust the duration depending on the level of soiling.
- Press the middle knob to start the cycle. The oven door will lock.
5.3 Après le cycle
Once the cycle is complete and the oven has cooled down, the door will unlock. Wipe away the fine ash residue with a damp chiffon. N'utilisez pas de nettoyants abrasifs.
6. Maintenance and Cleaning (Non-Pyrolytic)
Un nettoyage régulier permet de préserver les performances et l'apparence du four.
6.1 Nettoyage extérieur
Clean the exterior surfaces with a soft cloth and mild detergent. Avoid abrasive cleaners or solvents that could damage the finish.
6.2 Interior Cleaning (Light Soiling)
For light soiling, clean the oven interior with warm soapy water and a soft sponge. For stubborn stains, use a specialized oven cleaner, following the product's instructions carefully. Always ensure the oven is cool before cleaning.
6.3 Accessoires de nettoyage
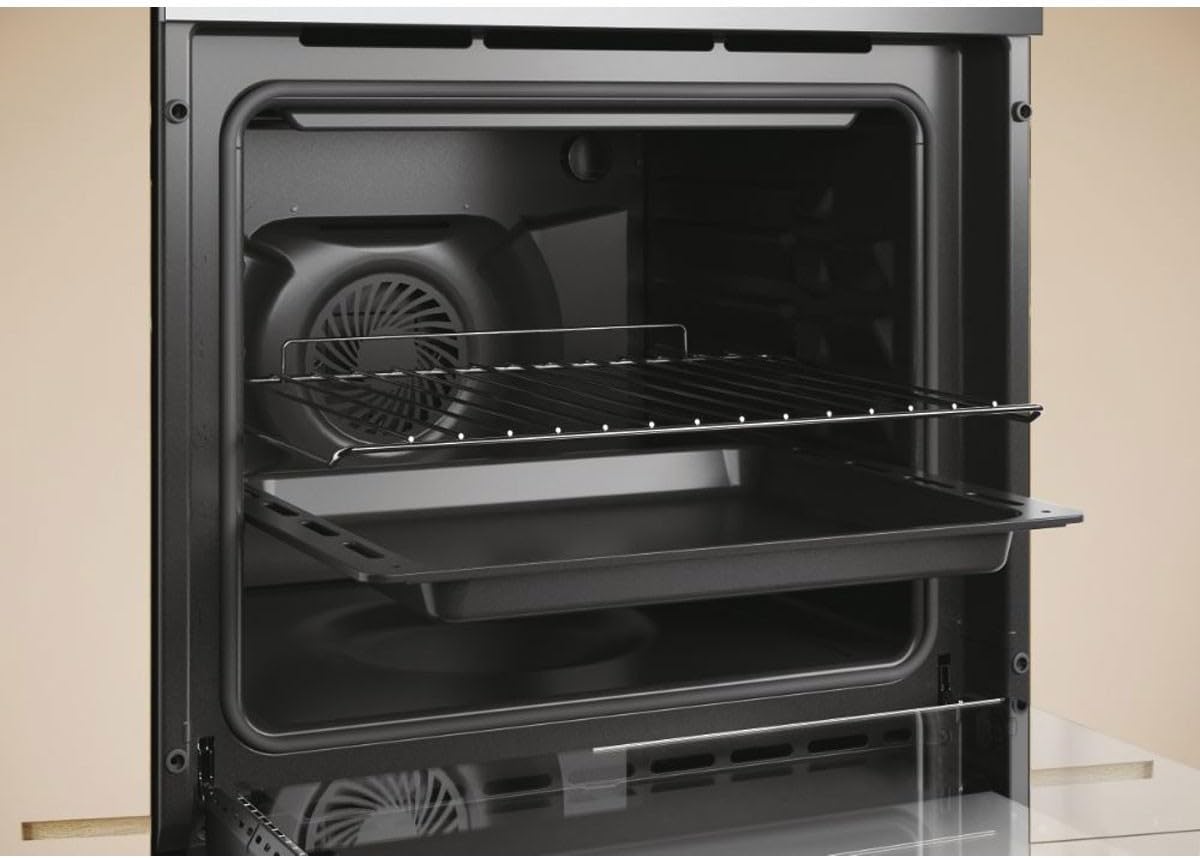
Image 6.1: The oven interior with two wire racks and a baking tray, illustrating the removable accessories.
Oven racks and trays can be removed and washed by hand in warm soapy water or in a dishwasher. Ensure they are completely dry before placing them back into the oven.

Image 6.2: A standard black enamel baking tray, designed to fit the oven racks.
7. Dépannage
Avant de contacter le service client, vérifiez les problèmes courants suivants :
| Problème | Cause possible | Solution |
|---|---|---|
| Le four ne chauffe pas. | Pas d'alimentation électrique ; paramètres incorrects. | Check circuit breaker/fuse; ensure oven is plugged in; verify function and temperature settings. |
| La lumière du four ne fonctionne pas. | L'ampoule est défectueuse. | Replace the oven bulb (ensure oven is cool and disconnected from power). |
| Pyrolytic cycle does not start. | La porte du four n'est pas correctement fermée ; des accessoires sont encore à l'intérieur. | Ensure door is fully closed; remove all accessories. |
| Cuisson inégale. | Position incorrecte de la grille ; four surchargé. | Use recommended rack positions; avoid overcrowding the oven. |
Si le problème persiste après avoir vérifié ces points, veuillez contacter un technicien de maintenance qualifié.
8. Spécifications
| Fonctionnalité | Spécification |
|---|---|
| Marque | Bonbons |
| Numéro de modèle | FCT896X |
| Mode de cuisson | Convection, électrique |
| Type d'énergie utilisée | Électrique |
| Méthode de chauffage | Convection, électrique |
| Type de carburant | Électrique |
| ASIN | B0B129TH77 |
9. Garantie et support client
This appliance comes with a manufacturer's warranty. Please refer to the warranty card included with your purchase for specific terms and conditions. For technical assistance, spare parts, or to schedule a service appointment, please contact Candy customer support or your authorized retailer. Have your model number (FCT896X) and serial number ready when contacting support.