Introduction
Thank you for choosing the SUNVIVI 12-Cup Programmable Drip Coffee Maker. This manual provides essential information for the safe and efficient operation, maintenance, and troubleshooting of your new appliance. Please read all instructions carefully before use and retain this manual for future reference.
Consignes de sécurité importantes
Lors de l'utilisation d'appareils électriques, des précautions de sécurité de base doivent toujours être respectées pour réduire le risque d'incendie, de choc électrique et/ou de blessures corporelles, notamment les suivantes :
- Lisez toutes les instructions.
- Ne touchez pas les surfaces chaudes. Utilisez les poignées ou les boutons.
- Pour éviter tout risque d'incendie, d'électrocution ou de blessure, ne plongez pas le cordon d'alimentation, les prises ou la cafetière dans l'eau ou tout autre liquide.
- Une surveillance étroite est nécessaire lorsqu’un appareil est utilisé par ou à proximité d’enfants.
- Débranchez l'appareil de la prise lorsqu'il n'est pas utilisé et avant de le nettoyer. Laissez-le refroidir avant d'ajouter ou de retirer des pièces et avant de le nettoyer.
- N'utilisez pas d'appareil dont le cordon ou la fiche est endommagé, ou si l'appareil présente un dysfonctionnement ou a été endommagé de quelque manière que ce soit. Rapportez l'appareil au centre de service agréé le plus proche pour examen, réparation ou réglage.
- L’utilisation d’accessoires non recommandés par le fabricant de l’appareil peut entraîner un incendie, un choc électrique ou des blessures corporelles.
- Ne pas utiliser à l'extérieur.
- Ne laissez pas le cordon pendre du bord de la table ou du comptoir, ni toucher des surfaces chaudes.
- Ne pas placer sur ou à proximité d'un brûleur à gaz ou électrique chaud, ni dans un four chaud.
- Branchez toujours d'abord la fiche à l'appareil, puis branchez le cordon à la prise murale. Pour débrancher, mettez la commande sur « arrêt », puis retirez la fiche de la prise murale.
- N'utilisez pas l'appareil à d'autres fins que celles prévues.
- Des brûlures peuvent survenir si le couvercle est retiré pendant le cycle d'infusion.
- La carafe est conçue pour être utilisée avec cet appareil. Elle ne doit jamais être utilisée sur une cuisinière.
- Ne placez pas une carafe chaude sur une surface humide ou froide.
- N’utilisez pas de carafe fissurée ou dont la poignée est desserrée ou affaiblie.
- Ne nettoyez pas la carafe avec des nettoyants, des tampons en laine d'acier ou tout autre matériau abrasif.
Composants du produit
Familiarize yourself with the parts of your SUNVIVI 12-Cup Coffee Maker:
- Réservoir d'eau: Features a visualized water window with graduation lines for precise filling.
- Swing-Open Brew Basket: Rotatable and detachable for easy coffee ground loading and cleaning.
- Filtre permanent : Reusable filter basket eliminates the need for paper filters.
- Carafe en verre : Capacité de 12 tasses avec graduations.
- Panneau de contrôle: Digital display with PROG, HOUR, MIN, and ON/OFF buttons for programming and operation.
- Plat chaud: Keeps coffee warm for up to 2 hours.
- Auto Drip-Stop System: Empêche les gouttes lorsque la carafe est retirée pendant l'infusion.
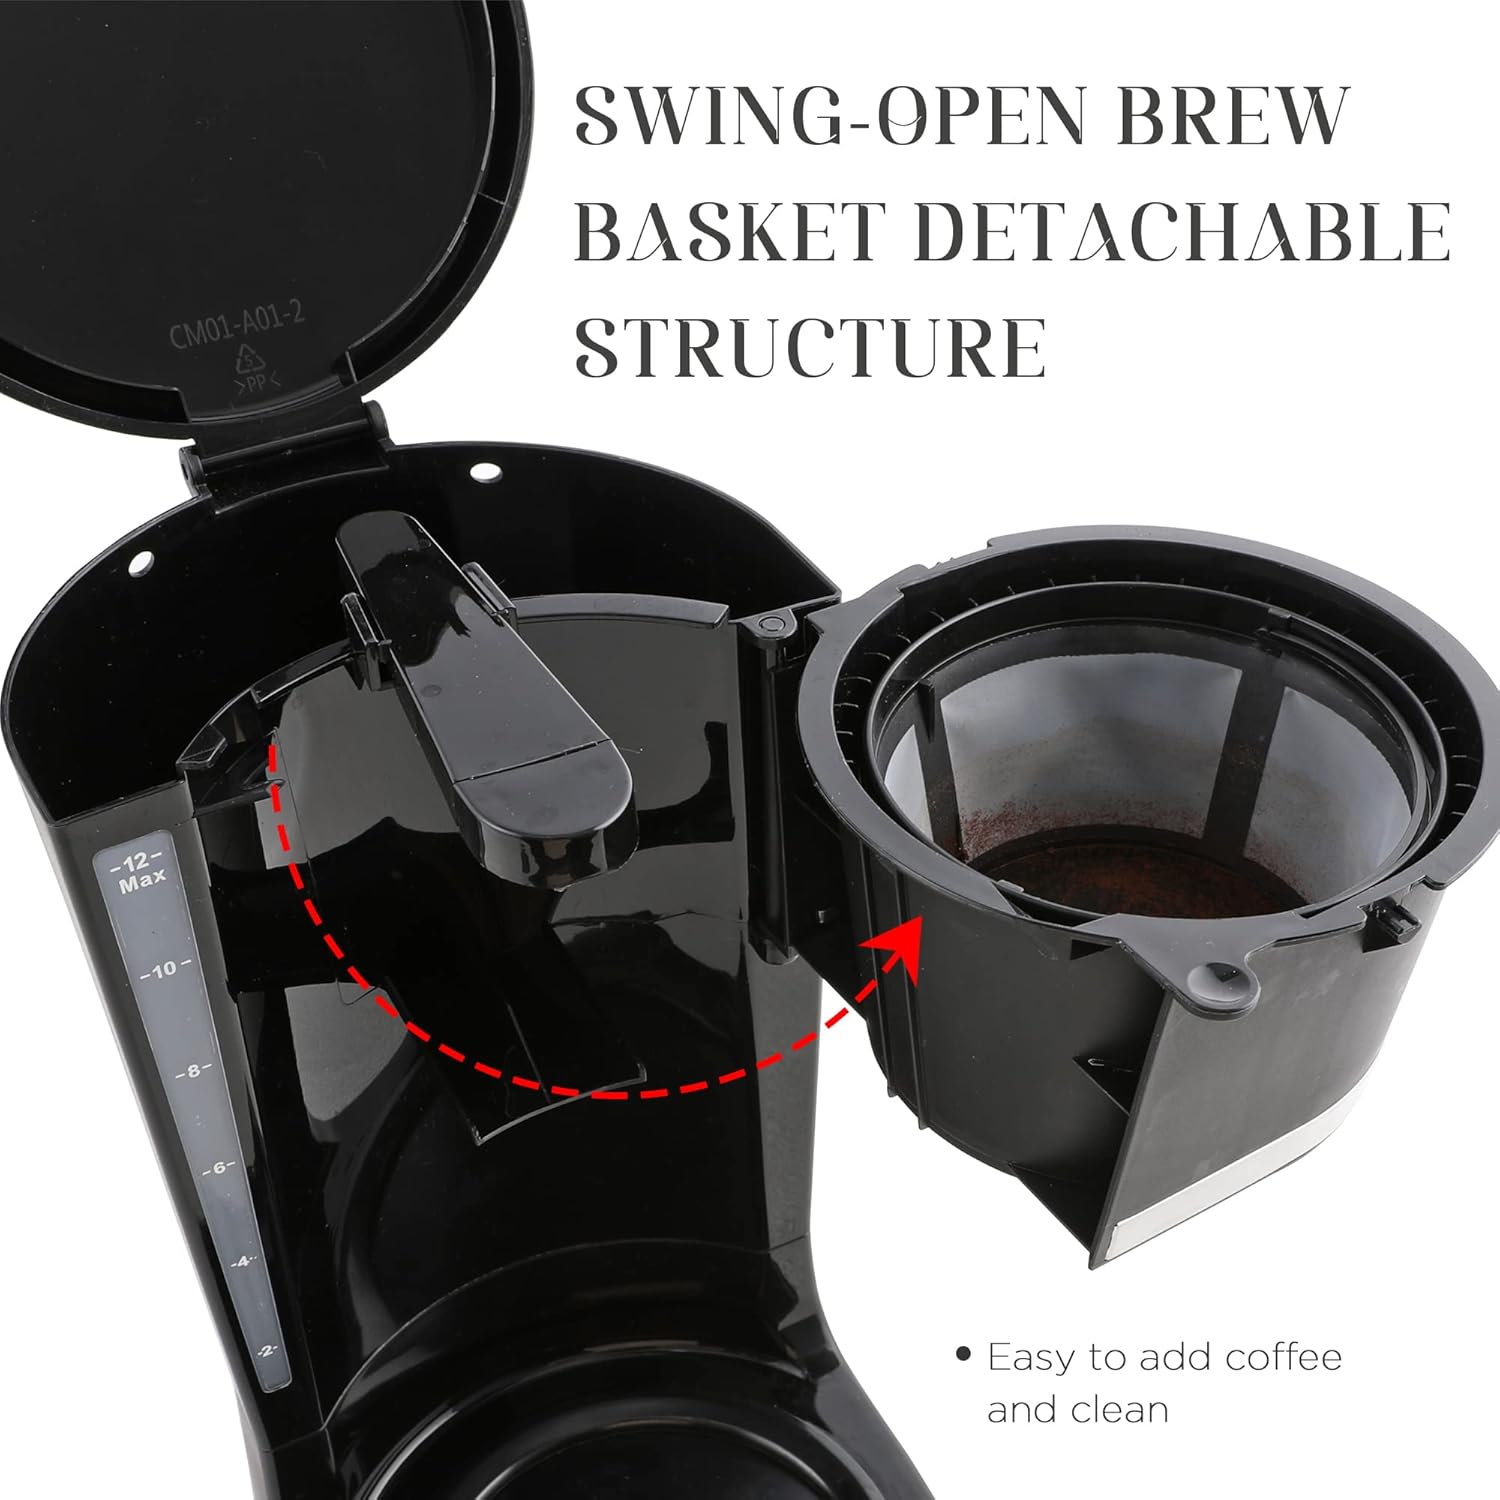
Image : Avant view of the SUNVIVI 12-Cup Coffee Maker, showing the glass carafe, control panel, and water level indicator.

Image: A hand pouring water into the coffee maker's water reservoir, highlighting the easy-view water window with 4 to 12 cup markings.
Installation
- Déballer: Retirez soigneusement tous les emballages et étiquettes de la cafetière.
- Faire le ménage: Wash the carafe, carafe lid, and permanent filter basket in warm, soapy water. Rinse thoroughly and dry. Wipe the exterior of the coffee maker with a soft, damp tissu.
- Premier cycle d'utilisation : Before brewing coffee for the first time, operate the coffee maker with only water to clean the internal components.
- Remplissez le réservoir d'eau jusqu'au repère de 12 tasses avec de l'eau fraîche et froide.
- Place the empty permanent filter basket into the brew basket.
- Placez la carafe vide sur la plaque chauffante.
- Appuyez sur le bouton MARCHE/ARRÊT pour démarrer un cycle d'infusion.
- Une fois le cycle terminé, videz l'eau et rincez la carafe.
Mode d'emploi
Préparation du café
- Remplissez le réservoir d'eau : Open the top cover and pour fresh, cold water into the water reservoir. Use the visualized water window and carafe markings to fill to your desired number of cups (2-12).
- Ajouter du marc de café : Rotate the swing-open brew basket to the right and lift it up. Place the permanent filter (or a paper filter) into the basket. Add your desired amount of ground coffee. For best results, use approximately one tablespoon of ground coffee per cup.
- Close & Place Carafe: Swing the brew basket back into position and close the top cover. Place the empty glass carafe onto the warming plate.
- Commencer le brassage : Appuyez sur le bouton MARCHE/ARRÊT. Le voyant s'allumera et l'infusion commencera.
- Auto Pause & Serve: If you wish to pour a cup of coffee before the brewing cycle is complete, simply remove the carafe from the warming plate. The Auto Drip-Stop system will temporarily halt the coffee flow for up to 30 seconds. Return the carafe to the warming plate within 30 seconds to resume brewing and prevent overflow.

Image: A hand demonstrating the Auto Drip-Stop system by removing the carafe mid-brew without any coffee dripping.
- Fonction de maintien au chaud : After brewing is complete, the coffee maker will automatically switch to the "Keep Warm" function, maintaining the coffee temperature between 175°F and 185°F for 2 hours. The indicator light will remain on during this period.
- Arrêt automatique: For safety and energy saving, the coffee maker will automatically shut off after 2 hours of keeping warm.
Setting the Programmable Brew Time
You can program your coffee maker to start brewing automatically at a later time, up to 24 hours in advance.
- Définir l'heure actuelle : With the coffee maker plugged in, press the HOUR and MIN buttons to set the current time. Hold the buttons to advance quickly.
- Définir l'heure du programme : Press the PROG button. The display will show "PROG" and the time will flash. Use the HOUR and MIN buttons to set your desired brew start time.
- Programme d'activation : After setting the desired time, press the PROG button again to confirm. The "PROG" indicator light will illuminate, indicating that the automatic brew function is set.
- Annulation du programme : To cancel the programmed brew, simply press the ON/OFF button.

Image: The digital display and control buttons (PROG, HOUR, MIN, ON/OFF) of the coffee maker, illustrating the programmable feature.
Video: A demonstration of setting the programmable brew time on the SUNVIVI 12-Cup Coffee Maker.
Entretien et nettoyage
Un nettoyage régulier garantit des performances optimales et prolonge la durée de vie de votre cafetière.
- Nettoyage quotidien :
- Débranchez toujours la cafetière avant de la nettoyer.
- Remove the permanent filter from the brew basket. Discard used coffee grounds.
- Wash the carafe, carafe lid, and permanent filter basket in warm, soapy water. These parts are top-rack dishwasher safe.
- Essuyez l'extérieur de la cafetière avec un chiffon doux.amp chiffon. N'utilisez pas de nettoyants abrasifs ou de tampons à récurer.
- Ne pas immerger la base de la cafetière dans l'eau ou tout autre liquide.
- Détartrage (élimination des dépôts minéraux) :
- Des dépôts minéraux (calcium) peuvent s'accumuler dans votre cafetière et affecter son fonctionnement. Détartrez votre cafetière tous les 2 à 3 mois, ou plus fréquemment si votre eau est dure.
- Remplissez le réservoir d'eau avec un mélange composé d'une part de vinaigre blanc et de deux parts d'eau froide.
- Place the empty permanent filter basket into the brew basket and the empty carafe on the warming plate.
- Appuyez sur le bouton MARCHE/ARRÊT pour démarrer un cycle d'infusion.
- After about 5 minutes, press the ON/OFF button to turn off the coffee maker and let the vinegar solution soak for 30 minutes.
- Appuyez de nouveau sur le bouton MARCHE/ARRÊT pour terminer le cycle d'infusion.
- Discard the vinegar solution and run 2-3 cycles with fresh, cold water to rinse thoroughly.

Image: The swing-open brew basket and removable permanent filter, designed for easy access and cleaning.
Video: A demonstration of the swing-open brew basket and how to remove the permanent filter for cleaning.
Dépannage
If your coffee maker is not functioning as expected, please consult the table below for common issues and solutions.
| Problème | Cause possible | Solution |
|---|---|---|
| Le café ne se prépare pas. |
|
|
| Le café est trop léger ou trop fort. |
|
|
| Le café déborde du porte-filtre. |
|
|
| Water leaks from the bottom of the unit. |
|
|
Caractéristiques
| Fonctionnalité | Détail |
|---|---|
| Marque | SUNVIVI |
| Nom du modèle | Cafetière 12 tasses |
| Couleur | Noir |
| Capacité | 12 tasse |
| Dimensions du produit | 12"P x 11"L x 6"H |
| Poids de l'article | 4.69 livres |
| Source d'énergie | AC |
| Caractéristiques spéciales | Auto Drip-Stop system, Automatic Pause & Serve, Keep Warm, Programmable, Swing-open Brew Basket |
| Composants inclus | Filtre permanent |

Image: Diagram showing the dimensions (height, width, depth) of the SUNVIVI 12-Cup Coffee Maker.
Garantie et assistance
For warranty information or customer support, please refer to the contact details provided with your product packaging or visit the official SUNVIVI website. Please have your model number (12 Cup Coffee Maker) and purchase date available when contacting support.


