1. Introduction
Merci pour votre achatasing the DOOMAY Digital Alarm Clock. This compact and versatile alarm clock is designed for convenience and readability, featuring an adjustable LCD display, snooze function, weekend mode, and temperature display. This manual will guide you through the setup, operation, and maintenance of your new alarm clock to ensure optimal performance.
2. Consignes de sécurité
- Tenez l'appareil à l'écart de l'eau et des environnements à forte humidité.
- Évitez d'exposer l'horloge à la lumière directe du soleil ou à des températures extrêmes.
- N’essayez pas de démonter ou de réparer l’appareil vous-même. Confiez toute intervention à un technicien qualifié.
- Utilisez uniquement le type de pile spécifié (2 piles AAA).
- Retirez les piles si l'appareil ne doit pas être utilisé pendant une période prolongée afin d'éviter toute fuite.
- Gardez les piles hors de portée des enfants.
3. Contenu du colis
- DOOMAY Digital Alarm Clock (1 unit)
- Piles AAA (2 unités)
- Manuel de l'utilisateur (ce document)
4. Produit terminéview
Familiarize yourself with the components and controls of your DOOMAY Digital Alarm Clock.
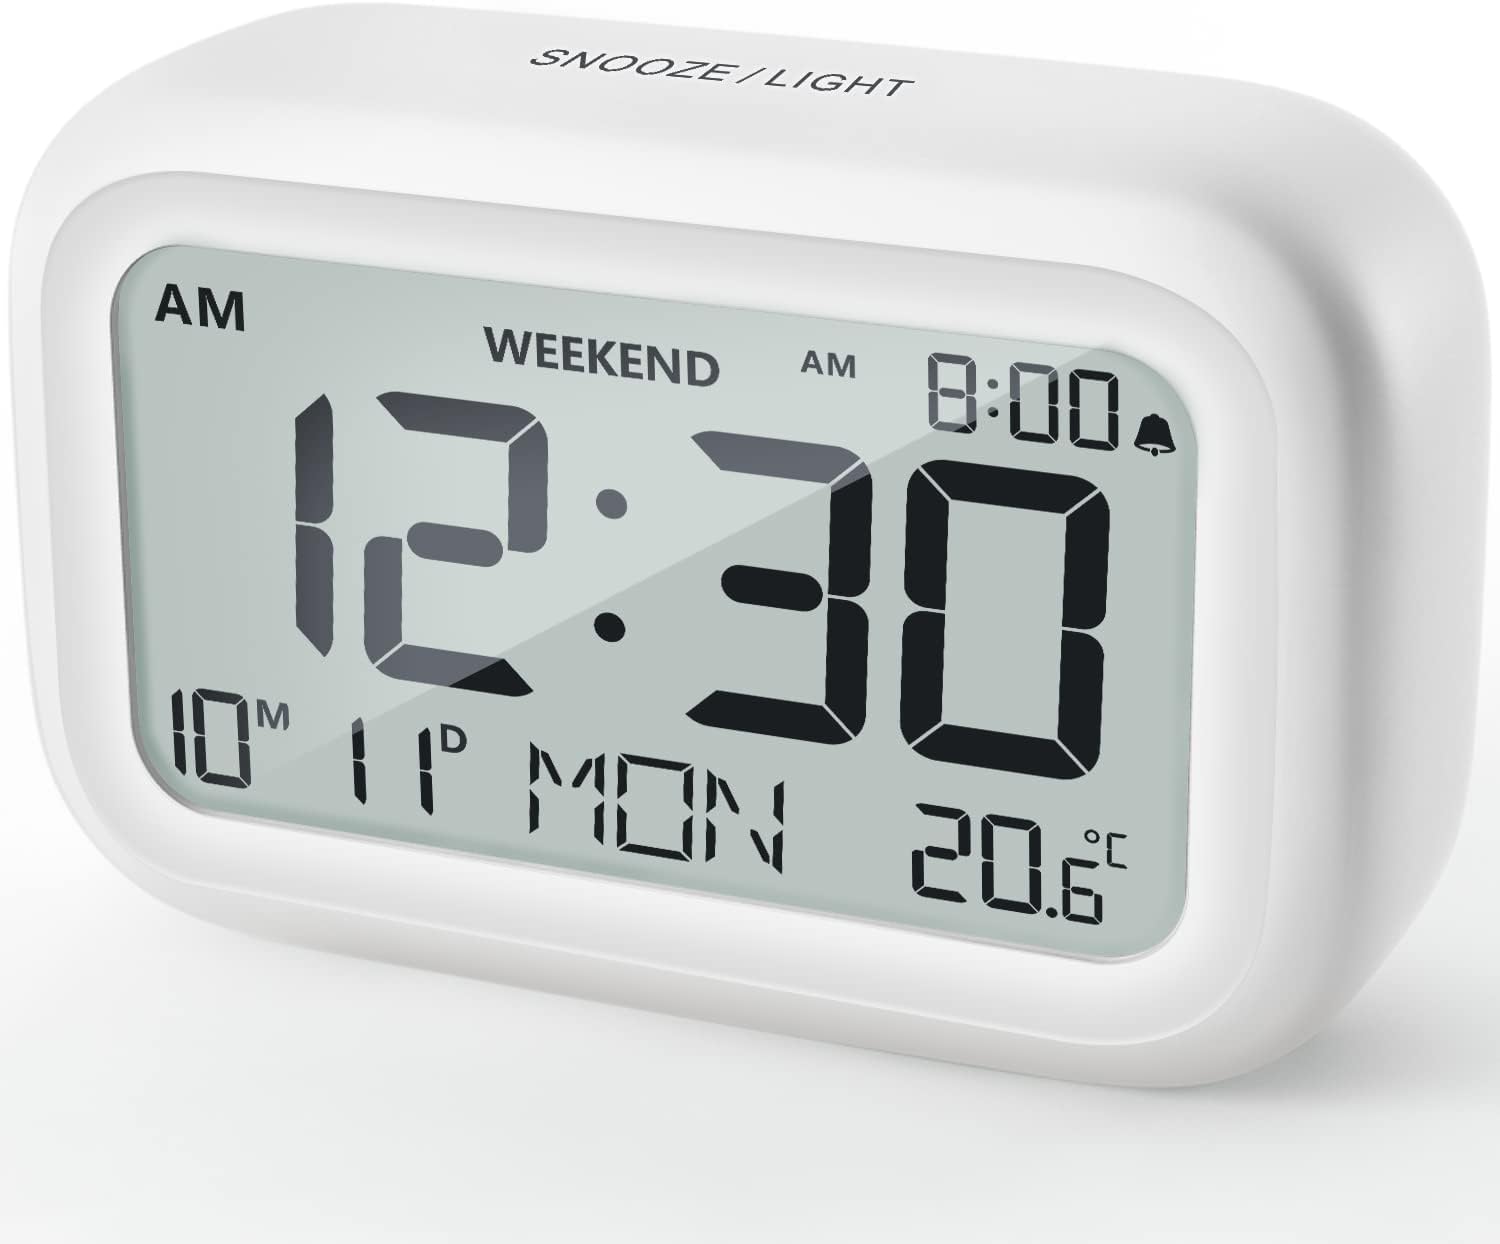
Figure 4.1 : Face avant View du réveil
This image displays the front of the DOOMAY Digital Alarm Clock, highlighting its large, clear LCD screen. The screen shows the current time (12:30), AM indicator, day of the week (MON), date (10th month, 11th day), and indoor temperature (20.6°C). The top of the clock has a "SNOOZE/LIGHT" button.

Figure 4.2 : Principales caractéristiquesview
This diagram illustrates the main functionalities of the alarm clock: 12/24H time display, calendar, alarm setting, adjustable volume, snooze function, backlight, weekend mode, and temperature display. The clock itself is shown on a wooden table, displaying 7:00 AM, Friday, and 28.8 degrees.

Figure 4.3 : Commandes du panneau arrière
This image shows the rear of the alarm clock, detailing the various control buttons and the battery compartment. Buttons are clearly labeled for: 12/24H time format, Alarm setting, Weekend mode, Date setting, Minus (-) for decreasing values, Plus (+) for increasing values, and °C/°F for temperature unit selection. The battery compartment is visible, designed for two AAA batteries.
Commandes et affichage :
- Écran LCD : Shows time, date, day of week, AM/PM indicator, alarm status, and temperature.
- Bouton SNOOZE/LUMIÈRE (en haut) : Activates snooze function during alarm; illuminates backlight for 5 seconds.
- Bouton 12/24H (Arrière) : Permet de basculer entre les formats d'affichage de l'heure sur 12 heures et sur 24 heures.
- Bouton ALARME (Arrière) : Passe en mode de réglage de l'alarme.
- Bouton WEEK-END (Retour) : Activates/deactivates weekend mode.
- Bouton DATE (Retour) : Passe en mode de réglage de la date.
- Bouton MOINS (-) (Arrière) : Decreases values during setting; adjusts alarm volume.
- Bouton PLUS (+) (Retour) : Increases values during setting; adjusts alarm volume.
- Bouton °C/°F (Arrière) : Permet de basculer entre les unités de température Celsius et Fahrenheit.
5. Installation
5.1 Installation de la batterie
- Ouvrez le couvercle du compartiment à piles situé à l'arrière de l'horloge.
- Insérez deux (2) piles AAA, en veillant à respecter la polarité (+ et -).
- Fermez soigneusement le couvercle du compartiment à piles.
- The display will light up, and the clock will be ready for initial setup. A low battery symbol will appear when batteries need replacement. If the display shows "8888" flashing, it's also an indication to change batteries.
5.2 Réglage initial de la date et de l'heure
- Définir l'heure :
- Appuyez sur le 12/24H button to switch between 12-hour (with AM/PM) and 24-hour formats.
- Appuyez et maintenez enfoncé le 12/24H Appuyez sur le bouton pendant 3 secondes pour accéder au mode de réglage de l'heure. Les chiffres des heures clignoteront.
- Utilisez le + or - boutons pour régler l'heure.
- Appuyez sur le 12/24H Appuyez de nouveau sur le bouton pour confirmer l'heure et passer au réglage des minutes. Les chiffres des minutes clignoteront.
- Utilisez le + or - boutons pour régler les minutes.
- Appuyez sur le 12/24H button one more time to exit time setting.
- Régler la date:
- Appuyez et maintenez enfoncé le DATE button for 3 seconds to enter date setting mode. The year digits will flash.
- Utilisez le + or - boutons pour régler l'année.
- Appuyez sur le DATE button again to confirm the year and move to month setting.
- Adjust the month using + or -.
- Presse DATE again to move to day setting.
- Ajustez la journée en utilisant + or -.
- Presse DATE one more time to exit date setting. The day of the week will automatically adjust.
6. Mode d'emploi
6.1 Réglage de l'alarme
- Appuyez et maintenez enfoncé le ALARME Appuyez sur le bouton pendant 3 secondes. Les chiffres de l'heure de l'alarme clignoteront.
- Utilisez le + or - boutons pour régler l'heure de l'alarme souhaitée.
- Appuyez sur le ALARME Appuyez de nouveau sur le bouton pour confirmer l'heure et passer au réglage des minutes. Les chiffres des minutes de l'alarme clignoteront.
- Utilisez le + or - boutons pour régler la durée de l'alarme (en minutes).
- Appuyez sur le ALARME button one more time to exit alarm setting. The alarm icon (bell symbol) will appear on the display, indicating the alarm is active.
- To turn the alarm ON/OFF, simply press the ALARME button once. The bell icon will appear/disappear.
6.2 Fonction de répétition
Lorsque l'alarme sonne, tapotez doucement le grand SNOOZE / LUMIÈRE Appuyez sur le bouton situé sur le dessus de l'horloge. L'alarme se mettra en pause pendant 9 minutes, puis sonnera à nouveau. Cette opération peut être répétée plusieurs fois.

Figure 6.1 : Activation de la fonction Snooze
This image demonstrates how to activate the snooze function by touching the top of the alarm clock. The text highlights that this action provides an additional 9 minutes of sleep after the alarm sounds.
To completely turn off the alarm after it sounds (without snoozing), press any button on the back of the clock.
6.3 Mode Week-end
The weekend mode allows the alarm to sound only from Monday to Friday, preventing it from ringing on Saturday and Sunday.

Figure 6.2: Weekend Mode Activated
This image shows the alarm clock display with the "WEEKEND" indicator prominently displayed, signifying that the weekend mode is active. The accompanying text clarifies that in this mode, the alarm will only sound from Monday to Friday, ensuring undisturbed weekends.
- Pour activer le mode week-end, appuyez sur FIN DE SEMAINE button once. The "WEEKEND" indicator will appear on the display.
- To deactivate Weekend Mode, press the FIN DE SEMAINE button again. The "WEEKEND" indicator will disappear.
6.4 Volume d'alarme réglable
The alarm clock offers two volume levels: Low (70 dB) and High (85 dB).

Figure 6.3: Alarm Volume Levels
This image visually represents the two available alarm volume settings: L01 (85 dB) for a louder alarm and L02 (70 dB) for a softer alarm. The alarm clock is shown in a bedroom setting, emphasizing its use as a bedside device.
- En mode d'affichage de l'heure normal, appuyez sur + or - buttons to cycle between the two alarm volume levels. The current volume level will be briefly displayed.
6.5 Fonction de rétroéclairage
To illuminate the display in low light conditions, simply tap the SNOOZE / LUMIÈRE button on the top of the clock. The backlight will activate for approximately 5 seconds, providing clear visibility of the time and other information.
Figure 6.4: Backlight in Action
This image provides a side-by-side comparison of the alarm clock's display. On the left, the clock is shown in a well-lit environment. On the right, the same clock is shown in a dark setting with its 5-second backlight activated, demonstrating how the display becomes clearly visible at night.
6.6 Affichage de la température
The clock displays the indoor temperature. You can switch between Celsius (°C) and Fahrenheit (°F) units.
- To change the temperature unit, press the ° C / ° F bouton au dos de l'horloge.
7. Entretien
7.1 Nettoyage
Essuyez l'horloge avec un chiffon doux et sec. N'utilisez pas de produits nettoyants abrasifs ni de solvants, car ils pourraient endommager la surface.
7.2 Remplacement de la batterie
When the low battery indicator appears on the display, or if the display shows "8888" flashing, it is time to replace the batteries. Follow the steps in Section 5.1 Battery Installation to replace the two AAA batteries.
8. Dépannage
| Problème | Cause possible | Solution |
|---|---|---|
| L'écran est vide ou sombre. | Les piles sont mortes ou mal installées. | Remplacez les piles par des piles AAA neuves, en veillant à respecter la polarité. |
| L'alarme ne sonne pas. | Alarm is not activated, or Weekend Mode is ON. | Ensure the alarm icon is displayed. Check if Weekend Mode is active and deactivate if necessary. |
| La fonction de répétition d'alarme ne fonctionne pas. | Not tapping the SNOOZE/LIGHT button correctly. | Ensure a firm, brief tap on the top SNOOZE/LIGHT button when the alarm is sounding. |
| L'heure/la date est incorrecte. | Not set correctly or batteries were removed. | Refer to Section 5.2 Initial Time and Date Setting to re-set. |
9. Spécifications
| Fonctionnalité | Détail |
|---|---|
| Numéro de modèle | 5293Royaume-Uni |
| Marque | DOOMAY |
| Dimensions (L x l x H) | 10.9 x 3.81 x 6.9 cm (4.29 x 1.5 x 2.72 pouces) |
| Poids | 127.01 grammes (0.28 livres) |
| Matériel | Acrylonitrile butadiène styrène (ABS) |
| Source d'énergie | 2 piles AAA (incluses) |
| Type d'affichage | LCD numérique |
| Niveaux de volume d'alarme | Low (70 dB), High (85 dB) |
| Durée de sommeil | 9 minutes |
| Durée du rétroéclairage | 5 secondes |
| Unités de température | Celsius (°C) / Fahrenheit (°F) |
10. Garantie et assistance
DOOMAY products are designed for reliability and performance. For any questions, technical support, or warranty claims, please contact your retailer or visit the official DOOMAY webConsultez notre site pour obtenir de l'aide. Veuillez conserver votre preuve d'achat à des fins de garantie.
For further information, you may visit the brand's Amazon store page: DOOMAY Store on Amazon


