1. Introduction
This manual provides essential instructions for the safe and effective use of your MAXSafes Under Desk Drawer Gun Safe. Please read this manual thoroughly before installation and operation to ensure proper functionality and security. This safe features a Super Biometric Finger Vein Recognition Lock, quick-access, and a slide-away design, approved by CA DOJ.

Image: MAXSafes Under Desk Drawer Gun Safe highlighting the advanced biometric vein recognition technology.
Vidéo : Un overview of how to use the finger vein safe, demonstrating its key features and operation.
2. Consignes de sécurité
- Verrouillez toujours le coffre-fort lorsqu'il n'est pas utilisé.
- Store the mechanical keys in a secure location away from the safe and out of reach of unauthorized individuals.
- Do not store firearms loaded inside the safe unless local laws permit and you are trained in safe firearm handling.
- Assurez-vous que le coffre-fort est solidement fixé afin d'empêcher tout retrait non autorisé.
- Keep children and unauthorized persons away from the safe.
3. Contenu du colis
Avant de procéder à l'installation, veuillez vérifier que tous les éléments sont présents dans l'emballage :
- MAXSafes Under Desk Drawer Gun Safe Unit
- Support de montage
- Installation Guide Paper (Template)
- ST 4.8*12 Bolts (6 pcs)
- Landing Pads (4 pcs)
- Clés mécaniques (2 pièces)
- Manuel d'utilisation
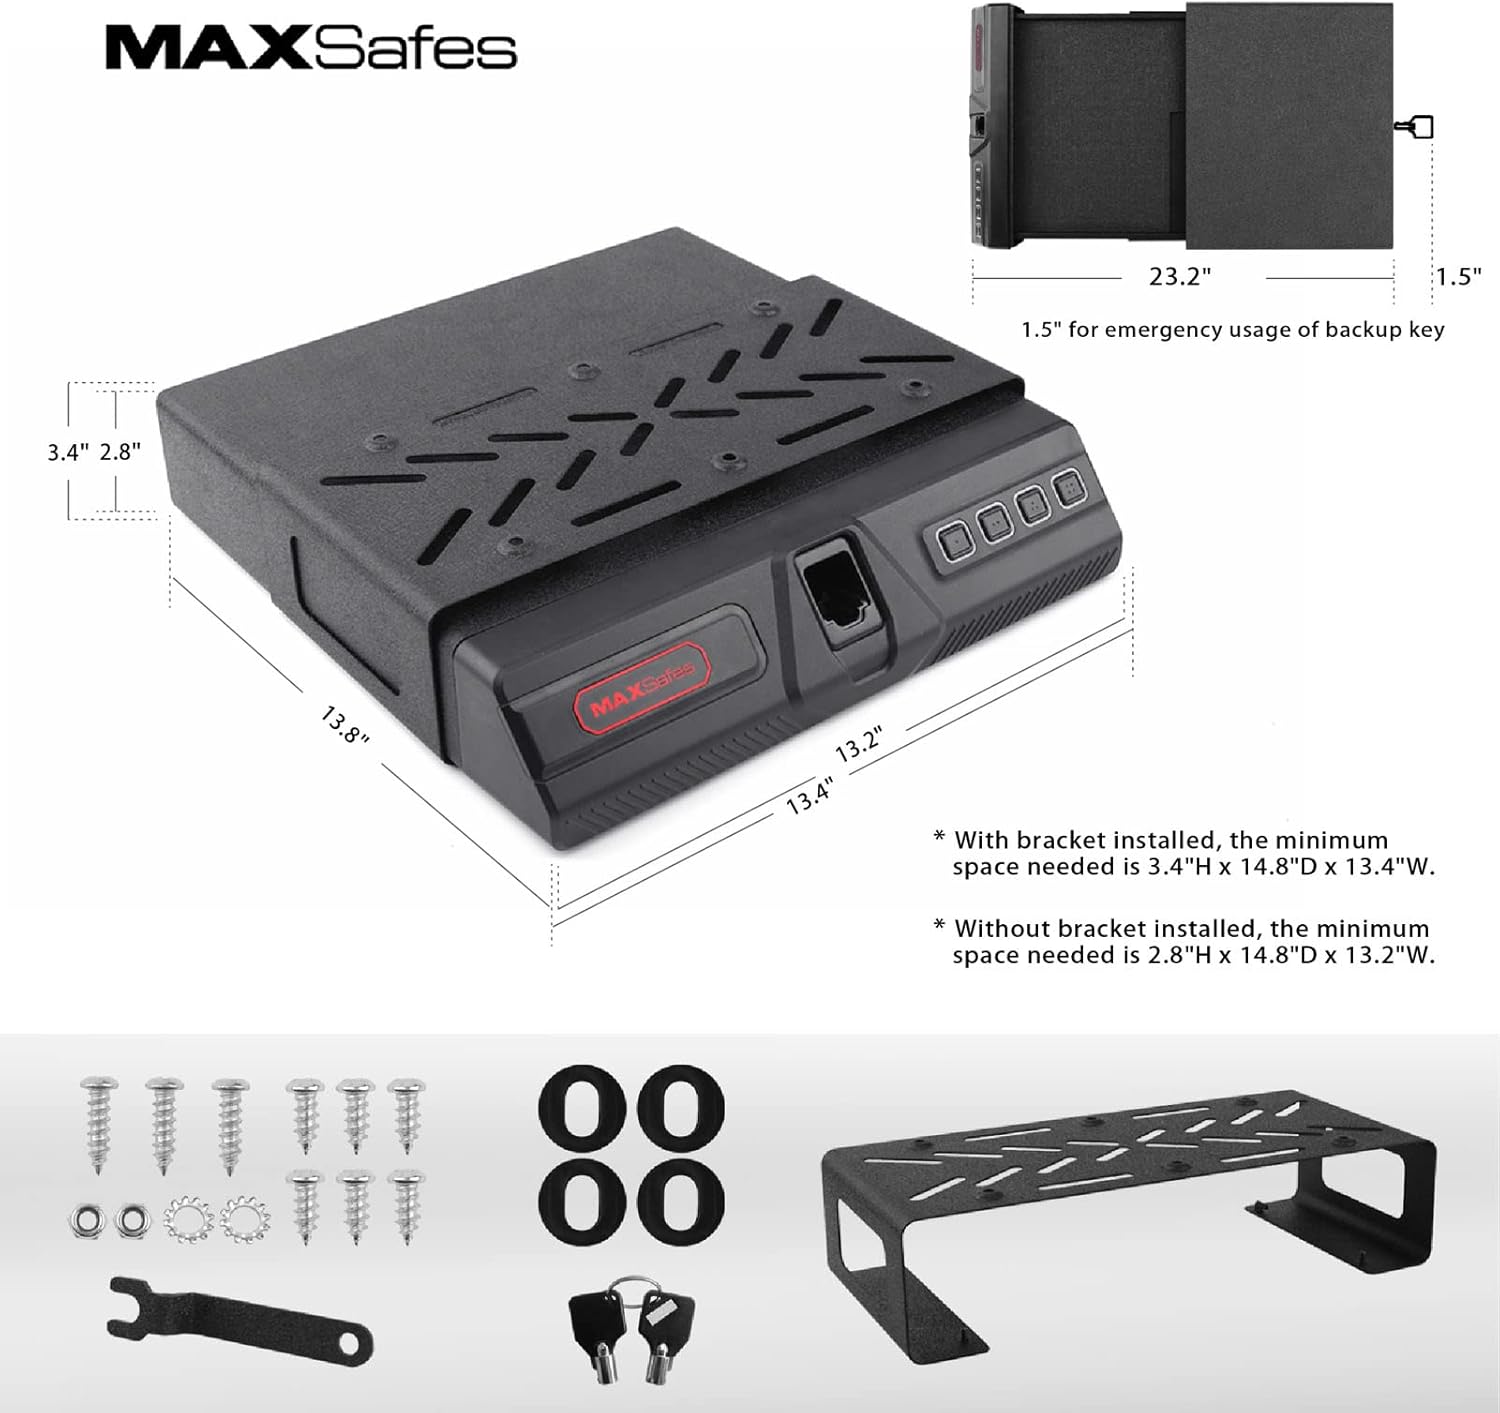
Image: The MAXSafes gun safe, mounting bracket, and included hardware for installation.
Video: Demonstrates how to unbox and take out the entire safe from its packaging.
4. Configuration et installation
4.1 Installation de la batterie
- Open the battery compartment by sliding the battery cover to the left.
- Install 4 AA batteries, ensuring correct polarity. We recommend using new, high-quality batteries for best performance. Under regular circumstances, four AA batteries would keep the safe running for 6-8 months.
- Fermez le compartiment à piles.
Video: Shows how to install the batteries into the safe.
4.2 Removing the Drawer from the Safe Body
- Open the safe using the mechanical key.
- Pull out the drawer from the safe by pressing the switches on both sides of the rail.
4.3 Installation Underneath a Horizontal Surface (e.g., Desk)
- Place the installation guide paper (template) on the desired position underneath the surface.
- Make sure Side A of the template faces the opening side of the safe.
- Line up the six holes on the bracket with the drilled holes on the template.
- Install the bracket on the desk using the provided ST 4.8*12 bolts.
- Slowly slide the body of the safe into the bracket with the opening side facing out.
- Make sure the pre-drilled holes on the body of the safe align with the pre-drilled holes on the bracket and slowly release the safe.
- Push the body of the safe further into the bottom of the bracket (approximately 5mm).
- Align both sides of the drawer with the sliding rail and install it to the body of the safe.

Image: Various installation scenarios for the MAXSafes gun safe, including under a desk, on a nightstand, and inside a closet.
Video: Detailed instructions on how to install the safe underneath a desk surface.
4.4 Installation on a Desk Surface
- Install the four landing pads included in the package to the four corners of the safe to prevent potential damage to your desk surface.
- Install one ST 4.8*18 screw on the center hole position, leaving out 8-9mm from the installation surface.
- Align the pre-drilled hole on the bottom of the safe with the installed screw.
- Slowly release the safe until the landing pads make contact with the desk surface.
- Push the safe forward until the screw fits into the pre-drilled hole.
- Adjust the installation position and install screws on the other two pre-drilled holes.
- Align the safe drawer with the rails and install it to the body of the safe.
Video: Step-by-step guide on how to install the safe securely on a desk surface.
5. Mode d'emploi
5.1 Opening with Mechanical Key
In case of battery depletion or forgotten codes, the safe can be opened using the mechanical key:
- Locate the keyhole on the side of the safe.
- Insérez la clé mécanique et tournez-la pour déverrouiller.
- The drawer will slide open.
5.2 Registering Your Passcode
You can set a personal passcode for quick access:
- Open the safe using the mechanical key.
- Locate the registration button inside the safe (often under a rubber cover).
- Input your desired passcode twice, pressing the registration button after each input to confirm.
- A long beep will indicate successful registration.
Video: Instructions on how to register your personal passcode for the safe.
5.3 Registering Your Vein IDs
The safe uses advanced finger vein recognition for secure access:
- Open the safe with the mechanical key and locate the registration button.
- Press the registration button and scan your finger for 3 times.
- Each scan will be followed by a yellow light flashing and a single beep.
- You will notice a long beep indicating your Vein ID has been successfully recorded.
- We recommend registering the same finger multiple times at slightly different angles to maximize reading accuracy. Ensure placing your finger deeply inside the module and keep touching the blue area during registration. Do not bend or twist your finger.
Video: A guide on how to register your finger vein IDs for biometric access.
5.4 Mode silencieux
Activate silent mode for discreet access:
- Silent Mode can be activated/deactivated by holding down the button “1” on the keypad.
- When Silent Mode is activated, passcode input and Vein ID scanning will not have audio feedback.
Video: Demonstrates how to activate and deactivate the silent mode feature on the safe.
5.5 Mode alarme
The safe features an alarm mode for enhanced security:
- Alarm Mode will be activated after 5 incorrect inputs (passcode or vein scan).
- To deactivate Alarm Mode, open the safe with the mechanical key.
- Then, remove the rubber cover and double click the registration button.
Video: Explains how to set and deactivate the alarm mode on the safe.
6. Entretien
- Regularly check battery levels and replace them as needed to avoid being locked out.
- Keep the vein recognition scanner clean and free from dust or debris.
- Wipe the exterior of the safe with a soft, dry cloth. Avoid abrasive cleaners.
- Ensure the sliding mechanism is free of obstructions for smooth operation.
7. Dépannage
| Problème | Cause possible | Solution |
|---|---|---|
| Safe does not open with Vein ID. | Finger not positioned correctly; Vein ID not registered; Sensor dirty. | Ensure finger is placed deeply and correctly. Re-register Vein ID multiple times at different angles. Clean the sensor. |
| Le coffre-fort ne s'ouvre pas avec le code d'accès. | Incorrect passcode entered; Passcode not registered. | Verify passcode. Re-register passcode. |
| Le coffre-fort ne répond pas. | Piles faibles ou mortes. | Replace all 4 AA batteries with new, high-quality ones. Use mechanical key to open if batteries are dead. |
| Alarm activates frequently. | Multiple incorrect access attempts. | Ensure correct access methods are used. Deactivate alarm mode using the mechanical key and registration button. |
| Le tiroir ne coulisse pas facilement. | Obstruction in the rails; Dirt or debris. | Check for and remove any obstructions. Clean the sliding rails. |
8. Spécifications
- Marque: Coffres-forts MAXSafe
- Dimensions du produit : 13.7"P x 13.2"L x 2.8"H
- Type de serrure : Biometric (Finger Vein Recognition)
- Capacité: 0.09 pieds cubes
- Matériel: Alloy Steel (16 Gauge solid steel)
- Dossier spécial : Sensor Light, Quick Access, Slide-Away Design
- Type de montage : Under Desk, Nightstand, Cabinet
- Poids de l'article : 18.96 livres (8.62 kilogramme)
- Niveau de résistance à l'eau : Non résistant à l'eau
- Code à barres : 769838727823
- Numéro de modèle : 8401955f-616d-482f-a05e-8c1f43a0e6f3
- Style: Compact
- Forme: Rectangulaire
- Piles requises : Oui (4 piles AA, non incluses)

Image: Key features of the MAXSafes gun safe, including vein recognition, digital keypad, and robust steel construction.

Image : Intérieur view of the safe showing two layers of customizable pick-and-pluck foam and internal dimensions.
9. Garantie et assistance
For warranty information, technical support, or any inquiries regarding your MAXSafes product, please refer to the official MAXSafes webConsultez le site ou contactez directement leur service client. Conservez votre reçu d'achat comme preuve d'achat.
Official MAXSafes Store: MAXSafes Store on Amazon


