1. Introduction
This manual provides comprehensive instructions for the installation, setup, and operation of your GHome Smart Light Switch SW5. This single-pole Wi-Fi smart switch allows you to control your lighting remotely via an app or voice commands through compatible smart home assistants.

Figure 1: GHome Smart Light Switch SW5 Product Overview
2. Informations importantes sur la sécurité
- Risque électrique : Installation requires working with high voltage. Always disconnect power at the circuit breaker before installation or servicing. If you are unsure about electrical wiring, consult a qualified electrician.
- Fil neutre requis : This smart switch requires a neutral wire for proper operation. If your house was built or remodeled before the mid-1980s, it may not have a neutral wire. Verify your wiring before installation.
- Compatibilité Wi-Fi : This device operates only on a 2.4GHz Wi-Fi network. It is not compatible with 5GHz Wi-Fi networks.
- Type de commutateur : This is a single-pole switch. It is not designed for use as a 3-way or dimmer switch.
- Compatibilité de charge : Not compatible with smart bulbs.
- Certifications: The GHome Smart Light Switch is UL and FCC certified, ensuring quality and safety standards.

Figure 2: Compatibility and Wiring Type Overview
3. Contenu de la boîte
- GHome Smart Light Switch (2 units)
- Installation Kit (wire nuts, screws)
- Manuel d'utilisation
4. Spécifications
| Fonctionnalité | Détail |
|---|---|
| Numéro de modèle | SW5 |
| Entrée/Sortie | 120V/60Hz, 15A Max |
| Max Vattage | 1800 W |
| Wi-Fi standard | 2.4 GHz (802.11 b/g/n) |
| Température de fonctionnement | -10°C à 40°C |
| Product Dimensions (Cover) | 4.72" x 2.76" x 0.34" (120 x 70 x 8.7 mm) |
| Internal Dimensions (without cover) | 4.09"H x 1.77"W x 1.18"D (104 x 45 x 30mm) |
| Certifications | UL, FCC |

Figure 3: Detailed Dimensions of the Smart Switch
5. Installation
5.1 Installation électrique
- Débrancher l'alimentation : Before starting, turn off the power to the light switch at your circuit breaker to prevent electrical shock.
- Retirer l'ancien interrupteur : Retirez soigneusement la plaque murale existante et dévissez l'ancien interrupteur du boîtier mural.
- Identifier les fils : Identify the following wires in your wall box:
- Live Wire (Hot): Généralement noir.
- Câble de charge : Se raccorde au luminaire.
- Fil neutre : Usually white. (Required for this switch)
- Fil de terre: Généralement en cuivre vert ou nu.
- Connecter le nouveau commutateur : Connect the wires from the wall box to the corresponding wires on the GHome Smart Light Switch using the provided wire nuts.
- Connectez le Neutre wire from the wall box to the white wire on the smart switch.
- Connectez le En direct wire from the wall box to the black wire on the smart switch.
- Connectez le Charger wire from the wall box to the red wire on the smart switch.
- Connectez le Sol wire from the wall box to the green wire on the smart switch.
- Commutateur sécurisé : Gently push the wired smart switch into the wall box and secure it with screws. Attach the new faceplate.
- Restaurer l'alimentation : Turn the power back on at the circuit breaker. The indicator light on the switch should begin blinking, indicating it's ready for app pairing.
Video 1: GHome Smart Switch Wi-Fi Light Switch Overview and Installation Tips. This video demonstrates the physical installation process and highlights key features of the smart switch.
5.2 Installation et appairage de l'application
The GHome Smart Light Switch can be controlled via the GHome app. Ensure your mobile device is connected to a 2.4GHz Wi-Fi network before proceeding.
5.2.1 Download the GHome App
- Rechercher "GHome" in your mobile device's app store (App Store for iOS or Google Play Store for Android).
- Download and install the GHome app.
- Ouvrez l'application et inscrivez-vous ou connectez-vous à votre compte.

Figure 4: GHome App Interface
5.2.2 Pairing in EZ Mode (Recommended)
- Ensure the smart switch is powered on and the indicator light is rapidly blinking. If not, press and hold the reset button on the switch for 5 seconds until it blinks rapidly.
- In the GHome app, tap the "+" icon on the top right corner to add a device.
- Select "Switch (Wi-Fi)" from the device list under the Electrician category.
- Confirm your 2.4GHz Wi-Fi network and enter its password.
- Select "EZ Mode" (usually the default) and confirm the indicator is rapidly blinking.
- The app will begin searching for the device. Once found, it will be added to your account.
- You can rename the switch for easier identification.
Video 2: How to connect GHome Smart Switch with APP in EZ Mode. This video guides you through the EZ Mode pairing process using the GHome app.
5.2.3 Pairing in AP Mode (Alternative)
If EZ Mode fails, you can try AP Mode:
- Ensure the smart switch is powered on and the indicator light is slowly blinking. If not, press and hold the reset button for 5 seconds until it blinks rapidly, then press and hold again for 5 seconds until it blinks slowly.
- In the GHome app, tap the "+" icon, select "Switch (Wi-Fi)", and then choose "AP Mode" from the top right corner.
- Confirm your 2.4GHz Wi-Fi network and enter its password.
- Go to your phone's Wi-Fi settings (WLAN) and connect to the hotspot named "SmartLife-xxxx".
- Return to the GHome app and wait for the device to connect.
- You can rename the switch for easier identification.
Video 3: How to connect GHome Smart Switch with APP in AP Mode. This video demonstrates the AP Mode pairing process for the GHome app.
5.2.4 Connecting with Google Home
- Ensure your GHome Smart Light Switch is already paired with the GHome app.
- Open the Google Home app on your phone.
- Tap "Get Started" and sign in with your Google account.
- Go to "Settings" and tap "Add device".
- Use the search function to find "GHome" and select the GHome app.
- Click "Agree and link" to link your GHome account with Google Home.
- Select your GHome Smart Light Switch from the list of devices to add it to Google Home.
Video 4: How to connect GHome Smart Switch with Google Home. This video demonstrates the steps to integrate your smart switch with Google Home for voice control.
5.2.5 Connecting with Amazon Alexa
- Ensure your GHome Smart Light Switch is already paired with the GHome app.
- Open the Amazon Alexa app on your phone and sign in.
- Tap "More" > "Skills & Games" > "Search" button.
- Type "GHome" and select the GHome skill.
- Tap "ENABLE TO USE" and then "Agree and link" to link your GHome account with Alexa.
- Alexa will discover your device. You can then control it using voice commands.
Video 5: How to connect GHome Smart Switch with Alexa. This video demonstrates the steps to integrate your smart switch with Amazon Alexa for voice control.
6. Utilisation de votre interrupteur intelligent
6.1 Commande vocale
Once connected to Alexa or Google Assistant, you can control your lights with simple voice commands:
- "Alexa, allume [Nom de la lumière]"
- "Hey Google, éteins [Nom de la lumière]"

Figure 5 : La commande vocale en action
6.2 Télécommande APP
Control your lights from anywhere using the GHome app:
- View the real-time status of your lights.
- Turn lights on or off remotely.
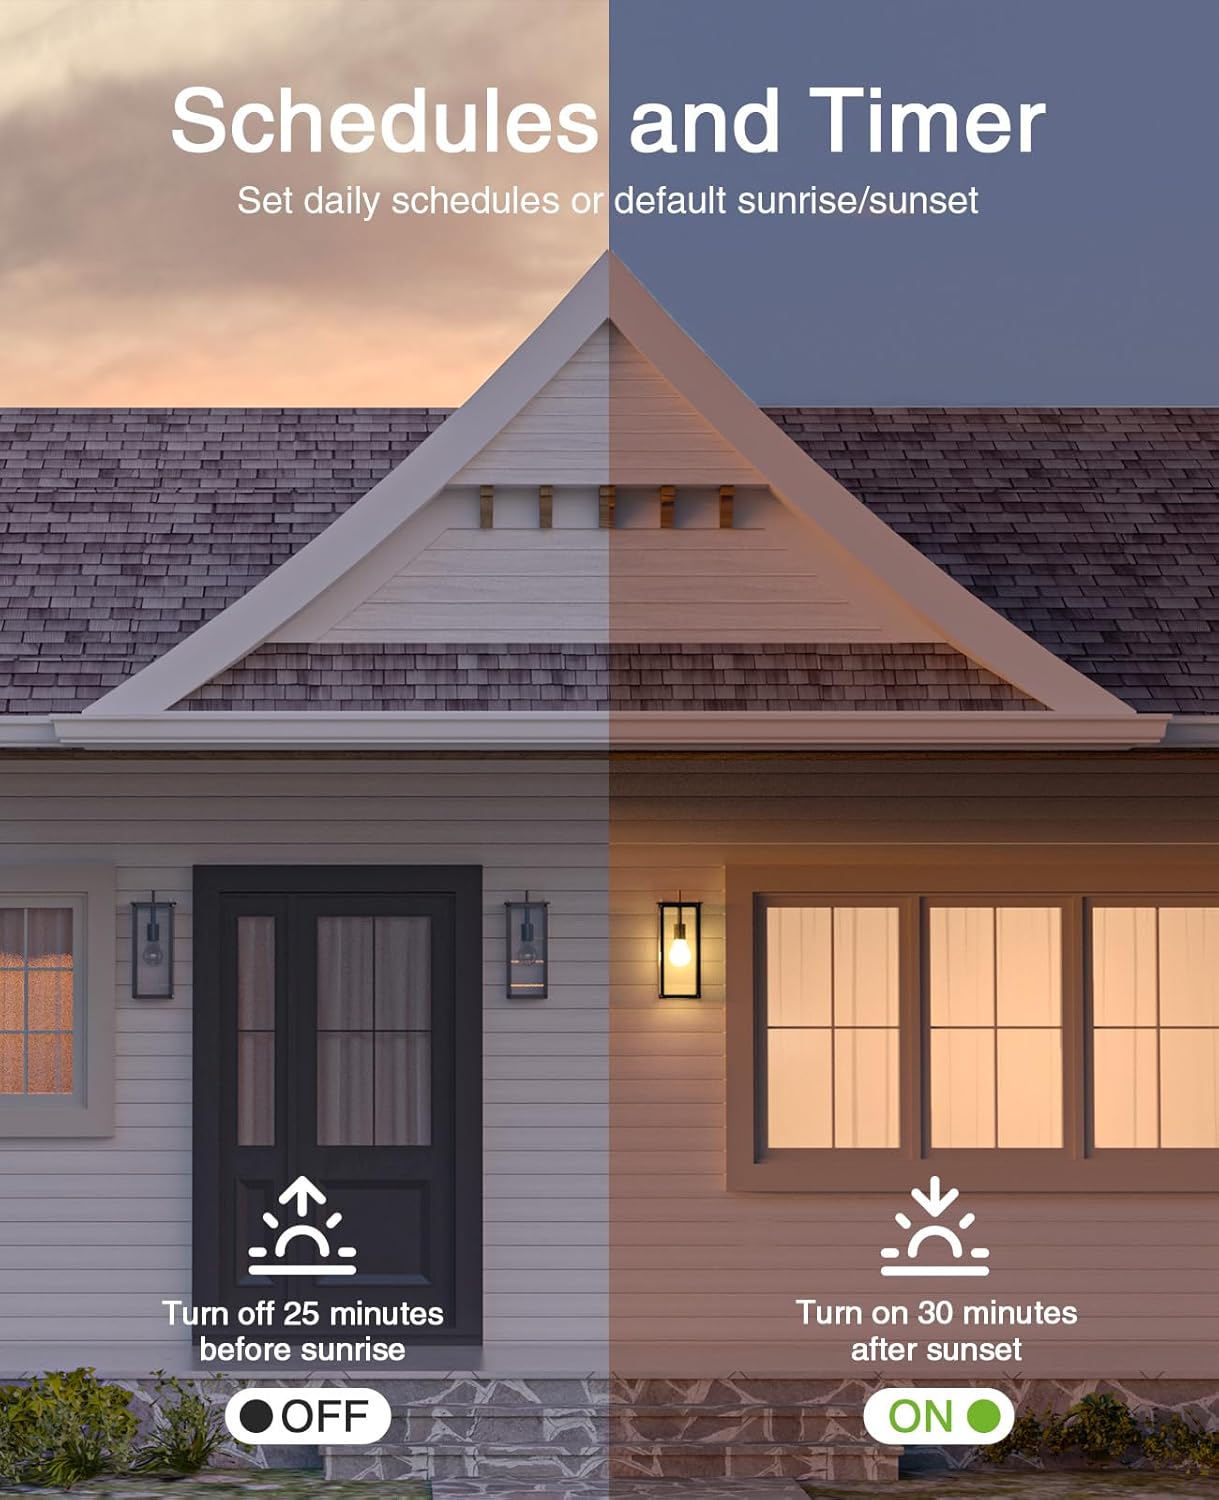
Figure 6: Remote Control via GHome App
6.3 Schedule and Timer Functions
Automate your lighting to fit your daily routine:
- Set daily schedules for lights to turn on/off at specific times.
- Utilize sunrise/sunset automation (e.g., porch lights on 30 minutes after sunset, off 25 minutes before sunrise).

Figure 7: Scheduling and Timer Features
6.4 Contrôle de groupe
Manage multiple smart switches simultaneously by creating groups within the GHome app.

Figure 8 : Fonctionnalité de contrôle de groupe
7. Entretien
7.1 mises à jour du micrologiciel
GHome regularly releases firmware updates to optimize stability and user experience. It is recommended to upgrade the firmware to the latest version (e.g., V1.1.3 or newer) by following the prompts in the GHome app.
7.2 Nettoyage
To clean the smart switch, ensure power is disconnected at the circuit breaker. Use a soft, dry cloth. Avoid using harsh chemicals or abrasive cleaners.
8. Dépannage
- Le commutateur ne répond pas :
- Vérifiez si le disjoncteur est enclenché.
- Ensure the switch is properly wired (especially the neutral wire).
- Vérifiez que votre réseau Wi-Fi est bien en 2.4 GHz et stable.
- Try resetting the switch by holding the reset button for 5 seconds.
- Impossible de se connecter au Wi-Fi:
- Confirm your router is broadcasting a 2.4GHz signal.
- Assurez-vous que votre téléphone est connecté au réseau 2.4 GHz pendant le jumelage.
- Rapprochez l'interrupteur de votre routeur Wi-Fi.
- Try both EZ Mode and AP Mode pairing methods.
- Vérifiez votre mot de passe Wi-Fi.
- La commande vocale ne fonctionne pas :
- Ensure the GHome skill/service is enabled and linked in your Alexa or Google Home app.
- Verify the device name in the GHome app matches the name used in voice commands.
- Vérifiez la connexion internet de votre assistant intelligent.
9. Garantie et assistance
9.1 Garantie
GHome Smart Light Switches typically come with a 12-month warranty from the date of purchase. Please retain your proof of purchase for warranty claims.
Video 6: Smart Light Switch features and benefits. This video highlights various smart features and mentions the 12-month warranty.
9.2 Assistance clientèle
For further assistance or technical support, please refer to the GHome Smart official website or contact their customer service directly. Contact information can usually be found on the product packaging or the GHome Smart website.


