1. Introduction
Merci pour votre achatasing the KEPLUG Sunrise Alarm Clock. This device is designed to enhance your waking and sleeping experience with its unique features, including sunrise and sunset simulations, dual alarms, FM radio, and various natural sounds. Please read this manual carefully to ensure proper use and optimal performance.
Contenu du colis :
- 1 x KEPLUG Sunrise Alarm Clock
- 1 x câble micro USB
- 1 x adaptateur mural
- 1 x Manuel d'utilisation
2. Produit terminéview
Familiarize yourself with the main components and controls of your KEPLUG Sunrise Alarm Clock.

Image 2.1: Devant view of the KEPLUG Sunrise Alarm Clock, showing the digital time display and the illuminated light panel. The clock face is round with a white base.
Boutons et ports de commande :
Refer to the diagram below for button identification (exact button layout may vary slightly by model, but functions are consistent).
- Bouton de réglage de l'heure : Permet d'accéder au mode de réglage de l'heure.
- Bouton Alarme 1 : Utilisé pour régler et activer l'alarme 1.
- Bouton Alarme 2 : Utilisé pour régler et activer l'alarme 2.
- Bouton radio FM : Activates and controls FM radio functions.
- Bouton lumineux : Controls the light brightness and color modes.
- Boutons de volume +/- : Règle le volume sonore.
- Boutons haut/bas : Permet de naviguer dans les menus et d'ajuster les valeurs.
- Snooze/Sleep Aid Button: Activates snooze during an alarm or sleep aid function.
- Port de charge USB: Pour recharger des appareils externes.
- Entrée d'alimentation micro USB : Se connecte à l'adaptateur secteur.
3. Installation
3.1 Connexion d'alimentation
- Connect the micro USB cable to the power input port on the back of the alarm clock.
- Branchez l'adaptateur mural sur une prise électrique standard.
- L'écran s'allumera, indiquant que l'appareil est sous tension.
The clock includes a built-in backup battery to retain settings during power outages or disconnections.
3.2 Réglage de l'heure
- Appuyez sur le Bouton de réglage de l'heure (often represented by a clock icon). The hour display will start flashing.
- Utilisez le Boutons haut/bas pour régler l'heure.
- Appuyez sur le Bouton de réglage de l'heure again to confirm the hour and move to minute setting. The minute display will flash.
- Utilisez le Boutons haut/bas pour régler les minutes.
- Appuyez sur le Bouton de réglage de l'heure a third time to confirm the minutes.
- Pour basculer entre le format 12 heures et le format 24 heures, appuyez sur la touche correspondante. Boutons haut/bas while the time is flashing during setup, or refer to the specific instructions in your manual for a dedicated time format button.
3.3 Luminosité de l'affichage de l'heure
The time display offers three brightness settings: High, Low, and Off. This can typically be adjusted by repeatedly pressing a dedicated display brightness button or by holding the Time Setting button. Refer to your specific model's instructions for exact control.
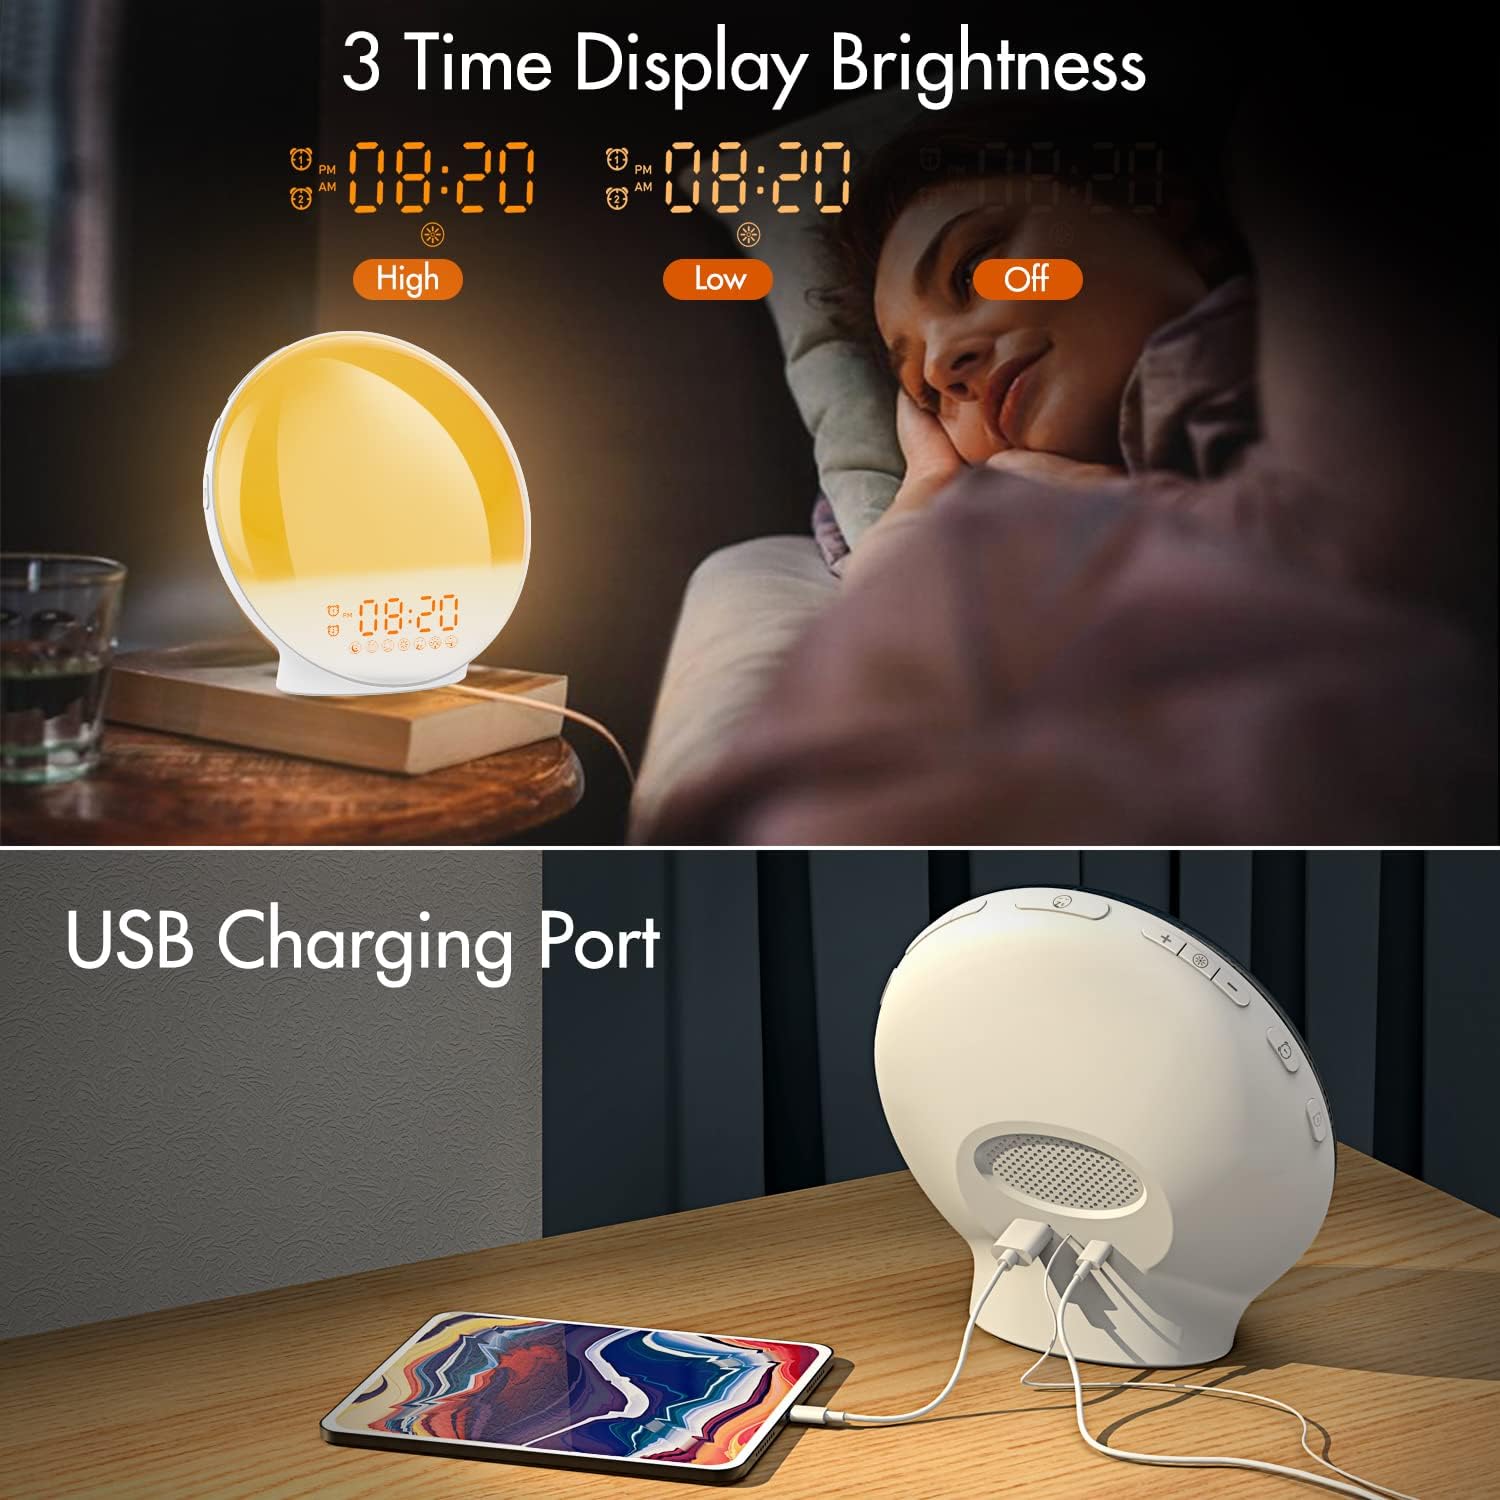
Image 3.1: Illustration of the three time display brightness options: High, Low, and Off, allowing users to customize visibility for different times of day or night.
4. Mode d'emploi
4.1 Réglage des alarmes (Alarme 1 et Alarme 2)
The clock features two independent alarms, allowing for separate wake-up times (e.g., weekday and weekend).

Image 4.1: Depiction of the dual alarm functionality, allowing users to set different alarms for weekdays and weekends, along with the snooze feature.
- Appuyez sur le Bouton d'alarme 1 (ou Bouton d'alarme 2) to activate and enter alarm setting mode. The alarm time will flash.
- Utilisez le Boutons haut/bas pour régler l'heure d'alarme souhaitée.
- Appuyez sur le Bouton d'alarme again to confirm the hour and set the minutes.
- Utilisez le Boutons haut/bas pour régler la durée de l'alarme souhaitée (en minutes).
- Appuyez sur le Bouton d'alarme again to select the wake-up sound. Use Boutons haut/bas to cycle through 7 nature sounds or FM radio.
- Appuyez sur le Bouton d'alarme again to set the volume level (1-16) for the alarm sound. Use Boutons haut/bas s'ajuster.
- Appuyez sur le Bouton d'alarme one last time to confirm all settings and activate the alarm. An alarm icon will appear on the display.
4.2 Fonction de répétition
Lorsqu'une alarme retentit, appuyez sur Le bouton de la sieste (often the large button on top or front) to pause the alarm for 9 minutes. This can be repeated up to 5 times.
4.3 Simulation du lever du soleil
The sunrise simulation gradually brightens the light before your alarm time, mimicking a natural sunrise.

Image 4.2: Visual representation of the sunrise simulation feature, where the light intensifies gradually over a set period before the alarm, designed for a gentle wake-up.
- When setting an alarm, after selecting the sound and volume, you will typically be prompted to set the sunrise duration.
- Utilisez le Boutons haut/bas to choose a duration between 10 to 60 minutes. The light will gradually increase from 0% to the set brightness level (0-20) during this period.
- The light color will transition from deep red to bright yellow, simulating a natural sunrise.
4.4 Simulation de coucher de soleil / Aide au sommeil
The sunset simulation gradually dims the light and can play soothing sounds to help you fall asleep.

Image 4.3: Illustration of the sunset simulation, where the light gradually dims over a period of 10 to 120 minutes, accompanied by optional sleep sounds like rain, forest, river, or FM radio.
- Appuyez sur le Snooze/Sleep Aid Button (or a dedicated Sleep Aid button) to activate the sleep aid function.
- Utilisez le Boutons haut/bas to select a duration for the dimming process (10-120 minutes).
- You can also select a natural sound (Rain, Forest, River) or FM radio to play during this period.
- The light will gradually dim from 100% to 0% over the selected duration, and the sound will fade out.
4.5 Radio FM
The built-in FM radio allows you to listen to your favorite stations or use them as an alarm sound.

Image 4.4: Surview of the 7 available alarm sounds and the FM radio option, providing diverse choices for waking up.
- Appuyez sur le Bouton radio FM pour allumer/éteindre la radio.
- Tenez le Bouton radio FM pour scanner et enregistrer automatiquement les stations disponibles.
- Utilisez le Boutons haut/bas to manually tune to a specific frequency or cycle through saved stations.
- Réglez le volume à l'aide de la Boutons de volume +/-.
4.6 Night Light / Color Light
The clock can function as a night light with various color options and adjustable brightness.

Image 4.5: Display of the 7 color atmosphere light options and 20 brightness levels, highlighting the clock's versatility as a mood light or reading lamp.
- Appuyez sur le Bouton lumineux pour allumer la lumière.
- Appuyez sur le Bouton lumineux repeatedly to cycle through 7 static colors (e.g., Red, Green, Blue, Yellow, Indigo, Purple, White) or an automatic color-changing mode.
- Utilisez le Boutons haut/bas to adjust the brightness level (0-20) of the selected color or white light.
- Tenez le Bouton lumineux pour éteindre la lumière.
4.7 ports de chargement USB
A 5V/2.4A USB port is located on the back of the device, allowing you to charge your smartphone or other small electronic devices.
Image 4.6: Arrière view of the alarm clock showing the USB charging port in use, connected to a tablet for charging.
5. Entretien
- Nettoyage: Essuyez l'appareil avec un chiffon doux et sec. N'utilisez pas de nettoyants abrasifs ni de solvants.
- Stockage: Rangez l'appareil dans un endroit frais et sec lorsqu'il n'est pas utilisé pendant une période prolongée.
- Pouvoir: Always use the provided power adapter to prevent damage.
6. Dépannage
| Problème | Cause possible | Solution |
|---|---|---|
| L'horloge ne s'allume pas. | Adaptateur secteur non connecté ou défectueux. | Ensure the power adapter is securely connected to both the clock and a working power outlet. Try a different outlet. |
| L'alarme ne sonne pas. | Alarme non activée ou volume trop faible. | Vérifiez si l'icône d'alarme s'affiche. Réinitialisez l'alarme et assurez-vous que le volume est suffisamment élevé. |
| La simulation du lever de soleil ne fonctionne pas. | La durée du lever du soleil n'a pas été définie lors de la configuration de l'alarme. | Ensure you have set a sunrise duration (10-60 minutes) when configuring the alarm. |
| Réception FM médiocre ou parasites. | Weak signal or antenna position. | Extend the antenna wire fully. Reposition the clock to improve reception. Perform an auto-scan for stations. |
| Le chargement USB ne fonctionne pas. | Appareil incompatible ou câble défectueux. | Ensure the device you are charging is compatible with 5V/2.4A USB charging. Try a different USB cable. |
7. Spécifications
- Marque: KÉPLUG
- Modèle: B09FRY71NH
- Dimensions du produit : 16 x 16 x 6.1 cm
- Poids de l'article : 481 g
- Voltage: 5 volts
- Source d'alimentation : Alimenté par batterie (avec adaptateur secteur)
- Type d'affichage : Numérique
- Caractéristiques spéciales : Charging Port, Dimmable Light, Sunrise/Sunset Simulation, Dual Alarm, FM Radio, Nature Sounds
- Date de mise en ligne sur Amazon : 12 novembre 2021
8. Garantie et assistance
For warranty information or technical support, please refer to the contact details provided with your purchase documentation or visit the official KEPLUG webConsultez le site. Conservez votre reçu d'achat comme preuve d'achat.