1. Introduction
Thank you for choosing the Aigostar Retro Desk LampCe manuel fournit les informations essentielles pour une utilisation sûre et efficace de votre nouveau lampVeuillez lire attentivement ces instructions avant le montage et l'utilisation, et conservez-les pour toute consultation ultérieure.

Figure 1: Aigostar Retro Desk Lamp utilisé.
2. Contenu du colis
Ensure all components are present and undamaged before proceeding with assembly. If any parts are missing or damaged, please contact customer support.
- Lamp Base
- Adjustable Wooden Arm Assembly
- Lamp Shade with E27 Socket
- Cordon d'alimentation avec interrupteur marche/arrêt
- Manuel d'utilisation
Remarque : L'ampoule n'est pas incluse et doit être achetée séparément.
3. Instructions de configuration
The Aigostar Retro Desk Lamp is designed for tool-free setup. Follow these steps to assemble your lamp:
- Déballer les composants : Retirez soigneusement toutes les pièces de l'emballage.
- Placer la base : Positionnez le lamp base sur une surface stable et plane.
- Attach Arm Assembly: The wooden arm assembly is pre-attached to the base and lamp head. Ensure all joints are securely tightened.
- Installez l'ampoule : Screw an E27 base bulb (maximum 40W) into the lamp douille. Ne pas trop serrer.
- Connecter l'alimentation : Branchez le cordon d’alimentation sur une prise électrique adaptée.

Figure 2: Tool-free setup for quick assembly.
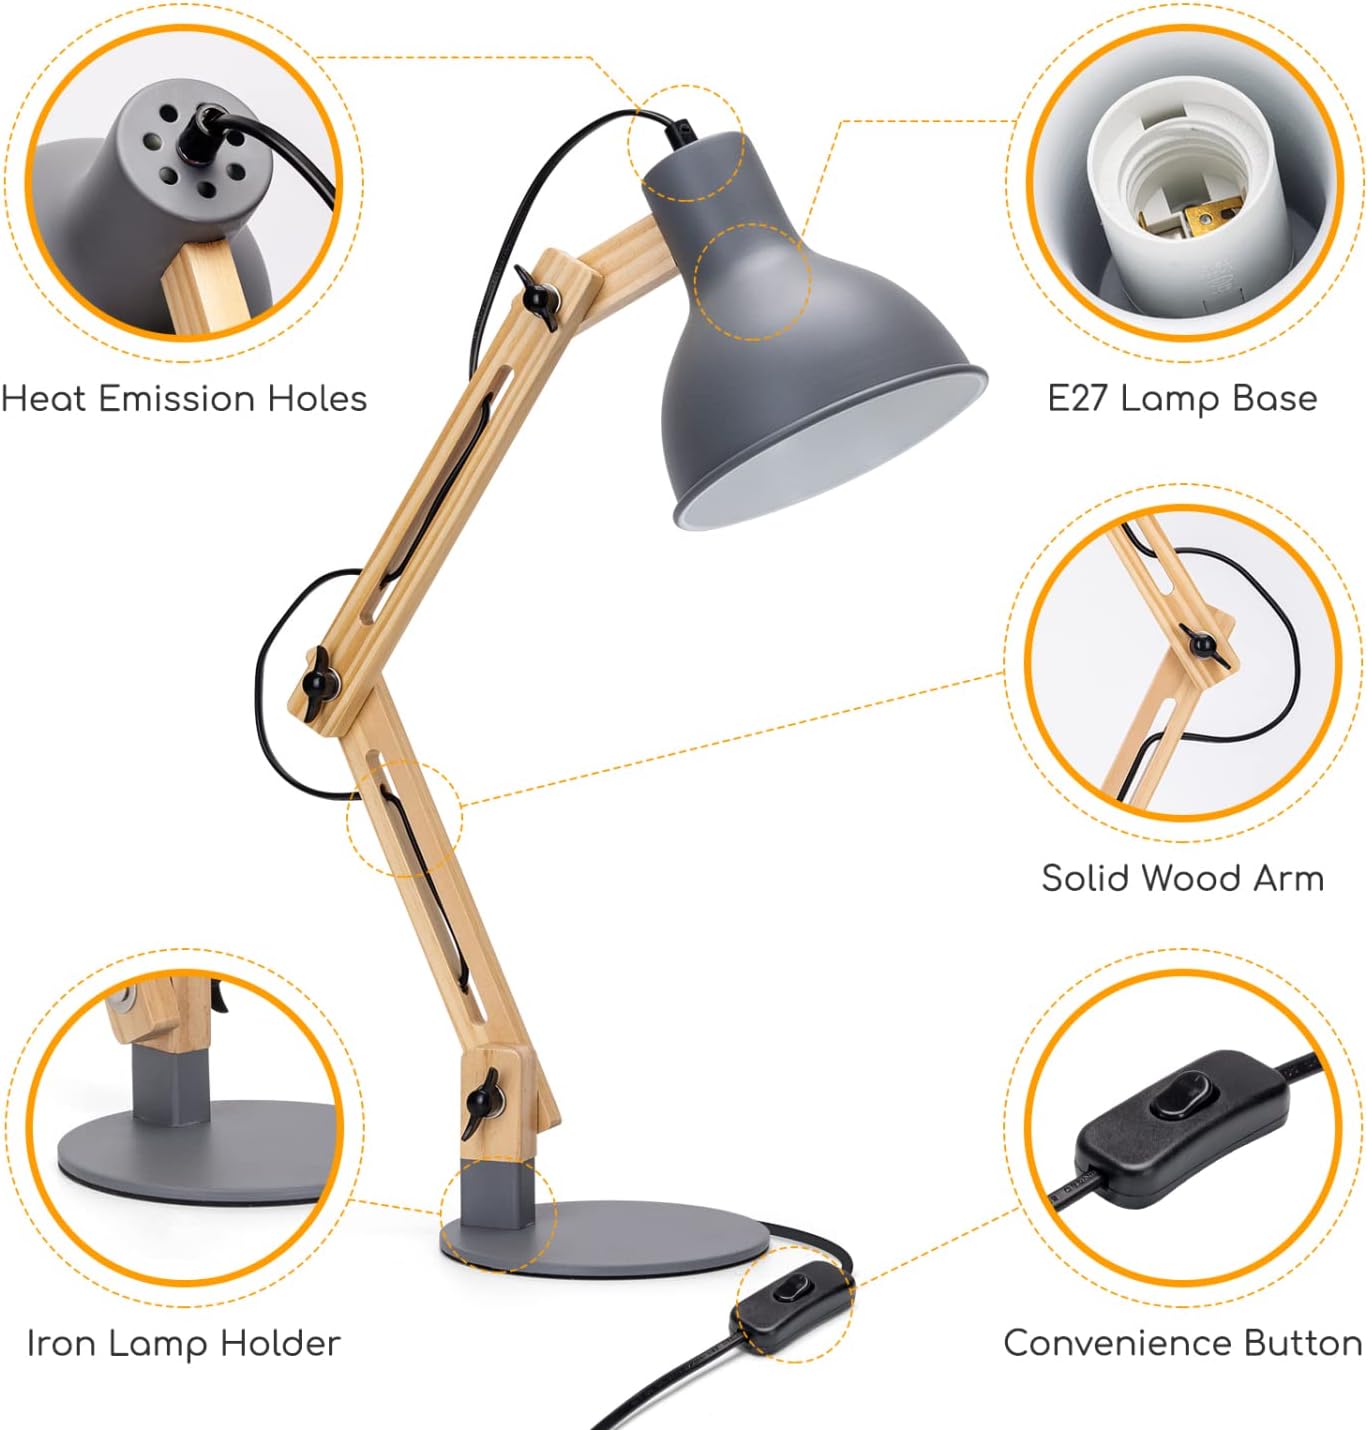
Figure 3 : Plusview de moiamp composants.

Figure 4 : Lamp dimensions and bulb specifications.
4. Mode d'emploi
Your Aigostar Retro Desk Lamp is designed for ease of use and flexibility.
4.1 Allumer/Éteindre
Locate the convenience button (switch) on the power cord. Press the switch to turn the lamp allumé ou éteint.
4.2 Réglage du Lamp Bras
Le lamp features a swivel hinge arm and multiple adjustable joints, allowing you to direct light precisely where needed. Gently loosen the wing nuts at the joints, adjust the arm to your desired position, and then tighten the wing nuts to secure it.
- Le lamp head can rotate up to 210 degrees.
- The upper arm can adjust by 60 degrees.
- The lower arm can adjust by 15 degrees.

Figure 5: Demonstrating the adjustable design of the lamp.

Figure 6: Specific adjustment angles for optimal light positioning.
5. Entretien
5.1 Nettoyage
Pour nettoyer le lamp, ensure it is unplugged from the power outlet. Use a soft, dry cloth to wipe down the surfaces. Do not use abrasive cleaners or solvents, as these may damage the finish.
5.2 Remplacement d'ampoule
Before replacing the bulb, always unplug the lamp and allow the old bulb to cool completely. Unscrew the old E27 bulb and screw in a new E27 bulb, ensuring it does not exceed 40W. Refer to Figure 4 for bulb specifications.
6. Dépannage
- Lamp ne s'allume pas :
- Check if the power cord is securely plugged into the wall outlet.
- Ensure the bulb is correctly screwed into the socket and is not burnt out.
- Verify that the on/off switch on the power cord is in the 'on' position.
- La lumière vacille :
- Visser l'ampoule dans la douille.
- Essayez une autre ampoule pour éliminer la possibilité qu'elle soit défectueuse.
- Lamp arm is loose:
- Tighten the wing nuts at the adjustable joints to secure the arm in place.
7. Spécifications
| Fonctionnalité | Spécification |
|---|---|
| Numéro de modèle | 218188 |
| Dimensions du produit (P x L x H) | 16 P x 16 L x 45.5 H cm |
| Poids de l'article | 1.38 kilogrammes |
| Couleur | Gris |
| Matériau de base | Bois |
| LampMatériau de l'abat-jour | Fer |
| Lamp Douille | E27 |
| Max Vattage | 40.00 W |
| Type de commutateur | Touch (Inline Switch) |
| Caractéristiques spéciales | Bras réglable |
| Source d'énergie | Électrique avec fil |
| Utilisation intérieure/extérieure | Intérieur |
| Pays d'origine | Chine |
8. Garantie et assistance
For warranty information or technical support, please refer to the documentation provided with your purchase or contact Aigostar customer service directly. Keep your purchase receipt as proof of purchase.


