1. Consignes de sécurité
Avertissement: Not suitable for children under 3 years. Contains small parts that could be swallowed.
Always operate the vehicle in a safe environment, away from people, pets, and obstacles. Do not operate near public roads or water bodies. Adult supervision is recommended for younger users.
2. Introduction
The Amewi Climbing Beast 22529 is a 1:10 scale 4WD remote-controlled crawler designed for off-road use. It features a powerful motor, oversized tires, and bright LED lighting for visibility in low-light conditions. The vehicle's plastic frame is engineered to absorb impacts, while metal ball bearings, splash-proof electronics, and shock absorbers with metal springs contribute to its durability and performance. The 2.4 GHz pistol-grip remote control provides precise and responsive handling, allowing multiple vehicles to operate simultaneously without interference. This model comes Ready-to-Run (RTR), with all necessary components and batteries included.
3. Contenu du colis
Veuillez vous assurer que tous les éléments énumérés ci-dessous sont présents dans votre colis :
- Amewi Climbing Beast 22529 Crawler (Ready-to-Run)
- 2.4 GHz Pistol-Grip Remote Control
- 7.4 V 1500 mAh Lithium-Ion Battery
- Câble de chargement USB
- 4 x AA Mignon 1.5 V Batteries (for remote control)
- 12 x Spare Body Pins
- Instruction Manual (German/English)

Image: The Amewi Climbing Beast 22529 Crawler, its 2.4 GHz remote control, and included accessories, displayed with the product packaging.
4. caractéristiques du produit
- Oversized TPR Rubber Tires: Designed for maximum grip on various terrains including mud, rocky paths, and sand.
- Metal Ball Bearings: Ensures smoother operation and reduced wear on all drive components.
- Steel Suspension System: Provides precise chassis movement and maximum traction on uneven terrain.
- Système de suspension avancé : Enhances off-road performance and stability.
- Électronique résistante aux éclaboussures : Protects internal components from water splashes.
- Collision-Resistant Frame: Durable plastic frame designed to absorb impacts.
- Adjustable Steering Trim: Allows fine-tuning of steering for straight tracking.
- Éclairage LED avant et arrière : Improves visibility during low-light operation.
- Vitesse de pointe : Approximately 15 km/h.
- 2.4 GHz Pistol-Grip Remote Control: Offers precise control and allows multiple vehicles to operate simultaneously.
- Direction et accélérateur proportionnels : Provides adjustable and responsive control over speed and direction.
- Galerie de toit : Functional roof rack for carrying small items.
- Transmission intégrale (4WD) : Ensures superior traction and climbing capability.
5. Installation
5.1 Vehicle Battery Installation and Charging
- Carefully remove the vehicle's body shell by detaching the body pins.
- Localisez le compartiment à piles.
- Connect the included 7.4 V 1500 mAh Li-Ion battery to the vehicle's ESC (Electronic Speed Controller) connector.
- Place the battery securely in the battery compartment.
- To charge the battery, disconnect it from the vehicle. Connect the battery to the USB charging cable. Plug the USB cable into a suitable USB power source (e.g., computer USB port, USB wall adapter). The charging time is approximately 180-240 minutes. Do not leave charging unattended.
- Once charged, disconnect the battery from the charger and reconnect it to the vehicle. Replace the body shell and secure it with the body pins.

Image: The vehicle's chassis showing the battery securely placed in its compartment.

Image: The included USB charging cable, AA batteries for the remote control, and the 7.4V Li-Ion battery for the vehicle.
5.2 Installation des piles de la télécommande
- Open the battery compartment cover on the bottom of the 2.4 GHz remote control.
- Insert the 4 x AA Mignon 1.5 V batteries, ensuring correct polarity (+/-).
- Fermez soigneusement le couvercle du compartiment à piles.

Image: The 2.4 GHz pistol-grip remote control, showing its various controls and ergonomic design.
5.3 Couplage de la télécommande
The vehicle and remote control are typically pre-paired from the factory. If re-pairing is necessary:
- Ensure both the vehicle battery and remote control batteries are fully charged and correctly installed.
- Turn on the remote control first. The indicator light should flash.
- Turn on the vehicle. The indicator light on the vehicle's receiver should also flash.
- Wait a few seconds. The indicator lights on both the remote control and the vehicle should become solid, indicating a successful connection.
- Si l'appairage échoue, éteignez les deux appareils et répétez l'opération.
6. Fonctionnement
6.1 Contrôles de base
- Volant: Tournez le volant de la télécommande vers la gauche ou vers la droite pour diriger le véhicule.
- Gâchette d'accélérateur : Pull the trigger towards you to move forward. Push the trigger away from you to brake or reverse.
- Garniture de direction (ST.TRIM) : Adjust this dial to ensure the vehicle drives straight when the steering wheel is centered.
- Garniture des gaz (TH.TRIM) : Réglez cette molette pour que le véhicule reste immobile lorsque la gâchette d'accélérateur est en position neutre.
- Interrupteur d'alimentation (ON/OFF) : Allume ou éteint la télécommande.
Image: The remote control, highlighting the steering wheel, throttle trigger, and trim adjustments.
6.2 Driving Guidelines
- Commencez par vous entraîner dans un espace dégagé et ouvert pour vous familiariser avec les commandes.
- Avoid driving in deep water, as while the electronics are splash-proof, the vehicle is not fully waterproof.
- Be mindful of the vehicle's range (approximately 60 meters) to maintain control.
- The LED lights can be used for driving in low-light conditions, but ensure sufficient visibility for safe operation.
- When driving on challenging terrain, use gentle throttle and steering inputs to maintain traction and avoid rollovers.
7. Entretien
7.1 Nettoyage
- After each use, especially after driving in dirt or mud, clean the vehicle.
- Use a soft brush or compressed air to remove loose dirt and debris from the chassis, wheels, and suspension components.
- Essuyez la carrosserie avec un chiffon humide.amp tissu. Évitez d'utiliser des produits chimiques ou des solvants agressifs.
7.2 Stockage
- Always remove the batteries from both the vehicle and the remote control before storing.
- Entreposez le véhicule dans un endroit frais et sec, à l'abri de la lumière directe du soleil et des températures extrêmes.
- Ensure the Li-Ion battery is stored at a partial charge (around 50%) for optimal longevity.
7.3 Entretien des composants
- Metal Ball Bearings: Periodically inspect and clean the metal ball bearings. Lubricate them with appropriate RC bearing oil if necessary to ensure smooth operation and prevent wear.
- Électronique résistante aux éclaboussures : While designed to resist splashes, avoid submerging the vehicle in water. If the electronics get wet, allow them to dry completely before operating again.
- Suspension: Check the shock absorbers and springs for any damage or debris that might hinder their movement.
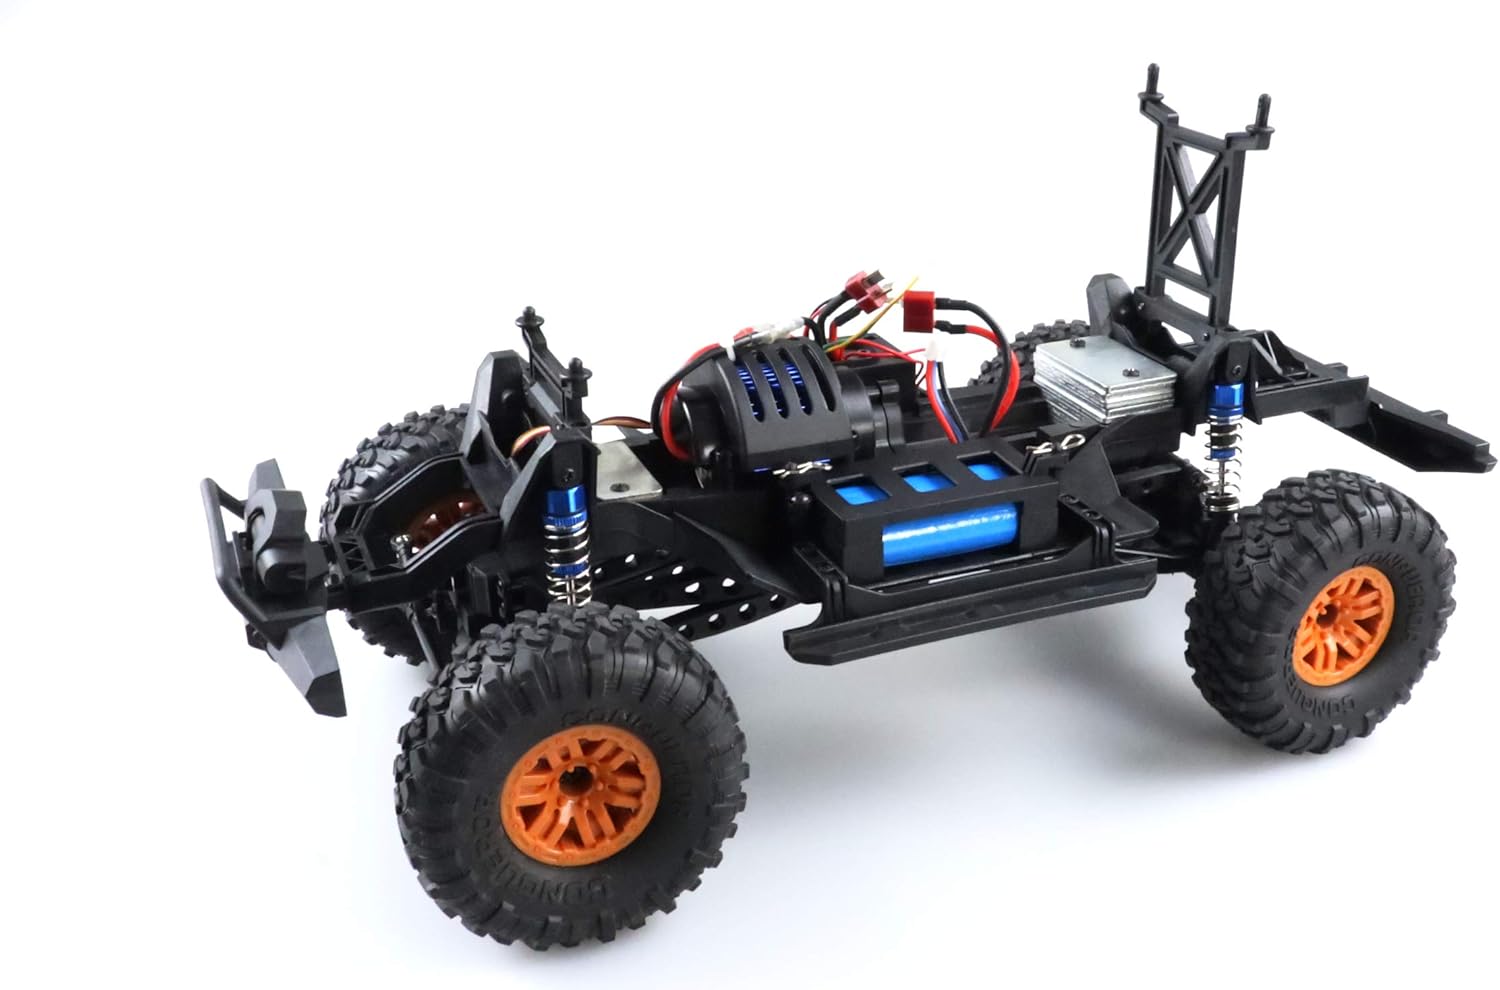
Image: The vehicle's chassis, illustrating the suspension, wheels, and drive components.

Image : Une image détaillée view of the vehicle's internal electronics, including the ESC and wiring.
8. Dépannage
| Problème | Cause possible | Solution |
|---|---|---|
| Le véhicule ne répond pas à la télécommande. | Low battery in vehicle or remote control; Not paired; Power switch off. | Charge/replace batteries; Re-pair remote control and vehicle; Ensure power switches are ON. |
| Vehicle drives erratically or loses signal. | Hors de portée ; Interférences ; Batterie faible. | Bring vehicle closer to remote control; Avoid areas with strong interference; Charge/replace batteries. |
| Le véhicule ne roule pas droit. | Le réglage de la direction est nécessaire. | Adjust the ST.TRIM dial on the remote control until the vehicle tracks straight. |
| Vehicle moves slightly when throttle is neutral. | Throttle trim needs adjustment. | Adjust the TH.TRIM dial on the remote control until the vehicle remains stationary. |
| Durée d'exécution réduite. | Battery not fully charged; Old battery; Heavy driving conditions. | Ensure battery is fully charged; Consider replacing old battery; Drive more conservatively. |
9. Spécifications techniques
| Fonctionnalité | Spécification |
|---|---|
| Échelle | 1:10 |
| Longueur | 475 mm |
| Largeur | 200 mm |
| Hauteur | 235 mm |
| Poids (avec batterie) | 2055 g |
| Empattement | 255 mm |
| Voie avant/arrière | 170 mm |
| Garde au sol | 27 mm |
| Roues (avant/arrière) | 96/35 mm |
| Diamètre de la jante | 44 mm |
| Frein | Électronique |
| Contrôleur | All-in-One unit |
| Moteur | 540 brossé |
| Système d'entraînement | 4WD |
| Servo de direction | Midi size 5-pin |
| Matériau principal | Plastique |
| Dimensions du compartiment de la batterie | 69 x 35 x 17 mm |
| Batterie de véhicule | Li-Ion, 2S, 7.4 V 1500 mAh, Dean connector |
| Vehicle Battery Dimensions | 68 x 34 x 16 mm |
| Vehicle Battery Weight | 87 g |
| Battery Balance Connector | XH |
| Durée d'exécution | Environ 20 min |
| Vitesse maximale | Environ. 15 km/h |
| Type de télécommande | Pistol-grip, 2.4 GHz |
| Portée de la télécommande | 60 m |
| Chargeur | Câble de chargement USB |
| Temps de charge | 180-240 min |
| Âge recommandé | 8 ans et plus |
| Couleur | Noir/Orange |
10. Garantie et assistance
Pour toute information relative à la garantie et à l'assistance technique, veuillez consulter les coordonnées fournies par votre revendeur ou le site officiel du fabricant. website. Keep your proof of purchase for any warranty claims. Information regarding spare parts availability is not provided in this manual.


