1. Introduction et plusview
The ToolkitRC M8S is a highly versatile and powerful smart charger and discharger designed for a wide range of battery types commonly used in remote-controlled (RC) applications, including drones, cars, and boats. Beyond its primary charging and discharging capabilities, the M8S integrates several essential tools such as a servo tester, cell tester, wattmeter, PWM/PPM/Sbus input/output generators, and a variable DC output control. Its intuitive interface, displayed on a vibrant 2.4-inch TFT color LCD screen, ensures ease of use for both hobbyists and professionals.

Illustration 1.1 : Avant view of the ToolkitRC M8S Smart Charger, showing its 2.4-inch TFT color LCD screen with main menu options for Charger, Measurer, Output, and Settings. A rotary knob and OK/Exit buttons are visible on the right.

Image 1.2 : Inclinée view of the ToolkitRC M8S Smart Charger, highlighting the screen interface and the output ports on the right side, including the main XT60 output and balance port.
2. Consignes de sécurité
WARNING: Failure to follow these safety instructions can result in fire, property damage, or injury.
- Utilisez toujours le chargeur dans un endroit bien ventilé, à l'écart des matériaux inflammables.
- Do not charge batteries that are damaged, swollen, or leaking. Dispose of such batteries properly.
- Ensure correct polarity when connecting batteries to the charger. Incorrect connections can cause damage to the charger or battery.
- Never leave the charger unattended while it is in operation.
- Gardez le chargeur à l’abri de l’eau, de l’humidité et des températures extrêmes.
- This device is not a toy. Keep out of reach of children. Adult supervision is required during operation.
- Use only the recommended power supply for the charger.
- Évitez de court-circuiter les bornes de sortie.
3. Contenu du colis
Upon opening the package, please verify that all components are present and in good condition. If any items are missing or damaged, contact your retailer immediately.
- ToolkitRC M8S Smart Charger Unit
- Manuel d'instructions (ce document)
- (Note: Power supply and charging cables are typically sold separately unless specified by your retailer.)

Image 3.1: The ToolkitRC M8S Smart Charger unit displayed alongside its retail packaging box, indicating the product's compact size.
4. caractéristiques du produit
The ToolkitRC M8S is engineered with advanced features to provide comprehensive battery management and diagnostic capabilities:
- Compatibilité étendue avec les batteries : Supports LiPo, LiHV, LiFe, Lion (1-8S), NiMh (1-20S), and Pb (1-12S) battery types.
- Puissance de sortie élevée : Capable of charging and discharging at 0.1-18A with a maximum charge power of 400W.
- Outils multifonctionnels :
- Balance Charge: Ensures even cell voltage for optimal battery health.
- Measurer: Functions as a cell voltage checker.
- Watt Meter: Measures power consumption and output.
- Servo Tester: Tests servo functionality.
- PWM/PPM/Sbus Input/Output Generators: For testing and generating control signals.
- DC Output Control: Provides a variable voltage and current DC power supply.
- Affichage vif : Features a 2.4-inch TFT color LCD screen for clear and detailed information display.
- Interface utilisateur intuitive: All-new UI designed for simple interaction and easy navigation.
- Prise en charge multilingue : System supports multiple languages for global users.
- Système de refroidissement optimisé : Efficient heat dissipation for reliable high-power operation.
- Conception compacte : Portable dimensions of 98 x 68 x 35 mm.

Image 4.1: A visual representation of the ToolkitRC M8S's multifunctional capabilities, including Balance Charge, Measurer, Watt Meter, Annunciator, Drone Adapter, and Signal Tester.

Image 4.2: The ToolkitRC M8S display showing various language options, indicating its multi-language support for users worldwide.

Image 4.3: An internal diagram of the ToolkitRC M8S, illustrating its optimized cooling system designed for efficient heat dissipation during high-power operation.
5. Installation
Follow these steps to set up your ToolkitRC M8S Smart Charger:
- Connectez l'alimentation : Connect a DC power supply (7-30V) to the input ports on the back of the charger. Ensure the polarity is correct (+ to + and - to -).
- Mise sous tension : Once the power supply is connected, the charger will automatically power on and display the main menu.
- Connectez la batterie : For charging or discharging, connect your battery to the appropriate output ports on the side of the charger. For LiPo/LiHV/LiFe/Lion batteries, connect both the main discharge lead (XT60) and the balance lead to the corresponding ports.
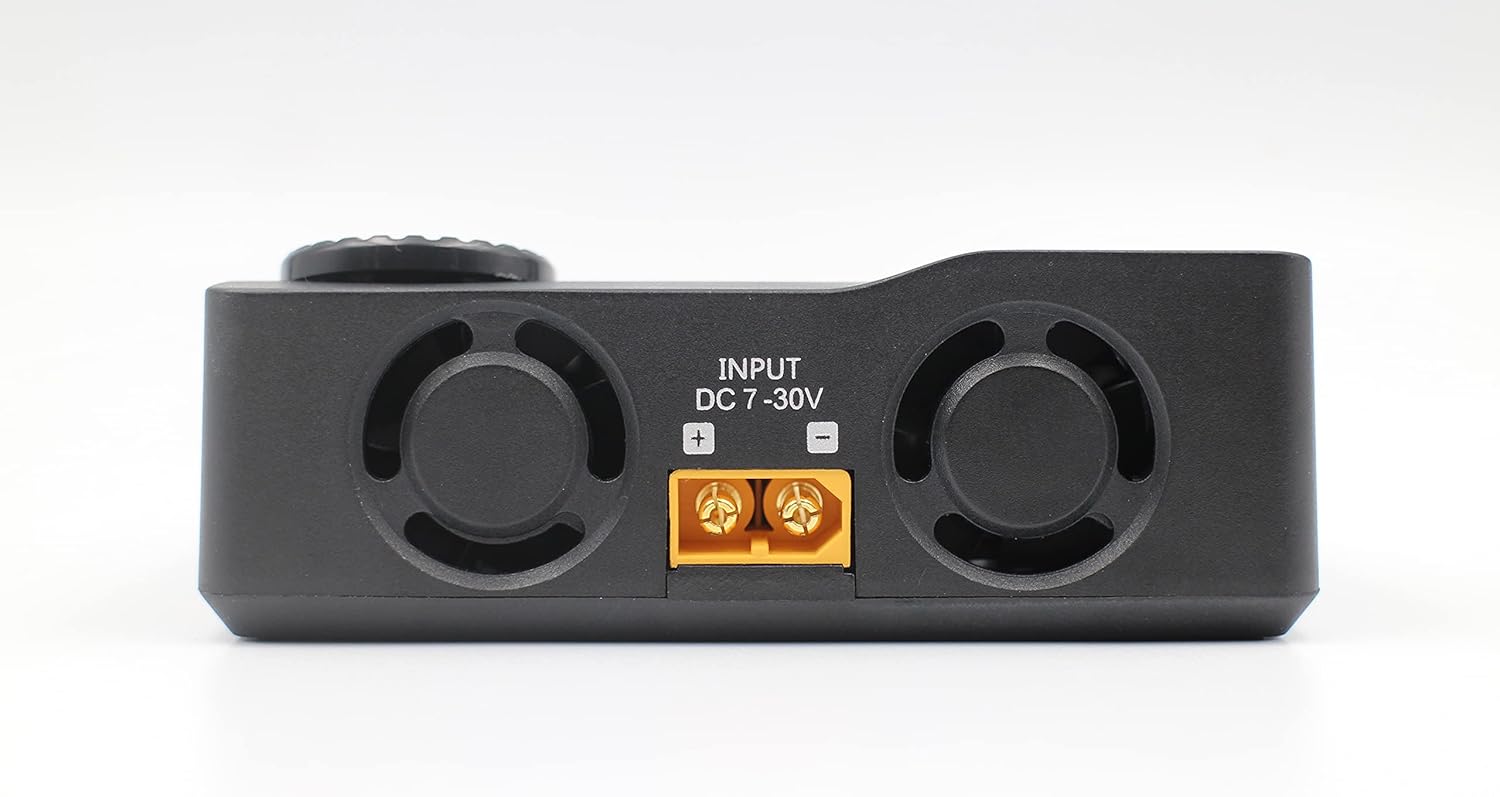
Image 5.1 : Arrière view of the ToolkitRC M8S Smart Charger, clearly showing the DC 7-30V input ports with positive and negative terminals for power connection.

Image 5.2 : Côté view of the ToolkitRC M8S Smart Charger, displaying the main XT60 output port and the 2-8S balance port for connecting batteries.
6. Mode d'emploi
The M8S features a user-friendly interface controlled by a rotary knob and two buttons (OK and EXIT).

Image 6.1: A close-up of the ToolkitRC M8S screen, showing the main menu with the 'Charge' option highlighted, indicating readiness for battery charging operations.
6.1. Navigation
- Bouton rotatif: Rotate to scroll through menu options or adjust values.
- Bouton OK : Appuyez pour confirmer une sélection ou accéder à un sous-menu.
- Bouton QUITTER : Press to go back to the previous menu or cancel an operation.
6.2. Charger une batterie
- Dans le menu principal, sélectionnez "Charger" et appuyez sur OK.
- Select the battery type (e.g., LiPo, LiHV, NiMh) and the number of cells (S).
- Adjust the desired charge current (Amps) et voltage (le cas échéant).
- Confirm settings and start the charging process. The screen will display real-time charging data.
6.3. Using Other Functions
- Measurer: Sélectionner "Measurer" pour vérifier le volume cellulaire individueltages, volume totaltage, and internal resistance of your battery.
- Sortir: Sélectionner "Output" to use the M8S as a variable DC power supply or to test PWM/PPM/Sbus signals.
- Paramètres: Sélectionner "Paramètres" to configure system parameters such as language, backlight, and sound.

Image 6.2: A composite image showcasing the ToolkitRC M8S's new user interface, displaying various screens including the main menu, a charging progress screen, and a PWM/PPM/Sbus signal testing screen.
7. Entretien
Proper maintenance ensures the longevity and optimal performance of your ToolkitRC M8S charger.
- Nettoyage: Utilisez un chiffon doux et sec pour nettoyer l'extérieur du chargeur. N'utilisez pas de nettoyants liquides ni de solvants.
- Stockage: Rangez le chargeur dans un endroit frais et sec, à l'abri de la lumière directe du soleil et des températures extrêmes lorsqu'il n'est pas utilisé.
- Ventilation: Ensure the ventilation openings are clear of dust and debris to maintain efficient cooling.
- Mises à jour du micrologiciel : Periodically check the ToolkitRC official website for any available firmware updates to ensure your charger has the latest features and bug fixes.
8. Dépannage
If you encounter issues with your M8S charger, refer to the following common problems and solutions:
| Problème | Cause possible | Solution |
|---|---|---|
| Le chargeur ne s'allume pas. | No power supply, incorrect power supply voltage, loose connection. | Vérifiez la connexion de l'alimentation et le volume.tage (7-30V DC). Ensure connections are secure. |
| Batterie non détectée. | Incorrect battery connection, damaged battery, wrong battery type selected. | Verify main and balance lead connections. Check battery health. Ensure correct battery type and cell count are selected in settings. |
| Message d'erreur de chargement. | Vol batterietage too low/high, internal resistance too high, short circuit. | Vérifiez le volume de la batterietage. Inspect battery and cables for damage. Reduce charge current if battery is old or has high internal resistance. |
| L'écran ne répond pas ou est figé. | Problème logiciel temporaire. | Disconnect power, wait a few seconds, then reconnect to restart the charger. |
If the problem persists after attempting these solutions, please contact ToolkitRC customer support or your retailer for further assistance.
9. Spécifications
| Fonctionnalité | Détail |
|---|---|
| Modèle | M8S |
| Vol d'entréetage | DC 7-30V |
| Courant de charge | 0.1-18A |
| Courant de décharge | 0.1-5A (Max 20W) |
| Puissance de charge maximale | 400 W |
| Types de batteries pris en charge | LiPo/LiHV/LiFe/Lion (1-8S), NiMh (1-20S), Pb (1-12S) |
| Solde actuel | Max 1A |
| Afficher | Écran LCD couleur TFT de 2.4 pouces |
| Dimensions | 98 x 68 x 35 mm |
| Poids | 255g |
| Code UPC | 729974629191 |

Image 9.1: A detailed specifications table for the ToolkitRC M8S, outlining input, charge/discharge parameters, supported battery types, and other technical data.
10. Garantie et assistance
ToolkitRC products are manufactured to high quality standards. For warranty information, please refer to the warranty card included with your product or visit the official ToolkitRC webConsultez le site. Conservez votre reçu d'achat comme preuve d'achat pour toute réclamation au titre de la garantie.
For technical support, troubleshooting assistance beyond this manual, or inquiries about spare parts, please contact your authorized ToolkitRC dealer or the manufacturer directly through their official support channels.
Officiel Website: www.toolkitrc.com (Remarque : ceci est un espace réservé) URL. Refer to your product packaging or official documentation for the correct webplacer.)


