1. Introduction
Merci pour votre achatasing the TAMIYA 1/10 R/C TA08 PRO Chassis Kit. This kit is designed for enthusiasts seeking a high-performance 2 belt-driven 4WD touring car chassis. This manual provides essential information for the assembly, setup, operation, and maintenance of your TA08 PRO chassis. Please read this manual thoroughly before beginning assembly or operation to ensure correct usage and to maximize the performance and longevity of your model.
2. Consignes de sécurité
Respectez toujours les consignes de sécurité suivantes afin d'éviter les blessures ou d'endommager le produit :
- This product is not a toy. It is intended for experienced R/C hobbyists.
- Gardez les petites pièces hors de portée des enfants pour éviter tout risque d'étouffement.
- Utilisez toujours les outils appropriés et suivez attentivement les étapes d'assemblage.
- Ensure all electronic components (motor, ESC, receiver, battery) are correctly connected and insulated.
- Operate the R/C car in open, safe areas away from people, pets, and obstacles.
- Do not operate in wet conditions or near water to avoid damage to electronics.
- Always disconnect the battery when not in use or during maintenance.
3. Contenu du colis
The TAMIYA TA08 PRO Chassis Kit includes the following main components:
- TA08 PRO Chassis Frame (Stepped-V shaped main chassis)
- 2 Belt-Driven 4WD System components
- TRF420 Oil-Filled Gear Differentials
- Steel TA07 Differential Joint Cups
- A-arm Suspension Arms
- Super Short Big Bore (SSBB) Shock Damples
- Universal Drive Shafts
- Full Ball Bearings
- 10-spoke wheels (Gunmetal color)
- Assembly hardware and small parts
Note: Body, motor, tires, R/C equipment (transmitter, receiver, servo, ESC), and battery are non inclus in this kit and must be purchased separately.

Figure 3.1: Assembled TA08 PRO Chassis Kit. Note that the body, motor, tires, R/C equipment, and battery are not included. 10-spoke wheels (gunmetal) are included.
4. Assemblage et configuration
4.1 Chassis Layout and Rigidity
The TA08 PRO features a unique chassis layout that eliminates the need for an upper deck, balancing weight and rigidity. The battery pack and servo are positioned at a slight angle (approximately 10 degrees) to minimize surface contact during cornering and optimize weight distribution. This design contributes to appropriate pitching (longitudinal) and rolling (lateral) rigidity.

Figure 4.1 : Côté view of the chassis layout. The design, without an upper deck, allows for tilting of battery and mechanical components to optimize the center of gravity, reducing overall height, width, and weight, while achieving balanced pitching and rolling rigidity.
4.2 V-Shaped Carbon Fiber Reinforced Resin Chassis
The chassis utilizes a V-shaped bottom and carbon fiber reinforced resin construction. This ensures high rigidity even without an upper deck. The balance of longitudinal (pitching) and lateral (rolling) rigidity has been optimized for performance. The front part of the rear suspension is designed to mount the suspension bushes directly to the chassis.

Figure 4.2 : Vue de dessus view of the V-shaped carbon fiber reinforced resin chassis. The V-shape and material ensure rigidity and optimized pitching and rolling balance.
4.3 Optimized Weight Balance
Mounting the battery and R/C equipment in a V-shape optimizes the weight balance. This design contributes to a low overall height, width, and weight, enabling high driving performance on relatively low-grip surfaces, especially within Tamiya Challenge Cup regulations.

Figure 4.3 : Haut view illustrating the V-shaped placement of the battery and R/C equipment for optimal weight balance.
4.4 Slim Chassis and Bumper Design
The slim main chassis and distinctive bumper shape reduce interference with the road surface during rolling. The urethane bumper features strategically placed holes, and its shape is designed to facilitate airflow between the tires and bumper, further enhancing driving stability.

Figure 4.4 : Bas view highlighting the slim chassis and the 87mm width, along with the specially designed urethane bumper for improved stability.
4.5 Spur Gear Placement
The spur gear is strategically positioned in front of the motor. This minimizes the difference in front and rear belt lengths, resulting in stable machine behavior. A shorter belt length also reduces resonance even with looser tension, thereby reducing drive loss.

Figure 4.5 : Côté view showing the spur gear positioned in front of the motor, optimizing belt length and reducing drive loss.
4.6 New Suspension System
The new suspension system enhances rigidity and maximizes tire grip. It features A-type upper arms supported by ball joints. Compared to conventional upper arm suspension types, this design allows for easier load transfer to the tires, enabling solid tire grip even at Tamiya Challenge speeds and on relatively low-grip surfaces.

Figure 4.6: Detail of the front suspension, showcasing the new design with A-type upper arms and SSBB dampers for enhanced grip.
4.7 Rear Suspension with Toe Control
The rear suspension is equipped with a toe control function. The suspension mount is a hanging type, which increases rear rigidity and improves rear grip and driving stability. Both front and rear SSBB (Super Short Big Bore) dampers are utilized. The toe control function specifically enhances traction by allowing the suspension to sink during cornering.

Figure 4.7: Detail of the rear suspension, featuring the toe control function and SSBB dampers for improved stability and traction.
4.8 Cable Storage Box
A compact cable storage box is included to neatly organize the wiring for the servo, speed controller, and receiver. Keeping the R/C equipment area tidy helps prevent accidental problems and ensures a clean setup.
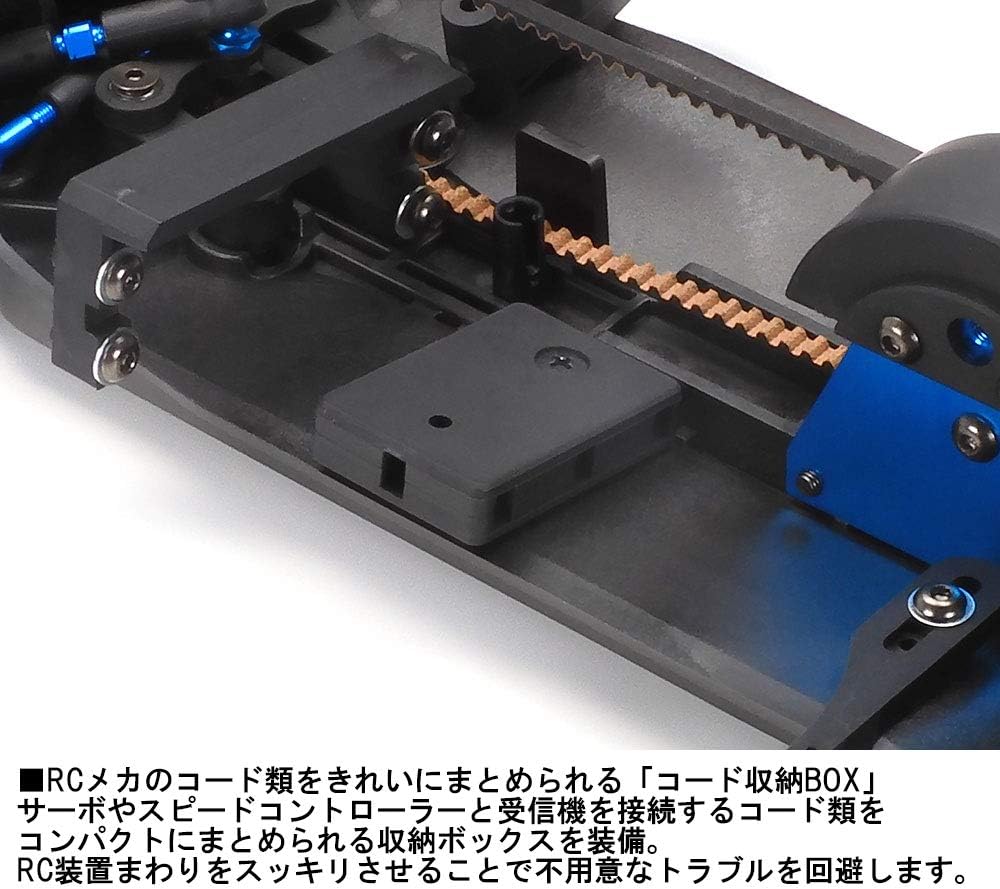
Figure 4.8: Close-up of the cable storage box, designed to keep R/C wiring organized and prevent issues.
5. Mode d'emploi
Once the chassis is fully assembled and all R/C equipment (motor, ESC, servo, receiver, battery, and transmitter) is installed and configured according to their respective manuals, you can begin operation. Ensure the battery is fully charged and the transmitter is properly bound to the receiver.
5.1 Pre-Run Checks
- Verify all screws are tightened and components are securely attached.
- Check steering and throttle response from the transmitter.
- Ensure wheels spin freely and suspension operates smoothly.
- Vérifiez que la batterie est complètement chargée et correctement installée.
5.2 Conseils de conduite
- Start with gentle throttle inputs to get a feel for the car's response.
- Practice steering in wide, open spaces before attempting tighter turns.
- Adjust camber and caster angles using turnbuckle shafts and lower arm spacers to fine-tune handling characteristics for different track conditions.
- Experiment with rotating body mounts (180 degrees) to switch between standard and 2mm advanced body positions, which allows for changing the car's balance with various bodies.
5.3 Relevant Videos
No official TAMIYA TA08 PRO assembly or operation videos were provided by the seller in the product data. Please refer to the detailed instruction manual included with your kit for step-by-step assembly and setup guides.
6. Entretien
Regular maintenance is crucial for the performance and longevity of your TA08 PRO chassis.
- Après chaque course : Clean the chassis of dirt and debris. Inspect for any loose screws or damaged parts.
- Périodiquement: Check the condition of the drive belts for wear or damage. Lubricate moving parts as recommended in the kit's detailed manual.
- Choc Dampers: Inspect SSBB shock dampers for leaks and ensure smooth operation. Refill with appropriate shock oil as needed.
- Roulements: Clean and lubricate ball bearings regularly to ensure smooth rotation and reduce friction.
- Différentiels : Check the TRF420 oil-filled gear differentials for smooth operation and proper fluid levels.
7. Dépannage
Cette section aborde les problèmes courants que vous pourriez rencontrer :
| Problème | Cause possible | Solution |
|---|---|---|
| La voiture ne répond pas aux commandes. | Low battery in car or transmitter; loose wiring; un-bound transmitter/receiver | Charge batteries; check all connections; re-bind transmitter and receiver |
| Poor handling/traction | Incorrect suspension setup; worn tires; differential issues | Adjust camber/caster; replace tires; inspect and service differentials |
| Bruit inhabituel pendant le fonctionnement | Debris in drivetrain; worn gears/bearings; loose components | Clean drivetrain; inspect and replace worn parts; tighten all screws |
| Vitesse/puissance réduite | Motor/ESC overheating; low battery; excessive friction | Allow components to cool; charge battery; check bearings and drivetrain for friction |
8. Spécifications
| Fonctionnalité | Détail |
|---|---|
| Numéro de modèle | 58693 |
| Échelle | 1/10 |
| Type de lecteur | 2 Belt-Driven 4WD |
| Type de châssis | Stepped-V shaped main chassis, carbon fiber reinforced resin |
| Différentiels | TRF420 Oil-Filled Gear Differentials with Steel TA07 Joint Cups |
| Damples | Super Short Big Bore (SSBB) Shock Damples |
| Suspension | A-arm suspension with adjustable camber and caster, rear toe control function |
| Roulements | Full Ball Bearings |
| Dimensions du produit | 18.3 x 8.5 x 5.2 pouces (dimensions approximatives, une fois assemblé) |
| Poids de l'article | 1 pound (chassis kit only) |
9. Garantie et assistance
For warranty information and technical support, please refer to the documentation provided with your TAMIYA product or visit the official TAMIYA website. As this is a kit, warranty typically covers manufacturing defects of individual parts. Damage due to assembly errors, misuse, or normal wear and tear is generally not covered.
For further assistance, please contact TAMIYA customer service or your authorized TAMIYA dealer.


