1. Consignes de sécurité importantes
Respectez toujours les consignes de sécurité élémentaires afin de réduire les risques d'incendie, d'électrocution et de blessures lors de l'utilisation d'outils électriques. Lisez attentivement toutes les instructions avant utilisation.
- Sécurité de la zone de travail : Maintenez votre espace de travail propre et bien éclairé. Les zones encombrées ou sombres favorisent les accidents. N'utilisez pas d'outils électriques dans des atmosphères explosives, par exemple en présence de liquides, de gaz ou de poussières inflammables.
- Sécurité électrique : Les fiches des outils électriques doivent être compatibles avec la prise de courant. Ne modifiez jamais la fiche. Évitez tout contact corporel avec des surfaces mises à la terre, telles que les tuyaux, les radiateurs, les cuisinières et les réfrigérateurs.
- Sécurité personnelle : Portez toujours des lunettes de protection. Utilisez une protection auditive lors d'une utilisation prolongée. Adoptez une tenue vestimentaire appropriée ; évitez les vêtements amples et les bijoux. Tenez vos cheveux, vos vêtements et vos gants éloignés des pièces mobiles.
- Utilisation et entretien des outils : N’utilisez pas l’outil électrique de force. Utilisez l’outil électrique adapté à votre application. Débranchez la prise de la source d’alimentation avant tout réglage, changement d’accessoires ou rangement de l’outil électrique.
- Entretien: Entretenez les outils électriques. Vérifiez le mauvais alignement ou le coincement des pièces mobiles, la rupture de pièces et toute autre condition pouvant affecter le fonctionnement de l'outil électrique. S'il est endommagé, faites réparer l'outil électrique avant de l'utiliser.
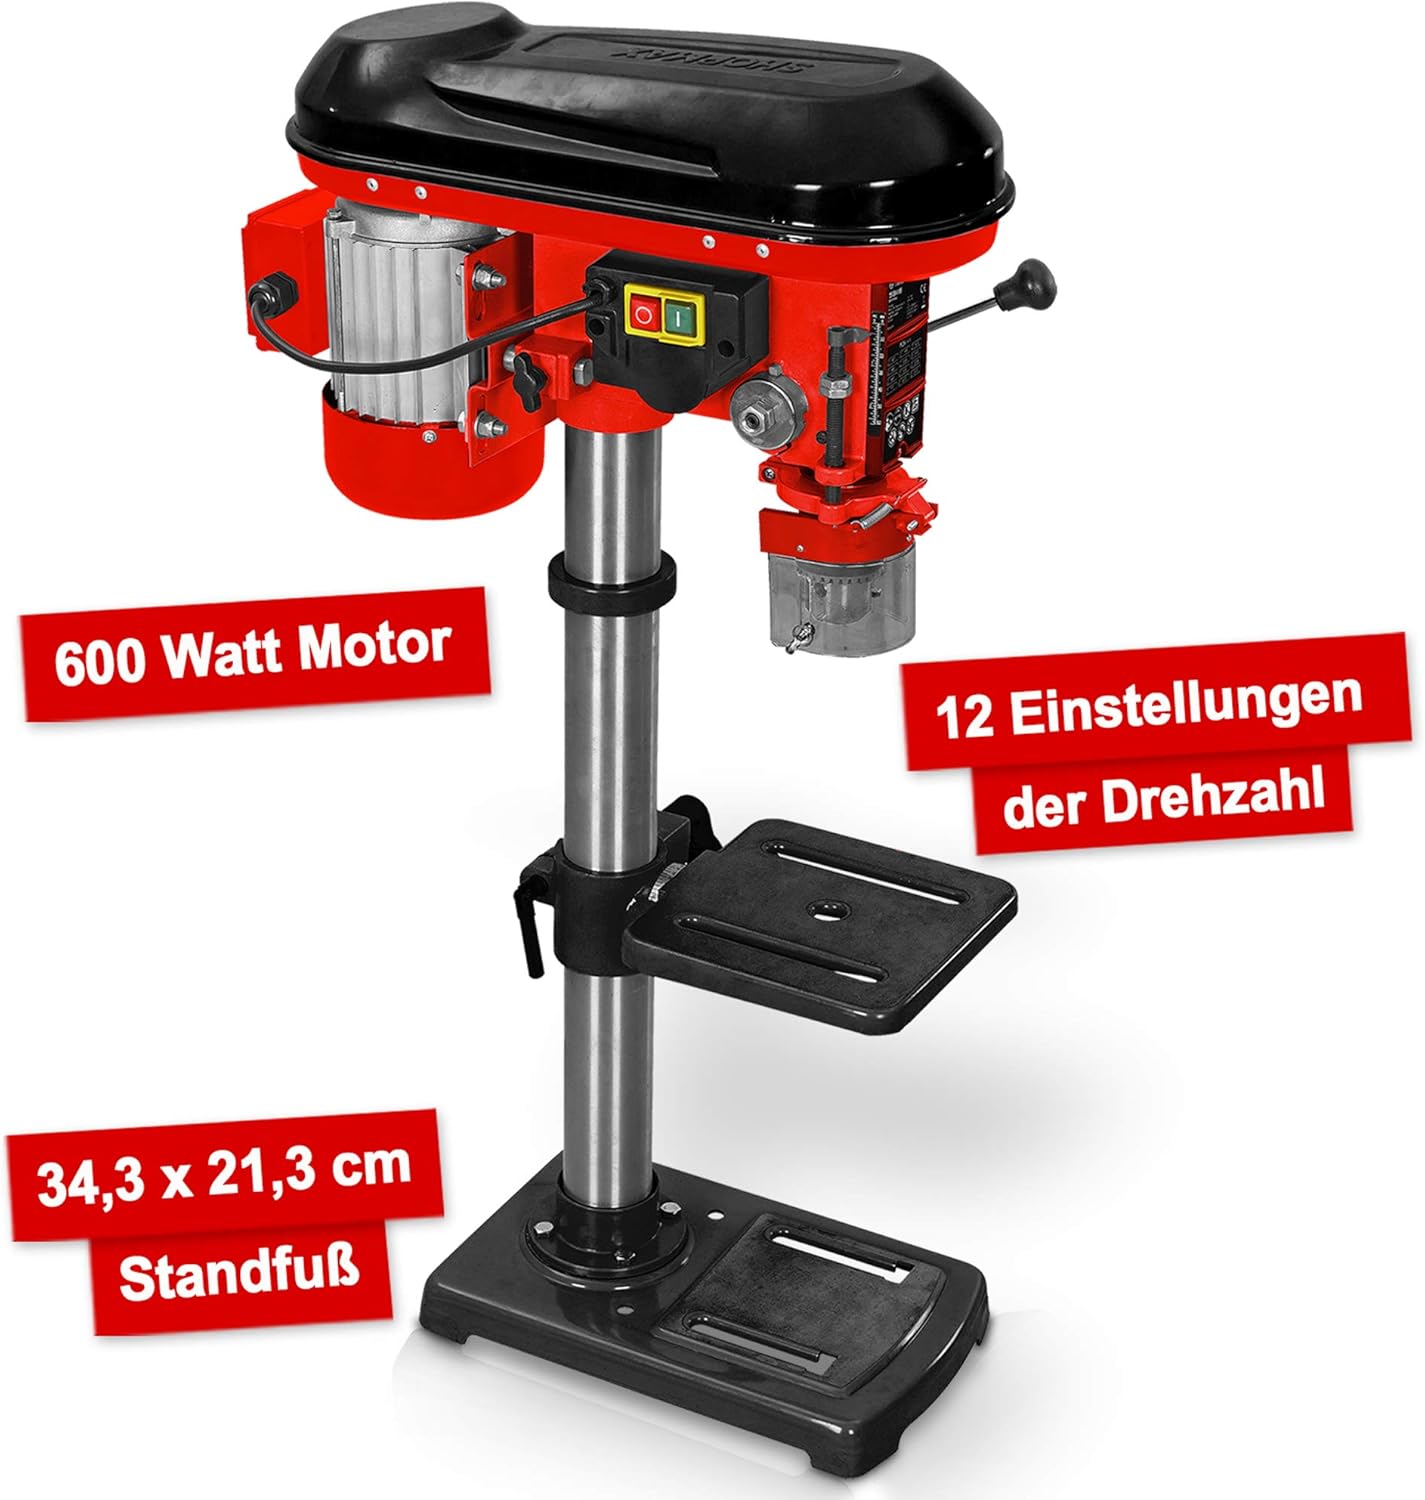
2. Produit terminéview et composants
The Hecht Professional Pillar Drill is designed for precise drilling operations. Familiarize yourself with its main components for safe and effective use.

- Boîtier du moteur: Contains the 600W motor and belt drive system.
- Assemblée de tête : Includes the chuck, spindle, and depth stop.
- Colonne: The main support structure for the head assembly and drilling table.
- Drilling Table: Adjustable in height and angle for versatile drilling.
- Plaque de base : Provides stability and features mounting slots for securing to a workbench.
- Chuck: Holds the drill bits securely (3-16 mm capacity).
- Speed Adjustment Lever: Used to change the drilling speed.
- Poignées d'alimentation : Used to lower the chuck and drill bit into the workpiece.
- Interrupteur marche/arrêt : Power control for the drill.
- Chip Protection Guard: Transparent guard for safety during operation.
3. Configuration et assemblage
Follow these steps to assemble and set up your pillar drill before initial use.
- Déballage: Retirez soigneusement tous les composants de leur emballage. Vérifiez qu'ils ne sont ni endommagés ni manquants.
- Installation de la plaque de base : Place the base plate on a stable, level workbench. Secure it using appropriate bolts through the elongated slots on the base.
- Assemblage de la colonne : Mount the column securely onto the base plate according to the provided hardware.
- Drilling Table Attachment: Slide the drilling table assembly onto the column. Adjust its height and secure it with the locking handle.
- Head Assembly Mounting: Carefully place the head assembly onto the top of the column and secure it.
- Installation de la manivelle : Insert the chuck onto the spindle taper. Use a rubber mallet to gently tap it into place, ensuring a firm fit.
- Chip Guard: Attach the transparent chip protection guard around the chuck area.

4. Mode d'emploi
Understand how to properly operate your pillar drill for optimal performance and safety.
4.1 Sélection des forets
Choose the appropriate drill bit for the material and desired hole size. The chuck accommodates bits from 3 mm to 16 mm. Ensure the drill bit is sharp and free from damage.
4.2 Installation des forets
- Assurez-vous que la perceuse est débranchée.
- Ouvrez les mâchoires du mandrin à l'aide de la clé de mandrin.
- Insérez le foret dans le mandrin en vous assurant qu'il est bien centré et fermement en place.
- Serrez fermement les mors du mandrin à l'aide de la clé de mandrin. Retirez la clé de mandrin immédiatement après le serrage.
4.3 Réglage de la vitesse
The drill features 12 speed settings, adjustable via a belt drive system. Select the speed appropriate for your material and drill bit size. Lower speeds are generally for larger bits and harder materials, while higher speeds are for smaller bits and softer materials.


4.4 Adjusting Drilling Table
The drilling table can be adjusted in height and tilted up to +/- 45 degrees. Loosen the locking handle, position the table as required, and then securely tighten the handle.

4.5 Réglage de la profondeur de forage
Use the depth stop mechanism to set the desired drilling depth. This ensures consistent hole depths for repetitive tasks.
4.6 Procédure de forage
- Secure the workpiece firmly to the drilling table using clamps or a vise. Never hold the workpiece by hand.
- Adjust the table height and angle, and set the drilling depth.
- Sélectionnez la vitesse appropriée.
- Turn on the drill using the On/Off switch.
- Slowly lower the drill bit into the workpiece using the feed handles, applying steady, even pressure.
- Une fois la profondeur souhaitée atteinte, retirez le foret de la pièce à usiner.
- Éteignez la perceuse.
5. Entretien
Regular maintenance ensures the longevity and safe operation of your pillar drill.
- Nettoyage: After each use, clean the drill of dust and chips. Use a brush or compressed air. Do not use solvents that may damage plastic parts.
- Lubrification: Periodically lubricate moving parts such as the column, spindle, and depth stop mechanism with light machine oil.
- Tension de la courroie: Check the tension of the drive belt regularly. Adjust if necessary to prevent slippage and ensure proper power transmission. Refer to the belt diagram inside the motor housing cover.
- Entretien du mandrin : Keep the chuck jaws clean and free of debris. If the chuck becomes stiff, clean and lightly lubricate it.
- Cordon électrique : Inspect the power cord for any damage. Replace if frayed or cut.
6. Dépannage
Cette section aborde les problèmes courants que vous pourriez rencontrer avec votre perceuse à colonne.
| Problème | Cause possible | Solution |
|---|---|---|
| La perceuse ne démarre pas | Absence d'alimentation ; interrupteur défectueux ; problème de moteur | Check power connection and circuit breaker; Inspect switch for damage; Consult qualified service personnel. |
| Vibrations excessives | Loose mounting; Unbalanced drill bit; Worn bearings | Tighten mounting bolts; Replace or re-center drill bit; Consult service personnel for bearing replacement. |
| Le foret glisse dans le mandrin. | Chuck not tightened sufficiently; Oily chuck jaws; Damaged chuck jaws | Tighten chuck firmly with key; Clean chuck jaws; Replace chuck if damaged. |
| Le moteur surchauffe | Overloading; Insufficient ventilation; Prolonged use | Reduce load; Ensure clear ventilation; Allow motor to cool down. |
| forage imprécis | Loose workpiece; Worn drill bit; Misaligned table | Secure workpiece firmly; Replace drill bit; Check and adjust table alignment. |
7. Spécifications
Technical data for the Hecht Professional Pillar Drill.
| Fonctionnalité | Spécification |
|---|---|
| Fabricant | Hecht |
| Numéro de modèle de l'article | Standbohrmaschine Hecht |
| Source d'énergie | Électrique avec fil |
| Voltage | 230 volts |
| Puissance maximale | 600 watts |
| Vitesse de rotation maximale | 2700 tr/min |
| Nombre de vitesses | 12 |
| Taille maximale du mandrin | 16 mm |
| Matériel | Métal |
| Couleur | Red Pillar Drill |
| Dimensions du colis | 71 x 45 x 27 cm |
| Poids | 23 kilograms (approx.) |
| Environnement d'utilisation | Intérieur |
| Numéro de référence | 8595614925655 |
8. Garantie et assistance
For warranty information, please refer to the documentation provided with your purchase or contact the retailer. For technical support or spare parts inquiries, please contact Hecht customer service or your authorized dealer.
Please have your model number (Standbohrmaschine Hecht) and reference number (8595614925655) available when contacting support.


