1. Introduction
The Dynascan R-400 is a professional-grade PMR-446 transceiver designed for license-free use. This device operates on the 446 MHz frequency band, offering reliable two-way communication. This manual provides essential information for the proper setup, operation, maintenance, and troubleshooting of your Dynascan R-400 transceiver to ensure optimal performance and longevity.
2. Consignes de sécurité
- Lisez toutes les instructions: Before operating the transceiver, thoroughly read and understand all instructions in this manual.
- Sécurité des batteries : Use only the specified Lithium-Ion battery and charging equipment. Do not short-circuit, incinerate, or disassemble the battery.
- Antenne: Do not operate the radio with a damaged antenna. If a damaged antenna comes into contact with your skin, a minor burn may result.
- Ingérence: Turn off the transceiver in areas where radio use is prohibited or when interference may occur, such as near medical equipment or aircraft.
- Résistance à l'eau et à la poussière : The device has an IP55 rating, providing protection against dust and splashes of water. It is not designed for submersion.
- Entretien: Do not attempt to service the transceiver yourself. Refer all servicing to qualified personnel.
3. Contenu du colis
Vérifiez que tous les éléments sont présents dans le colis :
- Dynascan R-400 PMR-446 Transceiver
- Batterie lithium-ion
- Base de chargement
- Adaptateur secteur pour base de chargement
- Clip de ceinture
- Dragonne
- Manuel d'utilisation
4. Produit terminéview
Familiarize yourself with the main components of your Dynascan R-400 transceiver.

Figure 4.1 : Devant view of the Dynascan R-400 transceiver, showing the speaker, microphone, and display area.
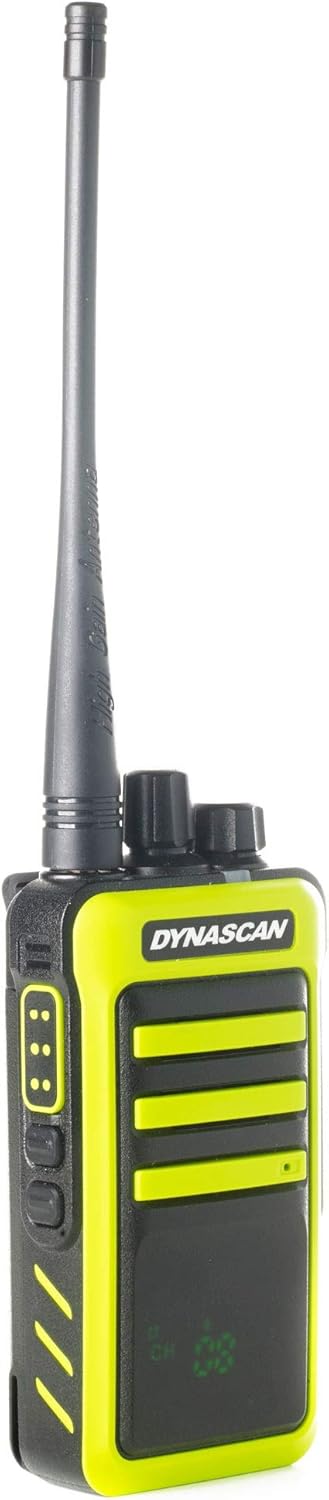
Figure 4.2 : Côté view of the transceiver, highlighting the Push-To-Talk (PTT) button and two programmable function buttons.

Figure 4.3 : Côté view showing the attachment point for the belt clip, allowing for convenient carrying.

Figure 4.4 : Côté opposé view, typically featuring the accessory port for external audio devices or programming cables.
5. Installation
5.1. Installation de la batterie
- Assurez-vous que l'émetteur-récepteur est hors tension.
- Align the Lithium-Ion battery pack with the battery compartment on the back of the transceiver.
- Poussez doucement la batterie en place jusqu'à ce qu'elle s'enclenche correctement.
- If applicable, secure the battery latch.
5.2. Chargement de la batterie
Before first use, fully charge the battery. The transceiver charges via its dedicated charging base.
- Connect the power adapter to the charging base and plug it into a standard electrical outlet.
- Place the transceiver (with battery installed) into the charging base. Ensure the charging contacts align.
- The charging indicator light on the base will illuminate, typically red for charging and green for fully charged.
- A full charge usually takes several hours. Do not overcharge the battery for extended periods.
5.3. Fixation de l'antenne
- Screw the antenna clockwise onto the connector on the top of the transceiver until it is finger-tight. Do not overtighten.
6. Mode d'emploi
6.1. Marche/Arrêt et réglage du volume
- To power on the transceiver, rotate the top-left knob (Power/Volume knob) clockwise until you hear a click and the display illuminates.
- Continuez à tourner le bouton dans le sens des aiguilles d'une montre pour augmenter le volume, et dans le sens inverse pour le diminuer.
- Pour éteindre l'appareil, tournez le bouton dans le sens inverse des aiguilles d'une montre jusqu'à entendre un clic.
6.2. selection de CHAINE
The Dynascan R-400 features 8 PMR-446 channels.
- Rotate the top-right knob (Channel Selector knob) to choose your desired channel from 1 to 8.
- Ensure all transceivers you wish to communicate with are set to the same channel.
6.3. Transmission et réception
- À recevoir a transmission, simply ensure the transceiver is powered on and set to the correct channel. The speaker will output incoming audio.
- À transmettre, press and hold the Push-To-Talk (PTT) button located on the side of the transceiver. Speak clearly into the microphone.
- Relâchez le bouton PTT pour arrêter la transmission et revenir en mode réception.
6.4. Fonction VOX (Transmission à commande vocale)
The VOX function allows hands-free transmission by detecting your voice.
- Refer to the full programming software (requires optional cable) for enabling and adjusting VOX sensitivity.
- When VOX is active, the radio will automatically transmit when you speak and stop when you cease speaking.
6.5. CTCSS/DCS Tones (Subtones)
The R-400 supports 50 CTCSS and 104 DCS subtones. These tones help filter out unwanted conversations on the same channel.
- To use CTCSS/DCS, all transceivers in your group must be programmed with the same channel and sub-tone.
- Programming of CTCSS/DCS tones typically requires the optional programming cable and software.
7. Entretien
7.1. Nettoyage
- Essuyez l'émetteur-récepteur avec un chiffon doux, damp tissu. N'utilisez pas de produits chimiques agressifs ou de nettoyants abrasifs.
- Assurez-vous que les contacts de charge de la radio et de la base soient propres et exempts de débris.
7.2. Entretien de la batterie
- Pour optimiser la durée de vie de la batterie, évitez de la décharger complètement et fréquemment.
- Rangez la batterie dans un endroit frais et sec lorsqu'elle n'est pas utilisée pendant une période prolongée.
- If the battery will not be used for a long time, charge it to about 50% before storage.
7.3. Stockage
- Store the transceiver in a dry, dust-free environment away from direct sunlight and extreme temperatures.
- Retirez la batterie si vous stockez l'appareil pendant plus d'un mois.
8. Dépannage
| Problème | Cause possible | Solution |
|---|---|---|
| Transceiver does not power on | Batterie déchargée ou mal installée | Chargez la batterie. Réinstallez la batterie correctement. |
| Impossible de transmettre ou de recevoir | Incorrect channel selected; Out of range; Low battery | Verify channel setting. Move closer to other transceivers. Charge battery. |
| Mauvaise qualité audio ou parasites | Weak signal; Interference; Antenna loose | Move to an open area. Check for sources of interference. Ensure antenna is securely attached. |
| L'indicateur de charge ne fonctionne pas | Charging base or adapter faulty; Poor contact | Check power connections. Clean charging contacts. Try a different outlet. |
9. Spécifications
| Fonctionnalité | Spécification |
|---|---|
| Modèle | R 400 |
| Gamme de fréquences | 446.00625 - 446.09375 MHz |
| Nombre de canaux | 8 |
| Max. Radiated Power | 500 mW |
| Type de batterie | Lithium-Ion (7.4 Volts) |
| Dimensions (H x L x P) | 12.4 x 5.9 x 3.7 cm |
| Poids | 218 g |
| Résistance à l'eau/à la poussière | IP55 (Résistant à l'eau et à la poussière) |
| Caractéristiques spéciales | Voice Operated Transmission (VOX), Encrypted Channels (programmable) |
| Sous-tons | CTCSS 50 / DCS 104 |
| Interface matérielle | USB (pour la programmation) |
10. Informations sur la garantie
The Dynascan R-400 transceiver is covered by a manufacturer's warranty. For specific warranty terms, conditions, and duration, please refer to the warranty card included with your product or contact Dynascan customer support directly. Keep your proof of purchase for warranty claims.
11. Assistance
For technical assistance, troubleshooting beyond this manual, or inquiries about accessories, please contact Dynascan customer support. You can typically find contact information on the manufacturer's official website ou sur l'emballage du produit.
Please visit the official Dynascan website contenant les dernières ressources d'assistance et les coordonnées.


