1. Introduction
Merci d'avoir choisi le Ourlife Kids Camera OU-630. This digital camera is designed for children, offering 1080p Full HD video recording, 12MP photo resolution, and a unique 60x macro magnification function for exploring the micro-world. It features a 3.5-inch large screen, various creative filters, games, and music playback. Please read this manual carefully to ensure proper use and maintenance of your camera.
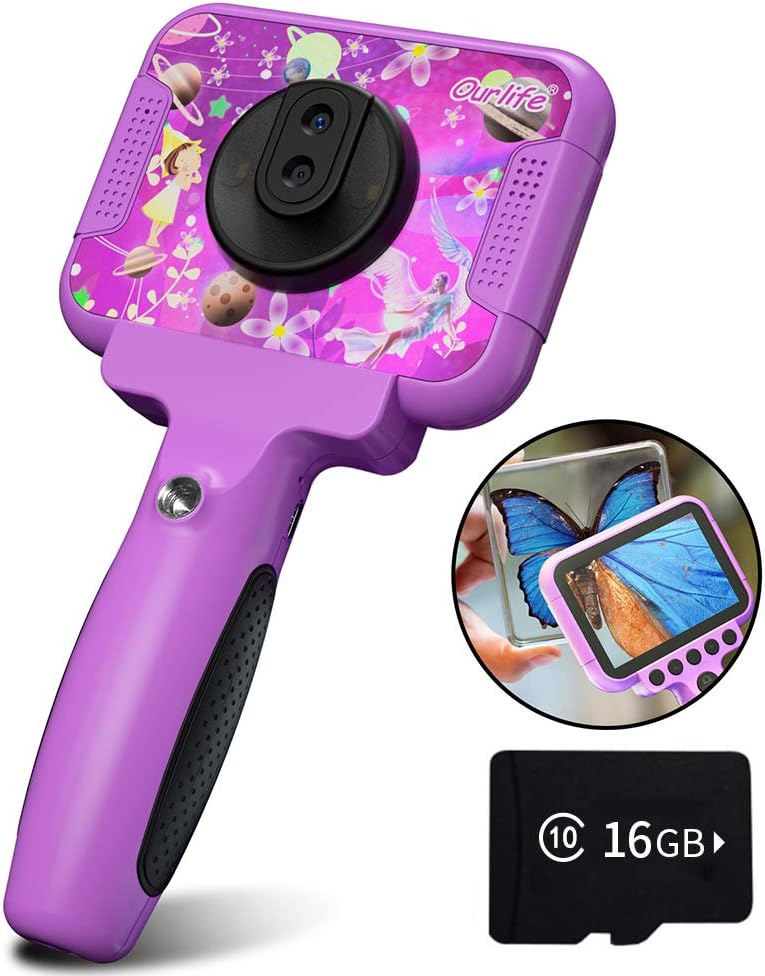
Image 1.1: The Ourlife Kids Camera OU-630, highlighting its design and macro capability.
2. Contenu du colis
Veuillez vérifier le colis pour vous assurer que tous les articles sont présents :
- Kids Camera x 1
- 16GB TF Card x 1
- Base Bracket x 1
- Câble de charge USB x 1
- Manuel d'utilisation x 1
- Neck Lanyard x 1
- Dragonne x 1

Image 2.1: Contents of the Ourlife Kids Camera OU-630 package.
3. Produit terminéview
Familiarisez-vous avec les composants et les commandes de l'appareil photo :
- Écran d'affichage : 3.5-inch color screen for viewAffichage de photos et de vidéos, et navigation dans les menus.
- Objectif principal : For standard photography and video.
- Objectif macro : Dedicated lens for 60x magnification.
- Boutons de contrôle : M (Menu), Up, OK, Down, Power, Shutter/LED.
- Poignée: Ergonomically designed for child-friendly grip.
- Port USB : Pour le chargement et le transfert de données.
- Emplacement pour carte TF: Pour l'insertion de la carte mémoire.

Image 3.1: Key features and specifications of the Ourlife Kids Camera OU-630.
Tableau des fonctions des boutons
| Bouton | Mode appareil photo | Mode d'enregistrement | Mode Musique | Mode de jeu | Mode de lecture |
|---|---|---|---|---|---|
| M | Retour au menu | ||||
| ▲ | Change filters/Frames Long press: Zoom in | Change filters/Frames | Chanson précédente | Déplacer vers la gauche | Previous photo |
| OK | Long press: Open/Close LED light | OK | Choose music/story | OK | Lecture / Pause |
| ▼ | Change filters/Frames Long press: Zoom out | Change filters/Frames | Chanson suivante | Déplacez-vous vers la droite | Photo suivante |
| ⏻ | Switch to Splicing mode | Retour au menu | NUL | NUL | Supprimer |
| ◎ | Prendre une photo | Retour au menu | NUL | NUL | NUL |
Image 3.2: Detailed functions of each button across different modes.
4. Installation
4.1. Charger la caméra
Before first use, fully charge the camera. Connect the included USB charging cable to the camera's USB port and to a compatible USB power source (e.g., computer, wall adapter). The charging indicator light will show the charging status. A full charge provides approximately 3 hours of use.
4.2. Insertion de la carte TF
The camera requires a TF (MicroSD) card to store photos and videos. A 16GB TF card is included. Locate the TF card slot on the side of the camera. Gently insert the TF card with the metal contacts facing down until it clicks into place. To remove, push the card in again until it springs out.
5. Mode d'emploi
5.1. Marche/Arrêt
- Pour allumer, appuyez et maintenez le Power button (⏻) jusqu'à ce que l'écran s'allume.
- Pour mettre hors tension, maintenez la touche Power button (⏻) jusqu'à ce que l'écran s'éteigne.
5.2. Navigation dans les menus
Utilisez le Haut (▲) et Bas (▼) buttons to navigate through menu options. Press the Bouton OK to confirm a selection. Press the Bouton M (Menu) to return to the previous menu or the main menu.
5.3. Prendre des photos
- Dans le menu principal, sélectionnez le Icône d'appareil photo et appuyez sur OK.
- Cadrez votre prise de vue en utilisant l'écran.
- Appuyez sur le Shutter button (◎) prendre une photo.
- Utilisez le Haut (▲) et Bas (▼) buttons to change filters or frames. Long press Haut (▲) pour zoomer, appuyez longuement Bas (▼) pour effectuer un zoom arrière.
5.4. Enregistrement de vidéos
- Dans le menu principal, sélectionnez le Icône vidéo et appuyez sur OK.
- Appuyez sur le Shutter button (◎) pour commencer l'enregistrement.
- Appuyez sur le Shutter button (◎) à nouveau pour arrêter l'enregistrement.
- Utilisez le Haut (▲) et Bas (▼) buttons to change filters or frames during recording.
5.5. Macro Function
The camera features a dedicated macro lens for 60x magnification, ideal for observing small objects. The optimal focal length for macro photography is 20-40mm.
- To switch between the main lens and macro lens, long press the Shutter button (◎).
- When in macro mode, position the camera close to the subject (20-40mm distance).
- Use the included base bracket for stability during macro shots to prevent hand shake.
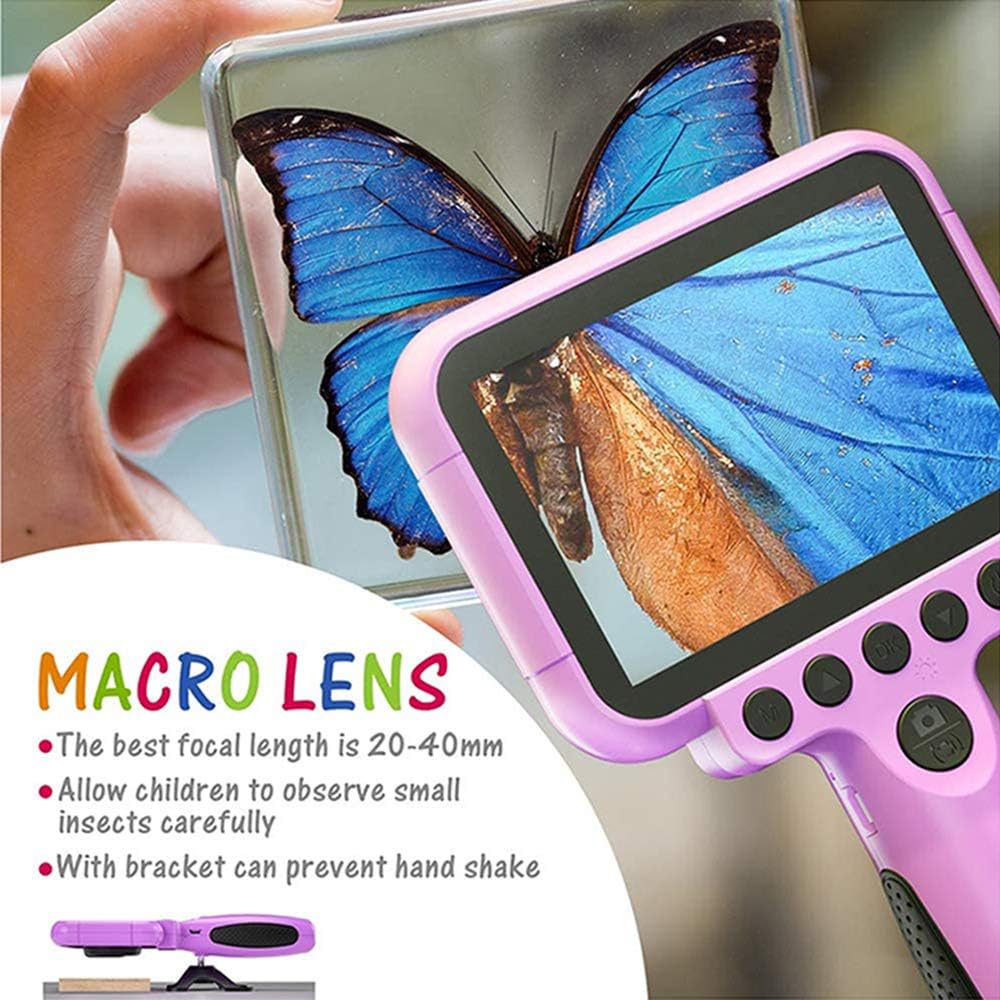
Image 5.1: Demonstrating the macro lens function for detailed observation.

Image 5.2: Switching between HD and Macro lenses.
5.6. Patchwork Mode (Splicing Mode)
This mode allows you to combine two separate photos into one. It includes various border patterns.
- In Camera Mode, press the Power button (⏻) to switch to Splicing (Patchwork) mode.
- Follow the on-screen prompts to take two photos that will be merged.
- Select from 9 available border patterns.

Image 5.3: Using the Patchwork Mode to combine images.
5.7. Mode Musique
The camera supports MP3 music playback. Store your favorite music files on the TF card. From the main menu, select the Icône de musique et appuyez sur OK. Utilisez le Haut (▲) et Bas (▼) buttons to select songs, and OK jouer/mettre en pause.
5.8. Jeux
The camera includes pre-installed games for entertainment. From the main menu, select the Game icon et appuyez sur OK. Use the navigation buttons to play.
5.9. Mode de lecture
À view your captured photos and videos, select the Photos/Video Playback icon dans le menu principal et appuyez sur OK. Utilisez le Haut (▲) et Bas (▼) buttons to browse, and OK to play videos or view photos. To delete a file, appuyez sur le Power button (⏻) alors que viewen le faisant.
5.10. Paramètres
Access camera settings by selecting the Icône Paramètres from the main menu. Here you can adjust various parameters such as date/time, language, resolution, and more.
6. Entretien
- Nettoyez l'appareil photo en l'essuyant avec un chiffon doux et sec.
- Évitez d'exposer l'appareil photo à des températures extrêmes, à la lumière directe du soleil ou à l'humidité.
- N'essayez pas de démonter ou de réparer la caméra vous-même.
- Ensure the TF card is inserted correctly to prevent data loss.
- Rechargez régulièrement l'appareil photo pour préserver la durée de vie de la batterie.
7. Dépannage
- La caméra ne s'allume pas : Assurez-vous que la batterie est chargée. Branchez-la à une source d'alimentation et réessayez.
- Impossible de prendre des photos/vidéos : Check if a TF card is inserted and if it has sufficient storage space.
- Mauvaise qualité d'image : Ensure the lens is clean. Check lighting conditions. For macro shots, ensure correct focal distance (20-40mm).
- La caméra se fige : Press and hold the Power button to force a restart.
- TF card error: Reinsert the TF card. If the issue persists, try formatting the card (this will erase all data) or use a different TF card.
8. Spécifications
| Fonctionnalité | Détail |
|---|---|
| Numéro de modèle | OU-630 |
| Résolution fixe efficace | 12 MP |
| Résolution vidéo | 1080p |
| Taille de l'écran | 3.5 pouces |
| Stabilisation d'image | Numérique |
| Type de lentille | Macro (60x zoom) |
| Type de batterie | 1 lithium polymère (inclus) |
| Technologie de connectivité | USB |
| Type de support pris en charge | Carte SD |
| Modes de prise de vue | Loop recording, Continuous shooting, Timed photo, Macro photography, Filter photos |
| Dimensions de l'article (P x L x H) | 3.94"P x 7.28"L x 0.79"H |
9. Garantie et assistance
Ce Ourlife Kids Camera OU-630 comes with a Garantie de 12 mois from the date of purchase. This warranty covers manufacturing defects and workmanship. It does not cover damage caused by misuse, accidents, unauthorized repairs, or normal wear and tear.
For technical support, warranty claims, or any questions regarding your product, please contact Ourlife customer service. Refer to the contact information provided on the product packaging or the official Ourlla vie website.


