1. Introduction
Thank you for choosing the Graef CM501EU Coffee Grinder. This manual provides essential information for the safe and efficient use of your appliance. Please read it thoroughly before first use and keep it for future reference.
The Graef CM501EU is designed to grind coffee beans just before preparation, ensuring maximum aroma. Its compact design and 140 grind settings make it suitable for various coffee types, from fine espresso powder to coarse French press grinds. It offers the convenience of grinding directly into a coffee container, a coffee machine's filter basket, or an espresso portafilter.
2. Consignes de sécurité importantes
Respectez toujours les consignes de sécurité de base lors de l'utilisation d'appareils électriques afin de réduire les risques d'incendie, d'électrocution et de blessures.
- Lisez attentivement toutes les instructions avant d'utiliser l'appareil.
- Ne plongez pas l'appareil, le cordon ou la fiche dans l'eau ou d'autres liquides.
- Une surveillance étroite est nécessaire lorsqu’un appareil est utilisé par ou à proximité d’enfants.
- Débranchez l'appareil de la prise lorsqu'il n'est pas utilisé, avant d'installer ou de retirer des pièces et avant de le nettoyer.
- Évitez tout contact avec les pièces mobiles.
- N’utilisez pas d’appareil dont le cordon ou la fiche est endommagé, ou après un dysfonctionnement de l’appareil ou après qu’il a été endommagé de quelque manière que ce soit.
- L’utilisation d’accessoires non recommandés ou vendus par le fabricant peut provoquer un incendie, un choc électrique ou des blessures.
- Ne pas utiliser à l'extérieur.
- Ne laissez pas le cordon pendre du bord de la table ou du comptoir, ni toucher des surfaces chaudes.
- Ne pas placer sur ou à proximité d'un brûleur à gaz ou électrique chaud, ni dans un four chaud.
- Vérifiez la présence d'objets étrangers dans la trémie à grains avant utilisation.
- Cet appareil est destiné à un usage domestique uniquement.
3. Produit terminéview
Familiarize yourself with the components of your Graef CM501EU coffee grinder.
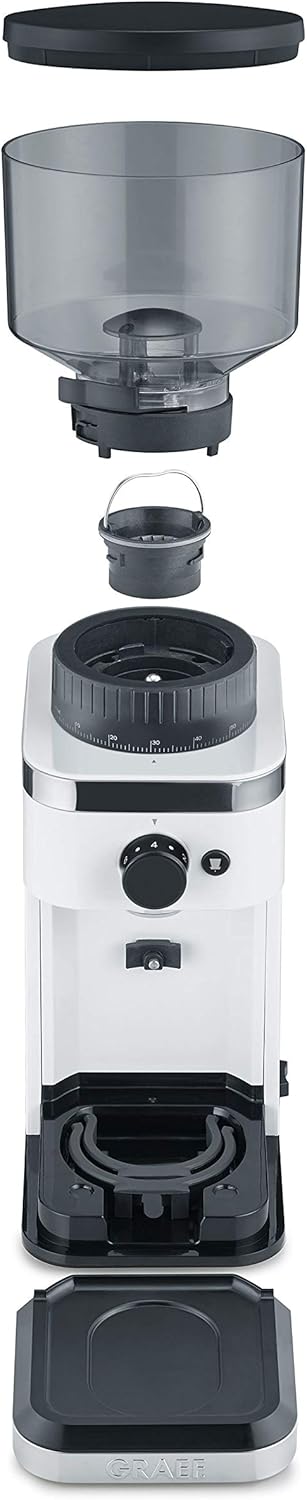
Figure 1 : Vue éclatée View des composants
This image displays the Graef CM501EU coffee grinder disassembled into its main parts, including the bean hopper with lid, conical burr grinder, main unit, portafilter holder, and drip tray. Understanding these components is crucial for assembly and cleaning.

Figure 2 : Face avant View of Assembled Grinder
This image shows the fully assembled Graef CM501EU coffee grinder from the front, highlighting the bean hopper, grind adjustment ring, control dial, and dispensing area.
Composants:
- Trémie à haricots avec couvercle : Peut contenir jusqu'à 300 g de grains de café entiers.
- Bague de réglage de la mouture : Allows selection of 140 different grind levels.
- Unité principale : Contient le moteur et le mécanisme de broyage.
- Cadran de contrôle: For selecting grind duration or cup quantity.
- Point de distribution : Where ground coffee exits.
- Porte-filtre : Attaches to the unit for direct grinding into an espresso portafilter.
- Bac de récupération: Collects any stray coffee grounds for easy cleaning.
- Contenant de café moulu : (Not explicitly shown as separate, but implied for collecting grounds).
4. Installation
Avant la première utilisation, assurez-vous que tous les matériaux d'emballage ont été retirés et que l'appareil est propre.
- Déballer: Retirez soigneusement le moulin à café et tous ses accessoires de leur emballage.
- Faire le ménage: Essuyez l'extérieur de l'unité principale avec le produit adamp cloth. Wash the bean hopper, lid, ground coffee container, and drip tray in warm, soapy water, then rinse and dry thoroughly.
- Assembler le bac de récupération des égouttoirs : Place the drip tray into its designated slot at the base of the grinder.
- Attach Bean Hopper: Align the bean hopper with the top of the main unit and twist it clockwise until it locks securely into place. Ensure the hopper is correctly seated to allow coffee beans to feed into the grinder.
- Trémie de remplissage : Fill the bean hopper with whole roasted coffee beans. Do not overfill beyond the maximum fill line.
- Connecter l'alimentation : Branchez le cordon d'alimentation dans une prise électrique appropriée (230 V).

Figure 3: Disassembled Parts for Setup
This image shows the main unit, bean hopper, lid, ground coffee container, portafilter holder, and cleaning brush, illustrating the components that need to be assembled and cleaned during initial setup.
5. Mode d'emploi
The Graef CM501EU offers precise control over your coffee grinding process.
5.1. Adjusting Grind Level
The grinder features 140 individual grind levels, from very fine for espresso to coarse for French press. To adjust the grind level:
- Ensure the grinder is off and unplugged.
- Rotate the grind adjustment ring located below the bean hopper to your desired setting. Finer settings are indicated by lower numbers, coarser settings by higher numbers.
- Refer to the table below for recommended grind settings for common brewing methods.

Figure 4: Grind Adjustment Ring
Un gros plan view of the black ring with numerical markings (e.g., 90, 110, 120) used to select the desired grind fineness. Rotate this ring to change the grind setting.
| Méthode de brassage | Grind Level (Approx.) | Description |
|---|---|---|
| Espresso | 1-30 | Very fine, like flour |
| Filter Coffee (Drip) | 30-80 | Medium, like table salt |
| French Press / Cold Brew | 80-140 | Coarse, like sea salt |
5.2. Moudre le café
You can grind coffee directly into a filter basket, a portafilter, or the included ground coffee container.
- Sélectionner la sortie : Use the switch on the side of the grinder to select between grinding into a container/filter basket (cup icon) or a portafilter (portafilter icon).
- Conteneur de position :
- For filter coffee: Place your coffee filter basket directly under the dispensing outlet.
- For espresso: Attach the portafilter holder and insert your portafilter securely.
- For general use: Place the ground coffee container under the dispensing outlet.
- Sélectionnez la quantité : Use the control dial on the front to select the desired number of cups or grinding duration.
- Commencez à broyer : Press the start button (often integrated with the control dial or a separate button). The grinder will operate until the selected quantity is reached.
- Arrêtez de grincer des dents : The grinder will stop automatically. You can also manually stop it by pressing the start button again or turning the main power switch to 'OFF'.

Figure 5: Control Dial and Cup Selection
This image shows the rotary dial for selecting the grinding duration or number of cups, along with the adjacent button to initiate grinding. The portafilter holder is also visible below.

Figure 6: Grinding into a Filter Basket
The grinder is shown actively dispensing ground coffee into a paper filter held within a filter basket, demonstrating its direct grinding capability for drip coffee makers.

Figure 7: Grinding into a Portafilter
This image illustrates the grinder dispensing fresh coffee grounds directly into an espresso machine's portafilter, secured by the integrated holder.

Figure 8 : interrupteur d'alimentation
A close-up of the main power switch, typically located on the side or back of the unit, with 'OFF', 'I' (on for container), and 'II' (on for portafilter) settings.
6. Entretien et nettoyage
Un nettoyage régulier garantit des performances optimales et prolonge la durée de vie de votre moulin à café.
- Débrancher: Débranchez toujours le broyeur de la prise électrique avant de le nettoyer.
- Trémie vide : Retirez tous les grains de café restants de la trémie.
- Démonter: Remove the bean hopper, lid, ground coffee container, and drip tray.
- Nettoyer les pièces amovibles : Wash the bean hopper, lid, ground coffee container, and drip tray in warm, soapy water. Rinse thoroughly and dry completely before reassembling. These parts are generally not dishwasher safe.
- Clean Grinding Burrs:
- Carefully remove the upper grinding burr. Refer to the product diagram for guidance.
- Use the provided cleaning brush to remove any accumulated coffee grounds from both the upper and lower grinding burrs.
- Do not use water or liquid cleaners on the burrs.
- Nettoyer l'unité principale : Essuyez l'extérieur de l'unité principale avec un chiffon doux et sec.amp Chiffon. N’utilisez pas de nettoyants abrasifs et n’immergez pas l’unité principale dans l’eau.
- Remonter: Once all parts are dry, reassemble the grinder in reverse order of disassembly. Ensure the burrs are correctly seated and the hopper is locked into place.
7. Dépannage
If you encounter issues with your Graef CM501EU coffee grinder, consult the following table before contacting customer support.
| Problème | Cause possible | Solution |
|---|---|---|
| Le broyeur ne démarre pas. | Not plugged in; Power switch off; Hopper not correctly seated; Overload protection activated. | Ensure plug is securely in outlet; Turn power switch to 'I' or 'II'; Re-seat hopper until it locks; Unplug, wait 30 minutes, then try again. |
| Pas de marc de café distribué | No beans in hopper; Grinding burrs clogged; Grind setting too fine. | Fill hopper with beans; Clean grinding burrs (see Maintenance); Adjust to a coarser grind setting. |
| broyage irrégulier | Burrs are dirty or worn; Foreign object in burrs. | Clean grinding burrs thoroughly; Inspect for foreign objects. If problem persists, burrs may need replacement. |
| Bruit excessif pendant le fonctionnement | Corps étranger dans les bavures ; composants détachés. | Unplug and carefully inspect burrs for foreign objects; Ensure all removable parts are securely in place. |
8. Spécifications
| Fonctionnalité | Détail |
|---|---|
| Marque | GREEF |
| Numéro de modèle | CM501EU |
| Pouvoir | 135 watts |
| Voltage | 230.0 V |
| Matériel | Stainless Steel (burrs), Plastic (housing) |
| Capacité de la trémie à grains | 300 gramme |
| Dimensions (L x l x H) | 20.5 x 13.5 x 20.5 cm |
| Poids | 2.1 kilogrammes |
| Paramètres de mouture | 140 levels (fine to coarse) |
| Utilisation recommandée | Grinding coffee beans for various brewing methods |
9. Garantie et assistance
Les informations spécifiques relatives à la garantie sont généralement fournies avec l'emballage du produit ou sur le site officiel du fabricant. webPour plus de détails concernant la couverture et les conditions de la garantie, veuillez consulter la documentation fournie avec votre achat.
For technical support, spare parts, or service inquiries, please contact Graef customer service. Contact details can usually be found on the official Graef websur le site ou dans la carte de garantie de votre produit.


