Introduction
This manual provides detailed instructions for the operation and maintenance of your GTMEDIA Z3 Portable DAB+/FM RDS Radio. Please read this manual thoroughly before using the device to ensure proper functionality and to maximize your listening experience.
Informations importantes sur la sécurité
- N’exposez pas l’appareil à la pluie, à l’humidité ou à des températures extrêmes.
- Évitez de laisser tomber ou de soumettre l'appareil à des impacts violents.
- N’essayez pas de démonter ou de réparer l’appareil vous-même. Confiez toute intervention à un personnel qualifié.
- Utilisez uniquement le câble de charge et l'adaptateur secteur spécifiés.
- Tenir hors de portée des enfants.
Contenu du colis
Vérifiez que tous les articles sont présents dans le colis :
- 1 x GTMEDIA Z3 DAB+/FM Radio
- 1 x câble de chargement USB
- 1 x Manuel d'utilisation

Image: The GTMEDIA Z3 radio, its retail box, USB charging cable, and user manual.
Produit terminéview
The GTMEDIA Z3 is a portable DAB+/FM RDS radio featuring a 2.4-inch TFT-LCD screen. It supports 60 preset stations for both DAB+ and FM, and includes functions such as clock, alarm, and sleep timer. The device is powered by a rechargeable 18650 lithium battery.
Commandes et affichage du panneau avant
- Bouton marche/arrêt : Turns the radio on/off or puts it in standby mode.
- Bouton de numérisation : Initiates station scanning.
- Bouton DAB/FM : Switches between DAB+ and FM modes.
- Bouton Menu : Accède au menu principal.
- Bouton EQ : Ajuste les paramètres de l'égaliseur.
- Bouton de préréglage : Accède aux stations préréglées.
- Volume/Select Knob: Adjusts volume and navigates/selects menu options.
- 2.4-inch TFT-LCD Display: Affiche les informations de la station, l'heure et les options du menu.
Panneau arrière et ports

Image: The back of the GTMEDIA Z3 radio, highlighting the 18650 lithium battery compartment and the DC 5V USB charging port.
- 18650 Lithium Battery Compartment: Contient la batterie rechargeable.
- DC 5V USB Charging Port: Pour charger l'appareil.
Guide d'installation
1. Chargement de la batterie
- Repérez le port de chargement USB à l'arrière de la radio.
- Connect the provided USB charging cable to the radio and to a compatible USB power adapter (DC 5V, ≥1500mA) or a computer USB port.
- The battery indicator on the display will show charging status. A full charge typically provides 4-7 hours of operation.
Image: The GTMEDIA Z3 radio's rear panel, illustrating the USB charging port and battery specifications.
2. Mise sous tension initiale et sélection de la langue
- Appuyez et maintenez enfoncé le Alimentation/Veille bouton pour allumer la radio.
- Upon first use, you may be prompted to select a language. Use the Volume/Select knob to navigate and press to confirm your choice. English is the default language.
3. Synchronisation du temps
The clock can be set manually or synchronized automatically with DAB+ or FM signals.
- Synchronisation automatique : When tuned to a DAB+ or FM station that broadcasts time information, the radio will automatically update its clock.
- Réglage manuel : Accédez aux paramètres système via le Menu button to manually set the time and date.
Mode d'emploi
1. Radio Modes (DAB+/FM)
Modes de commutation:
Appuyez sur le DAB/FM bouton permettant de basculer entre les modes radio DAB+ et FM.
Recherche de stations :
- Balayage automatique (FM) : En mode FM, appuyez sur la touche Balayage bouton permettant de rechercher et d'enregistrer automatiquement les stations disponibles.
- Local Scan (DAB+): En mode DAB+, appuyez sur la touche Balayage button to perform a local scan for DAB+ stations. Manual tuning is also supported.
Stations de préréglage :
The radio supports 60 preset stations for both FM and DAB+ (10 quick access presets). To save a station:
- Syntonisez la station souhaitée.
- Appuyez et maintenez enfoncé le Préréglage bouton.
- Utilisez le Volume/Select knob to choose a preset number and press to confirm.
Pour rappeler une station préréglée, appuyez brièvement sur la touche Préréglage bouton et utilisez le Volume/Select bouton pour sélectionner.
FM RDS Station Name Display:
When tuned to an FM station broadcasting RDS (Radio Data System) information, the 2.4-inch TFT-LCD screen will display the station name and other relevant data.
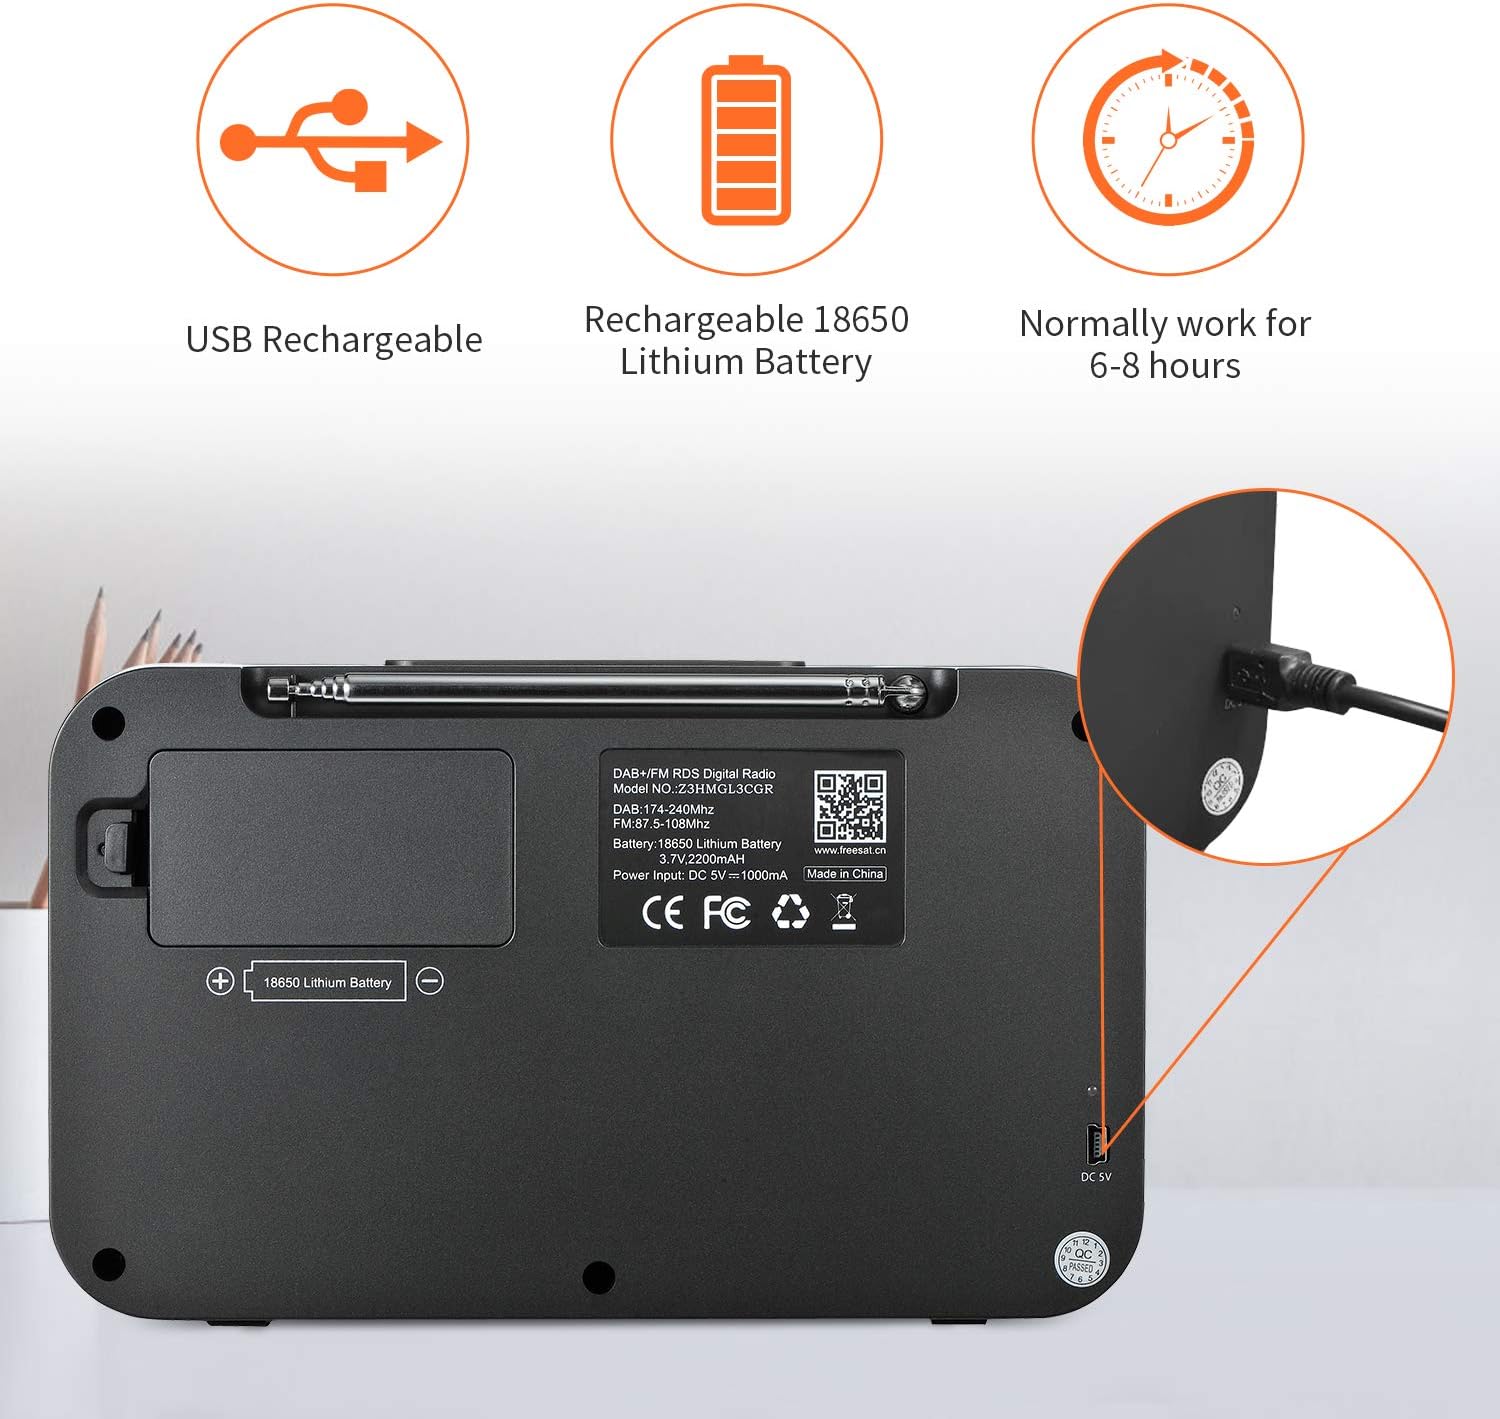
Image: The GTMEDIA Z3 radio's display showing "FM" and "90.500MHz" along with a station name, demonstrating the RDS feature.
2. Horloge, alarme et minuterie de sommeil
The GTMEDIA Z3 radio includes integrated clock, alarm, and sleep timer functions for enhanced convenience.

Image: The GTMEDIA Z3 radio with icons representing clock, alarm, and sleep timer functions, depicted in a bedroom setting.
Réglage de l'alarme :
- Appuyez sur le Menu button and navigate to the "Alarm" settings.
- Utilisez le Volume/Select knob to set the alarm time, duration, and alarm source (e.g., buzzer, DAB+, FM).
- Confirmez vos paramètres.
Réglage de la minuterie de veille :
- Appuyez sur le Menu button and navigate to the "Sleep Timer" settings.
- Utilisez le Volume/Select knob to choose the desired sleep duration (e.g., 15, 30, 60 minutes).
- La radio s'éteindra automatiquement après l'heure définie.
3. Lecture de musique
The GTMEDIA Z3 supports playback of various music formats including MP3, FLAC, and WAV. Playback modes include single play, repeat, and shuffle. Specific instructions for accessing and controlling music playback are typically found within the device's menu system.
Entretien
Nettoyage:
- Essuyez la radio avec un chiffon doux et sec.
- N’utilisez pas de nettoyants liquides ni de matériaux abrasifs.
Entretien de la batterie:
- Pour prolonger la durée de vie de la batterie, évitez de la décharger complètement et fréquemment.
- Rechargez régulièrement la batterie, même si vous n'utilisez pas fréquemment la radio.
- Rangez la radio dans un endroit frais et sec lorsqu'elle n'est pas utilisée pendant une période prolongée.
Dépannage
| Problème | Cause possible | Solution |
|---|---|---|
| Pas de courant | La batterie est déchargée. | Chargez la batterie à l'aide du câble USB fourni. |
| Mauvaise réception radio | Signal faible ; antenne non déployée. | Extend the telescopic antenna fully. Try repositioning the radio. Perform a new scan for stations. |
| Pas de son | Volume trop faible ; mode muet activé. | Augmentez le volume à l'aide du Volume/Select knob. Check if mute is active in settings. |
| L'affichage n'est pas clair | Réglage de la luminosité trop faible. | Adjust LCD brightness in the system settings. |
Caractéristiques
| Fonctionnalité | Détail |
|---|---|
| Marque | GTMEDIA |
| Modèle | Z3 |
| Technologie d'accordeur | DAB Plus, FM RDS |
| Bandes radio prises en charge | DAB+ (174.92-239.20 MHz), FM (87.5-108 MHz) |
| Afficher | 2.4-inch TFT-LCD (240 x 320 pixels) |
| Stations préréglées | 60FM, 60DAB+ |
| Source d'énergie | Alimenté par batterie |
| Type de batterie | 18650 Lithium Battery (3.7V 2200mAh) |
| Heures d'ouverture | 4 à 7 heures (en général) |
| Entrée de charge | DC 5V, ≥1500mA (via USB) |
| Technologie de connectivité | USB |
| Dossier spécial | Portable, Clock, Alarm, Sleep Timer, USB Upgradeable |
| Poids de l'article | 620 g |
| Dimensions du produit | 20 x 5 x 12 cm |
| Température de fonctionnement | 0 ~ + 45 ° C |
| Température de stockage | -10~+60°C |
| Formats musicaux | MP3, FLAC, WAV |

Image: Dimensions of the GTMEDIA Z3 radio, showing approximate measurements of 200mm x 120mm x 50mm.
Mise à jour du micrologiciel
The GTMEDIA Z3 radio supports firmware upgrades via a USB connection to a PC. For the latest firmware and detailed instructions, please visit the official support website.

Image: The GTMEDIA Z3 radio connected to a laptop via a USB cable, indicating its upgradeable feature.
Garantie et assistance
For technical support, warranty information, or any questions regarding your GTMEDIA Z3 radio, please visit the official GTMEDIA support website:


