Introduction
This manual provides essential instructions for the installation, operation, and maintenance of your Swann Master-Series 4K HD 8 Camera 8 Channel NVR Security System, model SWNVK-876808-US. This system is designed to provide high-definition surveillance for your property, featuring 4K resolution cameras and an 8-channel Network Video Recorder (NVR) for reliable recording and monitoring.
Please read this manual thoroughly before setting up and using your security system to ensure proper functionality and to maximize its performance and longevity.
Qu'y a-t-il dans la boîte
Carefully unpack all components and verify that you have received all items listed below. If any items are missing or damaged, please contact Swann customer support.
- Swann 8-Channel Network Video Recorder (NVR)
- 8 x 4K HD Security Cameras
- Câbles Ethernet (pour la connexion de la caméra)
- Adaptateurs secteur (pour NVR et caméras)
- Souris USB
- Vis et chevilles de fixation
- Autocollants d'avertissement de sécurité
- Câble HDMI
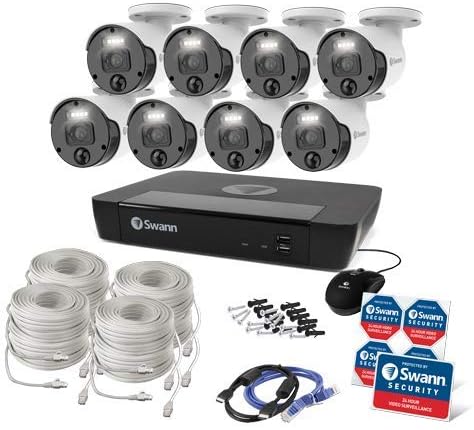
Figure 1 : Complete contents of the Swann Master-Series 4K HD 8 Camera 8 Channel NVR Security System kit, including the NVR, eight cameras, various cables, a USB mouse, and security stickers.

Figure 2 : The Swann Network Video Recorder (NVR) unit, which serves as the central recording and management hub for the security system.
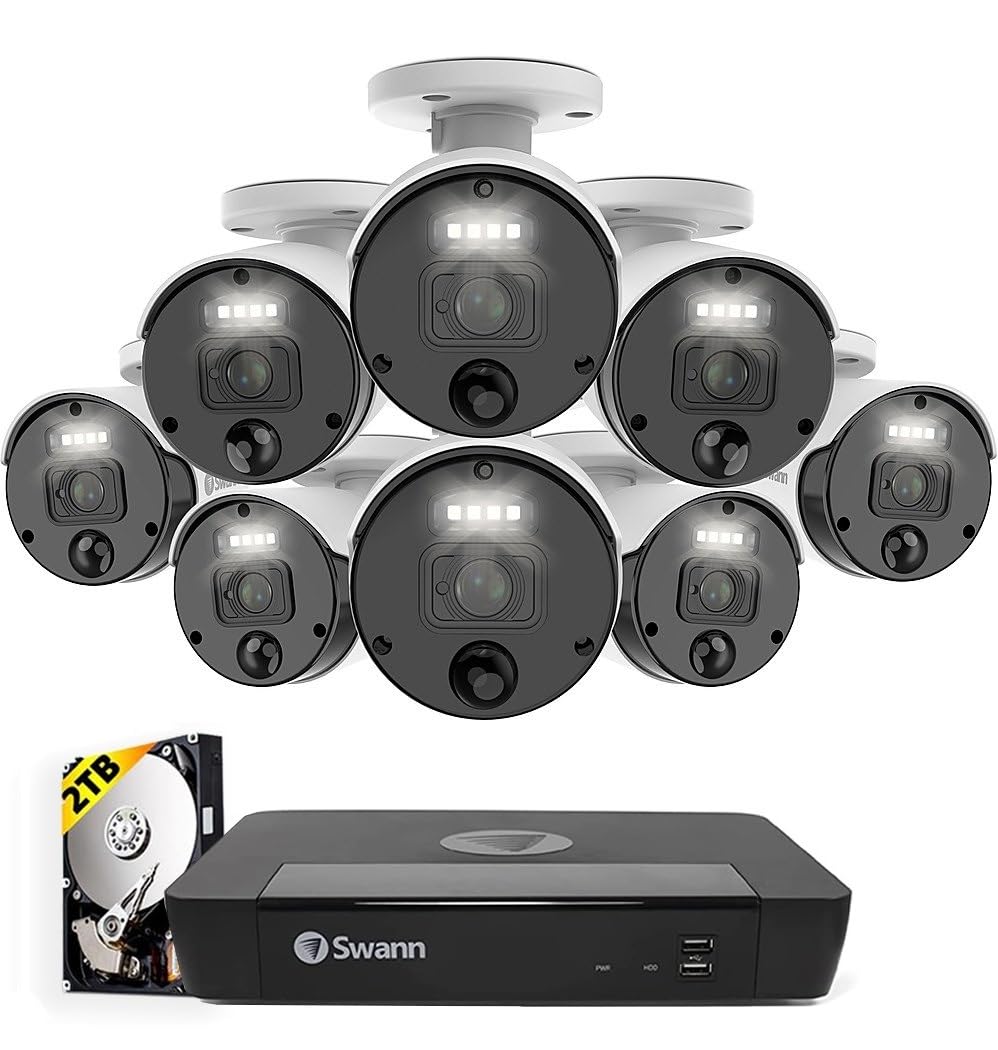
Figure 3 : The Swann Master-Series NVR unit shown with eight 4K HD security cameras, illustrating the core components of the surveillance system.
Installation
1. Connexion NVR
- Se connecter à un moniteur : Utilisez le câble HDMI fourni pour connecter le port de sortie HDMI du NVR à un moniteur ou à un téléviseur.
- Connecter une souris USB : Branchez la souris USB sur l'un des ports USB du NVR.
- Se connecter au réseau : Connect an Ethernet cable from the NVR's LAN port to your router or network switch for internet access and remote viewcapacités de navigation.
- Connecter l'alimentation : Plug the NVR's power adapter into the DC IN port and then into a power outlet. The NVR will power on automatically.
2. Installation de la caméra
- Caméras de montage : Choisissez des emplacements appropriés pour vos caméras, en veillant à ce qu'elles aient un champ de vision dégagé. view and are protected from direct weather exposure. Use the provided screws and plugs to securely mount each camera.
- Connectez les caméras au NVR : Connect each camera to an available Ethernet port on the NVR using the provided Ethernet cables. The NVR will automatically detect and power the cameras (Power over Ethernet - PoE).
3. Configuration initiale
- Assistant de première configuration : Upon first power-up, the NVR will display a setup wizard on the connected monitor. Follow the on-screen prompts to configure basic settings such as language, date/time, and network settings.
- Définir le mot de passe administrateur : Create a strong, unique password for the administrator account. This is crucial for system security.
- Initialisation du disque dur : The wizard may prompt you to initialize the hard drive. Confirm to prepare it for recording.
Exploitation du système
En direct View
Après la configuration initiale, l'enregistreur vidéo réseau (NVR) affichera le flux en direct. view depuis toutes les caméras connectées sur le moniteur. Vous pouvez basculer entre les vues d'une seule caméra. view, grille multicaméra view, and sequence view using the NVR's interface and mouse.
Enregistrement
- Enregistrement continu: The system is typically configured for continuous recording by default.
- Enregistrement de détection de mouvement : Configure specific cameras to record only when motion is detected within their field of view. Adjust sensitivity and detection zones as needed.
- Enregistrement programmé : Définissez des plages horaires d'enregistrement précises, permettant ainsi des programmes de surveillance personnalisés.
Lecture
Access the playback menu on the NVR to review enregistré footage. You can search by date, time, and event type (e.g., motion detection). Use the timeline and controls to navigate through recordings.
Remote Access (Swann Security App)
Pour télécommande viewing and management, download the official Swann Security app on your smartphone or tablet. Follow the in-app instructions to pair your NVR system. This allows you to view Accédez aux flux en direct, visionnez les enregistrements et recevez des alertes où que vous soyez grâce à une connexion Internet.
Entretien
- Nettoyage de l'appareil photo : Nettoyez régulièrement les objectifs de l'appareil photo avec un chiffon doux et sec.amp Utilisez un chiffon pour garantir une image nette. Évitez les nettoyants abrasifs.
- Ventilation NVR : Ensure the NVR unit has adequate ventilation to prevent overheating. Keep vents clear of obstructions.
- Mises à jour du micrologiciel : Regularly check for and install firmware updates for your NVR and cameras. Updates often include security enhancements and new features. Refer to the Swann support website pour le dernier firmware.
- Gestion du disque dur : The NVR's hard drive will automatically overwrite the oldest footage when it becomes full. Ensure your recording settings (e.g., continuous, motion detection) align with your storage needs.
- Sécurité du mot de passe : Change your administrator password periodically and use strong, unique passwords to protect your system from unauthorized access.
Dépannage
No Video Display on Monitor
- Check if the NVR is powered on and its power adapter is securely connected.
- Verify the HDMI cable connection between the NVR and the monitor.
- Ensure the monitor is set to the correct input source (e.g., HDMI 1).
Cameras Not Showing Live View / No Recording
- Check that each camera is securely connected to the NVR's Ethernet port.
- Ensure the Ethernet cables are not damaged.
- Verify that the NVR's hard drive is initialized and has sufficient space.
- Check camera settings within the NVR interface to ensure they are enabled and configured for recording.
Problèmes d'accès à distance
- Ensure the NVR is connected to your router and has an active internet connection.
- Verify your smartphone or tablet has an active internet connection.
- Confirm that the NVR is correctly paired with the Swann Security app.
- Check your router's firewall settings; some may block NVR access.
La vision nocturne ne fonctionne pas
- Ensure there are no obstructions directly in front of the camera lens blocking the infrared (IR) LEDs.
- Check camera settings to ensure night vision (IR) is enabled.
- Vérifiez que la caméra reçoit une alimentation suffisante.
Caractéristiques
| Fonctionnalité | Spécification |
|---|---|
| Marque | Swann |
| Numéro de modèle | SWNVK-876808-US |
| Technologie de connectivité | Wired (Ethernet/PoE) |
| Résolution de capture vidéo | 2160p (4K Ultra HD) |
| Dossier spécial | Vision nocturne |
| Nombre de canaux | 8 |
| Source d'énergie | Électrique avec fil |
| Dimensions du NVR (L x l x H) | 10 x 2 x 2.7 pouces |
| Appareils compatibles | Swann IP Cameras |
| Technologie à faible luminosité | Vision nocturne |
| Fréquence d'images | 15, 24, 30 fps (variable by resolution/settings) |
| Mode d'enregistrement | Continuous, Event (Motion Detection), Scheduled |
| Entrée vidéo | Ethernet (for IP Cameras) |
| Poids de l'article | 21.2 livre (paquet total) |
| Code UPC | 840236127788 |
Note: While the provided data listed 'BNC' for Video Input, this NVR system primarily uses Ethernet for IP cameras. Please refer to the product packaging or Swann's official website for the most accurate and up-to-date specifications.
Garantie et assistance
Your Swann Master-Series 4K HD 8 Camera 8 Channel NVR Security System is covered by a manufacturer's warranty. For specific warranty terms, duration, and conditions, please refer to the warranty card included with your product or visit the official Swann website.
For technical support, troubleshooting assistance, or to access the latest software and firmware updates, please visit the Swann support portal on their official webVous trouverez également sur ce site les coordonnées du service client.


